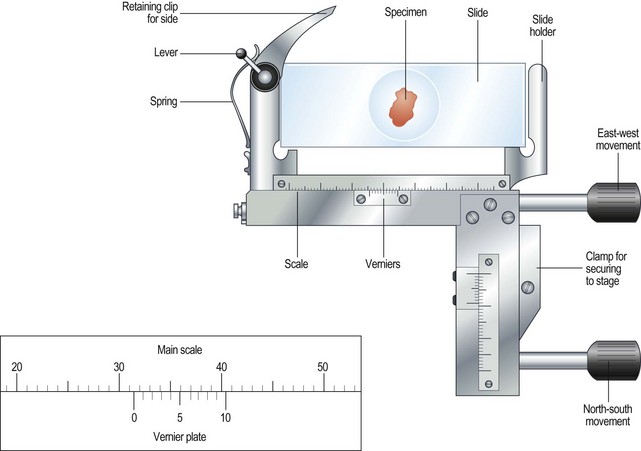
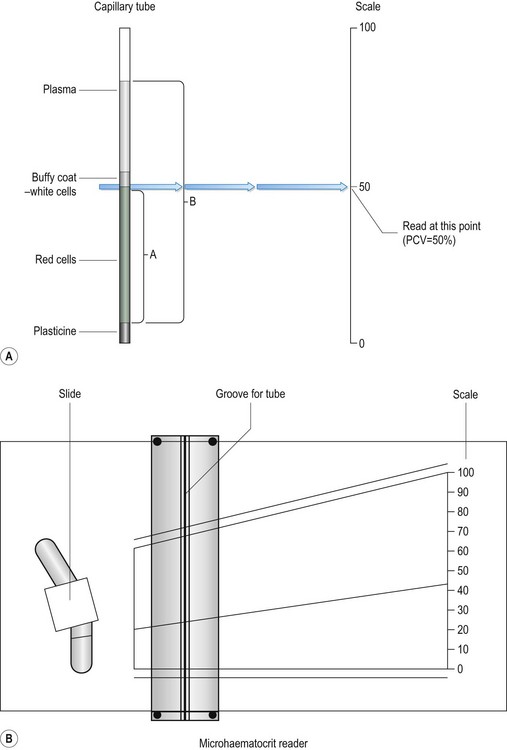
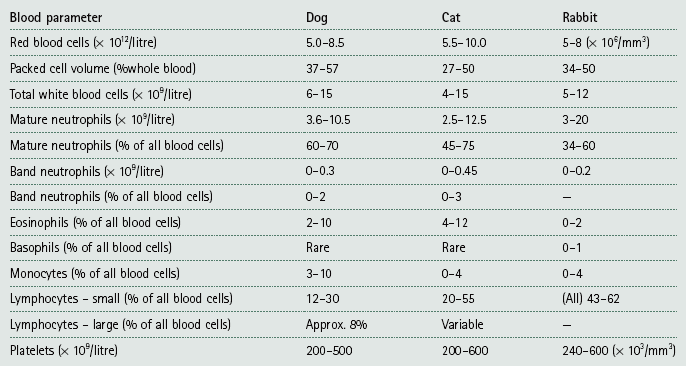
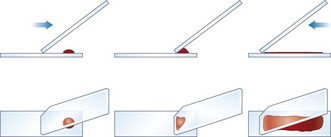
Chapter 5 Laboratory techniques • Collect samples before you begin treatment unless doing follow-up tests to assess progress. • Collect the appropriate samples and preserve them correctly. • Perform the test as soon as possible after collection. • Know how to perform the test correctly and accurately. • If dispatching to a commercial laboratory, separate plasma or serum, enclose all the relevant details of the case, use the correct types of packaging and post as soon as possible by a traceable route. A routine practice laboratory will have the following pieces of equipment. General rules for the care of microscopes are shown in Box 5.1. 1. Action: Place the microscope on an even, stable surface. 2. Action: Before use, clean the eyepieces (Fig. 5.1), objective lens and the condenser with special lens tissue. 3. Action: Clean the oil immersion lens with the proper cleaning fluid. 4. Action: Turn the light control to a minimum and turn on the instrument. Rationale: This prevents the sudden power surge breaking the microscope bulb. 5. Action: Adjust the eyepieces. 6. Action: Rotate the nosepiece in a clockwise direction so that the ×10 objective lens clicks into the viewing position. Rationale: Always start viewing a slide through the lowest magnification. 7. Action: Rack up the sub-stage condenser until its top surface is as high as possible. Rationale: This condenses the light source onto the specimen to make it bright and sharper. 8. Action: Looking from the side of the microscope, adjust the iris diaphragm control lever so that it is in its middle position. 9. Action: Place the slide on the stage over the hole in the centre. 10. Action: Position the area to be viewed over the light source by using the control knobs on the mechanical stage. 11. Action: Focus using the coarse adjustment knob and then with the fine adjustment knob. 12. Action: To increase magnification, turn the nosepiece clockwise until the next objective lens clicks into place. » Blood and bacterial smears should be examined under ×10, ×50, then ×100 with oil immersion. » Urine sediments and faeces should be examined under ×10, then ×50. » Parasite slides should be examined with the naked eye followed by ×5, ×10, and if necessary ×50. 13. Action: After you have finished, remove the slide from the stage. 14. Action: After use, wipe the objective lenses with lens tissue and turn the nosepiece so that the lowest-powered lens is in position. Reduce the light and switch off and cover the microscope with its cover. Rationale: The microscope is now clean and ready to use the next time. 1. Action: Set up the microscope as described above and place the slide on the stage. Rationale: You are now ready to use oil immersion. 2. Action: Rotate the nosepiece so that neither the ×50 or ×100 lens is in position. Rationale: You need to have clear access to the slide when you place the drop of oil. 3. Action: Place a drop of oil on the slide (Fig. 5.2). Rationale: This oil is specifically designed for this purpose. Do not use any other type of oil. 4. Action: Rotate the nosepiece until the ×100 lens is above the slide and click into position. Rationale: This technique can only be done using the ×100 lens. 5. Action: Gently adjust the focus so that the lens descends to touch the drop of oil. 6. Action: Looking through the eyepiece, adjust the focus using the fine control. At this point the oil may be seen to spread out (Fig. 5.2). Rationale: You may need to adjust the light to improve the view. 7. Action: When you have finished, remove the slide and clean the microscope as described above. Rationale: The microscope is now clean and ready to use the next time. On most microscopes these scales are located on both sides of the stage, arranged at right angles to each other – known as the vertical and horizontal axes. Their function is to allow location of a particular point on the slide so that you can find it again (Fig. 5.3). 1. Action: Place the slide on the microscope stage and fix it with the clips. 2. Action: Locate the object you wish to identify. 3. Action: Look at the scale on the vertical axis of the stage. 4. Action: Record the number where the zero mark on the Vernier plate meets the main scale. Rationale: In Figure 5.3 the zero mark falls between 31 and 32. If it falls between two divisions, record the lower number. 5. Action: Make a note of which of the marks on the Vernier plate is exactly opposite a division on the main scale. Rationale: In Figure 5.3, mark number 6 is exactly opposite a division on the main scale. 6. Action: Record this reading, placing it after the decimal point. Rationale: In Figure 5.3 this will give a reading of 31.6. 7. Action: Repeat steps 3–6 using the horizontal scale. 8. Action: You now have a grid reference for that object on that slide provided that the slide is placed in the same position on the stage. Rationale: By tradition, slides are placed on the stage with the label to the right. 9. Action: You may now remove the slide, but can return to the same location using the grid reference. The use of a centrifuge is required in many tests including: 1. Angle head – the specimen tubes are held in a fixed position, usually at 25–50° to the vertical. Higher rotational speeds can be achieved because of the aerodynamic shape of the rotor; however, because of the angulation of the tubes, the sediment settles at this angle making it difficult to remove. 2. Swing-out head – the specimen tubes are placed in buckets that swing out from the vertical to the horizontal as the speed of rotation increases. As the machine stops the buckets return to the vertical position. The surface of the sediment is level, which means that the supernatant can be more easily removed with a pipette. 1. Action: Always ensure that the centrifuge is placed on an even, stable surface. 2. Action: Use only the tubes recommended by the manufacturer. 3. Action: When placing the tubes in the machine, make sure that the top is not protruding above the top of the bucket. Rationale: This may affect the way that the machine works and make it unbalanced. 4. Action: Make sure that the sample tubes are balanced by placing in diametrically opposite buckets assessed by weight not volume. 5. Action: When using microhaematocrit tubes, ensure that the Plasticine® end is placed against the outer ring of the instrument. Rationale: This prevents the blood inside from escaping as it is subjected to centrifugal force. 6. Action: Vacutainer® tubes may be spun with their stoppers in place. 7. Action: Lock the lid of the centrifuge securely. 8. Action: Set the spin speed as appropriate. 9. Action: Never attempt to open the centrifuge until the head has stopped rotating. Rationale: If you do this you may damage the machine and yourself. 10. Action: After use, turn off the power supply and clean the machine thoroughly using a mild disinfectant and a soft cloth. Rationale: To prevent contamination of the next samples. 11. Action: Wear disposable gloves to remove any spillages or broken glass. • Always refer to the manufacturer’s instructions when first using the machine or if you encounter any problems. • Site the machine away from chemicals and centrifuges, which may cause damaging vibrations. • Run quality control tests at regular intervals to ensure accuracy and validity of the machine. These should be in addition to external quality control tests. • Switch off and cover when not in use. The sites and methods of restraint for the collection of blood from dogs, cats and rabbits have been described in Chapter 1, but once the sample has been collected it must be put into some form of container to preserve it and, if required, to prevent it from clotting. There are several forms of container: 1. Screw-topped tubes – these are usually made of plastic and have lids whose colour conforms to a standard colour code indicating the type of anticoagulant or preservative that they contain. This is shown in Table 5.1. Some brands may have push-on tops. Table 5.1 Standard colour coding for blood sample tubes 2. Evacuated glass tubes (Vacutainers®) – these consist of an evacuated glass tube sealed with a colour-coded rubber bung. They require the use of a double-pointed needle, which fits into a special needle holder. One end of the needle is used to penetrate the vein while the other end penetrates the rubber bung. The vacuum within the tube draws blood out of the vein into the tube. These are expensive and are more widely used in large animal practice. 3. Plastic blood-collecting syringes (Monovette®) – these are syringes that are designed for aspirating blood and contain anticoagulant. Once blood has been collected the needle is replaced with a cap and the plunger is unscrewed creating a leak-proof container. • Plasma – obtained by centrifugation of a blood sample collected in anticoagulant, for example (e.g. ethylenediaminetetraacetic acid (EDTA) or heparin. Store at 5°C. Contains all the clotting factors. May be used for some biochemical tests, but anticoagulant can interfere in some tests. • Serum – collect blood in glass tubes without anticoagulant and allow to clot. Serum is released as the blood clots; alternatively, it may be separated by serum separator tubes, which contain a layer of gel that separates the cells from the serum. Store at 5°C. Serum does not contain clotting factors V and VIII or fibrinogen and is used for biochemistry. 1. Action: Collect sample in an EDTA tube and rotate gently to mix the contents. 2. Action: Remove the cap and tilt the sample so that a clear surface free of air bubbles can be seen. 3. Action: Place the end of a capillary tube into the blood sample, tilting the sample to at least 55°, and allow blood to run in until the tube is about 4. Action: Wipe the blood from the outside of the tube with a piece of tissue. Rationale: This reduces the risk of spread of infection to you. 5. Action: Holding the tube between your finger and thumb, insert the opposite end (from the blood) into the Plasticine® or Cristaseal® block. Twist two or three times and take it out of the Plasticine®. 6. Action: Hold the tube vertically, sealed end down, and allow the blood column to run down. Rationale: Make sure that there is no evidence of a leak. 7. Action: Place the tube into one of the grooves of the microhaematocrit with the Plasticine® plug facing outwards towards the rim. 8. Action: Place a similar tube on the opposite side of the centrifuge. 9. Action: Screw the safety plate over the tubes and close the lid. 10. Action: Set the timer for 6 minutes. 11. Action: After 6 minutes allow the machine to stop naturally. 12. Action: Remove the capillary tube and check the colour and the thickness of the buffy coat. Write down your observations. 13. Action: Place the tube into the groove on the microhaematocrit reader (Fig. 5.4). Rationale: The blood will have separated into three layers (Fig. 5.4A): 14. Action: Adjust the tube vertically so that the bottom of the red cell layer is aligned with the 0%. Rationale: Make sure that you do not include the Plasticine® plug in your measurement. 15. Action: Slide the perspex plate so that the top of the plasma aligns with the 100% mark (Fig. 5.4B). Rationale: Use the bottom of the plasma meniscus as your measuring point. 16. Action: Adjust the reader handle on the left so that the line passes through the buffy coat / red cell junction. Rationale: This can be quite thick and pinpoint accuracy may be difficult. 17. Action: Read the measurement from the scale on the right hand side. Rationale: The scale on the reader runs from 0 to 100 and this is expressed as a percentage. 18. Action: PCV can also be calculated without the use of the reader by measuring the total length of the blood column (B) and the length occupied by the red blood cells (A) (Fig. 5.4A). Rationale: Do the following calculation: NB PCV ranges for the dog, cat and rabbit are shown in Table 5.2, and normal PCV values are shown in Table 5.3. Table 5.3 Red blood cell indices in the dog, cat and rabbit* *Taken from a range of sources. fl = femtolitre: 1 fl = 10−15l. Total white blood cell count (TWBC) and total red blood cell count (TRBC) are useful diagnostic parameters (Table 5.2), but are nowadays usually done by an electronic haematology analyser. They used to be done using a Neubauer haemocytometer, but this takes time and experience. Commercial labs can get the result back to the practice within 12 hours so manual analysis is rarely done. 1. Action: Select a new clean glass microscope slide and wipe it with lint-free tissue. If it has been soaked in methanol, rinse and dry it. 2. Action: Prepare a spreader by chipping the corner off another glass slide (Fig. 5.5). You may use a glass cutter to do this. Rationale: The use of the spreader prevents the smear overlapping the sides of the slide. 3. Action: Using a chinagraph pencil or an indelible felt pen, label the slide on the underside. 4. Action: Take the EDTA tube containing the blood sample and gently rotate it between your finger and thumb. The tube must be at room temperature. 5. Action: Place the slide flat on the bench, preferably on a white background, with the long edges parallel to the edge of the bench. Rationale: The white background will help to show up the blood smear. 6. Action: Dip a capillary tube into the blood sample and allow it to collect a small amount of blood. Rationale: Blood will move up the capillary tube by capillary action. 7. Action: Place a small drop of blood on the right-hand end of the slide about 1 cm from its edge. 8. Action: Place the spreader to the left of the blood at an angle of 45° to the horizontal and draw backwards to ‘pick up’ the blood (Fig. 5.5). 9. Action: Move the spreader forwards towards the left-hand end of the slide in a single smooth movement so that the blood is smeared along the slide. 10. Action: Dry the slide in the air by holding the sides between your finger and thumb and waving it gently. 11. Action: Make another blood smear. Rationale: It is always a good idea to make more than one smear in case one is unsatisfactory. 12. Action: Assess the quality of your smears. Rationale: The quality of the smear affects its use in diagnosis: » Thickness – if it is too thick it may be difficult to see the cells and it may take longer to dry, which may damage the cells. » Uneven – due to jerky movements during spreading known as ‘hesitation marks’ – some areas may be unusable. » Streaks, gaps and spots – may be caused by dirt or grease on the slide – discard the slide. » Narrow smear – smear has been made before the blood has run the full width of the spreader. Limits the use of the smear.
Laboratory equipment
The microscope
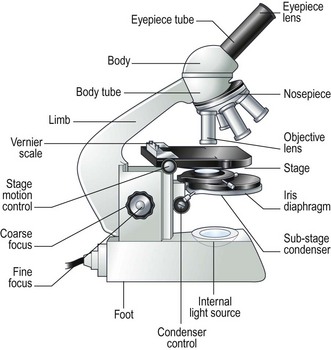
Procedure: Care and use of the microscope (Fig. 5.1)
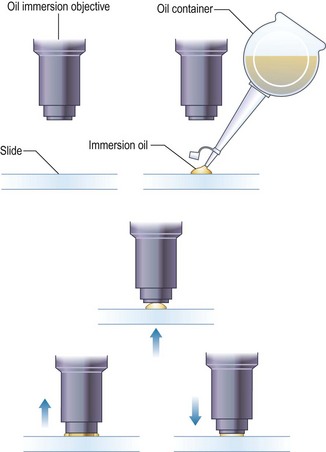
Procedure: Use of the oil immersion lens
Procedure: Use of the Vernier scales
The centrifuge
Procedure: Care and use of the centrifuge
Electronic analysers
Practical techniques
Blood collection
Colour of lid
Contents and uses
Pink
EDTA – for routine haematology
Mauve
Citrate – for coagulation tests
Orange
Heparin – plasma can be used for general biochemistry
Yellow
Fluoride – for glucose measurement
White
No additive – these allow the blood to clot so that serum can be extracted; these tubes must be made of glass
Plasma vs serum
Procedure: Packed cell volume
 full.
full.
Name / definition
Measurement
Normal values
Packed cell volume (PCV): percentage of packed red cells in a sample
Centrifuge capillary tube containing blood
Dog: 37–57%
Cat: 27–50%
Rabbit: 34–50%
Haematocrit (HCT): percentage of blood composed of red cells (often interchanged with PCV)
HCT = MCV × total RBC (1012/l)
Less accurate than PCV
—
Haemoglobin (Hb): amount of Hb within red cells – estimation of O2-carrying capacity
Estimated using haematology analyser
Dog: 12–18 g/dl
Cat: 8–15 g/dl
Rabbit: 10–17.5 g/dl
Mean corpuscular volume (MCV): measure of red cell size
MCV (fl) = (PCV × 1000)/total RBC (1012/l)
Measured directly by analysers
Dog: 70 fl
Cat: 45 fl
Rabbit: 69 fl
Mean corpuscular haemoglobin concentration (MCHC): average concentration per red blood cell
MCHC (g/dl) = total haemoglobin (g/dl) /PCV
35 g/dl for all species
Procedure: Preparation of a blood smear
![]()
Stay updated, free articles. Join our Telegram channel

Full access? Get Clinical Tree


 of the slide.