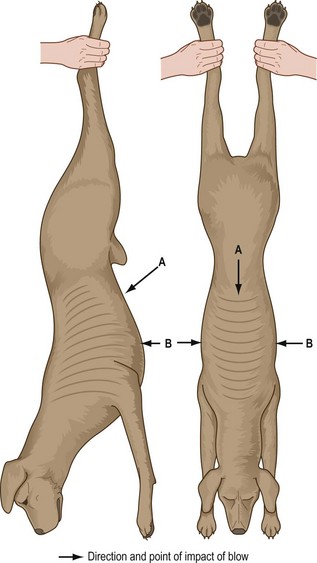
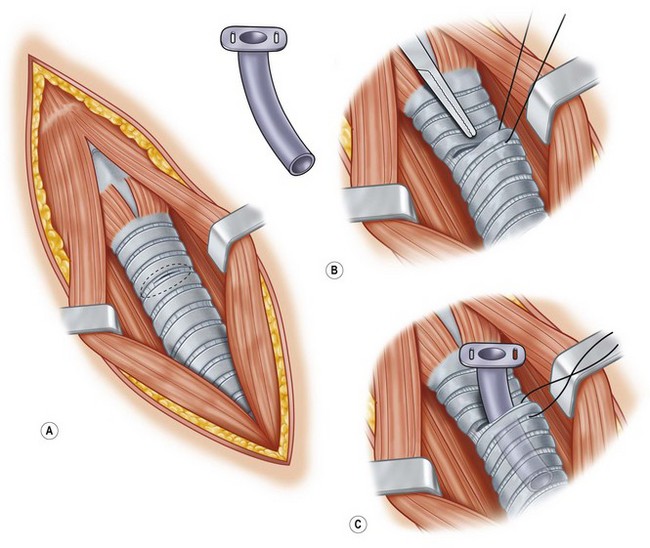
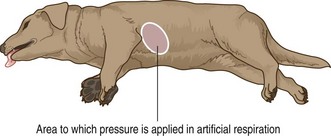
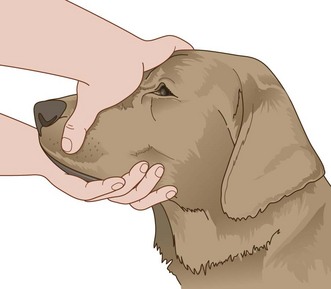
Chapter 3 First aid and other emergencies Under the Veterinary Surgeons Act 1966, anyone may carry out first aid providing that it is: What must happen afterwards is that the animal is handed over to a veterinary surgeon for further treatment. It is illegal for a layperson to keep the animal and continue treatment as this becomes an act of veterinary surgery requiring diagnosis, possible surgery and the prescribing of medication. Failure to do this may cause suffering, which will contravene the Animal Welfare Act 2006. • Airway – ensure that the animal has a clear airway allowing the passage of oxygen into the respiratory system and then into the circulatory system. • Breathing – make sure that the animal is making some form of respiratory effort. • Circulation – check that the heart is beating, i.e. there is a pulse, and look at the colour of the mucous membranes; a healthy pink colour will indicate oxygen is reaching the tissues. When an animal is about to suffer cardiopulmonary arrest and requires resuscitation it is important to be able to recognize the clinical signs (Box 3.1) and to have a strict routine for cardiopulmonary cerebral resuscitation (CPCR). In an emergency everything seems to happen at once and successful treatment requires a trained ‘crash’ team who have defined roles and understand their responsibilities. The procedures that must be carried out by this team are: • Intubation of the patient and attachment to an anaesthetic machine • Provision of oxygen and manual compression of the reservoir bag if necessary • Placement of an intravenous catheter for the administration of fluids • Attachment to an ECG machine to monitor progress and to assist in the provision of appropriate medication. • Bandaging and stabilization of limbs – see Chapter 4 • Wound management – see Chapter 4 • Fluid therapy – see Chapter 7 Look inside the front cover for a life support algorithm.) 1. Action: Ensure that the environment is safe for you and the animal. 2. Action: Stand back from the animal and observe for a moment. Rationale: You must remain calm and in control. Touching the animal may destroy some evidence (see Ch. 2). Try to calm the owners or people around the animal as they may be panicking. 3. Action: Make sure that the animal is restrained appropriately. You may need to ask someone to help you. If the animal is breathing normally you may have to apply a tape muzzle (see Ch. 1). 4. Action: Examine the airway to ensure that it is patent. Rationale: The animal may be trying to breathe, but this will be difficult if the airway is blocked 5. Action: If necessary remove any blockage (e.g. blood clot, saliva, rubber ball). 6. Action: Position the animal in such a way as to facilitate breathing (e.g. in lateral recumbency with the head extended, tongue pulled forward, loosen the collar). If the animal has been drowned, place the head lower than the rest of the body. 7. Action: Check that the animal is breathing. If necessary start artificial respiration (refer to later procedure). 8. Action: Check that the animal has a heartbeat. If necessary start cardiac massage (refer to later procedure). 9. Action: Check the patient’s capillary refill time, colour of mucous membrane, pulse and respiratory rate and body temperature. Record these parameters. 10. Action: Once the patient is stable and not going to die immediately, check for haemorrhage and take steps to control it (refer to later procedure). 11. Action: Assess the animal for signs of shock and treat appropriately (refer to later procedure). 12. Action: Examine the animal for fractures and immobilize them (refer to Ch. 4). 13. Action: Check the animal for all other wounds and provide a temporary dressing as appropriate. Rationale: To prevent the entry of infection before you can clean, debride and provide proper wound dressings (refer to Ch. 4). 14. Action: Administer the appropriate medication (e.g. antibiotics and analgesics). Rationale: Antibiotics will prevent sepsis and analgesia will help the animal to stabilize. 15. Action: Once you are satisfied that the animal is safe to move, take it to the surgery, or, if in the surgery, place it in a warm, quiet secure kennel and keep under observation. 1. Action: Clear any obstruction from the mouth and the pharynx. 3. Action: If water or a foreign body blocks the trachea then perform the Heimlich manoeuvre to remove the obstruction – hold the animal up by its hind legs or, if the animal is too big, hang it upside down over a table (Fig. 3.1). Administer a sharp punch to the abdominal wall, above the xiphisternum angled down towards the diaphragm. 4. Action: Repeat up to four times. Rationale: Repeating the procedure more than four times may cause damage. 5. Action: If attempts to remove the blockage fail then establish an emergency airway by pushing a wide gauge hypodermic needle through the ventral midline of the neck and into the trachea. Rationale: This will act as an airway until a proper tracheotomy can be performed. A tracheotomy creates a temporary opening in the trachea in an animal with an upper airway obstruction allowing air to enter the trachea distal to the site of the blockage. If a tube is then placed in the stoma created by the tracheotomy this is then termed a tracheostomy. The procedures are usually performed as an emergency under local anaesthetic or sedation – dyspnoeic patients may present an anaesthetic risk. Aseptic preparation of the surgical site should be carried out (see Ch. 9), but if the animal is about to die it need not be done – provide antibiotic cover later on when the situation has improved. A tracheotomy may also be used to remove obstructions or to collect samples. 1. Action: Position the patient in dorsal recumbency with the neck extended and raised up over a pad. Rationale: This helps to deviate the trachea ventrally. 2. Action: Clip up and prepare the caudal mandibular area, ventral neck and cranial thorax aseptically. 3. Action: Make a midline incision in the ventral cervical area of the neck and extend it from the larynx to the sternum. Rationale: To allow adequate exposure. 4. Action: Separate the overlying sternohyoid muscles along their midline and retract them laterally. Rationale: To provide a good view of the trachea and the proposed site. 5. Action: Blunt dissect the peritracheal connective tissue from the ventral surface of the trachea Rationale: To facilitate entry into the trachea. 6. Action: Do not traumatize the vital structures running on either side of the trachea (i.e. recurrent laryngeal nerve, carotid artery, jugular vein and thyroid vessels). Also look out for the oesophagus. Rationale: Keep in the midline and you should avoid these structures. 7. Action: Fix the trachea between your forefinger and thumb and make a horizontal or vertical midline incision through the wall of the trachea. Rationale: To create an opening into the trachea. 8. Action: Place sutures around the adjacent tracheal cartilages and use them to pull the edges of the incision apart. 9. Action: Use suction to clear debris, blood and secretions from the lumen. Rationale: To remove any blockage. 10. Action: If possible find the source of the blockage and remove it. Rationale: This may not always be possible. 11. Action: If the airway is now clear the opening can be closed: • Oppose the edges of the trachea with simple interrupted sutures placing sutures through the annular ligaments (between the cartilage rings). • Lavage the area with sterile saline. • Oppose the sternohyoid muscles using a continuous suture. • Oppose subcutaneous tissue and skin edges as normal (see Ch. 10). 1. Action: Prepare the patient as above and follows steps 1 to 7 (Fig. 3.2). 2. Action: If placing a tracheostomy tube the tracheal incision should be horizontal and between the 3rd / 4th or 4th / 5th tracheal cartilages. Do not extend the length of the incision more than half of the circumference of the trachea (Fig. 3.2). If the incision is too long there is a risk of bisecting the trachea completely. 3. Action: An alternative incision can be made vertically between the 3rd and 5th cartilages. Rationale: It may be more difficult to place the tracheostomy tube using this approach. 4. Action: Using suction remove blood and other debris from the trachea. Rationale: To facilitate inspiration and clean up the surgical site. 5. Action: Select a tube that is non-reactive and that is no larger than half the size of the trachea. If the patient is to be placed on a respirator a cuffed tube must be used. 6. Action: Place a suture around the tracheal ring distal to the incision (Fig. 3.2). Rationale: This will be used to assist in opening the trachea prior to tube placement. 7. Action: Using a pair of closed artery forceps, depress the cartilage cranial to the opening. Rationale: To facilitate introduction of the tube. 8. Action: At the same time, using the suture around the distal cartilage, pull it up and insert the tube (Fig. 3.2). 9. Action: Oppose the sternohyoid muscles with a continuous suture. Rationale: To close the dead space and to hold the tube in place. 10. Action: Close the subcutaneous tissues and the skin as normal (see Ch. 10). Rationale: To close the dead space and to hold the tube in place. 11. Action: Secure the tube by suturing it to the skin or by tying a gauze bandage around it and tying that around the patient’s neck. Rationale: The patient must be checked regularly to make sure that the tube is still in place and the site is not becoming infected (Box 3.2). NB Tracheostomy tubes used in emergency situations are not usually left in for more than a day or two. A permanent tracheostomy is achieved by the creation of a permanent stoma within the trachea and overlying skin, which may remain for life or until such time as the stoma is closed surgically. In some instances (e.g. out in the ‘field’) there may not be equipment available to intubate an animal so artificial respiration should be done by this method. Assume there is no damage to the chest wall. (For artificial respiration in an intubated patient refer to Ch. 8.) If there is damage to the chest wall, artificial respiration should be done by the mouth to nose method described below. 1. Action: Place the animal in right lateral recumbency with its head and neck extended, and pull the tongue forwards (Fig. 3.3). Rationale: This position allows maximum air intake. 2. Action: Pull the front legs forward. 3. Action: Check that there are still no respiratory movements. Rationale: Moving the animal sometimes stimulates spontaneous respiration. 4. Action: Place the palm of your hand in the middle of the chest (Fig. 3.3). 5. Action: Apply steady firm downward pressure and then release. 6. Action: Apply the pressure at Rationale: The smaller the animal the faster is the respiration rate. 7. Action: Check the animal at regular intervals for signs of respiration. 8. Action: Continue until the animal begins to breathe on its own. 9. Action: As soon as the animal starts to breathe provide oxygen. 10. Check the animal every 5 minutes during its recovery and extend the time intervals as it regains consciousness. This is used to stimulate breathing when the chest wall is damaged. 1. Action: Place the animal in right lateral recumbency with its head and neck extended, and pull the tongue forwards. Rationale: This position allows maximum air intake. 2. Action: Grasp the nose firmly in the right hand so that the thumb and fingers curl around the nose and mouth, and hold the mouth closed (Fig. 3.4). Rationale: This creates an airtight seal. 3. Action: Place the left hand under the lower jaw (Fig. 3.4). Rationale: This supports the lower jaw. 4. Action: If possible use a facemask, a handkerchief or some form of cloth to blow through. Rationale: To prevent the potential transfer of pathogens. 5. Action: Place your mouth over the animal’s nostrils forming a seal with your lips. Rationale: To maximize the effect of your expiratory effort. 6. Action: Blow down the nose at 1-second intervals turning your head away after each expiration. 7. Action: Do not overinflate the lungs particularly if the animal is neonatal (i.e. resuscitation after a caesarean section). Use just enough force to raise the chest slightly. Rationale: Lung damage can occur as a result of sudden overinflation, especially in young animals. 8. Action: Periodically check for signs of respiration. 9. Action: Repeat the procedure until spontaneous respiration begins. Rationale: Continue for 20–30 minutes. If there is no response the animal may be pronounced dead. 10. Action: As soon as the animal starts to breathe provide oxygen. 11. Action: Check the animal every 5 minutes during its recovery and extend the time intervals as it regains consciousness. 1. Action: Place the animal in right lateral recumbency. Rationale: In this position there is easier access to the heart for massage and for monitoring. 2. Action: Locate the position of the heart. Rationale: The heart lies between the 3rd rib and caudal border of the 6th rib. 3. Action: Using the heel of your hand, place it over the heart (Fig. 3.5a). Apply rhythmic pressure using enough force to depress the chest wall by 1–3 cm depending on the size of the animal. Rationale: This force will reach the heart wall and compress the muscle. 4. Action: Place your other hand under the animal’s chest to support it (Fig. 3.5A). Rationale: You can also place a firm sandbag under the chest to provide something to push against. 5. Action: In feline patients or in very small dogs you can apply pressure by placing the thumb and forefinger around the sternum (Fig 3.5B). 6. Action: The ideal rate of chest compressions is 100 per minute giving equal time to compression and relaxation. Rationale: Singing ‘Nellie the Elephant’ will provide the appropriate beat to your compressions. 7. Action: Give a breath every 5th or 6th compression. 8. Action: Every 3–4 minutes check for signs of a returning heartbeat. 9. Action: If cardiac function returns then stop chest compressions. 10. Action: If cardiac function does not return, assess the condition of the patient and then consider open-chest compressions. Rationale: This cannot be carried out in the ‘field’. If the animal is in the surgery this procedure can be considered but the prognosis is poor (see Ch. 8 – Anaesthetic emergencies). Any loss of blood can potentially be life threatening and should be taken seriously. Table 3.1 describes the types of haemorrhage and Table 3.2 describes the range of first aid treatments. Methods used to control haemorrhage are temporary and once haemorrhage has ceased the bandage should be removed and the wound cleaned and treated by suturing or by rebandaging (see Ch. 4 for bandaging techniques and Ch. 10 for suturing techniques). Table 3.1 Table 3.2 Range of first aid treatment for haemorrhage 1. Action: Place the animal on a stable table or on a surface that is at a comfortable height for you. 2. Action: Ask an assistant to restrain the animal so that you can reach the affected part of the body without the animal moving too much or biting you. 3. Action: Wash your hands thoroughly with a surgical scrub. 4. Action: Assess what type of haemorrhage you are presented with (Table 3.1). 5. Action: As quickly as possible stop the bleeding using one of the first aid measures described in Table 3.2. 6. Action: Once the bleeding has stopped, or is showing signs of stopping, assess the animal’s condition. Check for signs of shock and treat if necessary (see later procedure). 7. Action: Monitor the animal closely. If blood soaks through the bandage, place another one over the top. Do not remove the original bandage. 8. Action: Once the animal’s condition is stable, place it in a quiet warm kennel and check every 15 minutes. Rationale: Overexcitement may start the bleeding again. 9. Action: When the bleeding has stopped and the animal is stable, treatment to repair the wound can be carried out.
Procedure: Assessing the emergency patient
Airway and breathing
Procedure: Treatment of asphyxia
Tracheotomy vs tracheostomy
Procedure: Tracheotomy
Procedure: Temporary tracheostomy
Procedure: Artificial respiration
 –1-second intervals depending on the size of the animal.
Procedure: Mouth to nose resuscitation
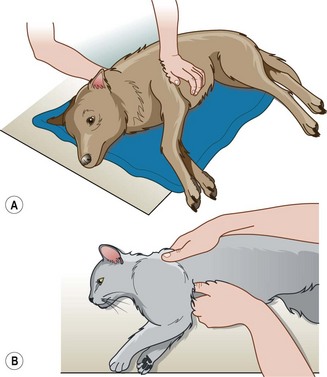
Circulation
Procedure: Cardiac massage
Type
Clinical signs
Treatment
Arterial
Blood is bright red and pumps out in spurts. Bleeding point is usually easy to identify.
Very serious and a significant volume may be lost rapidly. Stop immediately using digital pressure until a more permanent method is put in place.
Venous
Blood is darker red and flows in a steady stream. Bleeding point is usually easy to identify.
Serious; stop as soon as possible by digital pressure or a pressure bandage.
Capillary
Multiple pinpoint haemorrhages. Blood oozes from the wound with little force. Commonly seen in surgical incisions.
Less serious, but capillary ooze for a long period may result in significant blood loss. Stop by means of a pressure bandage.
Mixed
Combination of the types described above. This is the most common type.
Depends on the extent of the haemorrhage.
Treatment
Method
Comment
Direct digital pressure
With a clean finger and thumb apply pressure to either side of the wound. Avoid pushing bone fragments or foreign bodies deeper into the wound.
Quick and easy, but only a temporary measure until a pressure bandage is applied.
Pressure bandage
Place sterile swab over the wound and apply pressure using a conforming bandage. If wound involves the neck or chest, make sure that breathing is not impeded.
Deep wounds may need packing with sterile gauze to spread the pressure. If wound includes a penetrating foreign body or bone fragments, place a ring pad over it before placing the bandage.
Pressure points
These are sites where pressure can be applied to a major artery by pushing it against a bone, thus stopping the blood supply to the area distal to it. Common sites are the brachial, femoral and coccygeal arteries.
Sites are not easy to locate. Venous bleeding still continues. Apply a pressure bandage or tourniquet as soon as possible.
Tourniquet
Ready-made or improvised strap is applied to a limb proximal to the injury and tightened. Pressure should be just enough to stop bleeding.
Never leave a tourniquet in place for longer than 15 minutes as tissue damage will occur. Relieve pressure for 1 minute then retighten.
Procedure: Control of haemorrhage
![]()
Stay updated, free articles. Join our Telegram channel

Full access? Get Clinical Tree


First aid and other emergencies
Only gold members can continue reading. Log In or Register to continue
