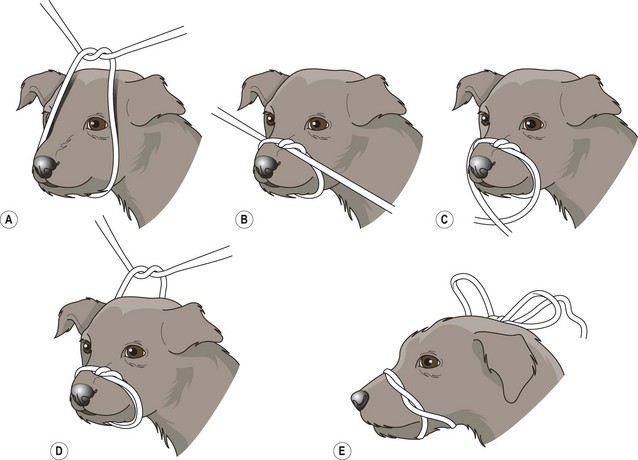
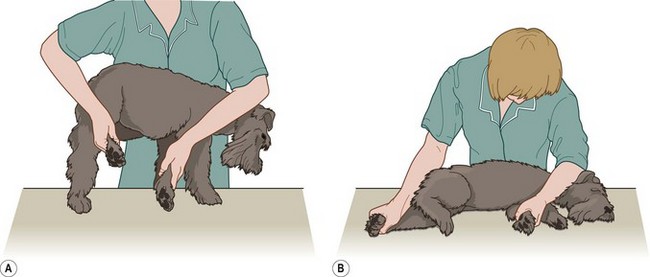
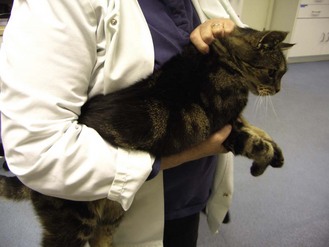
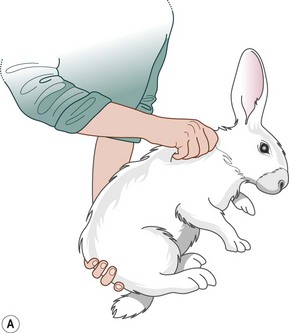
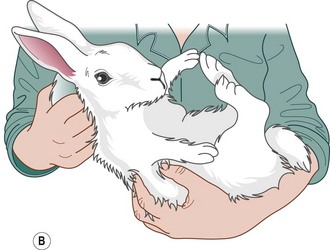
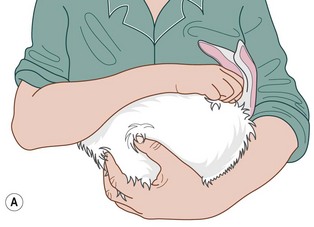
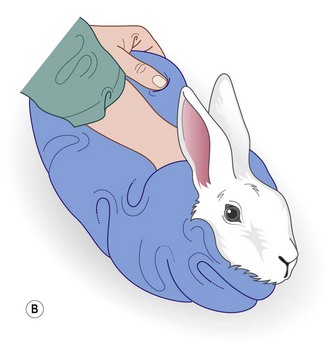
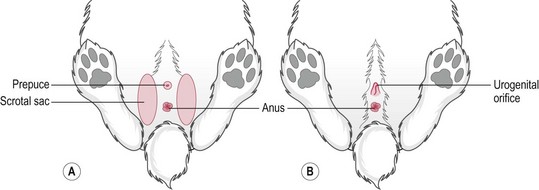
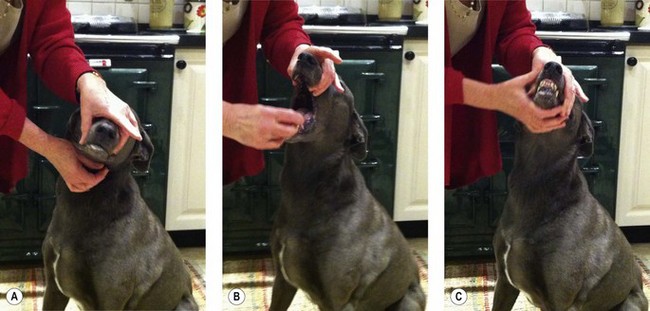
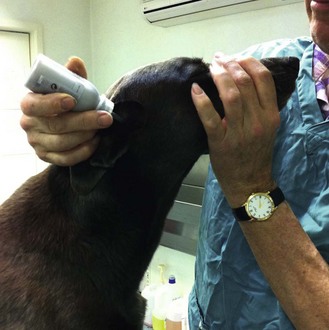
Chapter 1 Restraint, handling and administration of medication Restraint for General Examination Procedure: Administering a tablet Procedure: Administering a liquid feed or medication Procedure: Applying ear medication Procedure: Applying eye medication Procedure: Administering a subcutaneous injection. Site: Scruff of the neck Procedure: Administering an intramuscular injection. Site: Quadriceps femoris muscle Procedure: Administering an intravenous injection. Site: Cephalic vein Procedure: Collection of a blood sample from the cephalic vein Procedure: Administering an intravenous injection. Site: Jugular vein Procedure: Administering an intravenous injection. Site: Lateral saphenous vein Procedure: Placement of an intravenous catheter in a peripheral vein Procedure: Placement of an intravenous catheter in the jugular vein using the modified Seldinger technique Procedure: Administering a tablet Procedure: Administering liquid medication or oral fluids Procedure: Applying ear medication Procedure: Applying eye medication Procedure: Administering a subcutaneous injection. Site: Scruff of the neck Procedure: Administering an intramuscular injection. Site: Quadriceps femoris muscle Procedure: Administering an intravenous injection. Site: Cephalic vein Procedure: Administering an intravenous injection. Site: Jugular vein Procedure: Administering an intravenous injection. Site: Lateral saphenous vein Procedure: Administering fluids or liquid medication Procedure: Administering a subcutaneous injection. Site: Scruff of the neck Procedure: Administering an intramuscular injection. Site: Quadriceps femoris muscle Procedure: Administering an intravenous injection. Site: Marginal ear vein Procedure: Administering an intraperitoneal injection. Site: Mid abdomen Correct handling and restraint of the patient are essential if you are to perform any procedure effectively. If the animal is allowed to move it may hurt itself or you. An animal that is held firmly will feel much more secure and will be less inclined to struggle or to make an escape. So, at the very least, before you start anything: 1. Know how to do the procedure correctly – this will give you confidence and affect your attitude to the animal. 2. Have all your equipment prepared and ready to hand – this may include restraint equipment such as dog catchers or cat bags. 3. Organize assistance if you think you are likely to need it – having a ‘go’, failing and then deciding you need help causes delay, upsets the patient and may upset the watching client. 1. Action: Place the dog in a sitting position on the floor or on a stable examination table covered with a non-slip mat. Rationale: In this position the dog will feel comfortable and will be less likely to wriggle. 2. Action: Ask an assistant to stand astride the dog, or if on a table to stand behind the dog, and grasp the scruff on either side of the head just below the ears. 3. Action: Using a length of cotton tape or bandage, you should tie a loop in it. 4. Action: Approach the dog slowly and deliberately, crouching down to its level if necessary. 5. Action: Place the looped tape over the dog’s nose and tighten it quickly with the knot over its nose. Rationale: Any delay in tightening the loop may give time for the dog to shake its head free. 6. Action: Bring the long ends of the tape downwards and cross over under the chin. Rationale: Further throws around the nose before finally crossing over will strengthen the muzzle. 7. Take the two ends of the tape backwards and tie them in a bow behind the ears. Rationale: A bow allows a quick release if the dog becomes distressed. 8. Ask the assistant holding the dog to keep the head pressed down. Rationale: This position prevents the dog from lifting its forefeet to pull the muzzle of its nose. 9. If the dog is a brachycephalic breed insert another length of tape under the loop on the nose and under the piece at the back of the head. 10. Bring the two ends of this piece of tape together and tie them into a bow on the bridge of the nose. NB Never leave a muzzled animal unattended, as there is always a risk of asphyxiation by vomit or saliva. There are commercial muzzles available. These come in a range of sizes and may be quicker to put on, but they are much more expensive. 1. Action: Using a correct technique, lift the dog on to a stable examination table covered in a non-slip mat. 2. Action: Stand to one side of the dog. 3. Action: Place one hand under the dog’s neck and pull the head close to your chest with your hand. Rationale: If the head is held firmly against your chest the dog cannot move to bite you. 4. Action: Place the other arm over the dog’s back with your elbow pointing towards the far side. 5. Action: Apply pressure with your elbow along the spine making the dog sit down. NB Always remember that the closer you are to the animal the less able it will be to bite you! (This continues from the previous procedure.) 1. Action: Keep one arm under the neck pulling the head close to your chest. Rationale: If the head is held firmly against your chest, the dog cannot move to bite you. 2. Action: Move the other arm and place it under the abdomen, gently lifting the dog into a standing position. 3. Action: Pull the body close to your chest by bringing your forearm up under the abdomen. 4. Action: If you are required to restrain the dog for a long period of time, move your hand to lie over the spine but be careful that the dog does not sit down again. Rationale: This position may be more comfortable for you while still retaining control of the dog. 5. Action: If the dog starts to move or to object to the procedure, quickly return to the previous position. 1. Action: Apply a tape muzzle if appropriate (Fig. 1.1). 2. Using correct lifting procedure, lift the dog on to a stable examination table covered in a non-slip mat. 3. With the dog in a standing position, stand to one side of it. 4. Reach over the dog’s back and grasp the foreleg and hindleg furthest away from you (Fig. 1.2) at the level of the radius and tibia. 5. As quickly and as firmly as possible, pull the dog’s legs away from you supporting its spine against your chest. Rationale: This must be done quickly before the dog begins to struggle and change position. 6. Action: Gently lower the body down to the table. Rationale: Avoid letting the body drop to the table as it may frighten or injure the animal. 7. Action: Place your arm across the chest and neck and apply firm pressure to keep the dog’s head on the table. 1. Action: Place the dog on its side as previously described. 2. Action: Ask an assistant to hold both the back legs while you hold the forelegs. Rationale: If the dog is small this manoeuvre can be performed by one person. 3. Action: Roll the dog over until it is lying on its back. 4. Action: Extend the forelegs and hindlegs presenting the ventral abdomen for examination. 5. Action: Greater restraint can be achieved by bringing each forelimb to lie on either side of the neck then grasping the scruff of the neck on each side with the same hands. 1. Action: Place the cat on a stable examination table covered with a non-slip mat. Rationale: The cat will feel secure and comfortable and will be less inclined to make its escape. 2. Action: Stand to one side of the cat. 3. Action: Run the hand closest to the cat over its back and under the jaw, gently raising the head up a little. 4. Action: Place the other hand over the forelegs. Rationale: This prevents the cat from raising its forepaws to scratch. 5. Action: If the cat begins to struggle or object to the examination, move the hand from under the chin and grasp the scruff. Rationale: This controls the head allowing examination of the body. 6. Action: Use the elbow on this side to press the cat’s body firmly against your side. 7. Action: Use the other hand to hold the forelegs firmly down on the table. Rationale: This controls the forepaws and prevents scratching. NB This position uses minimal restraint but will allow you to examine the whole body and take the rectal temperature. 1. Action: Firmly grasp the scruff of the cat with one hand. 2. Action: Pick up the cat and, with the other hand, grasp its hindlegs. 3. Action: Place the cat on the table in lateral recumbency extending its head and hindlegs. 4. Action: As the cat struggles, make sure that you keep your arms wide apart to maintain the position. Rationale: As the forelegs are not restrained you must be careful to avoid getting scratched. NB This position allows examination of most of the body but it is inadvisable to use it to take the rectal temperature as the cat may struggle and injure itself. For the welfare of the cat, another method of restraint should be adopted as soon as possible. 1. Action: Approach the cat calmly and confidently, talking to it quietly. 2. Action: Assess whether the cat is safe to stroke. 3. Action: If safe, gently stroke the top of the head and run your hand along its back. 4. Action: Gently but firmly grasp the scruff of the neck with one hand and lift the cat. 5. Action: Place the other hand under the sternum and support the cat. 6. Action: Place the cat on an examination table covered in a non-slip mat. Rationale: If the cat feels insecure, it may try to scratch bite or escape. 1. Action: Place the body of the cat under one elbow and forearm, holding it close to your side. Let the hindlegs dangle. 2. Action: Hold the forepaws together between the fingers and thumb of the hand on that side. Rationale: This controls the forepaws and prevents them from scratching you. 3. Action: Hold the scruff of the cat firmly with your free hand. NB Avoid carrying aggressive or frightened cats around in your arms as such animals’ movements are unpredictable. They should be carried in a wire cat basket, which allows them to see out whilst providing you with clear visibility to assess their condition. 1. Action: Observe the rabbit before attempting to handle it. 2. Action: Rabbits should be handled gently but firmly. Rationale: Rabbits have an innate fear of humans whom they perceive as predators. 3. Action: Talk quietly to the rabbit and approach from behind its head. 4. Action: If the animal is fractious, grasp by the scruff and support the weight with one hand (Fig. 1.4) under the hindquarters. 5. Action: More docile rabbits may be restrained by placing one hand under the thorax, gripping the forelegs between the thumb and forefingers of that hand. Support the hind end with your other hand. 6. Action: To carry the rabbit, tuck the head and front feet under your upper arm and support the body along your forearm (Fig. 1.5A). 7. Action: A large towel can be used as an additional means of restraint. Unfold the towel on a table. Place the rabbit on the towel with its head projecting from one side. Wrap the towel around the body, covering the feet and leaving the head exposed (Fig. 1.5B). 8. Action: An excessively aggressive rabbit may be removed from a cage by throwing a towel over the animal and covering it completely. The rabbit can be unwrapped when it has been safely placed on an examination table. 1. Action: Hold the scruff of the rabbit and support its weight by placing one hand under its hindquarters. Rationale: The rabbit must be held firmly to avoid possible injury to you or the rabbit. 2. Action: Gently lower the rabbit onto an examination table so that it lies in dorsal recumbency. Maintain your hold on the scruff and tilt the animal so that it is almost upside down. Rationale: In this position the rabbit is almost hypnotized and will then be easier to examine. 3. Action: Using your forefinger and middle finger, apply pressure to the vent area just in front of the anus. With some rabbits you may find it easier if the examination is carried out by you while an assistant restrains the rabbit as described above. NB Young rabbits are notoriously difficult to sex up to the age of 3 weeks – you will not be the first to make a mistake! Adult bucks have large scrotal sacks that are visible lateral and cranial to the penis. The adult testes can be retracted into the abdominal cavity. Adult does have a prominent fur-covered dewlap under the chin from which hair is plucked to line the nest prior to giving birth. 1. Action: Place the dog in a sitting position on the floor or on an examination table covered in a non-slip mat. 2. Action: If necessary ask an assistant to hold the tail end of the dog. Rationale: This prevents the dog moving backwards or standing up. 3. Action: Place one hand over the top of the dog’s muzzle and, using your fingers and thumb, gently raise the head until the nose is pointing at the ceiling, and open the mouth (Fig. 1.7). 4. Action: Hold the tablet in the fingers of your other hand and with the forefinger of this hand pull down the lower jaw. 5. Action: Place the tablet on the back of the tongue. 6. Action: Close the mouth and hold it closed with one hand. Rationale: This also prevents the dog from spitting it out. 7. Action: Stroke the dog’s throat until you feel the dog swallow. 1. Action: Place the dog in a sitting position on the floor or on an examination table covered in a non-slip mat. 2. Action: If necessary ask an assistant to hold the tail end of the dog. Rationale: This prevents the dog moving backwards or standing up. 3. Action: Place one hand over the top of the dog’s muzzle and, using the fingers and thumb of one hand, gently tilt the head upwards and to one side. Rationale: This position restrains the head while encouraging the jaw to relax. 4. Action: Open the jaw slightly creating a pocket at the angle of the jaw. Rationale: The pocket holds the liquid as it runs into the main part of the oral cavity. 5. Action: Using a syringe filled with the liquid, insert it into the side of the mouth. Rationale: Try to avoid scraping the syringe over the gums as you may damage the mucous membranes. 6. Action: Depress the plunger so that the liquid trickles into the back of the mouth. 7. Action: Continue until the syringe is empty and repeat as necessary. 8. Action: When the procedure is complete, wipe the mouth clean and wipe up any spillage on the dog’s coat. 1. Action: Place the dog in a sitting position on the floor or on an examination table covered in a non-slip mat. 2. Action: If necessary apply a muzzle. 3. Action: Ask your assistant to stand to one side of the dog and follow the instructions for steps 4 and 5. 4. Action: Placing one arm under the dog’s neck and over the muzzle, pull the head towards your chest. 5. Action: Place the other arm over the dog’s back with your elbow pointing towards the far side. 6. Action: You, the veterinary surgeon, will stand on the other side of the dog and apply the medication to the nearest ear. Rationale: The applicator is introduced down the vertical ear canal and squeezed. 7. Action: Massage the ear gently. Rationale: To disperse the medication along the ear canal. 8. Action: Wipe the surrounding area. 9. Action: To treat the other ear, change places with your assistant. NB Restraining the animal in this position also allows you to examine the ear with an auroscope. 1. Action: Place the dog in a sitting position on the floor or on an examination table covered in a non-slip mat. 2. Action: If necessary apply a muzzle. 3. Action: Ask your assistant to stand to one side of the dog and follow the instructions for steps 4 and 5. 4. Action: Placing one arm under the dog’s neck and over the muzzle, pull the head towards your chest. 5. Action: Place the other arm over the dog’s back with your elbow pointing towards the far side. 6. Action: You, the veterinary surgeon, should stand in front of the dog and cup the head in both hands. Using the thumb of one hand the lower eyelid of one eye can be pulled down and the medication can be applied around the edge of the conjunctiva. 7. Action: Release the tension on the eyelid and close the eyelids over the medication. Rationale: This enables the medication to spread over the tissues of the eye and the eyelid. 8. Action: If necessary repeat with the other eye. 9. Action: After the procedure is completed make sure that, as your assistant relaxes his / her hold, the dog does not rub at its eye with its paws or rub its face on the ground. NB Restraining an animal in the position described also allows you to examine the eye. 1. Action: Place the dog in a sitting position or in sternal recumbency on an examination table covered in a non-slip mat. 2. Action: Apply a muzzle if necessary. 3. Action: Make sure that your syringe is already filled and that a suitable-sized needle is attached. 4. Action: Grasp the scruff firmly with one hand. Rationale: This restrains the head and tents the skin ready for injection. 5. Action: Using the other hand, insert the point of the needle with the bevel-side uppermost into the raised skin of the scruff. 6. Action: Inject the contents of the syringe into the subcuticular space and withdraw the needle. 7. Action: Gently massage the site of the injection. Rationale: To disperse the drug. Absorption from this site takes about 30–45 minutes.
Procedure: Muzzling a dog (Fig 1.1)
Restraint for general examination
Dogs
Procedure: To examine the cranial end of the body
Procedure: To examine the caudal end of the body or take the rectal temperature
Procedure: To examine the dog on its side or to provide stronger control (Fig. 1.2)
Procedure: To examine or restrain a dog on its back
Cats
Procedure: Restraint for the examination of a friendly cat
Procedure: Restraint for examination of a fractious cat
Procedure: Lifting a friendly cat used to being handled
Procedure: Lifting a frightened or aggressive cat
Procedure: Carrying a cat (Fig. 1.3)
Rabbits
Procedure: To restrain a rabbit (Fig. 1.4)
Procedure: To differentiate the sex of rabbits (Fig. 1.6)
Administration of medication
Procedure: Administering a tablet (Fig. 1.7)
Procedure: Administering a liquid feed or medication
Procedure: Applying ear medication (Fig. 1.8)
Procedure: Applying eye medication
Procedure: Administering a subcutaneous injection. Site: Scruff of the neck
![]()
Stay updated, free articles. Join our Telegram channel

Full access? Get Clinical Tree


Restraint, handling and administration of medication
Only gold members can continue reading. Log In or Register to continue
