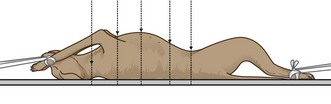
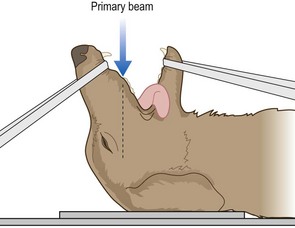
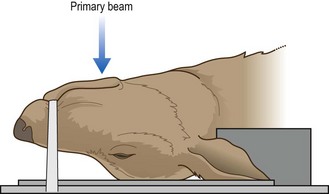
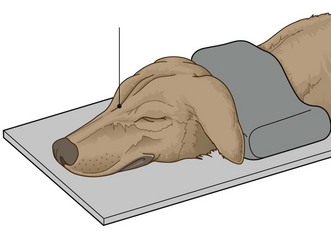
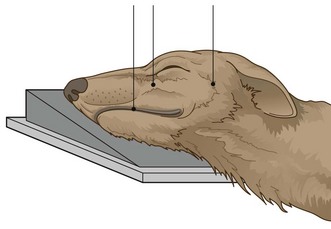
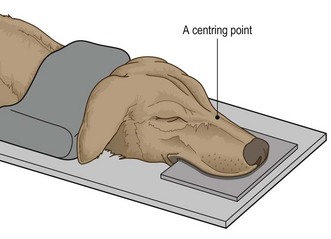
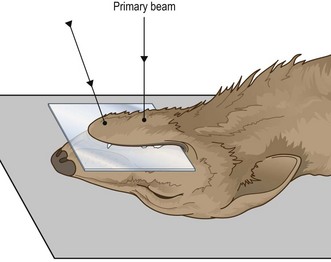
Chapter 6 Diagnostic imaging Procedure: Rostro-caudal view – open mouth Procedure: Rostro-caudal view – closed mouth Procedure: Lateral view of the skull Procedure: Lateral oblique view Procedure: Dorso-ventral intra-oral view Procedure: Ventro-dorsal intra-oral view Procedure: Ventro-dorsal open mouth oblique rostro-caudal view Procedure: Shoulder – medio-lateral view Procedure: Shoulder – cranio-caudal view Procedure: Elbow – medio-lateral view Procedure: Elbow – cranio-caudal view Procedure: Intravenous urography for examination of the kidneys and ureters Procedure: Cystography – examination of the bladder using contrast material Procedure: Retrograde urethrography for examination of the urethra using positive contrast in the male Procedure: Retrograde vaginourethrography for examination of the vagina and urethra using positive contrast in the female Procedure: Preparing the patient for a radiographic examination: 1. Action: Make sure that there is a valid clinical reason for the examination. 2. Action: Use some form of chemical restraint (i.e. sedation or general anaesthesia as appropriate to the patient). 3. Action: Remove any potential artefacts from the patient (e.g. collar, clips, matted hair, etc.). 4. Action: If required for the procedure, make sure that the patient is properly prepared (e.g. use of an enema, emptying the bladder, starvation). 5. Action: Position the patient correctly for the radiograph. Table 6.1 *After Aspinall 2003a, p 216, with permission of Elsevier Butterworth-Heinemann. Table 6.2 General principles of positioning* *After Aspinall 2003a, p 216, with permission of Elsevier Butterworth-Heinemann. Procedure: Lateral spine (Fig. 6.1): 1. Action: Place the patient in right lateral recumbency. Rationale: It is traditional to have the head to the left on the radiograph. 2. Action: Place supporting pads under the natural curves of the spine (i.e. the neck and lumbar spine). 3. Action: Place pads under the sternum and between the limbs. Rationale: These prevent rotation, which will pull the spine out of its horizontal position. 4. Action: If the lower cervical spine is to be examined, pull the limbs caudally (Fig. 6.1). Rationale: This ensures that the musculature of the shoulder does not overlie C6 and C7. 5. Action: If the cervical spine as a whole is to be examined, place a pad under the nose. 6. Action: Centre the primary beam (as indicated by the cross wires in the light-beam diaphragm) over the point of interest. Include muscle mass, but not fat and skin. 7. Action: If the entire spine is to be examined, ensure that each image overlaps with the ones on either side. 8. Action: If the first film fails to identify an abnormality, take repeat films on either side of the initial film. Rationale: To ensure that you have thoroughly examined the area of the spine. NB Centring points for the whole spine are as follows: Fewer films may be sufficient for cats and small dogs. Procedure: Ventro-dorsal spine (Fig. 6.2): 1. Action: Place the dog in dorsal recumbency supported in a trough or by foam pads or sandbags. 2. Action: Extend the hind- and forelimbs and secure with ties. Rationale: This prevents rotation and flexion of the lumbar spine. 3. Action: Extend the neck and hold in place with tape or a sandbag overlay. It may help to place a pad under the neck. Rationale: This ensures that the spine is fully extended. 4. Action: Centre the primary beam (as indicated by the cross wires in the light-beam diaphragm) over the point of interest. 5. Action: If the entire spine is to be examined, ensure that each image overlaps with the ones on either side. 6. Action: If the first film fails to identify an abnormality, take repeat films on either side of the initial film. Rationale: To ensure that you have thoroughly examined the area of the spine. NB Centring points for the whole spine are as follows: Fewer films may be sufficient for cats and small dogs. Procedure: Rostro-caudal view – open mouth: This is used to demonstrate the tympanic bullae, the foramen magnum, C1 and C2 and the atlanto-occipital joint. 1. Action: Place the animal in dorsal recumbency with the hard palate vertical to the cassette. Tip the nose backwards slightly past the vertical. 2. Action: Hold the mouth open to form a V shape (Fig 6.3) using tapes, or place an old needle case (with one end cut off to form a hole) between the teeth of the upper and lower jaws. Rationale: This removes the mandible and maxilla from the area of interest. 3. Action: Orientate the primary beam towards the hard palate and centre it (indicated by the cross wires in the light-beam diaphragm) on the base of the tongue. Rationale: In this position the tympanic bullae are located directly behind the base of the tongue. 4. Action: If the animal is intubated, remove the endotracheal tube just before exposure. Rationale: The tube may be superimposed on the tympanic bullae. Procedure: Rostro-caudal view – closed mouth: This is used to demonstrate the frontal sinuses, zygomatic arch and temporal region, and the sagittal crest. It is of less use in the cat as the conformation of the skull is different. 1. Action: Place the animal in dorsal recumbency with the hard palate vertical to the cassette. 2. Action: Wind a tape around the nose. Rationale: To hold the jaw closed. 3. Action: Direct the primary beam at an angle of 5–10° to the vertical in a rostro-caudal direction. Rationale: This enables an image of the structures to be seen on the radiograph. Procedure: Ventro-dorsal view: The ventro-dorsal (VD) view is used for the examination of the tympanic bullae and the external auditory meatus on either side. 1. Action: Place the animal in dorsal recumbency. Rationale: This ensures that the skull is as close as possible to the film. 2. Action: Extend the neck (Fig 6.4). 3. Action: Place a pad under the neck. Rationale: This forces the head back so that the hard palate is parallel to the cassette. 4. Action: Secure a tape around the upper canines and tie it to the table top (Fig. 6.4). Rationale: This ensures that the hard palate remains in a horizontal plane. 5. Action: Place a right or left marker on the cassette beside the head as appropriate. Rationale: It is important to be able to identify the location of a lesion or mass. 6. Action: Centre the beam (as indicated by the cross wires in the light-beam diaphragm) in the midline at a point halfway along the interpupillary line. Rationale: This point may vary with the area to be examined. 7. Action: Collimate the beam to include the entire skull. Rationale: If necessary, collimate more tightly over the area of interest. Procedure: Dorso-ventral view: The dorso-ventral (DV) view is used for examination of the ear and the temporo-mandibular joint. 1. Action: Place the animal in sternal recumbency with the neck extended (Fig. 6.5). 2. Action: Place a sandbag over the neck. Rationale: This keeps the hard palate parallel to the cassette especially in deep-chested dogs. 3. Action: Place a right or left marker on the cassette beside the head as appropriate. Rationale: It is important to be able to identify the location of a lesion or a mass. 4. Action: Centre the beam (indicated by the cross wires in the light-beam diaphragm) on a line midway between the eyes. Rationale: This point may vary according to the point of interest. Procedure: Lateral view of the skull: This is of limited value especially in visualizing the oral cavity as one side of the jaw is superimposed on the other. 1. Action: Place the animal in lateral recumbency. Rationale: The animal will be completely stable in this position. 2. Action: Place foam pads under the nose and the mandible. Rationale: This ensures that the sagittal plane of the skull is parallel to the cassette. 3. Action: Centre the primary beam (indicated by the cross wires in the light-beam diaphragm) midway between the ear and eye. Rationale: This will provide a view of most structures on the head. Procedure: Lateral oblique view: This is used to show masses or lesions identified in other views and to view the tympanic bullae or temporo-mandibular joints. It is also used to view the dental arcades (e.g. for the diagnosis of a malar abscess). 1. Action: Place the animal in lateral recumbency. Rationale: This is the most stable position for this view. 2. Action: Tilt the head along its long axis and support with foam pads. Rationale: This will separate each side of the head. 3. Action: Alternatively tilt the animal’s nose up by about 15° and support with pads. 4. Action: If viewing the teeth, place foam wedges under the appropriate arcade. 5. Action: If necessary, open the mouth and hold it open with a dental gag or needle case between the teeth. Rationale: This will prevent the mandible from obscuring the view of the upper arcades. 6. Action: Centre the beam (indicated by the cross wires in the light-beam diaphragm) on the point of interest (Fig. 6.6). NB This view can be varied according to what you want to investigate in more detail having identified a lesion in other positions. Procedure: Dorso-ventral intra-oral view: This is used for the investigation of the premaxilla, upper incisors, rostral portions of the maxilla and premolar teeth, and for the nasal cavity. 1. Action: The animal must be fully anaesthetized. 2. Action: Place the animal in sternal recumbency and extend the neck. Support with foam pads (Fig. 6.7). Rationale: The position of the head is straighter if the neck is extended. 3. Action: Place a sandbag over the neck. Rationale: To prevent rotation of the head. 4. Action: The endotracheal tube should be tied to the lower jaw. Rationale: To keep it in place and to allow correct placement of the cassette. 5. Action: Place a non-screen film above the tongue and the tube as far as possible into the mouth. 6. Action: Place a left or right marker beside the head as appropriate. Rationale: It is important to be able to identify the location of any lesions. 7. Centre the beam as follows: Procedure: Ventro-dorsal intra-oral view: This is used for investigation of the body of the mandible, the rostral parts of the horizontal rami of the mandibles and the mandibular incisor teeth. 1. Action: The animal must be fully anaesthetized. 2. Action: Place the animal in dorsal recumbency and support it. Rationale: Use a plastic trough and / or foam wedges to keep the body from tilting. 3. Action: Push the tongue firmly to one side or place it symmetrically in the centre of the oral cavity. Rationale: To avoid any confusion when evaluating the radiograph. 4. Action: Use only radiolucent gags in the mouth. Rationale: To prevent the image appearing on the radiograph. 5. Action: Position the endotracheal tube away from the point of interest. Rationale: To prevent it interfering with the image. 6. Action: Place the cassette as far as possible into the mouth between the tongue and hard palate. 7. Centre the beam as follows: • Action: The incisor teeth – at an angle of 20° to the vertical (Fig. 6.8) – i.e. aiming rostro-caudally. Rationale: To prevent foreshortening and to allow full evaluation of the dental roots and alveoli. • Action: The horizontal rami of the mandible – over the mid-point of a line drawn from the mandibular symphysis to the larynx (Fig. 6.8). Rationale: The centring point will vary according to the point of interest. Procedure: Ventro-dorsal open mouth oblique rostro-caudal view: This is used to investigate the nasal passages and allows better visualization of the more caudal regions than the dorso-ventral intra-oral view. 1. Action: The animal must be fully anaesthetized. Rationale: To allow adequate relaxation and thus accurate positioning. 2. Action: Place the animal in dorsal recumbency with the head as straight as possible. Use a trough or wedges to hold the body in position without tilting to one side. 3. Action: Open the mouth as widely as possible and prop open with a dental gag or a needle case between the caudal molars or the carnassials. Rationale: This prevents the mandibles obscuring the view of the maxillae. 4. Action: Pull the tongue and the endotracheal tube to one side. Rationale: To prevent them obscuring the view of the maxillae. 5. Action: Place the cassette under the head. 6. Action: Centre the primary beam (indicated by the cross wires in the light-beam diaphragm) on a point halfway along the length of the hard palate and collimate to include the whole hard palate. Rationale: This will provide good visualization of the whole of both nasal cavities. 1. Action: Place the animal in right lateral recumbency. 2. Action: Extend the forelegs and secure with ties tied to cleats on the table or with sandbags. 3. Action: Place a pad under the sternum. 4. Action: Place sandbags over the neck and the hindlegs. 5. Action: Centre the beam (as indicated by the cross wires on the light-beam diaphragm) midway between the sternum and spine and level with the caudal border of the scapula (approximately the 5th rib). Rationale: This ensures that the primary beam coincides with the base of the heart. 6. Action: Collimate the beam to include the cranial thoracic inlet, the edge of the sternum, the thoracic spine and the full extent of the diaphragm. 7. Action: Expose on inspiration.
Radiography
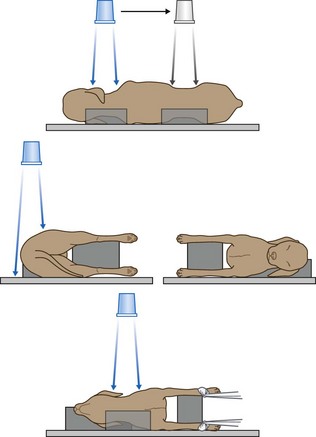
Practical positioning (Tables 6.1 and 6.2)
Type
Use
Effect on the radiograph
Troughs – range of sizes
To restrain the animal on its back and prevent rotation of the trunk
Radiolucent – can be placed over the cassette if necessary
Foam wedges – range of sizes. Often covered in wipeable fabric
To provide support of trunk and limbs; can be used to prevent rotation of the spine and to maintain it in a horizontal plane
Radiolucent
Sandbags – loose filling allows bending and twisting. Covered in wipeable fabric
Can be wrapped around limbs to hold them in place or placed over the neck
Radio-opaque – do not place in the primary beam
Tapes or ties – range of lengths
Looped around limbs to pull them into position and then tied to the cleats on the table
Radiolucent
Wooden blocks
For raising the cassette closer to the x-ray tube head
Radio-opaque – do not place over the cassette
Action
Rationale
Centre the primary beam over the main area of interest
To prevent distortion of the area by an oblique view
Place the area of interest as close as possible to the film
If there is an excessive object–film distance the part in question may be magnified and blurred
Ensure that the centre of the primary beam is at right angles to the film
To avoid distortion of the image; this is important when examining joints or intervertebral spaces
Collimate the beam to as small an area as is realistically possible
To reduce the amount of scattered radiation and thus improve the sharpness of the image
Take two views at right angles to each other
To assist in location of a lesion and to visualize the area completely
Try to contain the whole area of interest on a single film
To reduce the number of exposures; however, if this means that important parts are viewed obliquely (e.g the whole spine) then it is better to take views of several smaller areas
When imaging the spine, the body must be supported in areas which may drop down or rotate (e.g. neck and lumbar spine) so that the entire vertebral column is in the same horizontal plane
To prevent distortion and magnification of individual vertebrae and of the intervertebral discs
1 Spine
2 Head and neck
3 Thorax
![]()
Stay updated, free articles. Join our Telegram channel

Full access? Get Clinical Tree