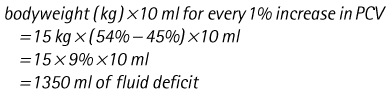
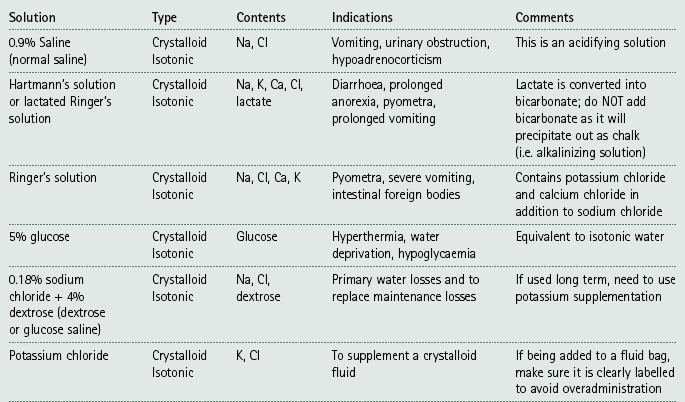
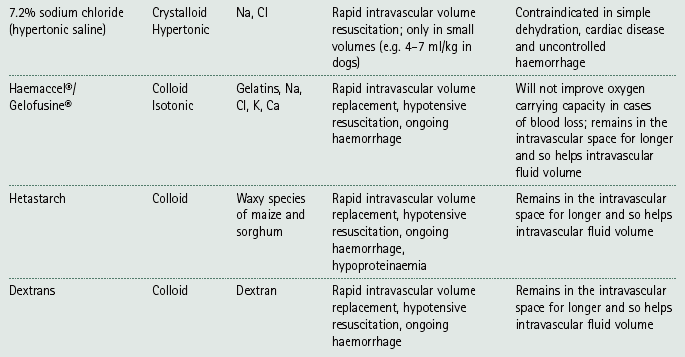
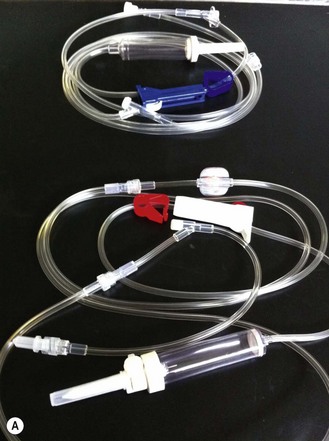
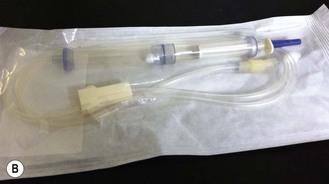
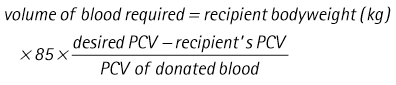
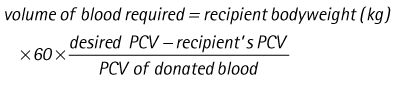
Chapter 7 Medical diagnostic and treatment techniques Body water is divided into two fluid compartments: • makes up 33% of the total body water and lies outside the cells • includes the plasma within the blood, interstitial fluid between the cells and the transcellular fluid, which is formed by active secretory membranes (e.g. synovial fluid, cerebrospinal fluid and lymph) • contains electrolytes (e.g. sodium, potassium, calcium, and magnesium, chloride, bicarbonate and phosphate) – sodium chloride is the predominant electrolyte • plasma also contains proteins (e.g. albumin, globulin, fibrinogen, prothrombin) whose function is to maintain blood volume and blood pressure by exerting an effective osmotic pressure keeping fluid within the blood vessels. There is no protein in interstitial fluid as the molecules are too large to pass through the capillary walls under normal conditions. • makes up 66% of the total body water and lies within all the cells • contains electrolytes (e.g. potassium, magnesium and sodium, phosphate, bicarbonate and chloride) – potassium phosphate is the predominant electrolyte • also contains proteins; these are non-diffusible and maintain an effective intracellular osmotic pressure. • Isotonic – fluid has the same osmotic pressure of plasma and will remain within the plasma when administered intravenously (e.g. 0.9% saline (normal saline)). • Hypotonic – fluid has a lower osmotic pressure than that of plasma. Fluid will be drawn into the cells resulting in swelling and the risk of cell lysis (e.g. sterile water, 0.45% saline). • Hypertonic – fluid has a higher osmotic pressure than that of plasma, which will draw water out of the cells (e.g. 7.2% saline, 10% dextrose). • Blood, plasma and oxyglobin – contain blood products used in cases of haemorrhage • Colloids or plasma expanders – contain large molecules of inert substances that are too big to pass through the capillary walls and are used to improve circulatory balance • Crystalloids – contain water, electrolytes and / or glucose. Table 7.1 describes the principal constituents of replacement fluids. • Subcutaneous – used where dehydration is mild and there is adequate peripheral circulation. Any crystalloid fluid can be given by this route. • Intraperitoneal – used where dehydration is mild and fluids cannot be administered orally. Larger volumes can be given as the peritoneal space is potentially large and is often used in neonates and exotics (see Ch. 1). • Intraosseus – often used in small exotics whose veins are fragile and easily damaged by needles and catheters. If the catheter is dislodged, haemorrhage from the site is unlikely to occur (see Ch. 1). • Oral – used when the animal is willing to drink, not vomiting and in the absence of an intestinal obstruction. It is usual to use hypotonic electrolyte drinks or plain water. This uses the enteral route. 1. Action: Obtain an accurate history from the owner asking questions about eating and drinking, urination, vomiting and diarrhoea, wounds, etc. Rationale: This provides a measurement on which to base evidence of recovery or deterioration. 3. Action: Check for skin elasticity by tenting the skin and also check the eyes to assess whether or not they are sunken. Box 7.1 shows how to calculate the fluid deficit using clinical signs to estimate percentage dehydration. Box 7.1 Calculation of fluid deficit using percentage dehydration obtained as a result of a clinical examination A 25 kg Labrador is found to be 8% dehydrated. Rationale: Loss of skin elasticity and sunken eyes do not appear until the animal is approximately 5% dehydrated (Table 7.2). Older and wasted animals have reduced elasticity even though they may not be dehydrated; overweight animals only lose their skin elasticity when severely dehydrated. Table 7.2 Clinical signs associated with dehydration 4. Action: Check the mucous membranes. Rationale: These become tacky as a result of dehydration. 5. Action: Check the capillary refill time (CRT) by applying gentle pressure to the gum and observing the return to normal colour. Rationale: Capillary refill time is prolonged as a result of reduced circulating blood volume. 6. Action: Assess responsiveness of the animal by observing its response to the goings on around it – try calling it by name. Rationale: Severely dehydrated animals become moribund. 7. Action: Collect a blood sample and carry out a packed cell volume (PCV) assessment (see Ch. 4). Box 7.2 shows how to calculate fluid deficit using PCV. Box 7.2 Calculation of fluid deficit using packed cell volume (PCV) A 15 kg spaniel has a PCV of 54%. (Assume normal PCV = 45%) 8. Action: Collect a urine sample and measure the specific gravity (SG) using a refractometer (see Ch. 4). 1. Standard giving set – delivers fluid at a rate of 15–20 drops/ml. Used for larger patients being given crystalloids or colloids (Fig 7.1A). 2. Paediatric giving set – delivers fluid at a rate of 60 drops/ml – this faster rate is useful to administer small volumes more accurately. Used for small patients and incorporates a burette which limits the total amount of fluid received by the animal (Fig 7.1A). 3. Blood administration set – a filter is incorporated into the double chamber to prevent any small clots getting into the circulation. Used for plasma, serum or whole blood (Fig 7.1B). 4. Flowline balloon infusers – deliver a very small amount (e.g. a few milliliters). Used for small exotic patients. Many practices also use infusion pumps to ensure that the correct volume is given at the appropriate rate for the individual patient. The giving set is attached to an intravenous catheter inserted into an appropriate vein, usually the cephalic vein. For details of restraining the patient and placing the catheter see Chapter 1. 1. Action: Select and prepare the equipment (i.e. a bag of appropriate fluid, giving set, clippers, surgical scrub solution, swabs, disposable gloves, intravenous catheter and bowl). Rationale: Preparing all equipment in advance ensures a smooth efficient procedure. 2. Action: Check the expiry date on the fluid bag before opening it and check for any evidence of damage. 3. Action: Warm the fluid bag by placing in a microwave or in a pan of hot water for a few minutes. 4. Action: Wash your hands and put on a pair of disposable gloves. 5. Action: Remove the fluid bag from its outer covering and identify the outlet port. Hang the bag on a drip stand. Rationale: This facilitates handling and administration. 6. Action: Remove the giving set from its outer wrappings and switch off the flow control. Rationale: This prevents loss of fluid when you insert the giving set into the fluid bag. 7. Action: Remove the cover from the infusion spike and introduce it into the bag by pushing it through the outlet port. Rationale: Careful handling will avoid puncturing the bag resulting in fluid escaping from the bag. 8. Action: Squeeze the fluid chamber so that it fills by one-third. Rationale: To aid control of the fluid during administration and avoid the formation of bubbles. 9. Action: Remove the cap from the end of the line taking care to avoid touching a non-sterile surface. Rationale: It is important to maintain sterility at all times. 10. Action: Open the flow control and allow a small volume of fluid to run out into a bowl. At the same time check for air bubbles in the line – if necessary flick them with your finger to encourage them to disperse. 11. Action: When you are satisfied that everything is ready, close off the flow control, replace the cap on the end of the line and hang the flow line over the drip stand (some giving sets include small plastic clips). 12. Action: Place the patient on a stable table and ask an assistant to restrain in sternal recumbency (see Ch. 1). Rationale: If the patient feels secure and comfortable it is less likely to try and escape. 13. Action: Select an appropriate vein and ask the assistant to raise it (see Ch. 1). 14. Action: Clip the vein and prepare the area aseptically using a surgical scrub Rationale: It is vital to prevent the entry of infection into the vein. 15. Action: Insert an appropriate intravenous catheter into the vein and secure it with tape (see Ch. 1). 16. Action: Remove the cap from the end of the flow line and attach the line to the end of the catheter. Rationale: This allows the fluid to run into the vein once the flow control is released. 17. Action: Release the flow control and observe the drip rate in the chamber. If necessary adjust the drip rate by manipulating the flow control. Box 7.3 shows you how to calculate the drip rate to correct a given fluid deficit. 18. Action: Secure the lower part of the flow line to the paw with tape. Rationale: To prevent the line or catheter being torn out by the patient or by catching on objects. 19. Action: Instigate a monitoring routine by yourself or the nursing staff (Box 7.4). Any patient undergoing fluid replacement therapy, by whatever route, should be closely monitored. Box 7.4 lists the parameters that should be checked. Critical care cases should be checked every 5–10 minutes whereas those of lesser severity, or as the patient begins to improve, should be checked at least every 30 minutes. Fluid charts should be kept as a record of treatment and as a way of informing other staff who may take over the care later on. • Haemorrhage – acute or chronic; internal or external • Clotting problems – associated with deficiencies of platelets or clotting factors. Selection of a donor – the animal must be healthy and fully grown. The owner must be aware of what is involved and have given permission for blood to be collected. Collection of large samples of blood for commercial use requires a licence under the Animals (Scientific Procedures) Act 1986 and the blood products must be supplied under the Veterinary Medicines Regulations. Table 7.3 describes the selection criteria in dogs and cats. Table 7.3 Criteria for the selection of blood donors Many practices keep a list of owners who are willing to allow their animals to donate blood and this is particularly useful in an emergency situation. Blood can be collected as often as every 4–6 weeks without prescribing iron supplementation, but the Home Office recommendation under the Animal (Scientific Procedures) Act 1986 is that you must not take more than 10% of the animal’s total blood volume within a 28-day period without holding a personal / project licence under the Act. (Total blood volume of a dog is taken to be 76–107 ml/kg body weight. A 25 kg Labrador would therefore contain approximately 2–2.5 litres of blood so 10% = 200–250 ml.) 1. Action: Collect a small sample of donor blood in an EDTA tube and spin down at 3000 r.p.m. for 10 minutes. 2. Action: Draw off and discard the supernatant fluid. Rationale: The supernatant contains the plasma and the buffy coat, which are not needed. 3. Action: Resuspend the red blood cells in a little saline at 38°C. Rationale: This washes the red cells, which must be kept at blood temperature to ensure survival. 4. Action: Spin the sample again and remove the saline supernatant. Rationale: This leaves the washed red cells. 5. Action: Resuspend the red cells in a measured volume of warm saline to produce a 3–5% solution. Rationale: This produces a solution that is easier to work with. 6. Action: Collect a small sample of recipient blood in a heparinized tube and spin down in a centrifuge. Rationale: This is used to obtain plasma from the recipient. 7. Action: Place 1–2 ml of recipient plasma in a test tube, well plate or on a clean slide and add 1–2 drops of donor red cell suspension. 8. Action: Gently mix by swirling the two liquids together and examine for evidence of haemolysis or agglutination. 9. Action: Compatibility is demonstrated by the absence of haemolysis or agglutination. Rationale: If the two blood samples are compatible there is no reaction. 1. Action: Select equipment required for blood collection. 2. Action: Select a suitable donor. Rationale: See Table 7.3 for selection criteria in dogs and cats. 3. Action: If necessary, check for compatibility. 4. Action: If necessary, sedate the animal. Cats may be given a general anaesthetic. 5. Action: Ask your assistant to firmly restrain the animal in a position allowing clear access to the jugular vein, on a stable examination table. Rationale: If the animal feels secure and comfortable it will be less likely to try and escape. 6. Action: Position the dog in lateral recumbency or in a sitting position. Cats are more comfortable in sternal recumbency with the forelimbs over the edge of the table and the head raised. Rationale: The position must be comfortable for the animal and must allow the jugular vein to be raised ready for venepuncture (see Ch. 1). 7. Action: Clip and prepare the site over the jugular vein within the jugular groove aseptically. Rationale: It is vital to prevent the entry of infection into the blood stream. 8. Action: Infiltrate local anaesthetic into the area around the vein and massage gently. Local anaesthetic cream may be used instead. Rationale: To desensitize the area making the procedure less painful. 9. Action: Ask your assistant to raise the vein. 10. Action: Wearing surgical gloves, introduce the needle bevel-side uppermost into the vein and draw back on the syringe. 11. Action: Detach the needle from the syringe and attach the needle to the tubing leading to the collection bag. 12. Action: Position the bag lower than the animal and set it on some electronic scales. 13. Action: Periodically invert the collecting bag. Rationale: To mix the blood with the anticoagulant in the bag. 14. Action: When the bag is full, clamp the tubing with a pair of artery forceps and remove the needle from the vein in the correct manner (see Ch. 1), applying pressure with a sterile swab for about 5 minutes. 15. Action: Apply a light neck bandage to the animal for several hours. 16. Action: If the blood is not to be administered immediately the tubing must be tightly clamped or heat sealed and labelled clearly with the species and date of collection. Blood can be stored at 4–8°C for a maximum of 3 weeks. Rationale: It is vital that infection does not enter the bag or that the blood does not deteriorate. 17. Action: Provide the donor with food and water and place in a warm, quiet kennel under observation for a few hours. Rationale: To make sure that the donor does not suffer from hypovolaemic shock. NB In cats a smaller volume will be collected and syringes containing anticoagulant may be used instead of collection bags. Following donation, cats should be given i.v. crystalloid fluid via an i.v. catheter placed in the cephalic vein, at the rate of 30 ml/kg over a period of 3 hours. If the cat has been given a general anaesthetic or sedation, it must be closely monitored during recovery. Once it is awake it should be given food and water and put into a warm quiet kennel. 1. Action: Select and prepare the equipment. 2. Action: Make sure that the bag of blood is warmed to body temperature, particularly if it has been removed from storage. Rationale: To prevent cold shock and potential hypothermia. 3. Action: Hang the blood bag on a drip stand and set up the infusion set as described for fluid therapy. Insert the infusion spike into the correct port on the blood bag, taking care not to puncture the bag. Rationale: Puncturing the bag will cause leakage and may introduce infection. 4. Action: Squeeze both chambers of the infusion set to fill with blood to one-third in each of them (Fig. 7.1B). 5. Action: Remove the cap from the infusion line and hold it over a bowl, making sure that you do not contaminate the tip. Rationale: It is essential to maintain sterility. 6. Action: Turn on the flow control to allow blood to flow through into the end of the line and out into the bowl. This must be done slowly to remove any bubbles and keep blood wastage to a minimum. Rationale: Bubbles must not enter the circulation as they may form an air embolism. 7. Action: Replace the cap on the end of the line and hang it over the drip stand ready for use. Rationale: Ensure that the equipment remains aseptic. 8. Action: Ask an assistant to restrain the patient within a warm comfortable kennel. The patient should be conscious or sedated and should be fitted with an intravenous catheter placed in the cephalic vein. Smaller exotics or neonates may be fitted with an intraosseus catheter (see Ch. 1). 9. Action: Flush through the catheter with a small amount of heparinized saline in a syringe. 10. Action: Remove the cap on the end of the fluid line and attach to the i.v. catheter. Switch on the flow control to allow the blood to flow into the patient. Rationale: If the blood is not flowing freely, check the catheter and reflush with heparin. 11. Action: When flowing freely, adjust the flow control to achieve the correct flow rate to deliver the required volume (Boxes 7.5 and 7.6). Box 7.5 To calculate the volume of donor blood required by the recipient 2 ml of blood/kg bodyweight raises the PCV by 1%. Rationale: Rapid transfusion should be avoided to prevent circulatory overload or reaction. 12. Action: Attach the line securely to the patient by means of tapes and bandages. Rationale: The line must be secure to avoid leakage or interference by the patient. 13. Action: Monitor the patient constantly for any signs of reaction. Record everything on the hospital chart. 14. Action: You should check for the following parameters: • Respiratory rate and character • PCV and total proteins should be measured as the transfusion is completed and at 12 hours and 24 hours after completion. Rationale: Any abnormalities in these parameters may indicate a transfusion reaction. In providing enteral nutrition it may not always be possible or advisable to use the entire normal anatomical route; for example, if a cat has a fractured jaw then the rate of healing may be increased by bypassing the oral cavity with the use of an oesophagostomy tube. There are several types of feeding tube designed to deliver nutrition when normal ingestion is impossible. The choice of tube depends on the injury or disease process and the expected duration of the assisted feeding process. Table 7.4 lists the types of tube. Table 7.4 GI = gastrointestinal; PEG tube = percutaneous endoscopically placed gastrostomy tube.
Fluid therapy
Basic theory
Selection of fluids
Administration of fluids
Procedure: Assessing the level of dehydration

Percentage dehydration
Clinical signs
Fluid deficit (ml/kg bodyweight)
<5
No detectable signs
Increasing urine concentration
–
5–6 i.e. mild
Subtle loss of skin elasticity
Slightly dry mouth
50
6–8 i.e. moderate
Definite loss of skin elasticity
Slight increase in CRT
Cold extremities
Dry mucous membranes
Slightly sunken eyes
80
10–12
Skin remains tented when pulled up
Prolonged CRT
Sunken eyes and protrusion of the 3rd eyelid
Dry mucous membranes
100
12–15
Signs of shock
Moribund
Death imminent
120
Equipment for intravenous administration
Procedure: Setting up and attaching an intravenous drip
Monitoring
Blood transfusions
Dogs
Cats
Fully adult but not elderly – ideal age 1–8 years
Fully adult but not elderly – ideal age 1–8 years
Fully vaccinated and not receiving any medication except normal preventative treatment (e.g. anthelmintics)
Fully vaccinated and not receiving any medication except normal preventative treatment (e.g. anthelmintics)
Bodyweight within normal range for the breed
Lean to normal bodyweight – preferably less than 4 kg
Docile temperament – must be able to tolerate procedure
Docile temperament – must be able to tolerate procedure
Normal PCV
Normal PCV
Blood type DEA 1.1 negative
Blood type A, B or AB
No history of travel outside the UK
No history of travel outside the UK
No previous blood transfusion
No previous blood transfusion
Nulliparous
Negative for FeLV, FIV and Mycoplasma haemofelis
Procedure: Cross matching blood
Procedure: Collection of blood for transfusion
Blood administration
Procedure: Blood transfusion
Placement of feeding tubes
Type of tube / location
Indications
Contraindications
Naso-oesophageal – distal oesophagus via the nose
Short term nutrition where the upper GI tract is functioning normally
Long term nutritional support; comatose or recumbent patients; trauma to head, neck, nasal cavity, oesophagus; abnormal gag reflex; vomiting; functional or mechanical GI obstruction
Nasogastric – via the nose; lies in the distal oesophagus but more caudal than the naso-oesophageal tube to reduce the risk of gastric reflux
Can be left in place for 3–7 days; well tolerated; makes use of the majority of the GI tract
May be irritating to the eyes and nose
Oesophagostomy – distal oesophagus via surgical implacement through the skin over the cranial oesophagus
Facial trauma, injury or disease involving the mouth and pharynx; can be tolerated for a long time (months)
Oesophageal disorders; vomiting; comatose or recumbent patients; following oesophageal surgery
Gastrostomy – stomach via surgical laparotomy or endoscopically through the ventrolateral abdominal wall (PEG tube)
Injuries or surgery to oral cavity, larynx, pharynx or oesophagus
Ulceration or neoplasia of the stomach; intractable vomiting; peritonitis; lateral recumbency
Enterostomy (duodenostomy or jejunostomy) – small intestine via surgical laparotomy or endoscopically via a gastric tube and through the pylorus
When stomach or duodenum must be bypassed; pancreatic disease or surgery; disease of the biliary system
Patients must be stable enough to survive anaesthesia and surgery; dysfunction of the small intestine
![]()
Stay updated, free articles. Join our Telegram channel


Full access? Get Clinical Tree


