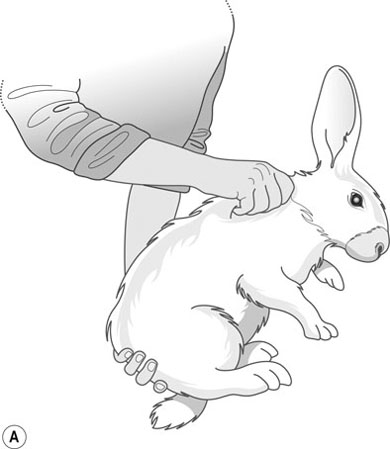
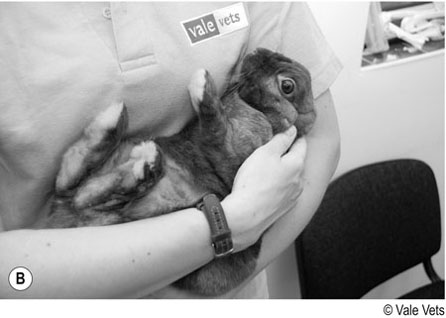
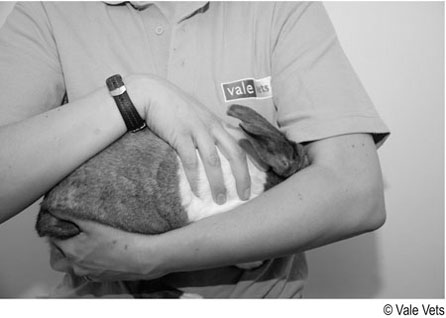
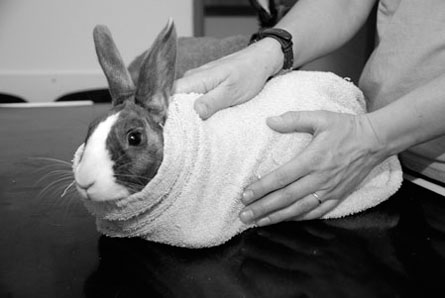
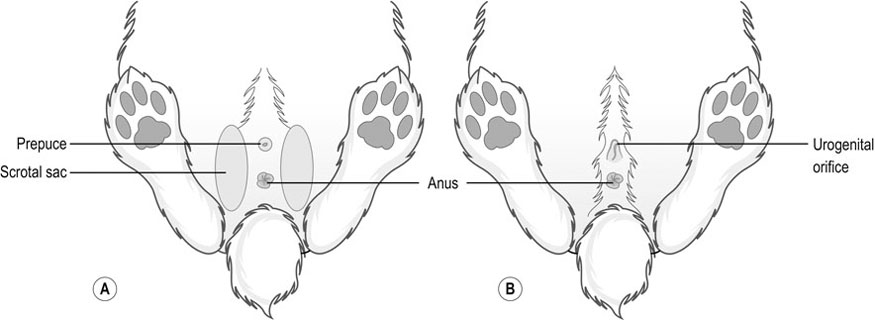
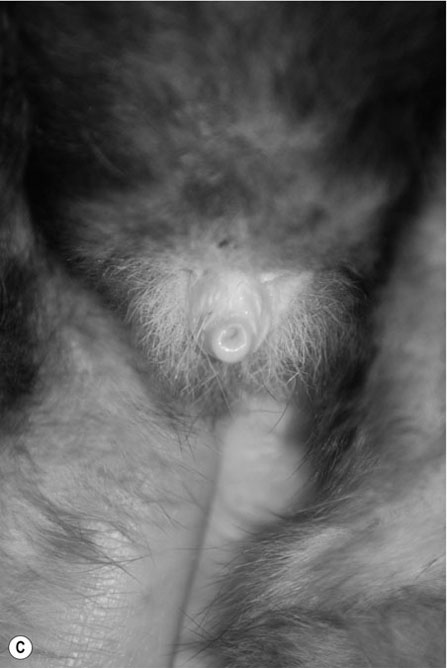
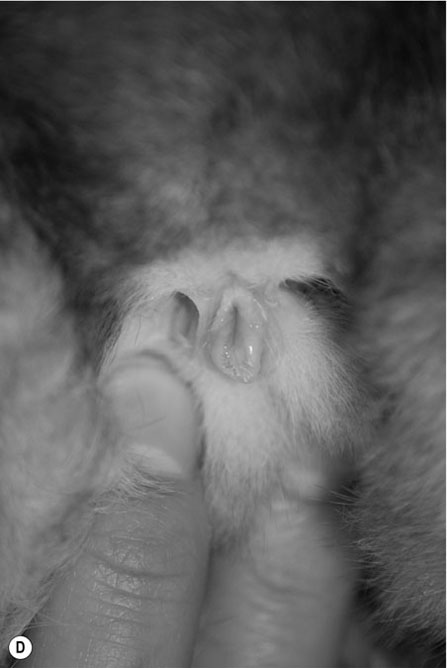
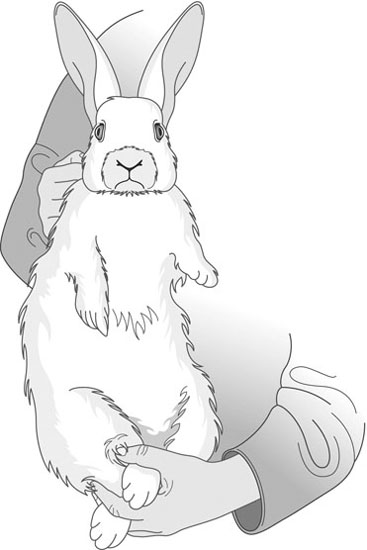
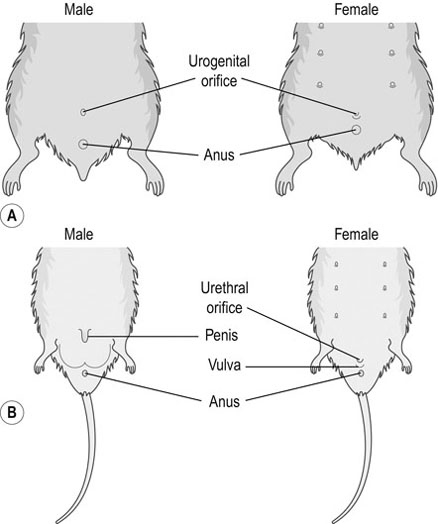
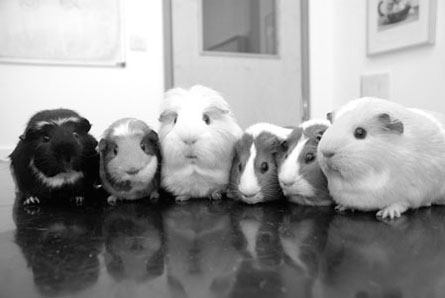
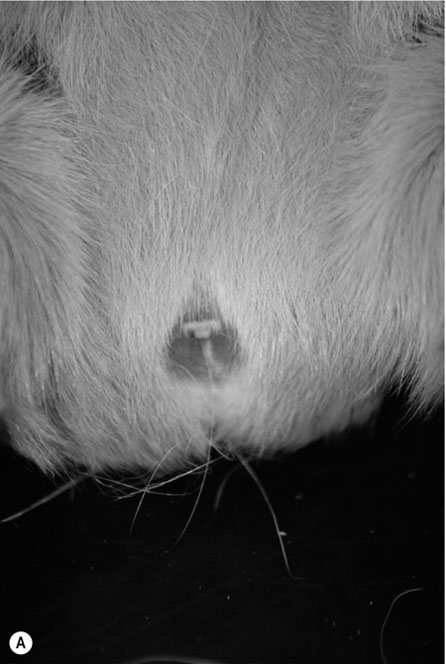
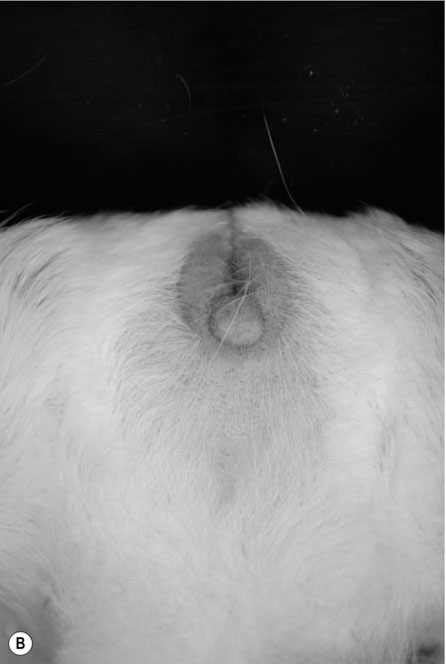
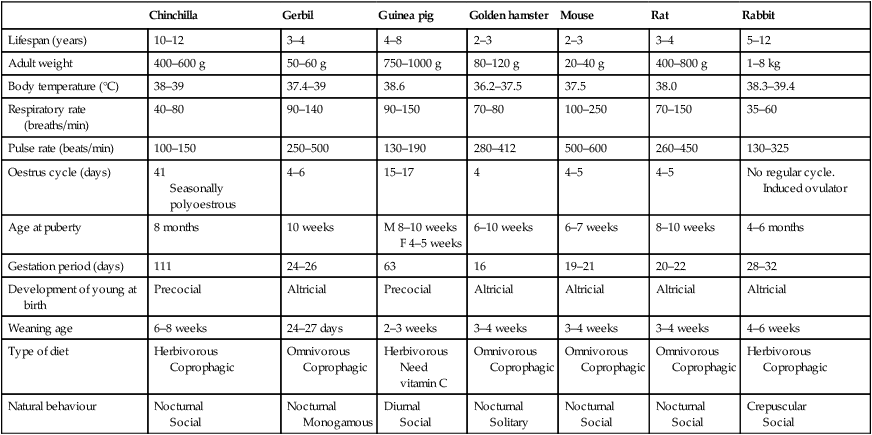
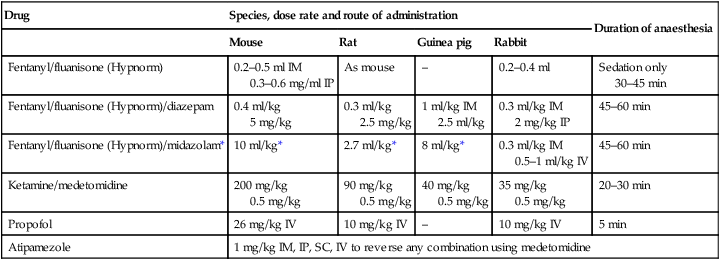
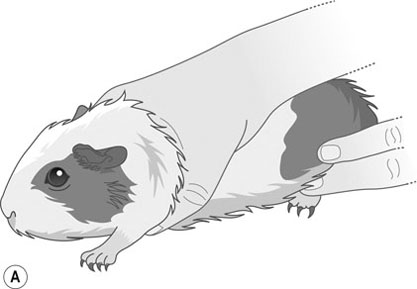
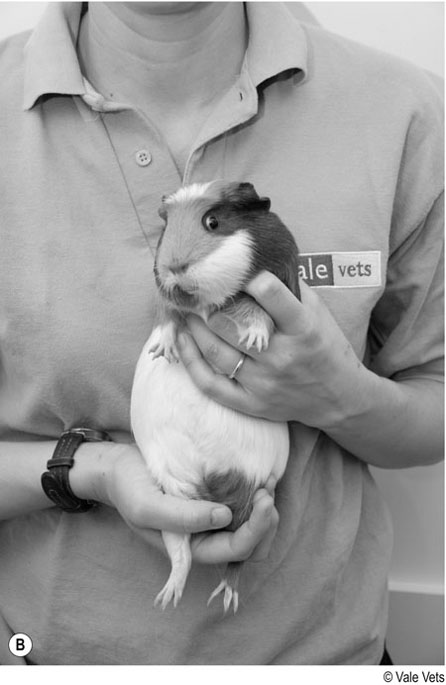
• Response to human contact – most exotic species have an innate fear of humans and any form of human contact is likely to induce a degree of distress. Certain individual animals, e.g. some rabbits, guinea pigs and ferrets, may tolerate or actively seek human company but to most the instinct is to run, or in some cases, to attack. This must be taken into consideration when providing nursing care – observe the patient unobtrusively, avoid unnecessary physical contact and be aware that most ‘exotics’ do not appreciate the sound of the human voice. • Methods of restraint – some species are small and agile and can be easily injured by inept handling while others have wings, providing a different means of escape. Reptiles are ectothermic, depending on their environment for heat and energy – they may suddenly become very active in the warmth of your hands. All are capable of causing injury to the ill-prepared handler. • Reaction to anaesthesia – the term ‘exotics’ covers a wide range of species showing an equally wide range of differing responses to anaesthetic agents. It is not the brief of this chapter to describe the action of each anaesthetic agent but veterinary nurses must ensure that they are familiar with the clinical parameters and the reflexes that can be used to monitor the level of anaesthesia. By understanding that the nursing care required by exotic species is different from that normally given to dogs and cats, the veterinary nurse can significantly increase the chances of recovery and survival of the exotic patient. For biological data, see Table 13.1. Table 13.1 Biological data relating to rabbits and small rodents 1. Action: Observe the rabbit before handling. 2. Action: Rabbits should be handled gently but firmly. Rationale: Rabbits have an innate fear of humans, whom they perceive as predators. 3. Action: Talk quietly to the rabbit and approach from behind the head. 4. Action: If the animal is fractious, grasp by the scruff and support the weight with one hand under the hindquarters (Fig. 13.1). 5. Action: More docile rabbits may be restrained by placing one hand under the thorax, gripping the forelegs between the thumb and forefingers of that hand. Support the hind end with your other hand. 6. Action: To carry the rabbit, tuck the head and front feet under your upper arm and support the body along your forearm (Fig. 13.2). 7. Action: A large towel can be used as an additional means of restraint. Place the rabbit on the opened towel with its head projecting from one side. Wrap the towel around the body, covering the feet and leaving the head exposed (Fig. 13.3). 8. Action: An excessively aggressive rabbit may be removed from a cage by throwing a towel over the animal and covering it completely. The rabbit can be unwrapped when it is safely on the examination table. Rationale: Care must be taken to avoid injuring the rabbit or being injured yourself. 1. Action: Hold the scruff of the rabbit and support its weight by placing one hand under its hindquarters. Rationale: The rabbit must be held firmly to avoid possible injury to itself or to you. 2. Action: Gently lower the rabbit on to an examination table so that it lies in dorsal recumbency. Maintain your hold on the scruff and tilt the animal so that it is almost upside down. Rationale: In this position the rabbit is almost ‘hypnotized’ and is easier to examine. 3. Action: Using your forefinger and middle finger, apply pressure to the vent area just in front of the anus. It may be easier for the examination to be carried out by an assistant while you maintain a firm hold on the rabbit (Fig. 13.4). N.B.: Young rabbits are difficult to sex up to the age of about 3 weeks. Adult bucks have large scrotal sacs which are visible lateral and cranial to the penis. The testes can be retracted. Adult does often have a prominent fur-covered dewlap under the chin. 1. Action: Place the rabbit in sternal recumbency on an examination table and wrap it in a towel as previously described (Fig. 13.3). 2. Action: Take the head in one hand and tilt slightly to one side. Rationale: In this position, one corner of the mouth is uppermost. 3. Action: Using a syringe of an appropriate size containing the liquid medication, place the nozzle into the uppermost corner of the mouth. Rationale: Avoid using large syringes as they are difficult to control. 4. Action: Apply gentle pressure to the syringe and give the medication. Allow time for the rabbit to swallow. 1. Action: Select a 5–8 F (French gauge) feeding tube. Rationale: The size depends on the size of the rabbit. 2. Action: Lay the tube along the outside of the rabbit’s body, from the external nares to the caudal end of the sternum. Mark the point of the external nares with a tape or ballpoint pen. 3. Action: Restrain the rabbit in sternal recumbency and wrap in a towel as previously described. Rationale: In this position the body is restrained but there is access to the head. 4. Action: Apply local anaesthetic spray to one of the rabbit’s nostrils. Wait for 3–5 minutes. Rationale: This desensitizes the opening to the nasal cavity and facilitates tube placement. 5. Action: Apply lidocaine gel to the end of the tube. Rationale: This lubricates the passage of the tube so that it can be inserted without resistance. 6. Action: Raise the rabbit’s head and place the tip of the tube into the selected nostril at the ventral meatus. Gently advance the tube medially and ventrally. Return the head to a normal position as the pharynx is approached. Continue until the mark on the tube lies at the entrance to the nasal cavity. Rationale: This ensures that the tube passes down into the distal oesophagus. 7. Action: Take a radiograph of the lateral thorax and abdomen. 8. Action: Pass the external part of the tube over the bridge of the nose and between the ears. Fix in place using superglue, tape or sutures at the external nares and at the base of one ear. Rationale: It is important that the tube is not dislodged by patient interference. N.B.: This technique can be used to administer liquid oral medication or for feeding hospitalized rabbits. 1. Action: Place the rabbit in sternal recumbency on a suitable examination table with a non-slip surface. 2. Action: Select a sterile 21G or 23G needle and a syringe of an appropriate size. Draw up the drug to be administered. Rationale: Large volumes can be given by subcutaneous injection. 3. Action: Grasp the loose skin of the scruff and inject the drug into the subcuticular space. 4. Action: Withdraw the needle and gently massage the site. 1. Action: Place the rabbit in sternal recumbency on a suitable examination table with a non-slip surface. Rationale: If the rabbit feels secure it will be less likely to struggle and injure itself. 2. Action: Select a 23G needle and a syringe of appropriate size. Draw up the drug to be administered. 3. Action: Grasp the scruff of the rabbit with one hand. Rationale: This prevents the rabbit from moving or leaping off the table. 4. Action: Inject into the lumbar muscles. 5. Action: Alternatively the quadriceps group of muscles on the cranial aspect of the thigh may be used. Restrain the rabbit in sternal recumbency and extend a hind leg towards the veterinary surgeon. Rationale: This position provides easy access to the muscle group. 6. Action: The veterinary surgeon will hold the muscle between the finger and thumb of the left hand and introduce the needle into the muscle with the right hand. Rationale: Assuming that the veterinary surgeon is right-handed. 7. Action: Draw back on the syringe to check that a vein has not been penetrated. 8. Action: If no blood appears in the hub of the needle, inject the drug into the muscle. 9. Action: Withdraw the needle, applying gentle pressure over the site. 1. Action: Place the rabbit in sternal recumbency on an examination table with a non-slip surface. Rationale: If the rabbit feels secure it will be less likely to struggle and injure itself. 2. Action: Wrap the rabbit in a towel with the head uncovered, as previously described. Rationale: This restrains the body while providing access to the head. 3. Action: Clip the fur lying over the marginal ear vein of one ear. Clean the site but avoid the use of spirit. 4. Action: Apply local anaesthetic cream to the site. Wait for 10 minutes. 5. Action: Place a ball of cotton wool soaked in hot water under the ear. Rationale: This causes the vein to dilate, making it easier to visualize. 6. Action: Apply pressure to the base of the selected ear. 7. Action: Maintain the pressure while the veterinary surgeon inserts a 23G needle through the overlying skin into the marginal ear vein. Rationale: The vein should be clearly visible. 8. Action: The veterinary surgeon will draw back on the syringe. Rationale: If blood appears in the hub of the needle, the vein has been penetrated. 9. Action: If blood appears in the hub of the needle, release the pressure on the vein a little, while the veterinary surgeon injects the drug to be given. Rationale: Do not inject more than 1.5 ml as larger volumes may cause damage to the vein. 10. Action: When the procedure is complete, the veterinary surgeon will slowly withdraw the needle while you apply pressure over the injection site for a few seconds. Rationale: This prevents haemorrhage into the surrounding tissues. N.B.: If repeated injections are to be given, use an intravenous or a butterfly catheter held firmly in place with superglue or tape. If collecting a blood sample, use the saphenous, the cephalic or the jugular veins. The maximum volume that can be collected at one time is 2.5 ml. 1. Action: Place the rabbit in sternal recumbency on an examination table with a non-slip surface. Rationale: If the rabbit feels secure it will be less likely to struggle and injure itself. 2. Action: Grasp the scruff with one hand and the hind legs with the other hand. Rationale: The rabbit must be held firmly to prevent it struggling during the procedure. 3. Action: Pick the rabbit up and hold it in dorsal recumbency with its spine against your chest (Fig. 13.5). 4. Action: The veterinary surgeon will introduce a short needle at a point midway between the xiphisternum and the pubis. 5. Action: Draw back on the syringe and examine the contents. 6. Action: If there is nothing in the syringe, gently inject the contents of the syringe. Rationale: Up to 50 ml of fluid can be given by this route. 7. Action: When the procedure is complete, withdraw the needle. N.B.: This technique can be used to collect samples of fluid from the peritoneal cavity and of urine from the bladder. 1. Action: Select an appropriate site. 2. Action: Prepare the site aseptically. Rationale: To prevent the introduction of infection. 3. Action: Infiltrate the area with local anaesthetic. 4. Action: Select a spinal needle or plain needle of an appropriate size and insert it into the bone. 5. Action: Flush the needle with heparinized saline. 6. Action: Fix the needle in place with tissue glue or by suturing. Rationale: It is important that the needle does not become dislodged. 7. Action: Attach a short length of tubing and a syringe or attach a fluid giving set to the needle. 8. Action: If the needle is to be left in situ, bandage the area. You may need to use a Buster collar. 9. Action: When giving further fluid or drugs through the needle maintain an aseptic technique. Rationale: To prevent the introduction of infection. 10. Action: Flush with heparinized saline before each use. Rationale: To flush out any blood clots. 11. Action: Keep the needle patent by flushing with heparinized saline at least three times daily, even if it is not being used. N.B.: This route is useful for small animals whose veins are often fragile and easily damaged by needles and catheters. If the needle is dislodged, haemorrhage from the site is unlikely to occur. For general considerations, see Table 13.2. Table 13.2 Points to be considered during anaesthesia of the rabbit 2. Action: During the induction process the rabbit must be handled gently and calmly. 3. Action: If using an injectable agent, e.g. fentanyl/fluanisone or ketamine/medetomidine, give by the appropriate route; restrain the patient as described previously (Table 13.3). Table 13.3 Anaesthetic agents used in small rodents and rabbits IM, intramuscular; IP, intraperitoneal; IV, intravenous; SC, subcutaneous. *One part fentanyl/fluanisone (Hypnorm) to one part midazolam (5 mg/ml) to two parts water. Source: Hotston-Moore (1999). 4. Action: Supplement with oxygen by mask or by intubating the patient. Rationale: This should be done even when using injectable agents. 5. Action: If using inhalation anaesthesia, e.g. isoflurane, induce using a mask or an induction chamber. 6. Action: Give 100% oxygen for 1–2 minutes before attempting to intubate the rabbit. 7. Action: Intubate the rabbit by placing it in sternal or dorsal recumbency with the head and neck extended. Use a laryngoscope to illuminate the area and an introducer, such as that found inside a cat urinary catheter, to stiffen the endotracheal tube. Slide the tube over the introducer into the trachea and remove the introducer. 8. Action: Alternatively, intubation may be performed ‘blind’. Estimate the position of the larynx externally and advance the endotracheal tube until it lies in the correct position. Check for correct positioning. 9. Action: Attach the endotracheal tube to the anaesthetic circuit. Rationale: Circuit must be appropriate to the species, e.g. Ayer’s or Jackson Rees modified T-piece. 10. Action: Take appropriate steps to keep the rabbit warm at all times. 11. Action: If possible raise the chest above the abdominal cavity. Rationale: The thoracic cavity is small and can be compressed by the abdominal contents. 1. Action: Make sure that you are familiar with the reactions of the rabbit under general anaesthesia. Rationale: Rabbits are not as relaxed as dogs and cats. 2. Action: Pay particular attention to the rate and depth of respiration. 3. Action: Monitor the tension of the jaw. Rationale: Absence of a head shake indicates an acceptable level of surgical anaesthesia. 5. Action: Assess the pedal reflex. 6. Action: The corneal and palpebral reflexes can also be used to assess depth of anaesthesia. 1. Action: The rabbit must be monitored until it is completely conscious and behaving normally. 2. Action: Place the rabbit in a cage in a room which is warm, quiet and dimly lit. Rationale: Bright lights and noise will distress the rabbit during recovery. 3. Action: Ensure that the rabbit is kept warm using a heatpad or Vetbed, or blankets or towels placed under and over the body. Avoid the use of shavings or hay. 4. Action: Monitor the core temperature until completely conscious. 5. Action: If necessary be prepared to give oxygen. Rationale: This will increase the rate of recovery. 6. Action: If the rabbit shows signs of pain, e.g. tooth grinding, grunting, lack of appetite, or if the condition warrants it, provide analgesia. 7. Action: If the rabbit does not eat or drink soon after recovery, consider providing fluid therapy – either intravenously or intraperitoneally; this should include glucose. 8. Action: Monitor urine and faeces output. For biological data, see Table 13.1. • Replace the rodent in its cage with your finger still in its mouth. As the rodent feels its feet on a firm surface it should let go! • Do not attempt to pull your finger from the rodent’s mouth, as the injury will be made worse by the backward-pointing curved teeth. • Do not shake the rodent off your finger, as this will cause serious injury to the rodent. • Wash the bite thoroughly under running water, apply antiseptic ointment and cover for as long as you are working with the animals. • Consult your doctor if it becomes excessively painful or swollen. 1. Action: If the chinchilla is tame, pick it up by placing one hand around its shoulders. 2. Action: Avoid grasping hold of the fur. 3. Action: Once removed from the cage, most chinchillas will sit quietly on your forearm gently restrained by the base of the tail. Rationale: If the animal feels supported and secure it will be unlikely to try to escape. 4. Action: More nervous or active animals can be lifted by the base of the tail, with your other hand supporting the body. 5. Action: To restrain for any clinical procedure, hold the base of the tail with one hand and place the other around the shoulder and chest. 1. Action: Grasp the base of the tail with one hand and support the body around the shoulders. Rationale: If the animal feels supported and secure it will be unlikely to try to escape. 2. Action: Hold the chinchilla in dorsal recumbency, moving the tail to expose the genital area. Rationale: This can be done single-handedly unless the chinchilla struggles. 3. Action: Examine the genital area and measure the anogenital distance. Rationale: This is the distance between the anus and the opening of the vulva (female) or the penis (male) and is longer in the male than in the female (Fig. 13.6). The female chinchilla has a large cone-shaped clitoris, which may be mistaken for the penis of the male. Adult male chinchillas have a pair of large testes which are very obvious during the breeding season of November–March. For biological data, see Table 13.1. 1. Action: If the gerbil is tame and used to being handled, scoop it into your cupped hands. Rationale: Gerbils are extremely active creatures and can jump horizontally and vertically. 2. Action: If the gerbil is less tame, immobilize it by placing your hand over it. Rationale: This will prevent it escaping. The darkness will temporarily calm it. 3. Action: Move your hand to grasp the scruff and lift the animal clear of the cage. 4. Action: Further restraint can be achieved by using your other hand to hold the base of the tail. Rationale: Do not hold the tip of the tail as the skin may be shed, leaving a raw and painful tail. 1. Action: Restrain the gerbil by grasping the scruff as described previously. 2. Action: Examine the ventral surface of the gerbil. 3. Action: Examine the genital area and measure the anogenital distance (Fig. 13.6). Rationale: The anogenital distance is the distance between the anus and the opening of the vulva (female) or the penis (male) and is longer in the male than in the female (Fig. 13.6). Adult male gerbils have a pair of testes lying in the inguinal region. For biological data, see Table 13.1. 1. Action: Guinea pigs should be brought to the surgery in small covered boxes. A companion pig should be brought if possible. Rationale: Guinea pigs are nervous animals and a box provides security and darkness, which will calm them. They like to be in close contact with their own species (Fig. 13.7). 2. Action: Open the box in a dim light if possible. Rationale: This will reduce stress, but you must be able to examine the patient. 3. Action: Pick up the animal by placing one hand around its shoulders and chest (Fig. 13.8). Rationale: Guinea pigs are generally non-aggressive and can be handled gently but firmly. 4. Action: Lift the guinea pig clear of the cage or box, supporting its weight with your other hand. Rationale: This is important if the animal is pregnant or heavy. 5. Action: Move your thumb from around the shoulders and place it under the mandible (Fig. 13.8). Rationale: This prevents the animal from lowering its head to bite. 6. Action: If further restraint is needed, place the guinea pig in dorsal recumbency and extend the hind legs. 1. Action: Restrain the guinea pig in dorsal recumbency as previously described. Rationale: This provides good exposure of the genital area. 2. Action: Examine the inguinal region. 3. Action: Examine the genital opening. Rationale: Females have a Y-shaped opening; males have a slit-shaped opening (Fig. 13.9).
Treatment of exotic species
INTRODUCTION
THE RABBIT – ORYCTOLAGUS CUNICULUS
Chinchilla
Gerbil
Guinea pig
Golden hamster
Mouse
Rat
Rabbit
Lifespan (years)
10–12
3–4
4–8
2–3
2–3
3–4
5–12
Adult weight
400–600 g
50–60 g
750–1000 g
80–120 g
20–40 g
400–800 g
1–8 kg
Body temperature (°C)
38–39
37.4–39
38.6
36.2–37.5
37.5
38.0
38.3–39.4
Respiratory rate (breaths/min)
40–80
90–140
90–150
70–80
100–250
70–150
35–60
Pulse rate (beats/min)
100–150
250–500
130–190
280–412
500–600
260–450
130–325
Oestrus cycle (days)
41
Seasonally polyoestrous
4–6
15–17
4
4–5
4–5
No regular cycle. Induced ovulator
Age at puberty
8 months
10 weeks
M 8–10 weeks
F 4–5 weeks
6–10 weeks
6–7 weeks
8–10 weeks
4–6 months
Gestation period (days)
111
24–26
63
16
19–21
20–22
28–32
Development of young at birth
Precocial
Altricial
Precocial
Altricial
Altricial
Altricial
Altricial
Weaning age
6–8 weeks
24–27 days
2–3 weeks
3–4 weeks
3–4 weeks
3–4 weeks
4–6 weeks
Type of diet
Herbivorous
Coprophagic
Omnivorous
Coprophagic
Herbivorous
Need vitamin C
Omnivorous
Coprophagic
Omnivorous
Coprophagic
Omnivorous
Coprophagic
Herbivorous
Coprophagic
Natural behaviour
Nocturnal
Social
Nocturnal
Monogamous
Diurnal
Social
Nocturnal
Solitary
Nocturnal
Social
Nocturnal
Social
Crepuscular
Social
HANDLING AND RESTRAINT
Procedure: To restrain a rabbit
Procedure: To sex a rabbit
ADMINISTRATION OF MEDICINES
Procedure: To administer fluids or liquid medication
Procedure: To place a naso-oesophageal feeding tube
Procedure: Subcutaneous injection
Procedure: Intramuscular injection
Procedure: Intravenous injection
Procedure: Intraperitoneal injection
Procedure: To place an intraosseous catheter
GENERAL ANAESTHESIA
Action
Rationale
1. There is no need for pre-operative starvation of rabbits
1. Rabbits are unable to vomit. Starvation may cause a fatal hypoglycaemia, especially in smaller individuals. The stomach is never completely empty as rabbits exhibit coprophagia
2. Avoid dehydration by giving fluids intravenously, subcutaneously, intraperitoneally or intraosseously
2. Rabbits undergoing a routine procedure can be given a bolus of fluid
3. Keep the patient warm at all times using a heat pad or by wrapping in ’bubble wrap’ but check regularly for signs of hyperthermia
3. Hypothermia may be a problem in small animals, particularly during anaesthesia and post-operatively, as they have a large surface area in relation to their body weight. Anaesthetics depress temperature regulation and may cause vasodilation. If viscera are exposed during surgery, heat loss will be increased
4. Apply an ophthalmic lubricant to protect the eyes
4. Rabbits have bulging eyes, which are prone to drying out during anaesthesia. If ketamine is used in any anaesthetic combination, the eyes will remain central and fixed
5. Make sure that the tongue is pulled forward if the patient is not intubated
5. A rabbit’s tongue is large and may obstruct the airway
Procedure: Induction of anaesthesia
Drug
Species, dose rate and route of administration
Duration of anaesthesia
Mouse
Rat
Guinea pig
Rabbit
Fentanyl/fluanisone (Hypnorm)
0.2–0.5 ml IM
0.3–0.6 mg/ml IP
As mouse
–
0.2–0.4 ml
Sedation only
30–45 min
Fentanyl/fluanisone (Hypnorm)/diazepam
0.4 ml/kg
5 mg/kg
0.3 ml/kg
2.5 mg/kg
1 ml/kg IM
2.5 ml/kg
0.3 ml/kg IM
2 mg/kg IP
45–60 min
Fentanyl/fluanisone (Hypnorm)/midazolam*
10 ml/kg*
2.7 ml/kg*
8 ml/kg*
0.3 ml/kg IM
0.5–1 ml/kg IV
45–60 min
Ketamine/medetomidine
200 mg/kg
0.5 mg/kg
90 mg/kg
0.5 mg/kg
40 mg/kg
0.5 mg/kg
35 mg/kg
0.5 mg/kg
20–30 min
Propofol
26 mg/kg IV
10 mg/kg IV
–
10 mg/kg IV
5 min
Atipamezole
1 mg/kg IM, IP, SC, IV to reverse any combination using medetomidine
Procedure: Maintenance and monitoring of anaesthesia
Procedure: Post-operative care
SMALL RODENTS
HANDLING AND RESTRAINT
THE CHINCHILLA – CHINCHILLA LANIGERA
Procedure: To restrain a chinchilla
Procedure: To sex a chinchilla
THE GERBIL – MERIONES UNGUICULATUS
Procedure: To restrain a gerbil
Procedure: To sex a gerbil
THE GUINEA PIG – CAVIA PORCELLUS
Procedure: To restrain a guinea pig
Procedure: To sex a guinea pig
![]()
Stay updated, free articles. Join our Telegram channel

Full access? Get Clinical Tree


