The Radiograph

CHAPTER one The Radiograph


Competent radiologic practice presupposes the availability of good-quality radiographs. Familiarity with the basic principles underlying the production of radiographs is a prerequisite for the radiologist. Accurate positioning of the animal under investigation, correct exposure factors, the use of grids and other ancillary aids, and good processing technique all influence the quality of a radiograph. The use of a technique chart is essential for consistent results. Consistency is important, particularly when studies have to be repeated over time to assess the progress of a particular case. If the radiographs in such studies are not comparable, errors of interpretation are likely to occur. Radiographs may be of poor quality because of improper positioning, improper exposure technique, or poor darkroom technique. It is hazardous to attempt to interpret such radiographs.


Radiographic technique is discussed in this book only insofar as is necessary for a proper understanding of points of interpretation. The necessary detailed information on technique can be found in any of the several works devoted to this topic.


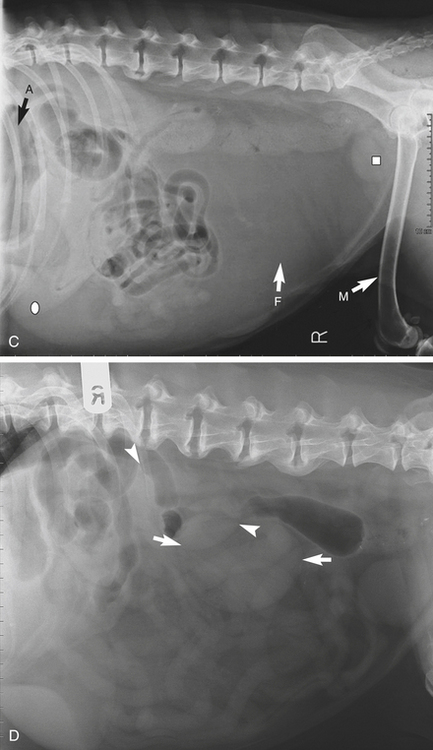
A radiograph is a composite shadow of structures and objects in the path of an x-ray beam recorded on film. Because a radiograph is, in essence, a shadowgraph, the geometric rules applicable to the formation of shadows are also valid for radiographs. Thus, the nearer the object under examination is to the film, the sharper will be its outline. Distance of an object from the film causes magnification of the resulting shadow and some distortion and blurring. The nearer the object is to the source of radiation, the greater will be the degree of magnification. The area being studied, therefore, should be placed as near to the film as possible and at a standard acceptable distance from the source of radiation, usually 100 cm (36 to 40 inches). Because the radiograph (being a shadowgraph) outlines an object in only two planes, at least two views, made at right angles to one another (orthogonal views), are required to demonstrate the object in a three-dimensional representation. Shadows are cast not only of the outline of the body, but also of structures within it (Figure 1-1).


The radiograph is not a simple shadowgraph: some of the x-rays pass directly through the body being examined. These are the useful rays because they affect the film and produce the image. Some of the incident radiation is absorbed within the body, and some is scattered. Scattered radiation reaching the film is undesirable because it causes fogging and blurring, or “unsharpness.” Fogging gives a radiograph a cloudy or hazy appearance. Structure margins are indistinct. Grids are used to reduce scatter. As rule they should be used when the part under examination exceeds 10 cm in thickness.


Fast film/screen combinations reduce exposure times and minimize movement blur. A radiograph shows not only the outline of an organ within the body but also other body structures superimposed on it and on one another.


Not all structures allow x-rays to pass through them in the same way. Dense substances, such as bone, inhibit the passage of radiation, whereas substances that are less dense, such as gases, allow the rays to pass through them virtually unchanged. In between there are substances, such as the soft tissues, that permit more radiation to reach the film than is permitted by bone but not as much as is permitted by gases. It is this differential absorption of x-rays that enables one structure to be distinguished from another. Fluoroscopy is imaging of structures in real time using x-rays and an image intensifier. There is an increased hazard with this technique. It should not replace conventional radiography.


DENSITY AND OPACITY


A radiograph is an image made up of shadows of different opacities. Subject density is the weight per given volume of a body tissue or other object. Bone is more dense than muscle, and muscle is more dense than fat. The denser an object is, the more it inhibits the passage of radiation. Radiographic opacity is a measure of the capacity of a tissue or structure to block x-rays. Where x-rays readily reach the film, the film appears black after processing. If the x-rays are prevented from reaching part of the film, the unaffected area will appear white on the processed film. Between these two extremes, various combinations of light, dark, and gray areas are produced. Radiographic opacity therefore depends on subject density; the greater the subject density, the less radiation reaches the film.


Increased opacity denotes a whiter shadow on the radiograph than would normally be expected. The term thus refers to increased subject density as reflected on the radiograph. Decreased opacity denotes a darker shadow on the radiograph than would normally be anticipated. The decreased subject density allows more radiation to reach the film, causing a greater degree of blackening.


All objects inhibit, to some extent, the passage of radiation. Structures that absorb little of the incident radiation are said to be radiolucent. X-rays readily pass through them, and they appear dark on a radiograph. Structures that inhibit the passage of most of the incident radiation are said to be radiopaque.


Increased radiolucency represents decreased subject density; increased radiopacity represents increased subject density. A radiolucent defect is an abnormal area of decreased radiographic opacity and hence of subject density within a structure.


Five radiographic opacities can be recognized:


Metallic substances are very dense, and they inhibit the passage of virtually all incident radiation. Areas of film covered by such material appear white (radiopaque) on a radiograph.


Bone is not as dense as a metallic substance. It allows little radiation to pass through it compared with other body tissues. Areas of film that have been covered by bone appear almost white on a radiograph.


Fluid inhibits the passage of more of the incident radiation than gas but not as much as bone does. A fluid opacity lies between the whiteness of a bone opacity and the blackness of a gas opacity. Fluid opacities appear gray on a radiograph. Because soft tissues consist, for the most part, of fluid, soft tissue opacity and fluid opacity appear similar. All fluid opacities appear the same. It is not possible, consequently, to distinguish radiographically among blood, chyle, transudates, and exudates.


Fat opacity falls between fluid and gas opacities. Fat may help to outline structures that would not otherwise be seen; for example, perirenal fat may outline the kidneys by providing a contrasting opacity to the kidney tissues.


Gases, including air, allow x-rays to pass freely through them. Areas of film covered by gas-containing organs, such as the lungs, appear dark (radiolucent) on a radiograph.


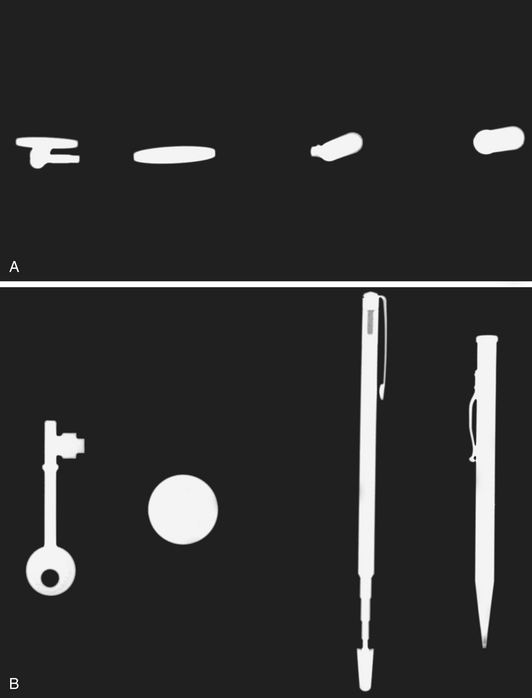
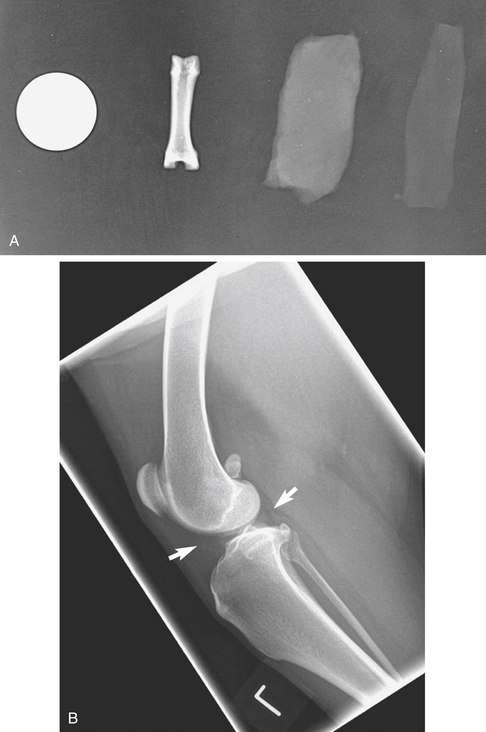
Bone, fluid, fat, and gas occur normally within the body and are said to have biologic densities. Metallic densities are introduced into the body as contrast media (explained later in this chapter), surgical implants, or foreign bodies (Figure 1-2, A to C).


image image

Figure 1-2 Radiographic opacities. A, A gas (air) shadow surrounds, from left to right, metallic, bone or mineral, soft tissue, and fat opacities. B, A lateral view of a stifle joint demonstrates the five radiographic opacities. The L marker is a metallic opacity. The femur, patella, fabellae, and tibia have bone (or mineral) opacity. The muscles have soft tissue opacity. Fat opacity (arrows) is seen within the femorotibial joint caudal to the patellar ligament and between the muscle planes. Gas (air) opacity surrounds the limb. C, A right lateral recumbent abdominal radiograph of a dog with an abdominal swelling showing the five radiographic opacities. The bladder (white square) contains fluid. The spleen (white oval) is soft tissue opacity. Fluid and soft tissue are similar in radiographic opacity. The bony skeleton has a mineral opacity (arrow M) and the right marker (R) is metallic; gas is present in the stomach (arrow A) and the intestines. The caudal abdomen is occupied by a large mass that is a fat opacity (arrow F). Recognition of radiographic opacities in this instance allows the differentiation of a fluid mass from a fat mass. This was a large intraabdominal lipoma. D, This right lateral recumbent abdominal radiograph of a clinically normal dog shows both the right kidney (arrowheads) and the left kidney (arrows). The left kidney appears larger and is therefore further away from the film/detector and is closer to the x-ray tube. The left kidney appears larger than the right because of magnification. Comparison of the renal silhouettes should only be made on a ventrodorsal projection, when both kidneys are at an equal distance from the tabletop. Spondylosis is also evident but is an incidental finding.


FACTORS AFFECTING IMAGE QUALITY


Many factors can affect the quality of a radiographic image:


STANDARD VIEWS


For changes in outline, position, and opacity to be appreciated, it is essential that the radiologist be familiar with the radiologic appearance of normal structures—that is, radiologic anatomy. If one is unfamiliar with the normal appearance, one cannot appreciate aberrations from it. Because almost any structure can be rotated through 360 degrees, it would be virtually impossible to become familiar with all the possible projections that could be produced from any given organ. Consequently, standard views of each part of the body are used. These usually consist of two views made at right angles to one another so that a three-dimensional impression is gained of the structure under study.


Agreed terms are used to describe the standard projections. The terminology used in this book is that suggested by the Nomenclature Committee of the American College of Veterinary Radiology. The committee recommended that veterinary anatomic directional terms should be those listed in the Nomina Anatomica Veterinaria. Radiographic projections are described by the direction in which the central ray of the primary beam penetrates the body part of interest—from the point of entrance to the point of exit. The subject area of interest should be as close to the film or detector as possible. Structures within the body that are further away from the film are magnified (Figure 1-2, D).


Definitions


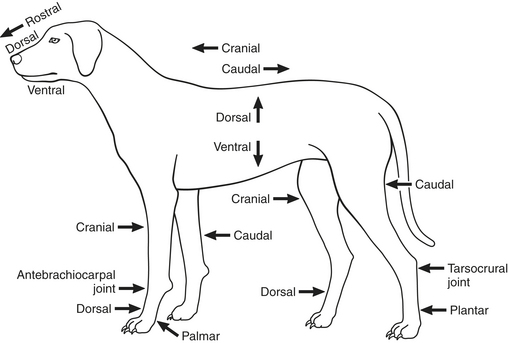
The meanings to be ascribed to the different directional terms are as discussed in the following sections (Figure 1-3).


BEAM DIRECTION


The direction of the x-ray beam is described from its point of entry into the body to its point of exit. For example, a right-left lateral recumbent view means that the animal is lying on its left side, and the x-ray beam enters the body through the right side and exits through the left side. This is generally termed a left lateral recumbent (LLR) view. A ventrodorsal (VD) view means that the x-ray beam enters the body ventrally and exits dorsally to reach the film. A dorsoventral (DV) view indicates the opposite. Mediolateral means the x-ray beam enters a limb from the medial side and exits on the lateral side. Most so-called lateral radiographs of the limbs are taken in a mediolateral direction. In a lateromedial view, the x-ray beam enters a limb from the lateral side and exits on the medial side.


Fluid level refers to an interface between fluid and gas. A fluid level is usually seen on a standing lateral radiograph using a horizontal beam when there is a mixture of fluid and gas within a viscus. The fluid line is always horizontal. A standing lateral view is a lateral view made with the animal in the standing position and with the x-ray beam directed horizontally. A fluid level may also be seen on a decubitus view using a horizontal beam. The term decubitus is used when a horizontal beam is used with the animal in a recumbent position. It is always necessary to use a horizontal beam to demonstrate a fluid level.


Appropriate safety measures should be adopted irrespective of beam direction, and special care is needed when horizontal beams are in use.


CONTRAST MEDIA


Contrast media are frequently used as diagnostic aids. A contrast medium is a substance introduced into the body to outline a structure or structures not normally seen or poorly seen on plain radiographs.


Radiographic contrast agents may be either positive or negative. Negative contrast agents are gases; the most commonly used gases are air, carbon dioxide, and nitrous oxide. These agents are used in imaging the urinary bladder and proximal or distal gastrointestinal tract. Negative contrast studies of the pericardial and peritoneal spaces have been described but have now been superseded by ultrasound. Positive radiographic contrast agents may be particulate suspensions or water soluble. Barium sulfate is the contrast agent used in suspensions, and a paste is used to evaluate the gastrointestinal tract. It is not suitable for use in body cavities or joints because it will provoke an intense granulomatous reaction. Water-soluble positive contrast agents are divided into two classes, nonionic and ionic, based on whether the molecules dissociate when in solution. Ionic contrast agents are hyperosmolar compared with plasma, whereas the nonionic agents have an osmolarity closer to that of plasma. These agents can be injected intravenously or introduced into almost any body cavity to improve contrast and detect a lesion. Only the nonionic agents may be injected into the subarachnoid space to outline the spinal cord in myelography.


A filling defect is a space-occupying mass within a hollow organ (see Chapter 2, p.154). Contrast medium fails to fill the organ fully at the site of the mass (defect). A plain radiograph is one made without any contrast agent.


VIEWING THE RADIOGRAPH


Radiographs should be viewed under optimal conditions. A room with subdued lighting is best. The radiograph is placed on a viewing box, or illuminator, which has fluorescent lighting. This device provides an even light intensity over the entire film. Any other method of viewing is unsatisfactory. For anatomic reasons, the entire radiograph does not transmit an even intensity of light. Thin parts of the body will appear darker on the radiograph than will thicker parts. It is useful to have a bright light available to give added illumination to the darker parts. The standard viewing box is designed to illuminate the largest radiographs in common use. When smaller films are viewed, light coming from the viewing screen around the film may cause troublesome glare. Masks are available to adapt illuminators to different sizes of film. Masks can be homemade from dark cardboard or other suitable material. Viewers with varying masking devices are also available. Direct light falling on the illuminator makes viewing difficult. The use of a magnifying glass is sometimes helpful in detecting fine radiographic detail, particularly in the study of bone structure. Increasing the distance between the viewer and the radiograph is often helpful in recognizing diffuse borders or subtle changes.


VD and DV radiographs are, by convention, placed on the illuminator with the left side of the animal’s body to the radiologist’s right; this positioning is used throughout this text. Lateral views should be displayed with the animal’s head facing toward the viewer’s left. Always placing radiographs on the illuminator in the same way facilitates ready recognition of anatomic structures.


Systematic Approach


The radiologist should adopt a systematic approach to the viewing of radiographs. This approach will ensure that all the radiograph—not just the area in which a lesion is believed to exist—is examined on each occasion. Significant changes may be demonstrated away from the area of immediate interest, and these may well be overlooked if the radiograph is not systematically examined. It is especially important that the viewer acquire a habit of making sure that all structures that should be present are indeed there.


It is good radiographic practice to have the areas of interest located at the center of the film. At this location there is the least distortion of the image, and structures on either side can be seen. Because the center of the radiograph tends to attract the eye initially, it is probably good practice to examine the periphery of the radiograph first and systematically progress to the center. Each structure encountered should be noted for position and normality or abnormality. The center of the radiograph is examined last. If an obvious lesion at the center of a radiograph is examined first, there is a tendency to give only a cursory examination to the rest of the film, particularly if the lesion seen is consistent with a tentative diagnosis. Any method of viewing that ensures a full examination of the entire radiograph is acceptable.


Some radiologists prefer to examine radiographs “cold,” that is, without any knowledge of the clinical picture. After a preliminary examination, the radiograph is then evaluated in the light of the clinical and other findings. Preconceived notions about a case may militate against an objective assessment of a radiograph.


Beginners tend to commit two kinds of errors. Either they miss something that should have been seen, or they “overread” the radiograph. Indeed, these errors are not always confined to beginners. Overreading a radiograph means drawing conclusions from it that are not warranted on the basis of objective evidence. This is most likely to happen if one has been involved in the clinical assessment of the case and already reached a tentative diagnosis. A definite tendency exists for one to see what one expects or wants to see.


Good film reading involves several stages. The first step is to identify all the structures on the radiograph, noting features that appear to be abnormal. The second step consists of elaborating a list of possible explanations for the abnormalities seen. The third step is to correlate the radiographic findings with the clinical signs and with the results provided by other ancillary diagnostic tests. The final step is to produce a list of possible diagnoses, arranged in order of probability, taking all the factors into consideration—that is, a list of differential diagnoses.


The best radiologic practice combines knowledge of normal radiographic anatomy with an understanding of physiologic, pathologic, and pathophysiologic processes; consideration of the clinical picture and the results of other diagnostic procedures; and an element of experience. It must be appreciated that the body responds to disease processes in a limited number of ways. Different diseases may produce similar radiologic changes. The same disease does not always manifest itself in the same way. One disease process may be superimposed on another. The use of radiologic signs, provided that the processes that lie beneath them are understood, greatly facilitates radiographic interpretation.


The more radiologic signs that are seen to support a diagnosis, the more probable that diagnosis becomes. Instant diagnoses, based on the recognition of one or two specific signs or on the basis that one has seen a condition before, are discouraged. The ability to read radiographs thoroughly and accurately comes only with practice and attention to detail. The formulation of a list of differential diagnoses, placed in order of probability, is the function of the radiologist, who must be prepared to reconcile his or her observations with the other evidence available.

Stay updated, free articles. Join our Telegram channel

May 27, 2016 | Posted by in ANIMAL RADIOLOGY | Comments Off on The Radiograph

Full access? Get Clinical Tree

Get Clinical Tree app for offline access