1 The ophthalmic examination
A full ophthalmic examination should be performed on all animals presenting with an ocular complaint. To perform this properly it is important to have a standard approach to all patients together with appropriate facilities and equipment.
The basic parts of the ophthalmic examination are:
Table 1.1 Facilities and equipment required for the ophthalmic examination
| General practice | Those with an interest in ophthalmology |
|---|---|
| All items listed left plus: |
Disposable items required for ophthalmic examination are:
HISTORY
THE OPHTHALMIC EXAMINATION
Hands-off examination
While the history is being taken the patient should be observed. Dogs are allowed to wander off the lead and investigate the consulting room while cats are encouraged out of their baskets and then watched from a distance. It is important to look at the behaviour of the pet, along with the gross appearance of the eyes and face. Signs of ocular discomfort – blepharospasm, increased lacrimation or other discharge, symmetry of the eyes and face – sunken or small eyes, enlargement of the globe, periorbital swellings or squints for example. Clues might inform us that the animal has been rubbing – periorbital hair loss and erythema or saliva staining on the front legs where the animal licks then rubs the face might be evidence of self-trauma. Basic assessment of the visual ability of the patient can be undertaken at this time – blind animals will often stay close to the owner and not move around the room, while if they do move they are often very cautious, sniffing the environment and exhibiting a high stepping gait.
Hands-on examination
Schirmer tear test readings
Schirmer tear test readings should be taken before the eyes are cleaned or handled further. Commercial tear testing strips are used (colour bar calibrated strips are the easiest to use and are available from Schering-Plough). The strips come in sterile plastic wallets. The strips should be bent at the notch while still in their plastic wallet (to prevent sweat and grease from hands interfering with the readings). The packet is opened and each test paper is held at the distal end. The shorter piece is placed in the ventral conjunctival sac half to two-thirds along from the medial canthus (i.e. out of the way of the third eyelid) (Figure 1.1). The strip is left in position for 1 minute before removing it and immediately reading the level of wetting on the scale (see Table 1.2). It is easier to hold the patient’s eye closed to prevent the strip from falling out prematurely. Topical anaesthetics are not used prior to measurement.
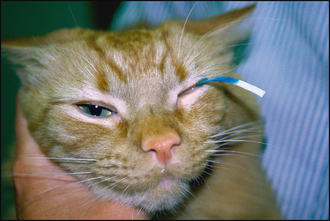
Table 1.2 Schirmer tear test readings in dogs and cats
| Dog | Cat | |
|---|---|---|
| Normal | 15–25 mm/min | |
| Borderline | 10–15 mm/min | |
| Keratoconjunctivitis sicca | <10 mm/min |
Basic vision testing and neurological tests
1. Menace response
A threatening gesture will cause the animal to blink and pull away slightly. The reflex tests the visual pathway (optic nerve, cranial nerve II) and the ability to close the lids (facial nerve, cranial nerve VII), i.e. can the animal see you and, if so, can it react and blink normally? It is important that the stimulus is visual only, and does not generate air currents which would trigger sensory nerve endings on the cornea and skin (trigeminal nerve – cranial nerve V). For this reason some people advocate testing from behind a clear Perspex screen, but in reality this is not really necessary. So long as the hand movements involve just a couple of fingers rather than waving the whole hand in front of the eyes there should not be any confusion over the actual reflex being tested. It is important to stimulate both from directly in front of the eyes and also from other angles – above and below plus medial and lateral. The fellow eye can be covered with your other hand to assess each eye separately.
Stay updated, free articles. Join our Telegram channel

Full access? Get Clinical Tree


