CHAPTER 1 The Acquisition and Management of Cytology Specimens
For the microscopic examination of tissue, one important factor that affects the accuracy of observation is specimen management. The successful use of aspiration cytology depends on several interrelated procedures: acquisition of a representative specimen, proper application to a glass side, adequate staining, and examination with a high-quality microscope. A deficiency in one or more of these steps will adversely affect the yield of diagnostic information. The objective of this chapter is to provide general recommendations for managing samples in a way that ensures they are diagnosed accurately.
GENERAL SAMPLING GUIDELINES
Before executing any sampling procedure, a cytology kit should be prepared and dedicated for that purpose. An inexpensive plastic tool caddie works well. Suggested contents are listed in Box 1-1. Six or more slides are placed on a firm, flat surface such as a surgical tray immediately before initiating the sampling procedure. The surface of the glass slide should be routinely wiped with a paper towel, or at least on a shirtsleeve, to remove “invisible” glass particles that interfere with the spreading procedure.
Box 1-2 lists suggested indications for the application of diagnostic cytology. The collection of specimens for cytologic evaluation from cutaneous and subcutaneous tissues and abdominal organs and masses in smaller animals is generally accomplished with a 20- or 22-gauge, 1- to 1½-inch needle firmly attached to a 6- or 12-cc syringe. For more difficult to reach internal organs, a 2½- to 3½-inch spinal needle is used. The added length amplifies the area for cell collection and enhances the diagnostic yield. Literally, cores of hepatic tissue can be obtained with the use of a longer needle. The stylet can be left in place as the cavity is entered to avoid contamination during the “searching” process of locating the tissue of sampling interest. Coating the needle and syringe hub with sterile 4% disodium EDTA before aspiration biopsy sampling of vascular tissues, notably bone marrow, reduces the risk of clot formation that will compromise the quality of the cytologic specimen. For the relatively inexperienced, this may be a practice to consider routinely when sampling any tissue. Clotted specimens are a frequent cause of cytologic preps of poor quality.
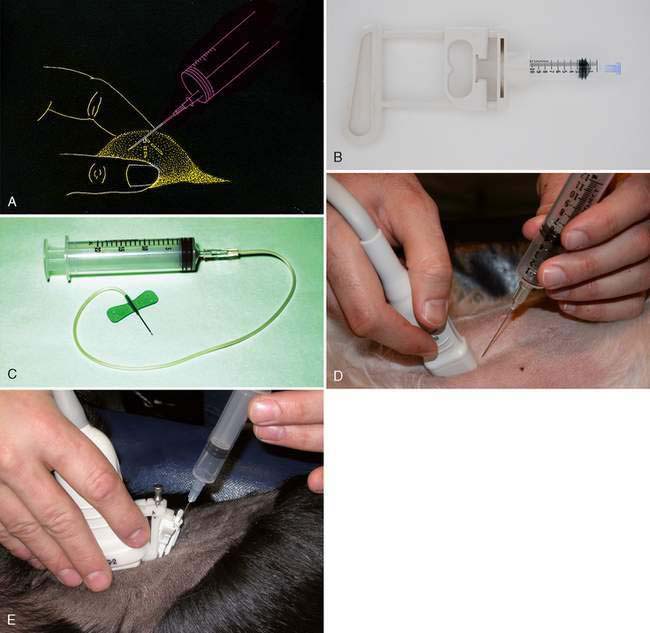
The general steps for obtaining a cytologic specimen are illustrated in Figure 1-1A. The tip of the needle is inserted into the tissue of interest, the plunger is retracted slightly (½ to 1 cc of vacuum), the needle advanced and retracted in several different directions, the plunger released, the needle withdrawn, and the specimen placed on a glass slide or in an EDTA (purple-topped) tube as appropriate. Commercial aspiration guns (Fig. 1-1B) are available that can be loaded with various size syringes (Fig. 1-1B). The syringe plunger sits within the trigger, which allows for easier and more stable retraction. If fluid is obtained from a mass lesion, the site is completely drained, the needle withdrawn, the fluid placed in an EDTA tube, and the procedure repeated with a new needle directed at firm tissue. Both specimens are examined microscopically. To enhance operator flexibility, intravenous extension tubing (Extension Set, Abbott Laboratories) can be used to attach the needle and syringe. Positioning and redirection of the needle is easier and accommodates patient movement (Fig. 1-1C).
Aspiration is not a prerequisite for obtaining a cytologic specimen. A technique based on the principle of capillarity, referred to as “fine-needle capillary sampling,” can be performed by placing a needle into the lesion with or without a syringe attached (Mair et al., 1989; Yue and Zheng, 1989). The technique has been shown to have diagnostic sensitivity similar to that of aspiration biopsy when used to sample a variety of tissues. Its major advantage is to reduce blood contamination from vascular tissues such as liver, spleen, kidney, and thyroid. Cells are displaced into the cylinder of the needle by capillary action as the needle is incompletely retracted and redirected into the tissue three to six times. Personal preference is justified when deciding between aspiration and nonaspiration sampling for collection of the specimen. Through trial and error the operator may determine that each has value for sampling different tissues.
DIAGNOSTIC IMAGING GUIDED SAMPLE COLLECTION
Cytology sample collection can be performed via the guidance of fluoroscopy, ultrasound, and computed tomography. Ultrasound guidance is the preferred method of sampling collection because of its widespread availability and portability. In addition, ultrasound provides real-time monitoring of precise needle placement. The technique and indications are detailed elsewhere (Nyland et al., 2002a). Ultrasound-guided fine-needle aspiration biopsy (FNAB) is indicated for cytologic evaluation of nodules and masses detected on ultrasound and to evaluate organomegaly when a diffuse cellular infiltrate such as lymphoma and mast cell tumor is suspected. Most sarcomas exfoliate sparsely or not at all. A surgical or ultrasound-guided cutting needle biopsy is recommended if the FNAB sample is not diagnostic. Ultrasound-guided FNAB can be performed in most patients without chemical restraint or local anesthesia. If chemical restraint is needed, agents that promote panting should be avoided because this will lead to excessive movement and gas ingestion (Nyland et al., 2002a).
Biopsy Guidance
Ultrasound-guided FNAB can be performed by freehand technique or with the aid of a biopsy guide fastened to the transducer. Freehand technique consists of holding the transducer in one hand and inserting the needle with the other at an oblique angle to the long axis of the transducer but still within the scan plane (Fig. 1-1D). This technique requires more skill but allows greater flexibility. If the needle cannot be seen during the procedure, slightly moving the transducer into the path of the needle and gently agitating the needle or injecting microbubbles in saline solution through needle will usually allow the needle’s position to be determined. Better visualization of the needle can be achieved by ensuring needle placement within the focal zone of the transducer. The biopsy guide holds the needle firmly and directs the needle along a predetermined course within the scan plane of the ultrasound transducer (Fig. 1-1E). This may be easier for the beginner as the lesion is more easily and reliably sampled; however, the biopsy guide limits transducer movement.
Equipment and Technique
The most commonly used needles are 20- to 23-gauge hypodermic and spinal needles. These are inexpensive and long enough to pass through the biopsy guide and still reach most lesions. Larger-bore needles are easier to visualize, and they generally increase the reliability of sample collection but increase the risk of hemorrhage. A larger-bore needle is used when aspirating viscous fluids. Once the needle is in placed in the lesion, the stylet is removed and the needle is moved up and down within the lesion until a small amount of fluid is seen within the hub of the needle (Fagelman and Chess, 1990). This method generally produces a sample with less blood contamination. Alternatively, a syringe can be attached to the needle for better handling—a few milliliters of negative pressure can be applied while moving the needle up and down. The negative pressure should be released before removing the needle from the lesion. When possible, two or three samples should be obtained from each biopsy site; a new needle is used for each sample taken. A large lesion may have a necrotic center; therefore samples should also be collected from the margins.
Complications
Complications associated with ultrasound-guided FNAB are uncommon and depend on the experience of the operator, size of needle, and type of lesion aspirated (Léveillé et al., 1993). Patients should be evaluated for bleeding disorders before FNAB, especially when highly vascular tissues are sampled. Occasional needle tract tumor implantation has been reported in animals (Nyland et al., 2002b; Liu et al., 2007). In humans, implantation is associated with the used of large-bore needles but is rare with 22-gauge or smaller aspiration needles. Because pneumothorax can develop following FNAB of the thoracic structures, the patient should frequently be observed for 12 to 24 hours after the procedure. Hypertension and paradoxical hypotension has been reported in dogs following ultrasound-guided FNAB of pheochromocytoma of the adrenal glands (Gilson et al., 1994). Therefore FNAB of the adrenal gland must be performed cautiously when that tumor is suspected.
MANAGING THE CYTOLOGIC SPECIMEN
Compression (Squash) Preparation
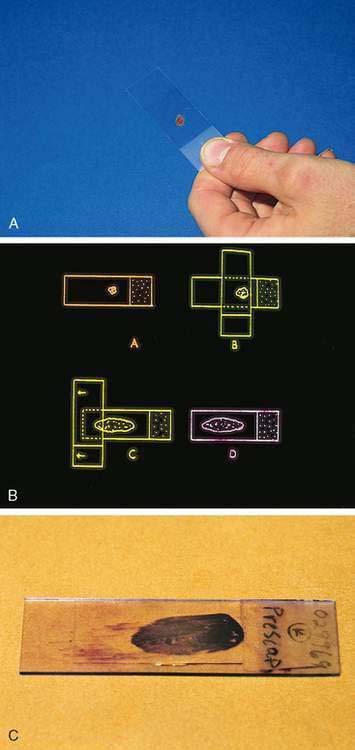
The compression (squash) technique is an important and adaptable procedure for the management of cytology specimens that are semisolid, mucus-like, or pelleted by centrifugation. A small amount of material is placed on a clean glass slide approximately ½ inch (1 cm) from the frosted end (Fig. 1-2A). A second clean glass slide is placed over the specimen at right angles. The specimen is gently but firmly compressed between the two glass slides and in the same continuous motion the top slide is pulled along the surface of the bottom slide, directing the material away from the frosted end (Fig. 1-2B). The objective is to redistribute the material, turning a multicellular mass into a thin monolayer ideal for maximal flattening of individual cells and even stain penetration. The compression preparation thus optimizes the specimen for microscopic examination of cell morphology. A properly prepared glass slide is characterized by a feather-shaped (oblong) area with a monolayer end referred to as the “sweet spot” (Fig. 1-2C). A common mistake is the initial placement of excess sample on the glass slide, resulting in a thick preparation that is not possible to adequately examine microscopically.
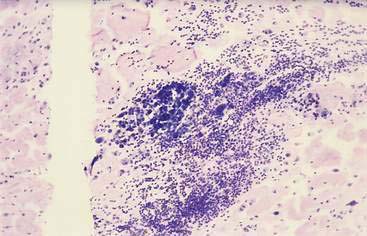
The term sweet spot refers to that area around the center mass of a baseball bat, tennis racket, or golf club that is the most effective part with which to make a successful hit. The same concept applies to the location of the cytologic specimen if it is to make a successful diagnostic hit. Cellular material too close to the ends or edges of the slide cannot be properly examined. When slides go through an automated stainer, its guiding tracks can scrape off diagnostic material that is too close to the end of the slide (Fig. 1-3). Material placed too far from the end the specimen may not be exposed adequately to the stain. The ends and longitudinal edges of the slide cannot be adequately examined because of the inability of the 40× dry and 50× and 100× oil objectives to properly focus at those extremes.
Management of Fluids
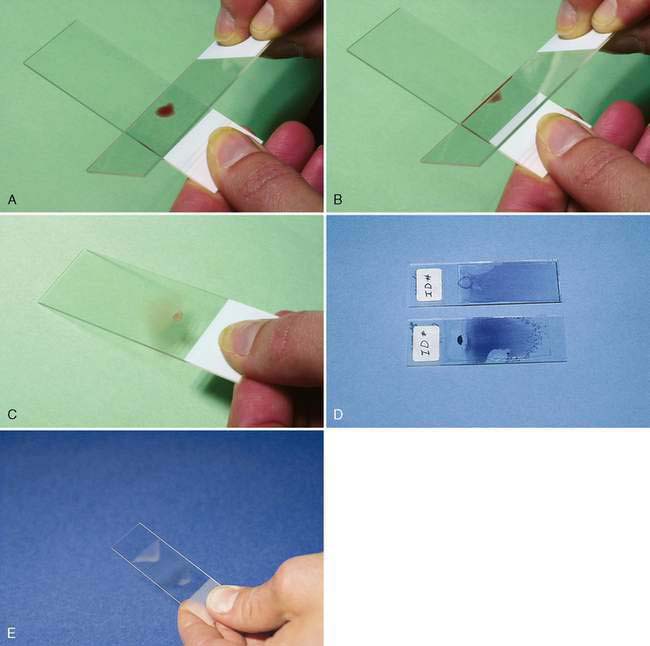
A fluid specimen should be immediately placed in an EDTA tube to prevent clot formation. Fluid with a plasma-like consistency can be handled in a fashion similar to the preparation of a blood smear. A small drop of fluid is placed approximately ½ inch (1 cm) from the frosted end. The angled edge of a second glass slide, acute angle facing the operator, is backed into the specimen and drawn away from the frosted end as the fluid begins to spread along its edge (Fig. 1-4A-C). The speed at which the slide is moved depends on the viscosity of the sample—the thinner the specimen, the faster the slide should be moved to distribute the specimen evenly and thinly. For a viscous fluid specimen such as synovial fluid, the spreader slide is moved with a slow and even movement.
< div class='tao-gold-member'>
Stay updated, free articles. Join our Telegram channel

Full access? Get Clinical Tree


