Chapter 15 Technical Aspects of Fluid Therapy
Routes of fluid administration
Subcutaneous
Subcutaneous fluid administration (hypodermoclysis) is a convenient and inexpensive route of maintenance fluid therapy for patients that do not require vascular access for other purposes. It should be reserved for relatively stable animals because peripheral vasoconstriction in illness may limit absorption of fluids and prevents successful use of the subcutaneous route. The fluid should be nearly isotonic (200 to 400 mOsm) to limit discomfort and complications. Although sodium-free or low-sodium fluids are tolerated by many human patients, the composition of fluid administered subcutaneously should ideally be comparable with that of extracellular fluid because electrolyte-free or hypertonic fluids are associated with higher complication rates.2,24,68 In humans, subcutaneous fluids can be supplemented with potassium at a concentration up to 40 mEq/L and in the author’s experience this concentration is usually well-tolerated by companion animals.70
The volume administered at any single site is limited by the distensibility of subcutaneous tissue. Therefore fluids are usually administered in the subcutaneous space over the dorsal neck and cranial trunk, where loose connective tissue is abundant. Although the addition of hyaluronidase to fluids for hypodermoclysis therapy in humans increases the rate of absorption of fluid, there is no evidence that the addition of this enzyme improves patient tolerance.12,68 However, it may be of value in dogs and cats with limited distensibility of their subcutaneous tissue when rapid administration is necessary because of time constraints. The fluid should be warmed to body temperature before administration to limit patient discomfort and enhance local blood flow and absorption. The skin should be cleansed with a cotton ball and alcohol to remove debris from the surface. Fluid may be administered with a syringe and 22-gauge needle in small animals or by gravity flow with a fluid administration set through a 20- to 18-gauge needle in larger animals. One company markets a subcutaneous catheter (Endo-Sof, Global Veterinary Products, New Buffalo, Mich.) designed to be implanted for repeated use. Although the catheter material is inert and can stay in place for a long time, failure to adhere to strict aseptic technique will result in bacterial contamination.
Intravenous catheters
Catheter product designs currently available include winged needle, over-the-needle, through-the-needle, and those placed through an introducer or over a guide wire (Table 15-1). Selection is influenced by operator experience, availability, cost, and patient requirements. Smaller diameter catheters and those made of soft material are less traumatic to veins than large or stiff catheters. For routine maintenance therapy, the smallest gauge catheter that provides adequate flow should be used. If rapid administration of fluid is required, the largest gauge size possible should be used (Table 15-2). The maximal fluid flow rate increases as the radius of the catheter lumen is increased. For small catheters (<14 gauge), this relationship is linear, whereas for larger catheters, flow rate increases geometrically with size and is proportional to the lumen radius raised to the fourth power (r4).25 Short over-the-needle catheters are preferred for rapid intravenous access in emergencies because they can be inserted rapidly and are available in sizes up to 8.5 French.
Table 15-1 Intravenous Catheter Design
| Style | Advantages | Disadvantages |
|---|---|---|
| Winged steel needle | Can be inserted rapidly with little to no skin prep | Suitable for short-term use only |
| High risk of extravasation | ||
| Over-the-needle (OTN) | Well suited for peripheral vein | Most brands cannot use for central access |
| Inexpensive | Cannot be tunneled very far subcutaneously | |
| Technically easy to use | Stiff materials more damaging to veins | |
| Multiple veterinary distributors | Unreliable for aspirating blood Fluid flow affected by limb position | |
| Over-the-needle with guide wire | Can be inserted into small/difficult veins | Same as OTN |
| Arterial catheters useful for dorsal pedal artery | More expensive than OTN | |
| Through-the-needle (TTN) | Can be used for central access | Technically more difficult to insert |
| Useful for repeated blood collection | Greater potential for hemorrhage than OTN type | |
| Can be tunneled subcutaneously | More expensive than OTN | |
| Made of softer/less irritating material | ||
| Less likely to produce thrombophlebitis over time | ||
| Through introducer sheath with or without guide wire | Can be used to achieve central venous access | Same as TTN, plus: |
| Can insert relatively large/multilumen catheter | Requires drape/sterile field/sterile gloves | |
| Can create a long subcutaneous tunnel | ||
| Catheter material may be very soft (silicone, polyurethane) | ||
| Can be placed in veins too difficult for TTN-style catheter |
Table 15-2 Suggested Intravenous Catheter Gauges
| Weight | Jugular Vein (Through-the-Needle) | Limb Vein (Over -the-Needle) |
|---|---|---|
| Maintenance Therapy | ||
| <5 kg | 22 | 24-20 |
| 5-15 kg | 22-19 | 22-18 |
| *15 kg | 19-16 | 20-18 |
| Resuscitation | ||
| <5 kg | 22-19 | 22-18 |
| 5-15 kg | 19-16 | 18-14 |
| *15 kg | 16-14 | 16-10 |
Through-the-needle catheters
Through-the-needle style catheters are usually long and provide several advantages over short, over-the-needle style catheters. Body position and movement do not affect the rate of fluid flow when the tip of the catheter is positioned in a deep or central vein. Multiple blood samples may be withdrawn easily from these catheters. They may be anchored securely to the skin and tunneled extensively through subcutaneous tissue and are therefore less likely to conduct surface bacteria into a vein than are shorter catheters.51,57 However, small vein cannulation is often more difficult than with over-the-needle catheters, and the risk of catheter or air embolization during catheterization is greater.
Guided catheters and peripherally inserted central catheters
Central venous catheters designed for insertion into a human internal jugular or subclavian vein use almost always use a guide wire placement technique to increase the likelihood of successful cannulation. Because they are composed of soft material, they either incorporate a wire stylet or are threaded over a preplaced guide wire using the technique of Seldinger.72 Some of the catheters marketed for use in humans are suitable for use in dogs and cats (e.g., Arrow Pediatric Central Venous Catheterization Sets, Arrow International). Some guide wire catheters are marketed specifically for use in dogs and cats (e.g., Mila International, Florence, Ky.; Global Veterinary Products). The guide wire technique allows central vein access via insertion into veins that may not be successfully cannulated otherwise. Other peripherally inserted central catheters (PICCs; Mila International, Global Veterinary Products) are inserted through a short, larger introducer sheath with or without a guide wire. A major advantage of these catheter designs is the availability of double or even triple lumen products that allow greater vascular access through a single catheter.
Catheter composition
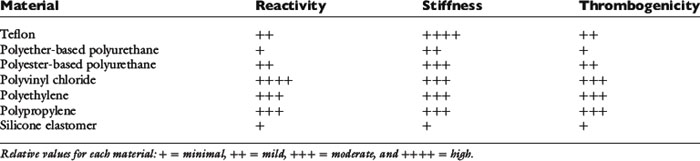
Catheter composition affects handling characteristics during insertion and influences the potential for thrombosis and phlebitis. Widely used catheter materials include polyvinyl chloride (PVC), polyethylene, polypropylene, polyurethane, silicon elastomer (Silastic), tetrafluoroethylene (TFE Teflon), and fluoroethylene-propylene (FEP Teflon) (Table 15-3). These materials are chemically inert, but leaching of plasticizers and stabilizing agents from some plastics probably contributes to the development of phlebitis, especially in small veins with low blood flow.63,75,85 Silicone elastomer catheters are the most chemically inert, whereas PVC, polypropylene, and polyethylene are the most reactive. Teflon and polyurethane are intermediate in reactivity. Some catheters composed of more irritating material are coated with silicone elastomer to reduce their reactivity. Catheter thrombogenicity is related not only to chemical reactivity but also to the stiffness of the material and the smoothness of its surface.18,33 Teflon is the stiffest material; polypropylene, PVC, and polyethylene are more flexible. Stiff catheters are easier to pass through the skin and subcutaneous tissues but are more prone to kinking and more likely to damage vessel walls and cause thrombophlebitis. Polyurethane elastomer (e.g., Vialon, Becton Dickinson, Franklin Lakes, N.J.) and silicone elastomer catheters are much softer and more flexible. Silicone elastomer catheters are so flexible that they are difficult to introduce into a vein without a stylet or guide wire.
Many brands of catheters are made radiopaque by the addition of heavy metal salts (barium or bismuth) to the plastic. When mixed uniformly into the material, these salts increase the roughness of the catheter surface and increase the risk of thrombosis.33 If embedded within the wall of the catheter, or if the catheter is coated with another, less thrombogenic material (e.g., silicon elastomer), this risk is lower. Heparin coating may significantly reduce catheter thrombus formation, at least for 1 to 2 days.67,74 Some manufacturers have developed antibiotic-coated catheters that appear to reduce the risk of catheter-associated sepsis.27,43,45 Examples of antiseptics either coated onto or impregnated into catheters include chlorhexidine-silver sulfadiazine and rifampicin-miconazole.27,43
Vein selection
Risk of thrombosis
There is a risk of thrombosis whenever a vein is cannulated. Thrombosis is more likely in small veins with low blood flow or when the intravascular portion of the catheter traverses a mobile joint. Some specific diseases such as preexisting phlebitis, glomerulonephritis, protein-losing enteropathy, autoimmune hemolytic anemia, and any disorder that causes systemic inflammation are complicated by increased risk of serious thrombosis and pulmonary thromboembolism.21,37,42,62 Intravenous catheterization in these animals is probably accompanied by a higher risk of clinically significant thrombosis than in other diseases. It may be advisable to avoid venous catheterization in these animals when possible. When catheterization is unavoidable, one should use short, soft, small diameter catheters that are removed as soon as possible. Compared with catheterization of peripheral veins, catheterization of the jugular vein in companion animals is probably not an independent risk factor for venous thrombosis and pulmonary thromboembolism, but the consequences of thrombosis in that location are more apparent and severe. Cats with aortic saddle thrombi have poor blood flow to their pelvic limbs and devitalization of those tissues. Pelvic limb vein catheterization in these animals is associated with a high risk of venous thrombosis and infection and must be avoided.
Catheter placement
Skin preparation
1. A wide clip centered on the intended venipuncture site is performed. A No. 40 blade is used to obtain a close cut. The clipper blade must be well lubricated and held parallel to the skin (not raked across it) to limit clipper burn, and the coat is clipped sufficiently far from the point of insertion so that there is no risk the catheter will touch hair during the procedure. If it is not possible to clip a sufficiently wide area, consider wrapping the appendage or neck with a temporary bandage to hold down the hair coat and keep it out of contact with the catheter.
2. Wash your hands and apply a germicidal lotion (e.g., Avagard [3M, St. Paul, Minn.], Citrus II [Beaumont Products, Kennesaw, Ga.], IC Lotion [R&R Lotion, Scottsdale, Ariz.], or Purell [GOJO Industries, Akron, Ohio]). Don a clean examination glove on the dominant hand using a “no touch” technique. Treat this glove as though it were sterile, and do not touch its fingers with your bare hand when removing it from the container.
3. Local anesthesia with subcutaneous lidocaine often facilitates catheterization. Although some animals react to the transient sting of injected lidocaine, this is often less stressful than the sensation produced by a large-gauge catheter being forced through the skin. Local anesthesia also provides the option of making a facilitation incision at the venipuncture site (see the Percutaneous Facilitation Procedure section). If local anesthesia is desired, it should be done immediately after clipping to allow time to take effect while the skin is prepared. The skin is wiped once with an alcohol-soaked cotton ball, and the venipuncture site is anesthetized with 0.1 to 0.5 mL of lidocaine/bicarbonate 9:1 mixture administered subcutaneously. By mixing nine parts of lidocaine with one part of sodium bicarbonate solution, the sting of lidocaine is reduced.53,64 If made in advance, the lidocaine/bicarbonate mixture should be used within 1 month because the lidocaine in this mixture degrades at a rate of approximately 11% per week.82
4. The skin must be cleaned for at least 2 and preferably 3 minutes with cotton balls freshly soaked with the surgical scrub of choice. Do not use containers of premade antiseptic-soaked gauze or cotton balls; people reaching into the container with their bare hands contaminate these. Most antiseptic soaps require continuous wet contact for that entire time to be effective. This means that there is no rinsing with alcohol or water between scrubs until the full 2 to 3 minutes have elapsed. Frequent changing of the cotton balls facilitates removal of surface debris. The following antiseptic agents are useful:
5. Residual soap solution is removed from the skin and surrounding hair with cotton balls or gauze sponges soaked in alcohol, hydrogen peroxide, sterile water, or sterile saline solution. Soap left on the skin and coat will cause dermatitis—remove all of it.
6. If desired, the skin may be painted with a povidone-iodine solution or an iodine tincture. The solution is allowed to dry before catheter insertion.
Percutaneous catheterization
Winged needle catheters
Materials Needed
2. Two clean latex examination gloves
3. One roll of 1-inch white tape
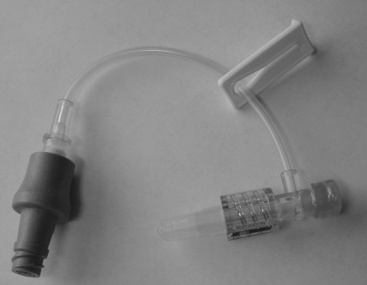
4. One catheter injection cap, intravenous tubing set, syringe filled with drug or intravenous solution, catheter “T” piece, or other needleless injection site device (e.g., Interlink connectors, Baxter Healthcare, Deerfield, Ill.; CLAVE or CLC 2000 connectors, ICU Medical, San Clemente, Calif.; Abbott Laboratories, Abbott Park, Ill.) (Figure 15-1)
5. Single dose of povidone-iodine ointment applied on a sterile gauze sponge (if the needle is to remain in place unobserved)
Procedure
1. Because this device is intended for short infusions and because the stainless steel needle may be less likely to drag surface contamination into the wound, skin preparation may be minimal. Although not essential, clipping the hair at the injection site facilitates visualization of the vein for needle placement. Whether the coat is clipped, wipe the area once with alcohol-soaked cotton balls or gauze to remove dander and flatten the coat.
2. Wash your hands, and put on clean examination gloves.
3. Flush the catheter with intravenous fluid or drug solution to purge air from the system. Disconnect the syringe from the tubing, and hold the catheter by its “wings” in your dominant hand. To prevent fluid from draining out of the system, hold the tubing coiled in the same hand, with the Luer adapter end held level with the needle tip.
4. After an assistant occludes the vein, tense the skin slightly with the opposite hand to stabilize. Do not touch the needle shaft or the skin at the intended point of insertion.
5. Hold the catheter by the plastic wing(s) with the bevel facing up, and push it through the skin and into the vein. There are two technique options:
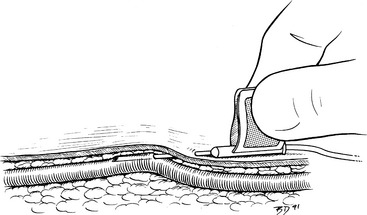
6. Blood flows into the catheter tubing when the vein is entered. Advance the needle fully into the vein. Lift the needle slightly as it is advanced, a technique that is important for any venipuncture, to minimize the risk of penetrating the vessel wall (Figure 15-2).
7. The assistant should immediately release the pressure on the vein.
8. Attach the syringe with drug solution or intravenous fluid to the tubing, and fill the catheter with solution. Alternatively, an intravenous fluid line may be attached if immediate fluid administration is desired. Examine the skin near the end of the catheter for any evidence of extravasation at the start of the infusion.
9. If the catheter has two pliable wings, lay them flat on the skin surface, and wrap a single piece of white tape over them and around the limb. This tape should be applied snugly but not tightly enough to occlude the vein. The tape does not cover the point of entry.
10. If the needle is to remain in place and unobserved, it may be prudent to apply a gauze sponge with antiseptic ointment to the skin penetration site, and secure this to the limb with a second piece of 1-inch white tape.
11. Coil the tubing, and secure the Luer end to the limb with another piece of tape. This coil helps prevent movement of the catheter if traction is applied to the tubing.
Over-the-needle style catheters
Materials Needed
2. Two pairs of clean examination gloves
3. One roll 1-inch waterproof white tape
4. One roll each of appropriately sized stretch gauze, stretch bandaging material, and cast padding
5. One catheter injection cap, catheter “T” piece, or needleless connection device
6. Syringe with heparinized saline solution, 1 to 2 U/mL
All materials are arranged ready for use on a clean tray or Mayo stand:
Procedure
1. Prepare the venipuncture site aseptically as described previously.
2. Wash your hands, apply germicidal skin lotion (if not already done), and don new clean examination gloves.
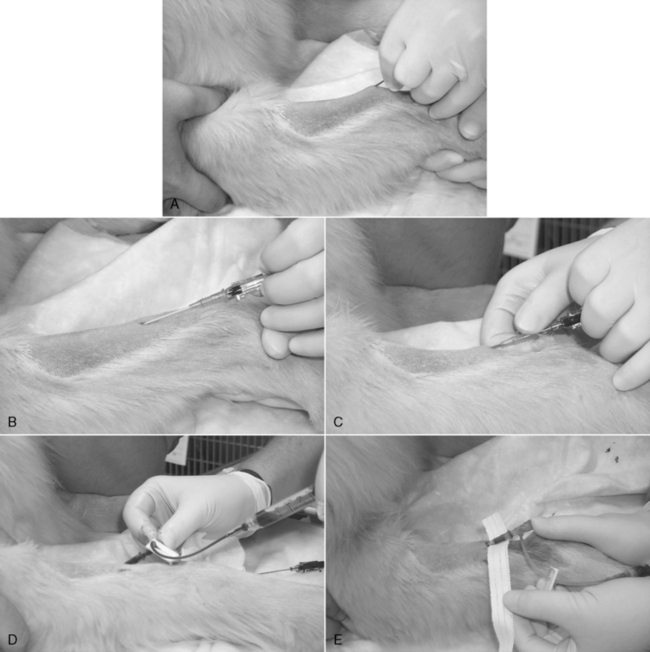
3. A small incision through the skin facilitates insertion of large-gauge catheters (Figure 15-3, A) or placement of the catheter through tough skin (see the Percutaneous Facilitation Procedure section). The techniques for direct and indirect insertion are the same as noted previously. Indirect catheterization is strongly preferred because this forms a subcutaneous tunnel between the point of entry through the skin and the point of entry into the vein that serves as a barrier to bacterial migration.52,56
4. An assistant restrains the animal and occludes the proximal vein. Grasp the catheter firmly at the junction of the needle and catheter hubs, ensuring that the catheter does not loosen and partially slide off the needle during manipulation. Never touch the skin at the point of insertion, and never touch the needle/catheter shaft. The needle bevel is directed up during the procedure. Advance the needle, first subcutaneously and then into the vein. Penetration of the vein often is heralded by a distinct “pop” as the needle punctures the tough vessel wall and by the flow of blood into the needle hub (Figure 15-3, B).
5. Advance the needle and catheter as a unit for another 3 to 5 mm. This ensures that both the needle and catheter tips are within the lumen of the vein. During this maneuver, hold the needle shaft as parallel to the long axis of the vein as practical, and lift the catheter tip away from the deep wall of the vein (as described for winged needle catheterization, see Figure 15-2). Once the catheter tip has entered the vessel, slide the catheter off the needle and into the lumen of the vein (Figure 15-3, C). If the catheter material is very soft and flexible, an alternative technique is to retract the needle 5 mm back into the catheter and advance the catheter and needle in unison all the way into the vein.
6. Your assistant should now release the vein occlusion, and the needle is withdrawn.
7. Attach the catheter injection cap, “T” piece, or needleless connector device, and flush the catheter with heparinized saline solution (Figure 15-3, D).
8. Remove any blood or fluid on the catheter hub and surrounding skin with sterile or clean gauze sponges.
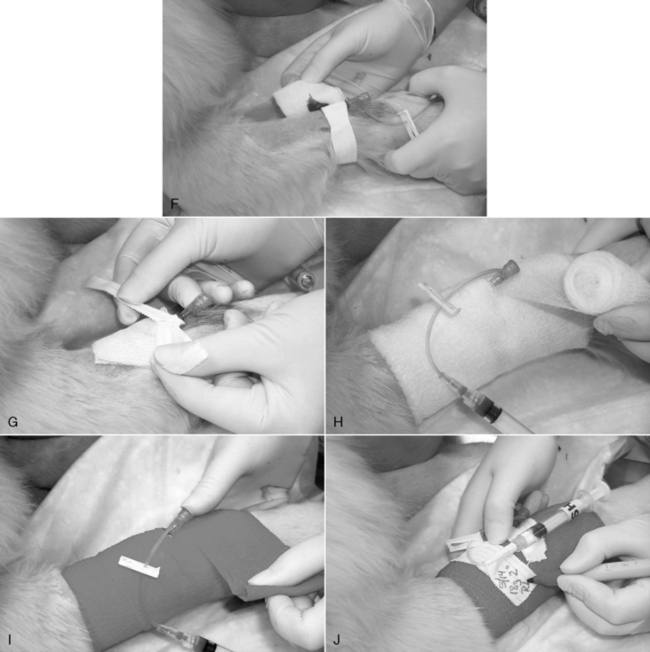
9. If a cephalic or lateral saphenous vein is cannulated, wrap the catheter hub with a strip of 1.5-to 2.5-cm (0.5 or 1 inch) white tape, and extend this strip around the limb. The tape should be pressed tightly onto the catheter hub but loosely anchored to the limb (Figure 15-3, E-G). The goal is to secure it to the limb, yet avoid wrapping it too tightly. When cannulating the medial saphenous or femoral vein (or any vein at a large, flat surface), the catheter hub should be anchored to the skin with a suture to limit in-and-out movement during flexion and extension of the limb. To provide a secure anchor without strangulating skin, place a single loop of suture material through the skin under the catheter hub, and create a slightly loose loop incorporating skin only by tying a secure square knot. Then tie the free ends of this anchor tightly around the catheter hub with a surgeon’s knot.
10. Cover the point of insertion with antiseptic ointment on a sterile gauze sponge (Figure 15-3, F).
11. If the catheter is to remain in place for more than 6 hours, it should be covered with a short, light bandage that extends 6 to 12 cm (2 to 4 inches) above and below the point of insertion (Figure 15-3, G-J).
Through-the-needle intermediate-style catheters
Materials Needed for Placement in the External Jugular Vein
1. Appropriate catheter: the ideal length will result in the tip of the catheter within the anterior vena cava just anterior to the right atrium.
2. Two clean latex examination gloves
3. 00 or 000 monofilament nylon, needle holders, suture scissors
5. One roll each 1 inch (2.54 cm) waterproof white tape and porous white tape
6. One roll each of appropriately sized stretch gauze, cast padding, and adhesive (Elastikon, Johnson & Johnson, New Brunswick, N.J.) or coadhesive (Vetrap. 3M, St. Paul, Minn.) wrap
7. One catheter injection cap, catheter “T” piece, or needleless connection device
8. Syringe with heparinized saline solution, 1 to 2 U/mL
10. Single dose of povidone-iodine ointment
11. Tube of cyanoacrylate adhesive (DURO superglue, Loctite Corp., Cleveland) (optional)
All materials are arranged ready for use on a clean tray or Mayo stand:
Procedure
1. Prepare the venipuncture site as described previously.
2. Wash your hands, apply germicidal lotion (if not already done), and put on clean examination gloves.
3. Proper positioning is critical for successful cannulation of the external jugular vein. In animals with thin skin and large, easily distended veins, the procedure is easily accomplished with the animal restrained in lateral recumbency. In this position, the external jugular vein is usually located directly lateral to the trachea. Sternal recumbency or a sitting position is preferred in animals that resist being restrained on their side and in those with thick skin or small, poorly distensible veins. In both the sternal and sitting positions, the animal should be held with its pelvic limbs directed away from the side chosen for venipuncture (Figure 15-4, A). This maneuver makes the neck more convex on that side and reduces the depth of the jugular furrow. An assistant elevates the head, and the nose should be initially held in a horizontal position and directed away from the intended site at a 30- to 45-degree angle with the median plane. If the animal has abundant loose skin on the neck, elevating the nose tenses the skin and facilitates identification of the vein. It is helpful to experiment with different head and nose positions until the optimal position is found. If you are right handed, occlude the vein at the thoracic inlet with the thumb of the left hand, and use your left index finger to palpate the vein. The patient’s right external jugular vein is preferred because it may be easier to advance the catheter into the cranial vena cava from this side. The puncture site should be 1 to 2 cm (about 0.5 to 0.75 inch) lateral to the vein and in the cranial half of the neck.
4. As with over-the-needle catheters, a small skin incision facilitates insertion of large-gauge catheters and eases access through tough skin (Figure 15-4, B). The techniques for direct and indirect insertion are the same as noted previously. Indirect insertion is strongly preferred because this forms a subcutaneous tunnel between the point of entry through the skin and the point of entry through the vein that serves as a barrier to bacterial migration. Never touch the skin at the point of insertion, and never touch the needle/catheter shaft.
5. Fully retract the catheter into the sterile sheath so that it is not visible at the needle bevel. Grasp the device firmly at the hub of the needle, and penetrate the skin with the bevel of the needle facing away from the skin surface. When possible, advance the needle subcutaneously parallel to the vein for at least 2 cm (0.75 inch) before introducing it into the vein (Figure 15-4, C). Penetration of the vein is usually heralded by a distinct pop as the needle punctures the tough wall of the vessel. A flashback of blood entering the needle hub is usually, but not always, seen (Figure 15-4, D). The catheter may then be manipulated through the sterile sheath and advanced through the needle.
6. If you suspect successful venipuncture but do not see a flashback, try advancing the catheter through the needle. If the catheter is not easily advanced, it is likely that the catheter has entered subcutaneous tissue. In that case, withdraw the entire assembly in unison. Do not pull the catheter back through the needle until the needle is withdrawn because of the risk of shearing on the needle bevel. Inspect the needle and catheter for damage; if none is present, it may be used for another attempt. Any subsequent attempts can be made through the original skin wound.
7. Because the needle forms a hole in the vessel wall that is larger in diameter than the catheter, postcatheterization hemorrhage is occasionally a problem. This can be minimized by holding the venipuncture site above the level of the heart to reduce venous pressure, such as by performing jugular vein cannulation with the animal in a sitting position. Accurate needle positioning minimizes laceration of the vein, and rapid application of a sterile dressing and bandage provides direct compression and tamponade.
8. Depending on the brand of catheter used, the needle is split off the catheter or is covered with a plastic needle guard as directed by the manufacturer (Figure 15-4, E).
9. Remove the wire stylet (Figure 15-4, F).
10. Attach the “T” piece, injection cap, or needleless connection device to the Luer hub. If using a “T” piece, first attach a syringe with heparinized saline solution to it, and purge all air from the lumen. If you use an injection cap, purge the air from its dead space by filling it with sterile solution. Attach the device, aspirate any air from the catheter, and confirm catheter patency by successful aspiration of blood. Purge the catheter with the solution (Figure 15-4, G).
11. If the catheter was inserted completely, withdraw it 1 to 2 cm (0.5 to 0.75 inch) from the skin, and dry this exposed section with a sterile gauze sponge. Wrap a 2.5- to 5-cm (1 to 2 inches) “butterfly” of waterproof white tape around the catheter and needle guard. This piece of tape should bridge the needle guard and the exposed portion of catheter to where it enters the skin (Figure 15-4, H). Through-the-needle catheters frequently fail because of kinking at the point of exit from the needle guard or the point of entry into the skin. The tape prevents this by forming a protective “sandwich” around the catheter as it exits the needle guard or hub.
12. If the catheter was too long, leave an appropriate length outside the skin, and incorporate it into a “sandwich” of white tape as described previously. If there is sufficient length, it may be coiled into a loop that is completely encased between the two layers of tape.
13. Dry the Luer connection at the junction of the needle and catheter hubs with a sterile gauze sponge, and compress them together firmly. If desired, a drop of cyanoacrylate adhesive may be applied to the surfaces before forcing them together (Figure 15-4, I). This connection may also be bridged with a “sandwich” created by two strips of 1-inch white tape that cover the first “butterfly” strip of tape and extend from the suture site all the way to the injection cap (Figure 15-4, J).
14. Suture the tape “sandwich” to the skin at points on both sides of the catheter within 0.5 cm (0.2 inch) of the penetration site (Figure 15-4, K).
15. Cover the point of insertion with the antiseptic-treated gauze sponge.
16. Anchor the catheter with a strip of porous white tape. If a jugular vein is cannulated, firmly apply the tape to the base of the needle guard, and then wrap it in a manner that pulls the catheter in a dorsal direction on the ipsilateral side to help prevent the catheter from slipping ventrally later (Figure 15-4, L). The goal is to secure the catheter to the skin, not to wrap it on tightly.
17. Apply layers of cast padding, stretch gauze, and elastic bandage material, wrapping up (dorsally) on the ipsilateral side in the case of a jugular vein catheter. While wrapping the catheter bandage, hold the limb or neck in a natural position (partially flexed limb or nose pointed down) to prevent binding (Figure 15-4, M-O).
18. If the catheter is intended to be positioned into the anterior vena cava or the intrathoracic portion of the caudal vena cava, a lateral thoracic radiograph should be obtained to confirm ideal location of the catheter tip.
Stay updated, free articles. Join our Telegram channel

Full access? Get Clinical Tree


