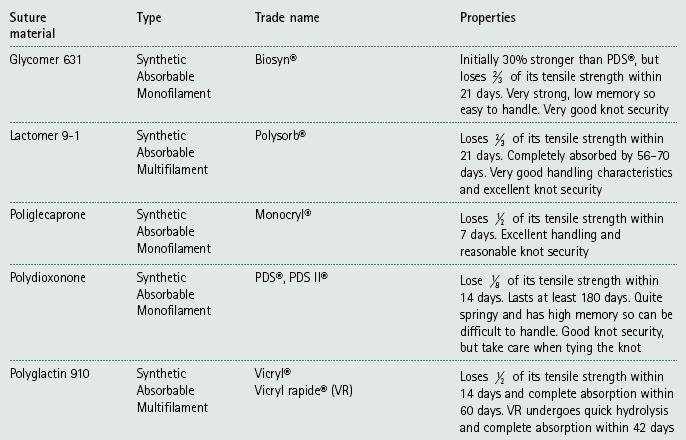
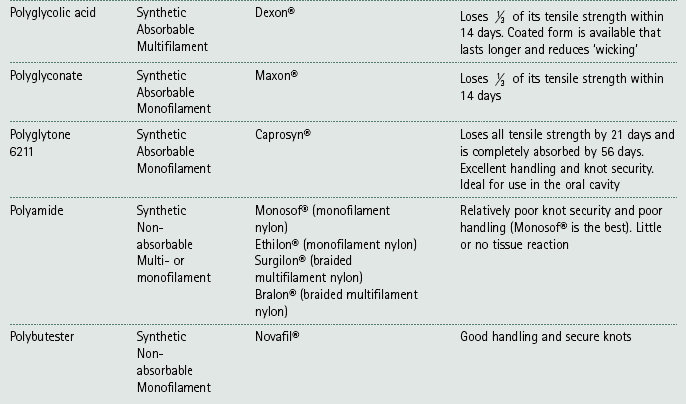
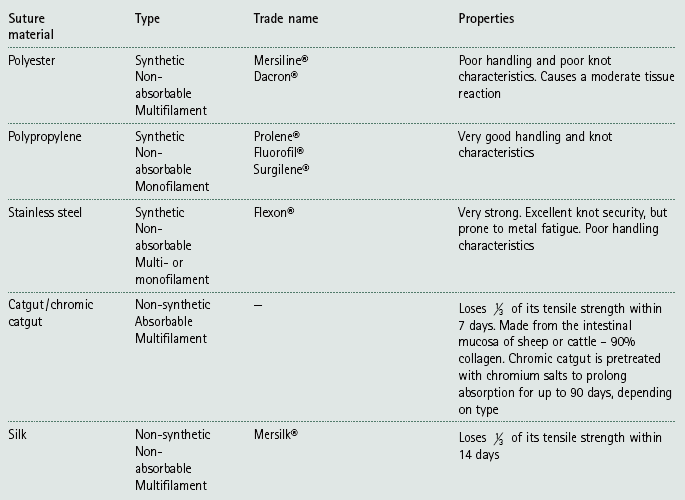
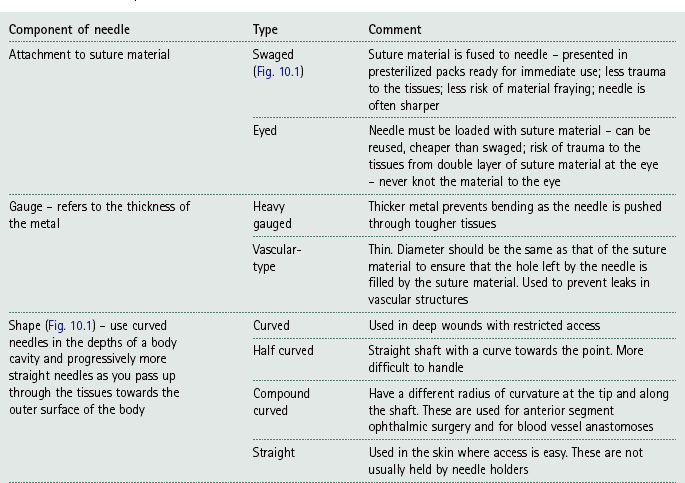
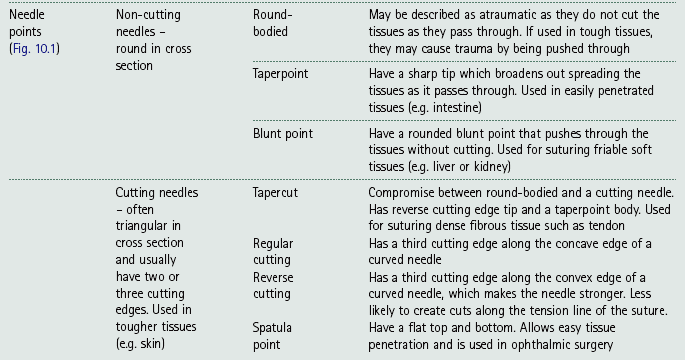
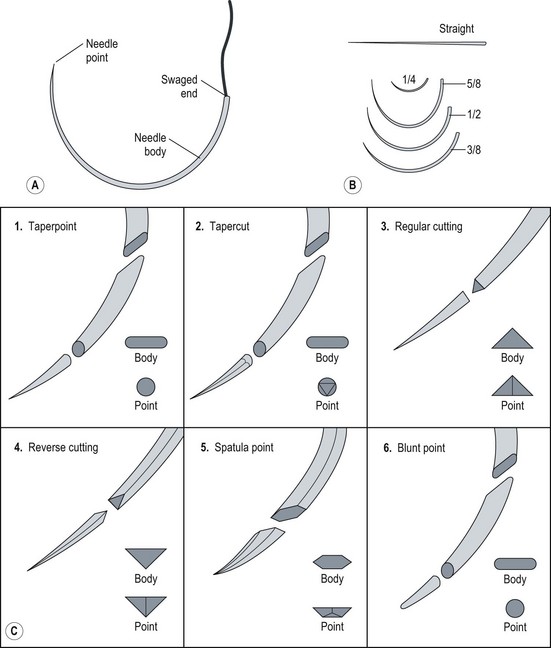
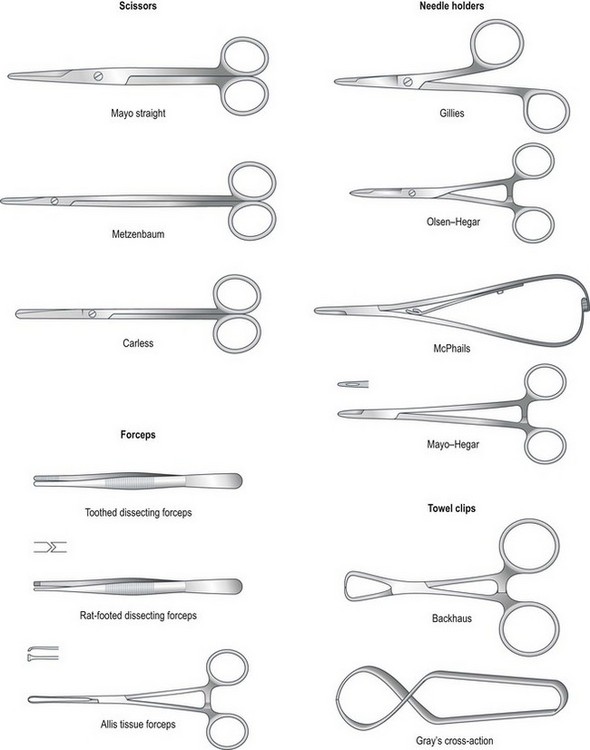
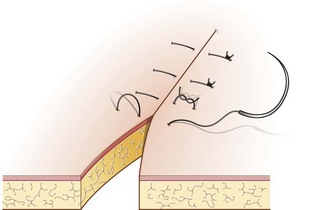
Chapter 10 Suturing techniques and common surgical procedures • First intention – occurs in surgical incisions and clean cuts. There is no loss of tissue and healing should occur within 5–10 days, although it may be speeded up by the use of sutures or other materials that hold the edges together (e.g. tissue glue or staples). There should be very little evidence of scarring. • Second intention – occurs where the edges are widely separated and / or where there is tissue loss. This will take place if first intention is impossible or has failed (e.g. due to infection, movement between the edges or patient interference). Healing by this method may take days, weeks or even months depending on the wound. Evidence of scarring is inevitable and variable. Suture materials are required for a variety of purposes during surgery including: The types of material (Table 10.1) can be broadly divided into: Table 10.1 Suture materials commonly used in practice* *After Hoad 2006, p 106, Minor Veterinary Surgery with permission of Elsevier Butterworth-Heinemann. 1. Absorbable / non-absorbable – this refers to whether the material remains in the tissue and has to be removed manually or whether it will lose its strength and subsequently be removed by phagocytosis or hydrolysis over a predestined period of time. 2. Monofilament / multifilament – refers to the number of filaments that are twisted together to form a single strand. Multifilament materials may cause ‘wicking’ of bacteria and fluids through the tissues by capillary action; however, they are more pliable, and have a higher tensile strength and better handling and knot security than monofilament materials. 3. Synthetic / non-synthetic or natural – natural materials tend to cause a considerable tissue reaction and catgut in particular cannot be depended upon to produce reliable knots so these materials are no longer recommended. Synthetic materials produce little tissue reaction. • In the USP / PhEur system, larger numbers represent suture material of a larger diameter while numbers followed by zero represent smaller sizes (i.e. material with the number 3 is much thicker than 3/0; 3/0 is thicker than 7/0). • In the metric system, each unit represents 0.1 mm – so 4 metric is 0.4 mm in diameter. • Use 3 metric for dogs and 2 metric for cats. • Reduce by one size for delicate tissue and increase by one size for tough tissue. Choice of suture material – choose the smallest size of suture material that will provide adequate support. Smaller sizes will result in less tissue trauma and smaller knots with greater knot security. There is also a lower viability of any bacteria that may stick to the material. Table 10.2 suggests suitable choices of suture material for different tissues. Table 10.2 Choice of suture material for different tissues* *Adapted from Manual of Canine and Feline Surgical Principles. BSAVA. Gloucester. As a general rule when selecting suture material, consider the following: • Avoid multifilament material in contaminated wounds – there is a risk of ‘wicking’ and the spaces between the strands may harbour blood, which will become a medium for bacterial growth. • Avoid non-absorbable materials in hollow organs (e.g. in the bladder the suture may become a focus for deposition of crystals forming calculi). • Avoid burying any suture material from a multi-use cassette – there may be a risk of contamination from previous use. • Avoid using catgut in inflamed, infected or acidic wounds – absorption is more rapid in these wounds. • Avoid reactive materials in the creation of stoma. • Use slowly absorbable materials in fascia or tendons – the rate of healing is slow and the tissue requires the support of the sutures for some time. There are many different types of suture needle and the choice depends on: Table 10.3 and Figure 10.1 describe the basic components of suture needles. Examples of needle holders (Fig. 10.2) include Gillies (which also provides a scissor action but no ratchet), Olsen-Hegar (which has a ratchet and scissor action) and McPhails (which has a spring ratchet). All needles, with the exception of straight ones, should be held in needle holders, which will provide control as the needle is pushed through the tissue and, when using cutting needles, will protect your gloves or fingers. Suture patterns can be classified as to: • Whether each suture is individually placed (i.e. interrupted) or linked to the one on either side of it (i.e. continuous) • The way in which the tissues are apposed: • simple interrupted sutures restore and align the anatomical surface of the tissue (e.g. the skin), creating a smooth surface • everting sutures turn the tissue edges outwards (e.g. continuous mattress sutures) • inverting sutures turn the tissue edges inwards towards the lumen of an organ (e.g. Lembert sutures). Suture patterns will be described from the point of view of a right-handed surgeon. 1. Action: Sutures should be placed horizontally from right to left. Rationale: Left-handed surgeons should work in the opposite direction. 2. Action: Holding the needle with needle holders as described above, introduce the needle through the tissue on the far side (or right side) of the wound 2–5 mm away from the tissue edge (Fig. 10.3). 3. Action: Bring the needle up on the opposite side 2–5 mm away from the tissue edge (Fig. 10.3A). Rationale: This is easiest to do using a curved needle. 4. Action: Pull the suture material through leaving about 3 cm sticking out of the far side. 5. Action: Knot the two ends together as described below. The knot must be left offset from the wound and not resting in the incision (Fig. 10.3B). 6. Action: Cut the suture material on either side, leaving the ends about 2–3 mm long. 7. Action: The resulting suture should be tight enough to result in apposition of the tissues but loose enough to avoid inversion of the edges. 8. Action: Place the next suture about 5 mm along the wound. Rationale: The distance apart depends on the site and tissue of the wound. Interrupted cruciate suture – this is currently a popular type of suture formed by two linked simple sutures arranged as a figure-of-eight and tied with one knot (Fig. 10.4). The advantages are that there are fewer knots, making it quicker to place, and the tension is spread better over a larger area than it is with a simple suture. Remove by cutting both loops so that you avoid dragging pieces of the suture that have been exposed to the external environment through the tissues. 1. Action: Holding the needle with needle holders, insert it into the tissue on the far side of the incision about 2–5 mm away from the edge. Pass across the incision and bring the needle up on the near side (Fig. 10.5). 2. Action: Move about 6–8 mm along the incision and reinsert the needle into the tissue on the near side. Rationale: The suture material has made a horizontal line parallel to the edge of the wound (Fig. 10.5). 3. Action: Pass across the incision and bring the needle up on the far side. The suture material has described a rectangle across the incision (Fig. 10.5). 4. Action: Draw the suture material moderately tight so that the edges appose and then tie a knot. Rationale: Do not pull so tight that the edges evert. 5. Action: Repeat the process for the next suture, which should be about 4–5 mm away. This is a tension-relieving suture. 1. Action: Holding the needle with needle holders, insert the needle approximately 8–10 mm away from the edge of the incision on the far side (Fig. 10.6). 2. Action: Pass through the incision line and bring the needle up at an equal distance on the near side (Fig. 10.6). Rationale: This is for the same reason as in 1. 3. Action: Turn the needle around and insert it on the same side, but at a point approximately 4 mm from the incision edge (Fig. 10.6). Rationale: This creates a stitch at right angles to the incision. 4. Action: Pass through the incision and bring the needle up at a point 4 mm from the incision. Rationale: The path described by the suture material is a line at right angles to the incision. 5. Action: Tie a knot with the two ends after applying the appropriate tension. Halsted suture – the technique is essentially the same as for a vertical mattress suture except that two sutures are placed in a parallel fashion before they are tied (Fig. 10.7). This produces an interrupted pattern in which the edges of the wound are inverted. Lembert suture – this is similar to the vertical mattress suture and is used to repair hollow organs. As the holding layer of an organ is the submucosa, the needle should penetrate only to this depth and never into the lumen. As the suture is tightened it inverts the tissues (Fig. 10.8). This is a specialized suture used in the repair of the intestine. 1. Action: Holding the needle in needle holders, insert the needle through the serosa of the intestine on one side of the incision. Rationale: This is the outer layer of the area to be closed. 2. Action: Push the needle through the wall of the intestine right through to the mucosa and into the lumen and then return it through all the layers up to the serosal surface again (Fig. 10.9). 3. Action: Now cross the incision and insert the needle down through the tissue layers on the other side; then bring the needle back up to the serosal surface again (Fig 10.9). Rationale: This completes the suture. 4. Action: Tie a knot with the two ends of the suture material. A modified Gambee is placed in the same way, but does not penetrate the lumen of the intestine. 1. Action: Holding the needle with needle holders, place a simple interrupted suture and knot it, but only cut the end of the suture material that is not attached to the needle. 2. Action: Insert the needle into the skin perpendicular to the incision and at an appropriate distance from the first suture. Rationale: Sutures are usually placed at about 5 mm apart. 3. Action: Take the needle across to the other side and bring it up through the tissue directly opposite the entry point (Fig. 10.10A). Rationale: Do not knot the suture. 4. Action: Insert the needle on the opposite side perpendicular to and 5 mm along the incision. Continue until you reach the end of the incision. Rationale: The resulting suture line has sutures that are perpendicular to the incision below the tissue and advances forward above it (Fig. 10.10A). 5. Action: To end the line of sutures, tie a knot using the suture material attached to the needle and the last loop of suture that is exterior to the tissue. Rationale: The knot must be secure to ensure that the whole line does not come undone. A simple continuous pattern provides maximum tissue apposition and is relatively leak proof compared with a line of simple interrupted sutures. Running simple continuous sutures (Fig. 10.10B) – in this pattern both the sutures below and above the incision advance along the line. Subcutaneous sutures – these are placed in a simple continuous pattern below the skin and the bites of the suture lie vertical to the incision (Fig. 10.11A). They are used to eliminate dead space and to relieve tension on the skin sutures. This pattern should be used in conjunction with a buried knot(s). (See later description.) Intradermal sutures – these are often used to replace skin sutures and to reduce scarring. They are useful to reduce patient interference and to eliminate the need for suture removal in sensitive areas (e.g. post castration or in fractious patients). The suture is started by burying the knot in the dermis (see later description) and the suture line lies intradermally. The bites of the suture lie parallel to the line of the incision (Fig. 10.11B) and the suture line is completed with another buried knot. Absorbable suture material should be used. 1. Action: Holding the needle with needle holders, place a simple interrupted suture and knot it, but cut only the end of the suture material that is not attached to the needle. 2. Action: Bring the needle up through the loop of the suture and then cross the incision and insert it into the tissue on the opposite side as you would for a simple continuous pattern (Fig. 10.12). Rationale: This action locks the simple suture in place. 3. Action: Take the needle across the incision and bring it up through the tissue on the opposite side. As the needle exits the tissue, bring it up through the loop of the previous suture. Rationale: This locks the previous suture in place. 4. Action: Repeat as you go along the incision (Fig. 10.12). 5. Action: To finish the line, insert the needle back down into the tissue on the same side as it has just been brought out from and pass it across the incision to exit on the other side. Retain the single end of the suture material on the first side. Tie the loop of material close to the needle to the single end. (Fig 10.12). This pattern uses up more suture material than other patterns. It can be time consuming to remove as each loop must be cut individually to avoid pulling suture material that has been exposed to the external environment through the inner tissues of the wound. Continuous Lembert sutures – these are interrupted sutures (Fig. 10.8) placed as a continuous line and are inverting sutures used to close hollow organs. The needle must not penetrate into the lumen and the suture bites are placed perpendicular to the incision as in the vertical mattress suture pattern. Continuous horizontal mattress sutures – start with a simple interrupted suture and then continue with linked sutures as described above (Fig. 10.5). The suture bites are parallel to the line of the incision. More tension on the suture line will produce greater tissue eversion. A. Purse ring suture (Fig. 10.13) – This technique may be used to close visceral stumps and to secure percutaneous tubes into a viscus such as may be seen in gastrostomy and cystostomy procedures. 1. Action: This suture is placed before you insert an ‘ostomy’ tube, or may be used to reduce a rectal prolapse or to temporarily close the anal sphincter prior to surgery of the rectum. It may also be used to close a hole in the thoracic wall after penetration by a foreign body (e.g. a stick). 2. Action: Place a line of running sutures around the stump or – ‘ostomy’ tube so that the suture needle ends up at the same point as it started. Rationale: When this is pulled tight it will gather up the tissue like the top of a cloth purse. 3. Action: Leave a length of suture material free from each end. Rationale: This will allow you to pull the suture tight and will be used to tie the knot. 4. Action: Pull up the ends of the suture around the tube and tie the ends together (Fig. 10.13). Rationale: This will create a seal around the tube. 5. Action: If the purse ring suture is around a penetrating foreign body, slowly withdraw the foreign body as you tighten the suture. B. Quilled suture (Fig. 10.14) – A quill is material such as a piece of rolled gauze or a piece of tubing from an old giving set that is used to distribute the tension of a suture over a greater surface area. You can use either vertical or horizontal mattress sutures. This uses vertical mattress sutures and tubing from a giving set. 1. Action: Cut two pieces of intravenous drip tubing to the approximate length of the incision. Rationale: You can use two pieces of rolled up gauze instead of tubing. 2. Action: Insert the needle approximately 8–10 mm away from the edge of the incision on the far side. Rationale: This will allow sufficient space to place the mattress suture at right angles to the line of the incision (Fig. 10.6). 3. Action: Pass through the incision line and bring the needle up through the tissue at an equal distance from the edge on the near side of the incision. Rationale: This is the same reason as no. 1. 4. Action: Turn the needle around and insert it on the same side, but at a point approximately 4 mm from the edge. Rationale: This creates a stitch at right angles to the line of the incision. 5. Action: Pass back through the incision and bring the needle up at a point 4 mm from the far edge. 6. Action: Before you pull the suture material completely through, place a short length of the tubing under the suture on the near side and then pull the suture tight (Fig. 10.14). 7. Action: On the far side of the incision, place the other piece of tubing parallel to the incision and between the two entry points of the suture. Secure the suture with a knot, which should lie on top of the tubing. Rationale: This will hold the tubing in place on the far side (Fig. 10.14). 8. Action: Continue to place a line of interrupted vertical mattress sutures along the incision line so that each one helps to hold the piece of tubing in place (Fig. 10.14). C. Chinese finger-trap suture (Fig. 10.15) – This is a technique consisting of a series of knots that is used to secure a tube such as a suction drain to the skin. Tension on the tube increases as the tube is pulled, thus preventing its removal. 1. Action: Place a simple interrupted suture in the skin at a point close to the exit of the tube. Rationale: This will form a firm attachment of the tube to the body. 2. Action: Leave both ends of the suture material long. Rationale: These ends will allow you to wind them along the length of the tube. 3. Action: Take one end between the thumb and forefinger of your left hand and the other end in your right hand and pass them over each in the front of the tube and form the first throw of a simple knot. 4. Action: Cross them over each other behind the tube and perform a throw again. Rationale: The suture will have moved along the tube. 5. Action: Cross them over each other in front of the tube and perform another throw. Rationale: The gap between each knot should be about 0.5–1 cm. 6. Action: Repeat this at least 5–6 times and terminate with a secure knot consisting of several throws. Rationale: The suture material will have entwined the tube in a net-like structure, which will hold it firmly in place (Fig. 10.15). • The type of suture material – multifilament suture materials tend to have better knot-holding ability than monofilament suture materials (Table 10.1). • The length of the cut ends – if they are too short the knot may unravel. • Using instruments – this is easier and more common than using hand tying and the advantage is that there is less wastage of suture material. There may be a loss of feeling when using instruments, but once you are proficient you will learn to gauge the tension of each throw. • By hand – this technique is useful in confined or hard-to-reach spaces or when sutures have been preplaced (e.g. in closure of a thoracotomy). It is usually necessary to leave the ends of the suture material longer than when using instruments, which can lead to wastage. The technique may be one handed, which is useful in small spaces, or two handed, which allows better control. The type of knot (Fig. 10.16) formed tends to depend on the surgeon’s technique. 1. Action: Place a simple interrupted suture and leave the two ends of suture material free. 2. Action: Holding the needle holders in your right hand, place the tips between the two strands of suture material and wrap the strand nearest to you (long end) around the needle holders to form a loop. Rationale: The long end is attached to the needle. 3. Action: Open the tips of the needle holders a little and grasp the short end of the suture material. Rationale: The short end is the end without the needle. 4. Action: Bring the short end through the loop towards you by reversing your hands and tighten the suture gently. Rationale: You have now formed the first throw. 5. Action: Now wrap the strand furthest away from you (long end) over the needle holders to form a loop. Rationale: This is the beginning of the second throw. 6. Action: Open the tips of the needle holder a little and grasp the short end of the suture material and pull it through the loop. Rationale: Gently allow this throw to form the knot to prevent the suture tightening excessively. 7. Action: Keep your hands low and parallel to prevent the knot tumbling. Rationale: Each throw should be directly on top of the other if it is not to become a half-hitch (Fig. 10.16). NB Even pressure must be applied to each end; if one end is pulled with greater tension than the other a half-hitch will form. Hands should be on the same level – if one hand is lifted the suture will tumble and form a sliding two-half-hitch knot. If the ends are crossed incorrectly a granny knot will form (Fig. 10.16). Tumbled knots, half-hitches and granny knots are incorrect and may come undone. Square knot – this is the most common type of knot and is used to anchor most suture patterns. Surgeon’s knot (Fig. 10.16) – this is similar to the square knot except that the first throw has the strand of suture material thrown over the needle holders twice before the short strand is pulled through. This has the advantage of creating more friction so that the first throw is kept snug while the second standard throw is placed on top. A surgeon’s knot is asymmetrical so must be followed by a square knot on top to ensure security. Buried knots – this technique is used to start a line of subcutaneous or intradermal sutures to reduce the irritation that may be caused by the knots rubbing against superficial tissues. To bury the knot, introduce the needle deep in the far subcutaneous or intradermal tissue passing it up into the tissue, across the incision and then down into the tissue on the near side (Fig. 10.17), exiting deep in the incision line. Now form a knot, which will be buried within the incision line. 1. Surgical staples – these cause little or no tissue reaction and they provide excellent tissue apposition and haemostasis. They may be used in a variety of situations both internally and externally and have the following advantages: a. Reduction in surgical time, which is of benefit to critically ill patients b. Reduction in tissue handling and trauma c. Reduction or elimination of contamination by intestinal contents d. Provide an easy and secure method of closing tissues such as the lung, liver and gastrointestinal tract, large vessels and vascular pedicles. Box 10.1 outlines the factors to be considered in the use of surgical staples. 2. Tissue adhesives – these are cyanoacrylate monomers that become strong insoluble polymers on contact with the water on tissue surfaces. Setting time varies between 2 and 60 seconds depending on the thickness of the glue layer, the amount of moisture and the chemical makeup of the adhesive. The use of tissue glue has proved to be effective in: a. Cutaneous wounds and incisions c. Repair and treatment of corneal ulcers – requires experience as the consequences of accidental misapplication could be disastrous d. Closure of oral wounds following dental work e. Surgical incisions where patient interference is likely and where the patient will not tolerate an Elizabethan collar. f. Useful in small species (e.g. rodents) where the wound is very small. The list of procedures has been arranged in alphabetical order. It should be assumed that all are carried out under a general anaesthetic and that the surgical site has been prepared aseptically and draped appropriately. For details of these procedures see Chapters 8 and 9. 1. Action: Position the anaesthetized patient in such a way as to maintain stability and provide optimal access to the site of the abscess. 2. Action: The site should be clipped and prepared aseptically and sterile drapes should be placed over the patient and around the abscess. 3. Action: Full aseptic technique must be observed. Gloves and safety glasses are recommended. 4. Action: Using a sterile scalpel blade, make a stab incision into the skin overlying the abscess. The incision may be enlarged if necessary and the flow of exudate can be accelerated by the use of gentle pressure over the surrounding area. 5. Action: Using a 20 ml syringe and a large gauge needle, flush out the abscess with warmed saline. You may add dilute chlorhexidine in a dilution of 1 : 40 if necessary. 6. Action: Chronic abscesses may have a thick fibrous lining that should be debrided and then reflushed. Rationale: If the lining is not debrided there is a risk that the abscess will reform. 7. Action: Clean and dry the surrounding area and leave the wound open to drain. 8. Action: Abscesses with a large dead space may be partially closed with a Penrose drain in place (see below). Rationale: This will enable the purulent material to drain out more easily. 9. Action: If partial closure is performed, use absorbable monofilament suture material. The knot should have a minimum number of throws. 10. Action: In most cases the wound is left open to drain and to heal by second intention, but in some cases it may be necessary to place a suitable dressing (see Ch. 4). Rationale: The dressing should be of a type that will absorb the exudate. 11. Action: The patient should be sent home with antibiotics, NSAID analgesics and, if necessary, an Elizabethan collar. The owner should be instructed to bathe the area gently with saline or cooled boiled water for the first 1–2 days if the abscess is still draining. 12. Action: The wound should dry up and heal within a few days. Rationale: A small percentage of abscesses return and will have to be redrained.
Suturing techniques
Suture materials
Tissue
Comment
Type
Skin
Non-absorbable
Monofilament / multifilament
Subcuticulis
Absorbable of short duration. Tissue heals quickly as it is not reliant on suture for much more than 14–21 days
Monofilament / multifilament
Fascia
Absorbable of long duration / non-absorbable. Tissue heals slowly and may rely on the strength of a suture for up to 9 months
Monofilament
Muscle
Absorbable of long duration / non-absorbable
Monofilament / multifilament
Hernia repair
Absorbable of long duration / non-absorbable
Monofilament
Viscera
Absorbable of short duration. Tissue heals quickly as it is not reliant on suture for much more than 14–21 days
Monofilament
Tendon
Non-absorbable
Monofilament
Vessel ligation
Absorbable of short duration. A non-absorbable multifilament (e.g. silk) may be used for large vessels (e.g. renal artery or vein)
Multifilament / monofilament
Vessel repair
Non-absorbable
Monofilament
Nerve
Non-absorbable
Monofilament
Suture needles
Suture patterns
Interrupted suture patterns
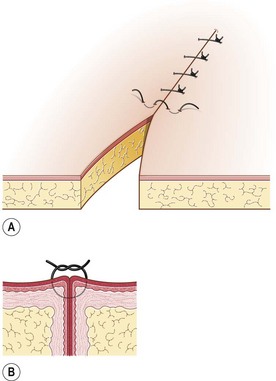
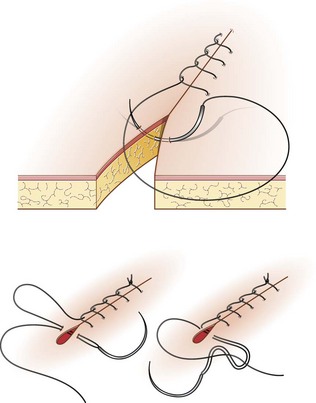
Procedure: Simple interrupted suture
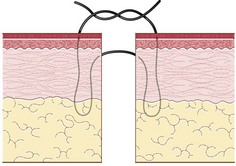
Procedure: Horizontal mattress suture
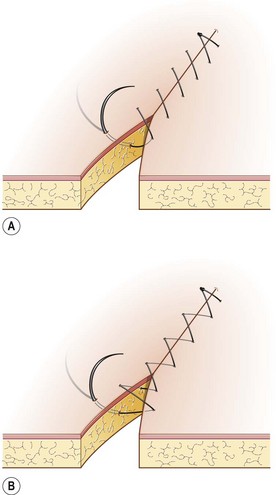
Procedure: Vertical mattress suture
Procedure: Gambee suture (Fig. 10.9)
Continuous suture patterns
Procedure: Simple continuous suture (Fig. 10.10)
Procedure: Ford interlocking suture (Fig. 10.12)
Specialized suture techniques
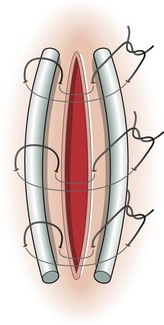
Procedure: Purse ring suture
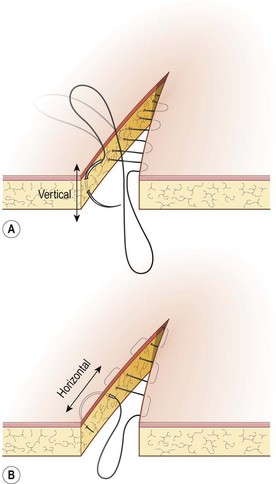
Procedure: Quilled sutures
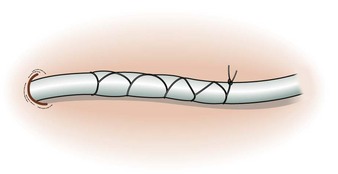
Procedure: To tie a Chinese finger-trap suture
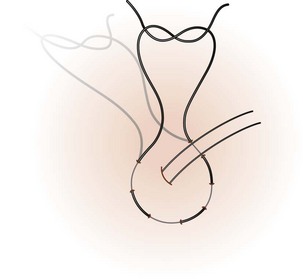
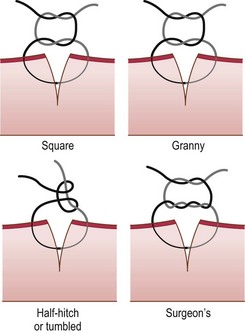
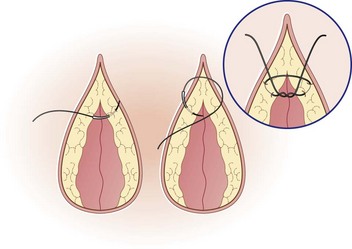
Knots
Types of knot
Procedure: Tying a square knot using instruments
Other methods of tissue repair
Common surgical procedures
Abscesses
Procedure: Surgical treatment of abscesses in dogs and cats
![]()
Stay updated, free articles. Join our Telegram channel

Full access? Get Clinical Tree


Suturing techniques and common surgical procedures


Only gold members can continue reading. Log In or Register to continue
