Chapter 80 Skin grafts can be classified according to their source as follows: (1) autografts (autogenous grafts), in which the donor and recipient sites are on the same animal; (2) allografts (homografts)—in this case, the donor and recipient sites are on genetically different individuals of the same species; (3) xenografts (heterografts) in which the donor and recipient sites are on animals of different species; and (4) isografts, a graft between identical twins or between F1 hybrids produced by crossing inbred strains.13,59 Although human medicine makes extensive use of all types of grafts, in veterinary medicine, almost all grafts are autografts; therefore, in this chapter, we will restrict the discussion to autografts. Grafts are also classified according to thickness and may consist of either the full thickness of the skin, which is composed of epidermis and the entire dermis, or a split thickness of skin, which is composed of epidermis and varying partial thicknesses of the dermis. Split-thickness grafts have been further classified as thin, intermediate thickness, or thick, according to the thickness of the layer of dermis included in the graft.10,13,54 Skin grafts are indicated when there has been major loss of skin from trauma or other factors, such as tumor removal. In dogs and cats, skin grafting is primarily indicated for loss of skin on the distal limbs, where the paucity of loose skin precludes wound closure via skin mobilization or construction of local flaps.27,59,62 Skin grafts are also occasionally used to resurface large wounds of the trunk, such as may be seen with large full-thickness burns. General and local conditions are considered before grafting is performed. Debilitated patients and those with chronic disease may have preexisting conditions that put them at higher risk for graft failure. These conditions may include cachexia, anorexia or hyporexia, chronic inflammatory conditions, uremia, hypoperfusion, and infections, to name a few. Obvious deficiencies such as anemia with low hemoglobin concentration should be corrected before grafting.59 The graft recipient site should be healthy, free from infection, and well perfused, and the donor skin should match the recipient area as closely as possible with regard to thickness, color, and haircoat.10 The ideal graft donor site has hair of the same color, texture, length, and thickness as the hair surrounding the recipient site. However, the most common donor site is the cranial lower lateral thoracic area.63 The skin is fairly thin, yet still well haired in this area. Because of the abundance of loose skin in this area, the donor site can be easily closed after the graft is harvested. The three most common causes of graft failure are separation of the graft from the bed, infection, and movement. These disrupt the fibrin bonds that bind the graft to the bed, thus impairing revascularization and nutrition of the graft. Fluid accumulation beneath the graft (e.g., seromas, hematomas, or exudation) mechanically separates the graft from its bed. Mesh grafts and closed-suction drainage are the best ways to facilitate drainage of such fluid accumulations. Infection is detrimental to graft survival not only because of exudate production but also because bacterial enzymes may cause dissolution of fibrin attachments. β-Hemolytic streptococci and Pseudomonas spp. produce large amounts of plasmin and proteolytic enzymes, which disrupt the fibrin attachments of the graft to the recipient bed. Pseudomonas spp. also degrade elastin through the production of elastase; elastin facilitates graft adhesion through its adherence to fibrin.43,63 Bandaging and splinting methods vary with the type and location of graft; specific bandaging information in this chapter is described with each type of graft. The bandage change interval may vary from once daily to once every 2 to 4 days, depending on the type of graft and the wound. The immediate postoperative bandage is usually left undisturbed for 24 to 48 hours; this helps to facilitate graft adhesion and immobilization and absorption of wound fluid, and protect the graft from trauma. Some surgeons prefer to leave the initial bandage in place for 3 to 5 days.42 However, the authors are of the opinion that the bandage should be changed sooner (24 to 48 hours) because there are instances when a skin graft may encounter early postoperative problems that would interfere with successful engraftment. If these problems are identified and corrected, a good “take” is still possible; however, if the graft is not examined until the third to fifth postoperative day, its fate is usually unalterable by that time. One reason given for delaying the initial postoperative bandage change is concern about the graft adhering to the contact layer, thus being dislodged from the recipient bed. Warm saline can be applied to soften dried wound fluid and the contact layer to facilitate its removal and prevent the problem of bandage adherence to the graft.42 Whatever bandage change interval is selected, regular bandage changes should be performed for at least 2 to 3 weeks postoperatively. After that time, a light bandage for an additional 10 to 14 days is highly recommended.43 Even though vascular ingrowth (and thus engraftment) is well established by 14 days, the process of reinnervation of the graft may take several weeks. When sensory testing was performed on skin grafts applied to the backs of rats, return of sensation was first noted on the thirteenth postoperative day at the graft margins; however, complete reinnervation required 40 days.73 During the period of reinnervation, human patients may experience paresthesia or dysesthesia. It is reasonable to assume that animals may also experience similar sensations, leading to self-trauma. Therefore, during the entire period of bandaging, appropriate methods should be used to prevent the patient from traumatizing the bandage and the underlying graft. Besides the prevention of self-trauma, another important function of postoperative bandaging is immobilization of the grafted area. During the first few days after grafting, excessive motion of the graft site may disrupt the adherence of the graft from the recipient bed, potentially leading to subgraft seroma formation and failure. Even after adherence, excess motion may still lead to graft failure by shearing off the capillary buds as they grow into the graft. Immobilization of the grafted part can be accomplished by means of bulky bandages, slings, splints, and casts. Schroeder-Thomas splints or spica splints may be useful on the upper portions of the limbs; spica splints are especially useful on the upper extremities of cats.42 Bandages have potential adverse effects. Uneven application of tension during bandaging, wrinkles, or excessive buildup of bandage material may cause excessive pressure on the graft, leading to necrosis. Improper immobilization may result in a bandage’s abrading the graft.43 A wet bandage permits wicking of bacteria to the graft and may lead to infection. Noticeable hair regrowth on a graft is usually seen 2 to 3 weeks after grafting. It may vary from a full regrowth to sparse regrowth. Sparse regrowth may be caused by damage to hair follicle bases during removal of subcutaneous tissue or poor graft revascularization. In general, hair regrowth on split-thickness grafts and on strip, punch, and expanded mesh grafts is patchy. Full-thickness sheet grafts and unexpanded mesh grafts result in the best hair regrowth and cosmetic appearance.22 Split-thickness skin grafts can be harvested freehand with various types of freehand knives or blades. The knives have depth control adjustments to help regulate the thickness of skin that is cut. However, practice and experience are necessary to use these instruments effectively.59,62 A #10 scalpel blade can be used to cut a split-thickness graft, although the process is time consuming;28 also, depth control is difficult, and holes may be cut in the skin.54 Power-driven dermatomes incorporate depth control and are capable of rapidly harvesting a uniform split-thickness graft. They are also generally easier to use than manually operated knives. An electric dermatome has been described for cutting split-thickness grafts in veterinary surgery.9 A nitrogen-powered dermatome of the same design is also available. Grafts can be meshed with a scalpel blade or a graft meshing block. A graft meshing block consists of an aluminum block that contains numerous staggered parallel rows of notched cutting blades. The graft that is to be meshed is placed on this block with the epithelial surface facing up. Then a Teflon or nylon roller is rolled over the graft while pressing down firmly. This pushes the skin down onto the knives, creating numerous slits in the skin, thereby producing a meshed graft.21,60 Seed grafts can be harvested by using a suture needle, skin hook, or forceps to elevate the skin before cutting it with a scalpel blade. A disposable Keyes dermal biopsy punch may be used to harvest punch grafts. Disposable skin stapling devices provide a rapid, effective means of closing donor site incisions and affixing graft edges to the recipient site.62 Successful skin engraftment, or “take,” depends on establishment of arterial and venous connections with the recipient bed.45 The graft bed must be capable of furnishing adequate vasculature for the graft. Grafts should be placed on either healthy granulation tissue or an acute wound surface that is vascular enough to produce granulation tissue and is free from infection and debris. If epithelium is advancing from the wound edge over healthy granulation tissue, the wound should be able to support a skin graft.48,54 An adequate granulation tissue bed that will support engraftment may come from either a surgically created acute wound or an acute natural wound that has been rendered surgically clean.35,51 A slightly contaminated wound that is treated before the onset of bacterial invasion may be cleaned, irrigated thoroughly, and debrided before acute application of a skin graft during the same procedure.59 In this situation, provision must be made for the greater amount of bleeding and production of wound fluid compared with a granulation tissue recipient bed, and extra absorptive capacity is built into the bandage. An alternative to acute grafting of the open wound is to debride the wound thoroughly, bandage with daily dressing changes, and apply a graft on the third postoperative day.8 The wound must be visually free from evidence of infection; additional provision for drainage from beneath the graft is indicated if there is any doubt about the condition of the tissues.62 Clean abrasion and avulsion wounds may be grafted acutely.54 Studies of dogs report faster vascularization of grafts placed on fresh tissue than on a granulation surface.2,27 Engraftment requires vascular ingrowth; therefore, grafts will not take when applied to any tissue lacking adequate vascularity on the recipient surface that will be in contact with the raw (deep) surface of the graft. Examples of such surfaces include stratified squamous epithelial surfaces;20 heavily irradiated tissues; avascular fat; chronic poorly vascularized or hypertrophic granulation tissue; or bone, cartilage, tendon, or nerve that has been denuded of overlying connective tissue.8,9 Successful engraftment is also prevented by an excessively intense or chronic inflammatory process at the graft bed; therefore, infected wounds, crushed tissues, and chronic ulcers are poor recipient sites for grafting.17 Wounds that lack sufficient vascularity to support a graft (e.g., wounds with tissue denuded of its connective tissue covering, irradiated tissue, and avascular fat) should be reconstructed with vascular flaps rather than grafts. If an unhealthy graft recipient surface is present (e.g., infected tissue, crushed tissue, hypertrophic granulation tissue, chronic granulation tissue, or chronic ulcers), the wound should be debrided, irrigated, and properly bandaged to promote the development of healthy granulation tissue on which to place the graft.48,63 The newly harvested skin graft begins to degenerate immediately after being detached from the donor site; regeneration cannot begin until after the graft begins to receive nourishment from the recipient bed. Regeneration initially progresses more slowly than degeneration; for the graft to survive, regeneration must overtake degeneration by the seventh to eighth postoperative day.16,50 Graft survival depends on early reestablishment of sufficient circulation to provide nutrients and to dispose of metabolic waste products.16,21,40,50 Phase II of adherence begins at about 72 hours postgrafting, when the fibrinous network is invaded by fibroblasts, leukocytes, and phagocytes; these begin the conversion into a fibrous adhesion. Gain in strength continues with conversion of the fibrin network to fibrous tissue until a complete fibrous union is present by postoperative day 10.20,50,59,62,70 Even after healing, collagen maturation continues between the graft and bed. This maturation is responsible for any graft contraction that occurs; contraction is more marked in thin split-thickness grafts than in thick split-thickness grafts.13 After the graft is harvested, its blood vessels vasospasm, thus expelling most of the blood from the severed ends.3,12,26,50,55 Serum, erythrocytes, and neutrophils accumulate between the graft and recipient bed as a result of vascular leakage from the recipient bed vessels.12,16,20 Soon after placement in the recipient site, graft vessels dilate,3 pulling fibrinogen-free, serum-like fluid and cells into the graft by capillary action. This process continues, pulling cells and serum into the dilated graft vessels (Figure 80-1, A), keeping them dilated and nourishing the graft until it revascularizes. Accumulation of hemoglobin and its breakdown products gives a purplish or cyanotic appearance to the graft. Absorbed fluid diffuses into the interstitial space of the graft, producing edema; this peaks at about 48 to 72 hours postgrafting. Vascular connection between the graft and recipient bed is established at about that time; however, venous drainage may lag behind arteriolar inflow; therefore, edema may increase initially.3,4,15 As time passes, venous and lymphatic drainage improve, and excess fluid is able to exit the graft, resulting in a regression of edema, and the graft returns to a normal weight by the eighth postgrafting day.4,11,12 Inosculation is the anastomosis of the cut ends of graft vessels with recipient bed vessels of approximately the same diameter (see Figure 80-1, B). This process may begin as early as 22 hours after graft placement,12,16 but it is more commonly noted between 48 and 72 hours.4,14,42,71 The fibrin network holding the graft on the bed serves as scaffolding along which capillary buds from the graft bed grow and meet the severed ends of graft vessels.20 Many vessels may make contact and form anastomoses; however, few survive.14 In addition to recipient vessel activity, graft vessels may also actively proliferate and initiate connections to the recipient site.37 The formation of anastomoses between the graft and recipient site vessels and the resultant blood flow into the graft vessels have an inhibitory effect on capillary bud proliferation in the recipient bed. If separation from the graft bed occurs because of seroma or hematoma formation, this inhibiting effect is reduced, and granulation tissue proliferation resumes.37 Marked vascular remodeling takes place in the graft as the result of random anastomoses of graft arteries with recipient bed veins and vice versa.3 Initially, perfusion is slow when blood begins to flow in the graft vasculature on the third or fourth postgrafting day, but it continues to improve until normal flow velocity is reached by the fifth or sixth day.14 Grafts are also revascularized by the ingrowth of new vessels from the bed into the graft. These vessels may grow into the dermis or into preexisting graft vessels, which serve as nonviable conduits for new ingrowing vessels (see Figure 80-1, C). If ingrowing endothelial cells contact areas of surviving endothelium in old graft vessels, anastomosis occurs, resulting in more rapid revascularization. New capillary ingrowth occurs at approximately 0.5 mm/d. Graft vessels that are not involved in inosculation or ingrowth of new vessels degenerate and disappear.16,50 Newly formed vessels are tortuous and irregularly dilated. Maturation of vessels begins within 48 hours after the appearance of new, undifferentiated capillaries. The vessels that receive most of the blood supply undergo an increase in diameter and lose their tortuosity, forming arterioles. This maturation and differentiation process continues until a new system of arterioles, venules, and capillaries has developed. As with ordinary second intention healing of open wounds, vascularization of the graft is under cytokine control. For example, levels of vascular endothelial growth factor are elevated in the graft, particularly from postgrafting days 5 to 7,39 corresponding with the peak of vascular ingrowth activity. In addition to blood vessels, new lymph vessels form for lymphatic drainage of the graft by the fourth or fifth day.62 The progression of vascularization can be followed by observing characteristic color changes in the graft. When initially placed, grafts are pale. During the next 48 hours, the graft may appear red to dark purple as inosculation begins, resulting in congestion as inflow tends to exceed outflow. This gives way to a lighter reddish hue by 72 to 96 hours. By postoperative day 7 or 8, the entire graft is red to pink if survival is complete. A more normal pale pink color gradually returns by day 14.63 Areas of avascular necrosis are indicated by persistently pale coloration (whitish or light tan); these areas will undergo necrosis and then slough. Dry ischemic necrosis may appear as black discoloration. A partial-thickness take may be characterized by dark discoloration because of vascularization of the deep portion of the dermis and ischemic necrosis of the epidermis and superficial dermis. This superficial necrotic layer forms a dark eschar on the graft surface. After this sloughs or is debrided, the underlying viable dermis reepithelializes from dermal adnexa. The final appearance of the graft in a partial-thickness take is one of sparsely haired, epithelialized skin. Reinnervation of grafts depends on the type and thickness of the graft, the amount of scar tissue formation, and the innervation of surrounding tissue. Reinnervation is better in full-thickness grafts than in split-thickness grafts.22 In the authors’ experience, animals show signs of paresthesia as grafts reinnervate. At about 3 weeks after full-thickness grafting, most grafts appear to be fully healed, with normal skin color indicating a well-established vascular supply and strong connective tissue attachment to the wound bed. However, when bandaging is discontinued, the animal may persist in licking or chewing the graft. An additional period of bandaging may help protect the graft during this time of reinnervation. Elizabethan collars have been advocated for about 1 month postoperatively with temporary removal and close observation.63 A variety of different skin grafts have been used successfully in small animals. A split-thickness skin graft is composed of epidermis and a variable quantity of dermis. These grafts are classified as thin, intermediate, or thick, depending on the amount of dermis in the graft.12,20 The main indication for this type of graft in dogs is for reconstruction of defects with extensive skin loss.27 Because the skin of a cat is so thin, split-thickness grafts are not indicated.22 Graft Bed Preparation: Before grafting, the defect must be prepared to accept the graft. Chronic granulation tissue should be completely excised if it is present, and grafting should be delayed until a healthy acute granulation bed forms, usually within 4 or 5 days. In the presence of healthy granulation tissue, the epithelium at the wound edge is removed.48,51 The top of healthy granulation tissue may be lightly scraped or the superficial 0.5 to 2.0 mm of granulation tissue may be tangentially excised with a sharp blade.48,52 Alternatively, the surface of the granulation tissue may be wiped with a gauze sponge to prepare for grafting.9 The defect is covered with a surgical sponge soaked in antiseptic solution (i.e., 0.05% chlorhexidine diacetate in normal saline) while the graft is harvested. Rinsing the wound surface with a 0.25% solution of neomycin in saline is an alternative.52 It is advisable to let natural hemostasis occur before applying the graft. If bleeding persists, it may be controlled by pressure or careful pin-point electrocoagulation.22 A fresh wound should be thoroughly debrided and lavaged with an antiseptic solution before grafting. If a minimal amount of devitalized tissue remains on the wound after surgical debridement, wet-to-dry dressings may be applied for an additional 1 to 2 days to hasten the removal of residual debris; at this point, nonadherent dressings are indicated to minimize further removal of granulation tissue at bandage changes.50 By using this method, a healthy granulation tissue bed for grafting can usually be established within 5 to 7 days. An alternative is to perform staged surgical debridement and lavage with a 0.05% chlorhexidine solution. Between debridement procedures, the wound can be bandaged with a water-soluble antibiotic (e.g., silver sulfadiazine) and some of the new bandage materials that interact with wound tissues to enhance healing.65 The night before grafting, a nonadherent bandage should be applied with a thin coating of 0.1% gentamicin sulfate ointment.63 Split-thickness grafts can be cut “freehand” with a manually operated graft knife. There are a number of designs available; most use some sort of cutting guide to help control the depth of the cut. The Goulian-type graft knife (Weck knife) (Figure 80-2) uses a disposable blade and has a fixed guard that slides over the blade. The Humby and Watson graft knives use an adjustable guard in the form of a round rod positioned in front of the blade. A convenient way to set the depth for these knives is to use a scalpel blade as a “feeler” gauge. An ordinary (not rib-back) #10 or #15 blade is approximately 0.35 mm thick, which is an ideal thickness for partial-thickness grafts in dogs. To set the depth, the scalpel blade is slipped between the graft knife blade and the guard, and the guard is adjusted until the distance between the guard and knife blade is equal to the thickness of the scalpel blade with no appreciable play.41 Partial-thickness grafts can also be harvested with an ordinary razor blade or a scalpel blade. 43,54 A partial-thickness incision is made in the donor skin by a scalpel blade held perpendicular to the skin surface. After this initial incision has been made, a scalpel or razor blade is held almost parallel to the skin surface, and cutting is begun. After 3 to 4 mm of partial-thickness skin has been cut, three or four traction sutures are placed in the split thickness of skin to apply traction on it as the blade cuts the remainder of the graft (Figure 80-3). It may be necessary to use several blades before completing the procedure because the blades rapidly become dull. Cutting grafts with scalpel blades may be tedious, and the curved blade may be difficult to control in cutting grafts larger than 1 cm.62 Some holes may inadvertently be cut in the graft as it is being harvested; however, these will heal, and they allow drainage from beneath the graft.28 Several types of power-driven dermatomes are available for harvesting split-thickness grafts, and these can be used on dogs. Perhaps the most widely known is the Brown dermatome, which uses a rapidly oscillating blade similar to an electric hair clipper. It is available in both electric- and gas- (nitrogen-) powered versions (Figure 80-4) and has been described to work well in harvesting split-thickness grafts from dogs.42 After aseptic preparation of the donor site, it is common practice to inject sterile physiologic saline or lactated Ringer’s solution subcutaneously under the donor site to elevate and tense the skin. The skin should also be lubricated with sterile mineral oil or a sterile water-soluble surgical gel. These measures help ensure smooth progression of the dermatome as it is advanced. Good donor sites for grafts include the lateral thorax, the thoracolumbar region just lateral to the dorsal midline, the proximolateral aspect of the forelimb, and the lateral thigh.42 After a new disposable blade is placed in the dermatome, the thickness of the graft is determined by an adjustment on the instrument. The thickness of the graft can be selected from 0 to 0.76 mm (0 to 0.03 inch). A graft thickness of 0.38 mm (0.015 inch) is usually selected for use on dogs. The width of the graft is determined by interchangeable base plates used on the dermatome, ranging from 1 to 4 inches in width. The dermatome blade is lubricated with sterile mineral oil or water-soluble gel. The instrument is turned on, and the rapidly oscillating blade is advanced along the donor site, which is held taut by the surgeon and assistant surgeon. The assistant surgeon uses the fingers or a sterile tongue depressor to apply traction while the surgeon applies countertraction with the free hand not operating the dermatome. The use of towel forceps has also been described for placing the skin under tension. After cutting has started, the dermatome may be continuously advanced or the graft may be severed. Especially in cutting long grafts, a second assistant should use skin hooks, forceps, or two 20-gauge needles bent to serve as skin hooks to grasp and tense the graft as it comes from the dermatome. The power-driven dermatome is relatively easy to use, but it is an expensive instrument and thus may not be practical for occasional users. Graft Placement: After harvest, the graft is placed on the recipient bed and oriented so that the direction of hair growth will be the same as that of the surrounding hair. The graft may be cut to an exact fit of the defect; however, many surgeons prefer the graft to overlap the edge of the defect by up to 1 to 2 cm. The overlapped portion of the graft will undergo avascular necrosis and can be excised later (Figure 80-5). Whether overlapped or not, the edge should be adequately secured with sutures or staples placed through the graft and surrounding skin. Additional sutures should be placed as needed in the central field of the graft to ensure good contact with the recipient bed.12,27 Donor Site Closure: The donor site can be excised completely and the edges sutured together for an improved cosmetic result.57 Alternatively, the donor site can be covered with a sterile nonadherent dressing and antibiotic ointment or a petrolatum-impregnated gauze and treated as an open wound.18 The contact layer is covered with secondary and tertiary layers. The donor site heals by reepithelialization from the cut ends of hair follicles, sebaceous glands, and sweat glands as well as from the wound edges.52 Disadvantages of open wound management of the donor site include the requirement for multiple bandage changes, prolonged healing time, and sparse hair regrowth.48 After placement of the graft, hematomas may be removed from under the graft by swirling a cotton-tipped applicator under the graft. A thrombin or saline solution may be used to irrigate underneath the graft before application of the dressing.8,12,20,35 Bandages: Antibiotic ointment may be placed around the graft edges, and a nonadherent dressing pad or a gauze pad impregnated with petrolatum may be placed over the graft. An absorbent conforming mesh gauze is wrapped over the area followed by application of an immobilizing splint and tape or a split cast and tape that can be removed periodically for dressing changes. If the graft has been placed over a joint, immobilization can be accomplished with a Mason metasplint, a Schroeder-Thomas splint, a transarticular external fixation splint, or a molded splint of casting material incorporated into the bandage. Immobilization is necessary until fibrous tissue anchorage is strong enough to withstand shearing strain without capillary rupture.35 Immobilizing splints are usually necessary for 10 to 14 days postoperatively.66 The frequency of bandage changes depends on the temperament of the animal and the cleanliness of the bandage. The first bandage is usually changed 48 hours after surgery.52 If a hematoma or fluid is noted beneath a graft when the bandage is changed, it can be removed by making an incision in the graft and applying gentle pressure over the graft or by using a sterile eye dropper or a cotton-tipped applicator to remove serum or blood.12,20,35,62 Because of the risk of contamination or graft movement, the longer the intervals between bandage changes, the better. However, frequent changes (i.e., daily) may be necessary if bandages become soiled with feces or urine, if an animal disturbs the bandage, or if infection is present. Bandage changes are performed carefully to avoid damage to the graft from movement and contamination.7,43 Physical restraint of the animal is always indicated, and chemical restraint may also be necessary.42,59,62 A tie-over bandage may be used for local immobilization and conformity of the graft and bed; it immobilizes grafts in difficult areas, such as on inner thighs and upper limbs.42 Several 2-0 or 3-0 monofilament nylon sutures with long ends are placed in the skin around the graft about 1 cm from the graft edge. A nonadherent pad is placed over the graft followed by a bolus of sterile cotton or gauze. The long ends of the preplaced sutures are drawn together over the bolus and twisted together until they pull the bolus gently down against the graft. One or two metal clips can be used to fix the twisted sutures near the bolus. Gauze, tape, and a splint or cast are used in addition to the tie-over bandage for more protection and immobilization. Gentle elevation of the edge of the tie-over bandage between some of the tie-over sutures allows inspection of the graft. Tie-over bandages are generally removed on the third or fourth postoperative day followed by continued protective bandaging and immobilization until at least 21 days postoperatively.59,62 Negative-Pressure Wound Therapy: More recently, advances in wound care have been applied to postoperative care of split-thickness grafts. In randomized clinical trials of human patients, the use of postoperative negative-pressure wound therapy on split-thickness grafts has been shown to improve the percentage of graft survival and the cosmetic appearance compared with a tie-over bandage or similar standard dressing.30,34,38
Skin Grafts
General Considerations
Classification
Indications and Preoperative Considerations
Common Causes of Graft Failure
Postoperative Considerations
Cosmesis
Surgical Principles
The Graft Recipient Site
Where Grafts Will Not Take
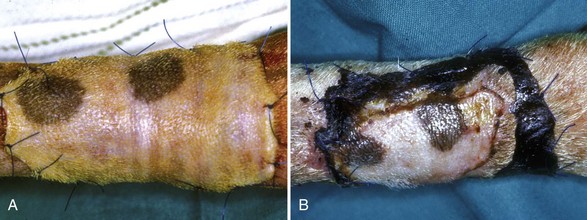
The Process of Engraftment (“Graft Take”)
Adherence
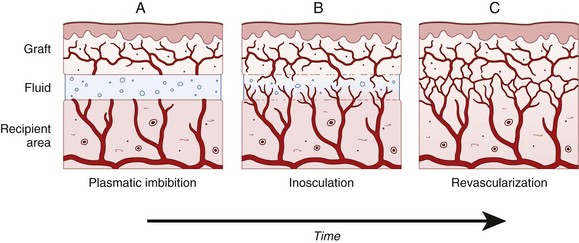
Plasmatic Imbibition
Inosculation
Vascular Ingrowth
Types of Grafts
Split-Thickness Grafts
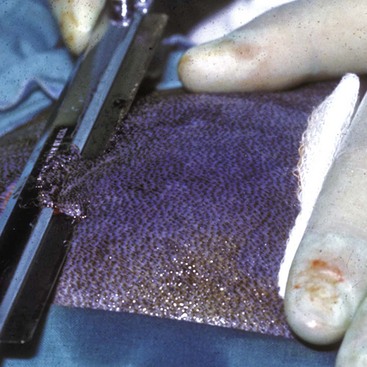
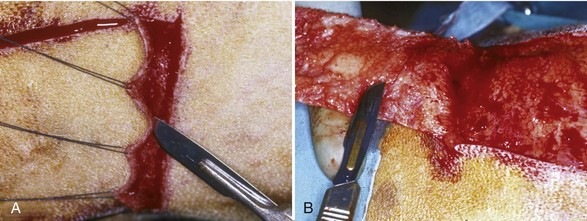
Technique
Aftercare
![]()
Stay updated, free articles. Join our Telegram channel

Full access? Get Clinical Tree


Skin Grafts

Only gold members can continue reading. Log In or Register to continue
