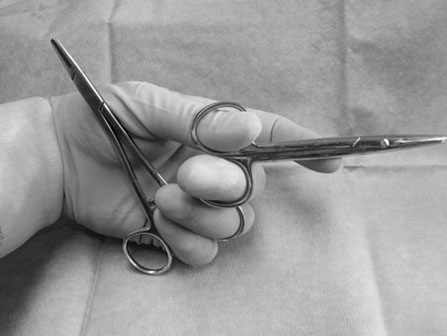
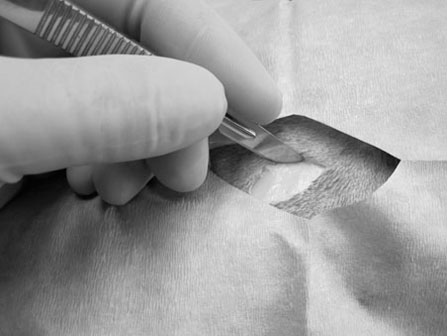
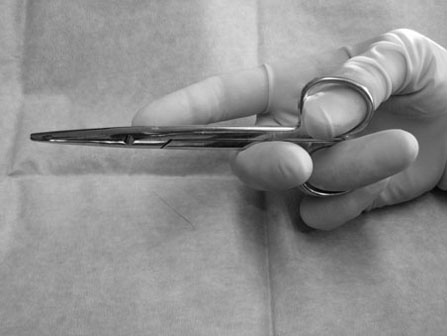
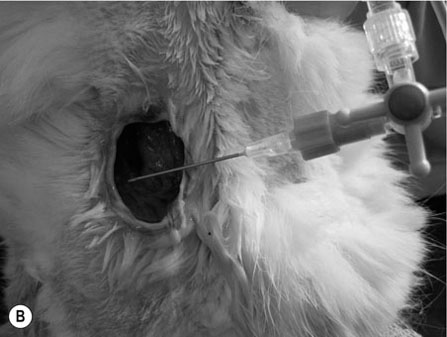
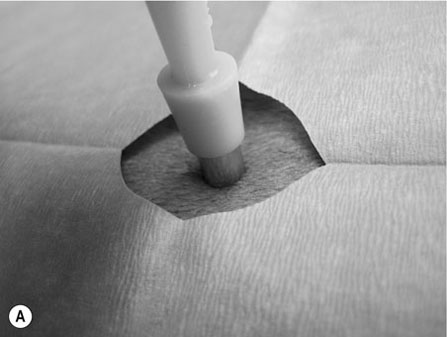
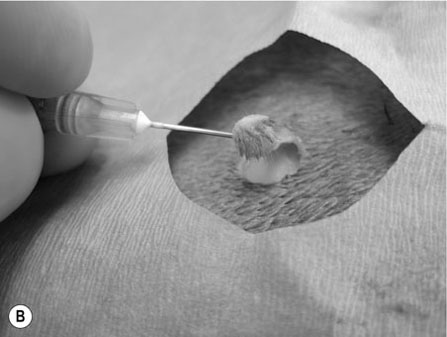
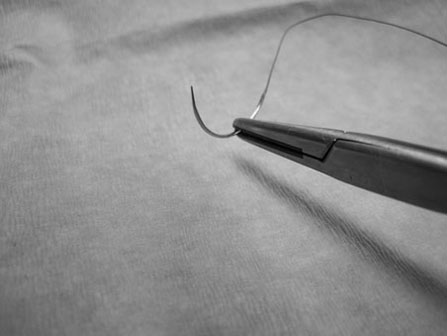
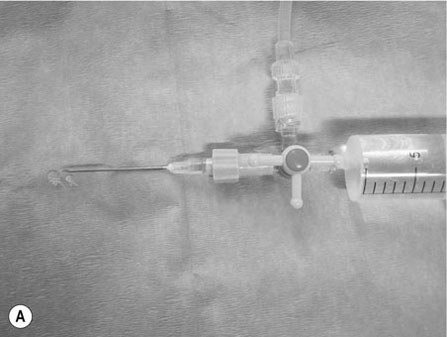
Scalpels, scissors, tissue forceps, haemostatic forceps and needle holders are the main instruments required for minor surgery. Their use is generally self-explanatory, but some tips may prove useful. Whatever method is followed for a particular technique, it is always important to follow some basic rules of surgery, to increase the likelihood of a successful outcome. Halstead’s seven principles of good surgical technique are outlined in Box 12.1. Close adherence to these is the key to successful surgery. Several procedures refer to ‘palming’ an instrument, which is a useful technique when using looped instruments such as scissors, artery forceps and needle holders. These may be held by the third finger in the palm of the hand when not in use (Fig. 12.1). Palming an instrument allows the surgeon to use one instrument whilst holding one or more additional instruments in the same hand. The saved instrument may be swung into action when needed. This means that the instrument is readily available for use and no time is wasted trying to locate it. 1. Action: A blade should always be placed on (and removed from) a blade holder using needle holders. 2. Action: The pencil grip is generally used for handling a scalpel (Fig. 12.2). Rationale: This grip gives fine control over the blade. 3. Action: The scalpel blade should be drawn backwards along the tissue, using enough pressure to make a single clean cut through the skin. 4. Action: Your free hand may be used to steady the skin and to provide a little tension to the wound edges. There are various types of needle holders: • Gillies – has a scissor action for cutting suture ends but does not have a ratchet. • Olsen-Hegar – has a cutting edge and a ratchet to hold the needle securely. • Mayo-Hegar – similar to long-handled artery forceps and has a ratchet for holding the needle but no cutting edge. • McPhail’s – has a spring ratchet so that squeezing the jaws together opens the holder and releases the needle. In general, the easier ones to use are locking (ratcheted) needle holders without scissors. This is because the scissors may cut the suture material inadvertently. 1. Action: Mayo-Hegar needle holders should be held in the tripod manner (see Handling surgical scissors procedure). 2. Action: The needle is held about one-third of the way along its curve (Fig. 12.3) within the jaws of the needle holders. 3. Action: The wrist is used to rotate the needle, pushing it through the tissue in a curve. 1. Action: The tripod hold is most commonly used for scissors (Fig. 12.4). 2. Action: The tips of the thumb and third finger are placed in the scissors loops, and the index finger is used to direct the tip of the scissors. Rationale: The second finger helps to steady the scissors. 3. Action: For cutting fine tissue, use the tips of the scissors; for cutting thicker tissues, the base of the scissors may be better. 4. Action: Blunt dissection involves inserting the tip of the closed scissors into tissue and opening them whilst they are inserted. 5. Action: Scalpel blades should be used to cut skin and scissors used to cut subcutaneous tissue. 6. Action: Surgical scissors should not be used to cut suture material. Rationale: This will blunt the scissors. Suture scissors should always be used for this purpose. 1. Action: Assess the patient for dehydration and commence intravenous fluids if required. 2. Action: Administer a premedication (premed) to the patient as directed by the veterinary surgeon. 3. Action: Stabilize the patient under sedation or general anaesthetic. Rationale: This will reduce any pain and prevent unwanted movement from the patient. 4. Action: Clip the skin surrounding the abscess and prep for aseptic surgery (see Chapter 7). 5. Action: Drape the surgical site (see Chapter 7). 6. Action: Observe strict aseptic technique: wear gloves, gown and mask. 7. Action: Make a stab incision into the abscess, preferably at the most dependent area. A no. 11 scalpel blade is most useful for this. Rationale: Making the opening at the most dependent part will help gravity to drain the abscess. 8. Action: Ensure exudate is emerging from the incision. If none is seen, try going a little deeper with the blade, ensuring that no damage is done to the deeper tissues. Rationale: If none is seen, it may be that the incision is not deep enough. 9. Action: Using the blade, make an X-shaped incision about 1 cm in size. Alternatively, a small triangle of skin may be cut out. Rationale: A stab incision may heal too quickly to allow adequate drainage. 10. Action: Gently squeeze the area surrounding the incision to release the purulent material. Rationale: The pus may be quite viscous and require encouragement to leave the wound. 11. Action: Using a 20 ml syringe, three-way tap, 19G needle and giving set, flush the wound with at least 500 ml of warmed sterile saline (Fig. 12.5A, B). If any necrotic tissue remains, scrape the cavity with a sterile Volkmann curette or a no. 10 scalpel blade 12. Action: The wound is left open to drain. 13. Action: Antibiotics and suitable analgesics are prescribed for an appropriate length of course. Rationale: To kill off any infection and to prevent recurrence. 14. Action: The owner may be instructed to bathe the wound in salty water for a few days. Biopsies are samples of tissue that may help us to gain insight into a particular disease process. Biopsying may be carried out to investigate a skin disease (dermatopathy) or an abnormal mass and the results may provide valuable information as to the presence of a disease and an indication of what the treatment should be. A biopsy procedure should ideally give maximum information for minimal patient morbidity. When neoplasia is suspected, it is preferable to perform a biopsy prior to considering surgery in order to assess whether it is possible to remove just the mass (local excision) or whether a large area of normal tissue surrounding the growth must be removed to ensure that any stray neoplastic cells are also removed (wide margin of excision). Table 12.1 lists common skin and subcutaneous tumours of the cat and dog. Table 12.1 Common skin and subcutaneous tumours of the dog and cat M, Malignant; B, benign. • Surgical – either taken with a scalpel or with a biopsy punch. This type provides the greater amount of tissue and enables the pathology laboratory to view the cells and any associated disruption of the architecture of the tissue. Patient must be anaesthetized. • Fine-needle aspirates – these only allow cells to be assessed as the tissue is disrupted. This limits the amount of information that the pathologist can obtain and sometimes results in a lack of diagnosis. Patient may be conscious or sedated. • Tissue core biopsy – requires much less tissue but still allows the layout of the tissue to be evaluated. 1. Action: Administer a premed to the patient as directed by the veterinary surgeon. 2. Action: Stabilize the patient under sedation or general anaesthetic. Rationale: This will reduce any pain and prevent unwanted movement from the patient. 3. Action: Clip the skin surrounding the biopsy area and prep for aseptic surgery (see Chapter 7). 4. Action: Drape the surgical site. Rationale: This reduces contamination of the wound. 5. Action: Observe strict aseptic technique: wear gloves, gown and mask. Rationale: This reduces contamination of the wound. 6. Action: Using a no. 10 or 15 scalpel blade on a holder, make an elliptical incision through the skin at one edge of the biopsy site, aiming to remove a piece of tissue of about 1 × 0.5 cm. 7. Action: The biopsy should include all skin layers and should include some normal tissue at the edge. 8. Action: Close the skin wound using simple interrupted sutures of non-absorbable suture material, e.g. Ethilon. Rationale: Absorbable sutures may not absorb well in abnormal tissue. 9. Action: Place the biopsy in a 10% solution of formol saline. Rationale: This fixes the tissue and delays decomposition, preserving the histological features. 10. Action: Seal the biopsy container appropriately and label it with the patient’s details. Rationale: Control of Substances Hazardous to Health regulations apply to all biological samples. 11. Action: Send the sample to the pathology laboratory with a completed histopathology request form which includes the following information: • A brief description of the appearance and position of the biopsied tissue • How long it has been present • Any previous or concurrent treatment • Whether margins have been included in the biopsy. 12. Action: The patient should be discharged, with instructions to the owner on wound care and when to expect the biopsy results. Rationale: Antibiotics are generally not required following a biopsy. 1. Action: Follow steps 1–5 as above. Rationale: This is a surgical biopsy and so will require the same aseptic technique. 2. Action: Select a sterile biopsy punch of suitable size and place it perpendicular to the skin surface over the area to be biopsied. Rationale: A larger punch will give a better chance of a useful biopsy. 3. Action: Using slight downward pressure, rotate the punch backwards and forwards, cutting through the skin as evenly as possible (Fig. 12.6A). 4. Action: Lift the punch away from the skin at a slight angle: this should remove the circle of tissue. If the tissue remains in situ, use a hypodermic needle to lift one edge and then cut the attachments with scissors (Fig. 12.6B). Rationale: Using forceps to lift the tissue may damage the biopsy. 5. Action: Follow steps 7–12 as above. Rationale: The product of this procedure is dealt with in exactly the same way. This technique is more useful for evaluation of subcutaneous masses than skin masses. 1. Action: Follow steps 1–5 as for a surgical biopsy. 2. Action: Prime the trigger tissue core biopsy device by drawing back the spring-loaded clip. Rationale: This must be done before the needle is inserted into the tissue. 3. Action: Make a small cut over the chosen point of entry of the biopsy needle with a no. 11 scalpel blade. 4. Action: Introduce the needle into the mass and depress the plunger to its first point of tension. Rationale: This advances the needle into the centre of the mass and exposes the biopsy channel. 5. Action: Fully depress the plunger until a click is felt. Rationale: The outer sheath is sprung forward, effectively cutting a core of tissue from the mass. 6. Action: Remove the needle and pull the plunger out again, reloading the device. 7. Action: Fill a 5 ml syringe with sterile saline and attach a 23G needle. Use this to rinse the biopsy off the needle and into a biopsy pot containing 10% formol saline (Fig. 12.7). Rationale: Using a needle to scrape the tissue off may damage the delicate biopsy. 8. Action: Repeat the process if further biopsies are required. 9. Action: Examine the biopsy site for any evidence of bleeding. 10. Action: Follow steps 10–12 as above. Rationale: The product of this procedure is dealt with in exactly the same way.
Minor surgical procedures
USE OF INSTRUMENTS
Procedure: Handling a scalpel
Procedure: Handling needle holders
Procedure: Handling surgical scissors
SURGICAL PROCEDURES
Procedure: Surgical treatment of abscesses
SKIN BIOPSY TECHNIQUES
Skin tumours
Subcutaneous tumours
Mast cell tumour (M)
Lipoma (B, M – rarely (liposarcoma), but may be infiltrative)
Squamous cell carcinoma (M)
Haemangioma (B)
Histiocytoma (B)
Haemangiosarcoma (M)
Lymphoma (M)
Soft-tissue sarcoma (M, but slow metastatic rate – these tumours tend to recur)
Melanoma (B, M)
Lymphoma (M)
Basal cell tumour (B)
Mast cell tumour (M)
Sebaceous adenoma (B)
Sebaceous adenocarcinoma (M)
Trichoepithelioma (B)
Papilloma (B)
Procedure: Surgical biopsy
Procedure: Punch biopsy
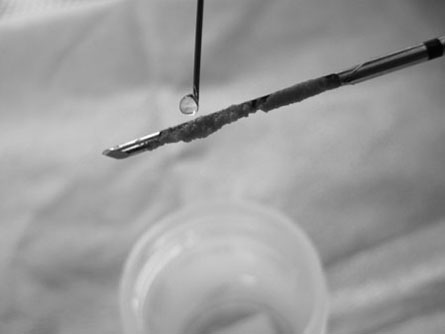
Procedure: Tissue core biopsy
![]()
Stay updated, free articles. Join our Telegram channel

Full access? Get Clinical Tree