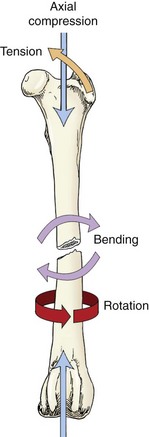
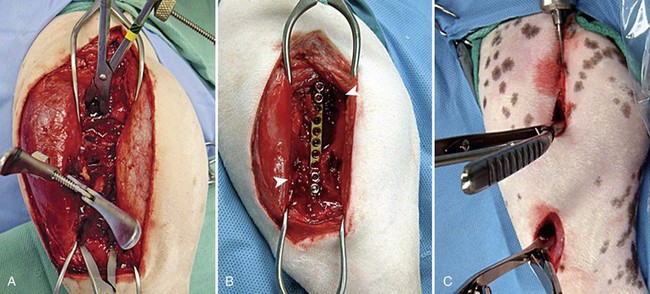
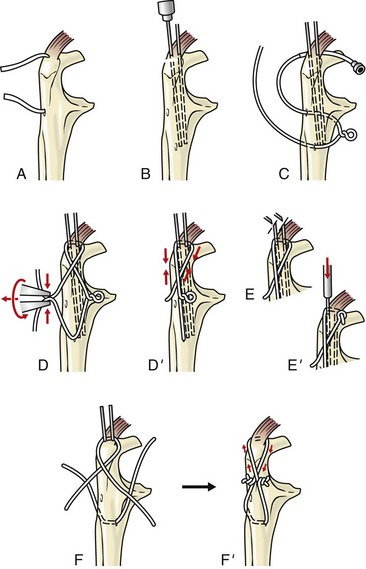
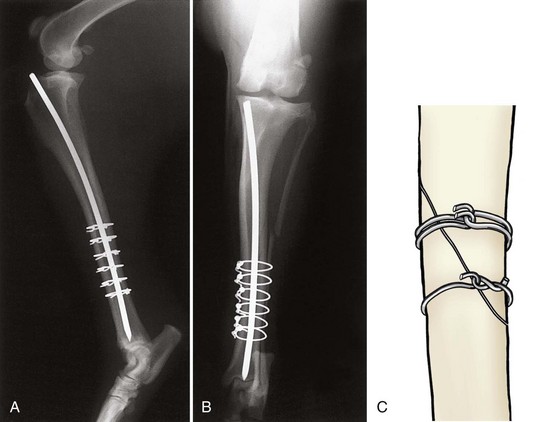
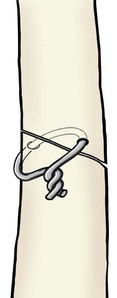
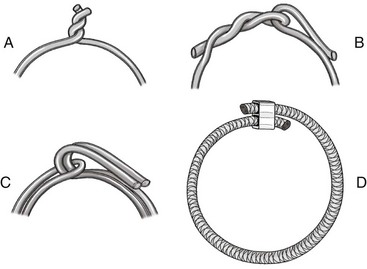
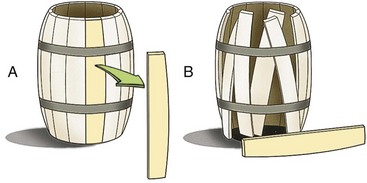
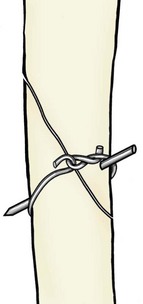
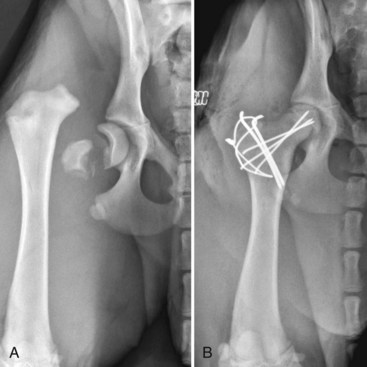
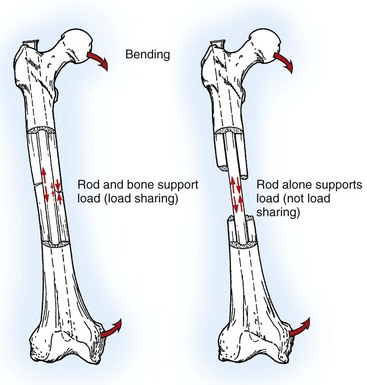
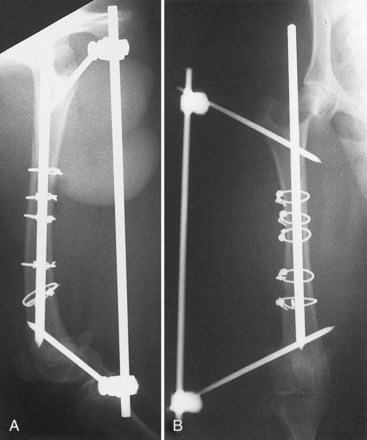
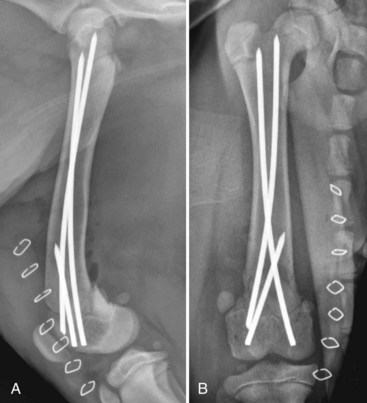
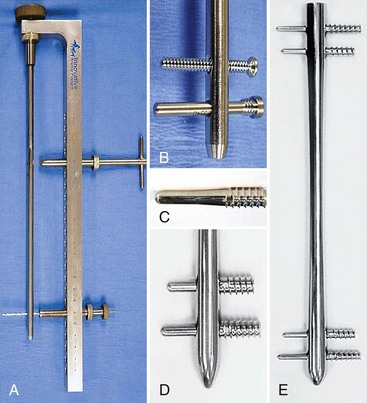
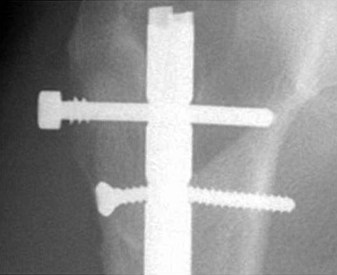
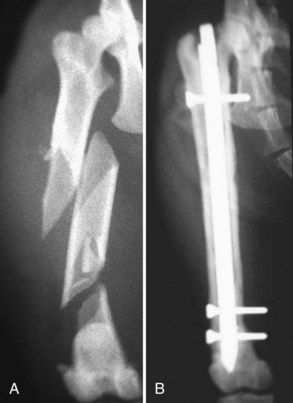
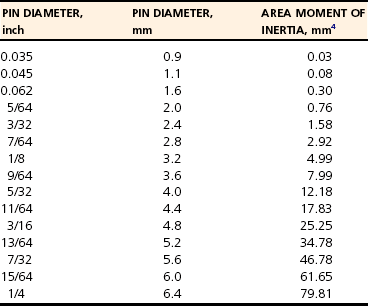
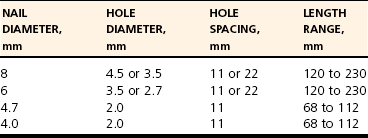
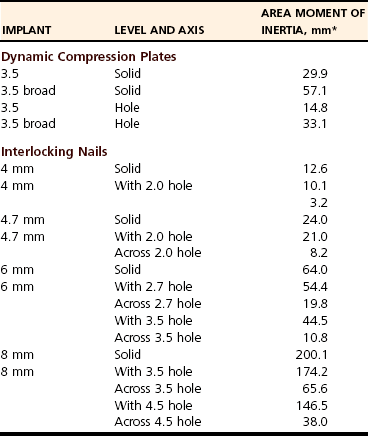
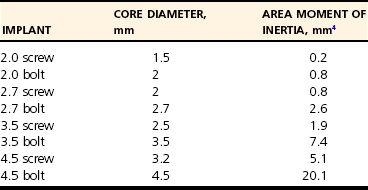
Chapter 43 The stability of the fracture fragments dictates the mode of fracture healing (see Chapter 41). Although it takes longer for the bone to reach its normal strength, complications are less likely after stable repair. This stability is particularly important for articular fractures, in which fragment motion results in joint damage, inflammation, and greater osteoarthritis. When absolute rigidity is not achieved, secondary bone healing involving production of callus and remodeling occurs. Healing parameters of radiographic union and functional strength are often achieved more quickly, but there may be more discomfort for the patient, and the implants experience greater stress, predisposing them to failure. Too much motion may cause healing to be delayed or to fail. Reduction of the fracture is necessary to restore the function of the bone. Anatomic reduction—exact rebuilding of the bone—offers the advantage that the rebuilt bone structure supports the fixation at the same time as the fixation supports the bone. This type of implant is a neutralization implant, in that it acts to neutralize forces being borne by the bone (Figure 43-1). The primary concern is that the tissues around the fracture must be dissected to manipulate the fragments and to place the implants. This may further devitalize portions of the bone, which may slow healing and increase the risk of infection. Anatomic reduction is necessary in articular fractures, in which restoration of a smooth articular surface is essential to minimize future cartilage injury. After radiographs are reviewed and fracture classification is completed, the surgeon should determine whether the fracture can be reconstructed. If the answer is no, then an appropriate fixation technique should be devised, depending on the fracture type and location. If the fracture can be reconstructed, the subsequent question should be whether or not anatomic reconstruction is desired. If anatomic reconstruction is required or elected, the AO* (Arbeitsgemeinschaft für Osteosynthesefragen) principles of fracture fixation should be followed to achieve primary bone healing. If open reconstruction is neither desired nor possible, then techniques of biological osteosynthesis are applied to promote secondary bone healing. Fractures suitable to open anatomic reconstruction include (1) transverse, (2) short oblique, (3) long oblique, (4) segmental, (5) minimally comminuted (such as those including large butterfly fragments), and (6) articular fractures. However, open anatomic reconstruction requires various degrees of soft tissue dissection to allow manipulation, reduction, and rigid stabilization of the fracture segments (Figure 43-2, A). Iatrogenic damage to the soft tissues, periosteum, and fracture hematoma inevitably occurs and potentially impedes healing.139 Although restoration of the joint surfaces is essential for articular fractures, its necessity for fractures of the diaphysis has been challenged over the past two decades with the advent of biological osteosynthesis.† In response to complications associated with traditional open reduction techniques, a paradigm shift has occurred from establishing absolute rigid fixation to creating an environment more conducive to fracture healing.139 Biological osteosynthesis is founded upon the theory that less precise reconstruction and less rigid fixation will reduce iatrogenic trauma to the fracture site and encourage early formation of callus with rapid secondary bone healing.139 Some of the principles of biological osteosynthesis include (1) indirect fracture reduction using limited surgical approaches with minimal, if any, disturbance of the fracture hematoma, (2) fracture stabilization using bridging osteosynthesis rather than anatomic reconstruction and rigid fixation, (3) limited reliance on secondary implants, such as cerclage wires or interfragmentary screws, and (4) limited, if any, use of bone grafts. These principles may be implemented through the use of an “open but do not touch” technique or by using various minimally invasive surgical techniques collectively referred to as minimally invasive osteosynthesis. The “open but do not touch” technique is the simplest form of biological osteosynthesis. Although this technique requires an open approach for direct observation, the fracture site is not disturbed and alignment is restored via manipulation of the major bone fragments at positions away from the fracture (Figure 43-2, B). Distraction and alignment of the segments are facilitated by the use of bone-holding forceps or intramedullary implants, such as an intramedullary rod or interlocking nail. The “open but do not touch” technique, however, requires an open approach and therefore inevitably results in some degree of soft tissue manipulation and vascular compromise. With minimally invasive osteosynthesis, open exposure of the fracture is not performed, and only small incisions remote from the fracture site are used to achieve closed reduction and fixation (Figure 43-2, C). Minimally invasive osteosynthesis most effectively preserves an optimal biologic environment for fracture healing. However, in part because of the lack of direct observation of fracture segments, proper implementation of minimally invasive osteosynthesis techniques is associated with a steep learning curve. The unique conformation and large surrounding muscle mass of some bones can make closed reduction particularly challenging. Preoperative radiographs and a normal bone specimen can be used for reference during surgery; however, specialized training and regular practice are essential for proficiency. To avoid potentially devastating iatrogenic complications, intraoperative fluoroscopy is highly recommended for assessing fracture reduction and alignment, as well as for ensuring proper positioning of the implants. Although critical for the reduction of articular and metaphyseal fractures, intraoperative imaging for diaphyseal fractures is considered beneficial but not necessary. The concepts and techniques of minimally invasive osteosynthesis are progressively gaining acceptance as an alternative to previously described methods of repair. Orthopedic wire is made of 316L stainless steel, similar to most implants, but it is more malleable so that it can be contoured and secured by a knot. It has little bending strength but resists loads aligned with it. The tensile strength is related to the cross-sectional area (π × radius2). Therefore, a small increase in wire diameter greatly increases the strength of the wire. The usual sizes, respective diameters, and relative strengths are given in Table 43-1. The size of the wire is determined by the size of the bone and the magnitude of the expected forces. There are no rules for the appropriate size for a particular situation other than to use the biggest diameter that seems appropriate to the size and strength of the bone. In the authors’ experience, for cerclage and tension band wires, 18 gauge wire is used in dogs larger than approximately 20 kg; 20 gauge wire is usually used in smaller dogs and in cats, although 24 gauge may be appropriate for some uses in miniature and toy breeds. Table • 43-1 Gauge and Diameter of Commonly Used Orthopedic Wire *Relative tensile strengths are given in a ratio that compares the other sizes versus 18 gauge because this size is used most often. From Roe S: Internal fracture fixation. In Slatter DH, editor: Textbook of small animal surgery, ed 3, Philadelphia, 2003, Saunders/Elsevier. Wire use is of four types: tension band, cerclage, hemicerclage, and interfragmentary. A tension band wire is placed to oppose the pull of a muscle or ligament on a bone fragment (Figure 43-3). It usually is used in combination with two small-diameter pins that align the fragment and counter rotation. A figure of eight pattern over the aspect of the bone opposite the structure distracting the fragment optimizes the ability of the wire to resist the pull. In theory, because the wire counters the tension vector in the tendon or ligament, a portion of the load is actually converted into a force that compresses the fracture or osteotomy site, which further enhances healing. A tension band wire is usually anchored around the pins or screw used to align the fragment. In the calcaneus, the pin is countersunk to allow unimpeded movement of the superficial flexor tendon, so the wire is anchored through a hole drilled in the most proximal aspect of the proximal fragment. In most instances, the wire is anchored distally through a transversely drilled hole. Because the wire makes several tight bends, tightening each arm of the figure of eight independently removes all slack from the wire. It is possible to overtighten a tension band wire, causing the aligning pins to bend and the fragment to be displaced. A cerclage wire fully encircles a bone to hold fragments apposed. It is best suited to long oblique fractures of the diaphysis (Figure 43-4). It naturally aligns itself with the narrowest diameter close to its location unless a pin is placed to maintain a specific position or alignment, or a notch is made in the bone to ensure a set position for the wire. Knot types and specific principles of their application are discussed later in this chapter. A variant of the cerclage wire is the hemicerclage. In diaphyseal fractures in which it is not possible to place a full cerclage, a hemicerclage may add some stability. Holes are drilled in both the proximal and distal fragments, and the wire is preplaced before reduction of the fracture (Figure 43-5). The surgeon must decide the optimal direction in which to wrap the wire, because it is effective in countering forces only in one direction. When an intramedullary pin is used (see later), the pin is included within the hemicerclage loop so that the fragments are more tightly braced to the pin. The primary role of hemicerclage is to maintain alignment while definitive fixation is applied. Because they limit rotation well in only one direction, and because they rely on the strength of the hole in the bone when loaded, hemicerclage wires are mechanically inferior to a full cerclage and must not be relied on as primary fixation. Interfragmentary wire may be used in long bone fractures, but more often it is placed between fragments of mandible or maxilla (see Chapter 67, Figures 67-9 thru 67-13). Wires are anchored into each fragment by being passed through transversely drilled holes. The interdental wire is a specific application of wire that is anchored around the base of the teeth. To be successful, the fracture fragments must make good contact. Ideally, the fragments should interdigitate. Wire techniques are not effective if significant comminution or bone loss is present, because the wire relies on the integrity of the bone for stability. The wire can be secured in several different ways. In veterinary surgery, the twist and single- and double-loop knots are most commonly used (Figure 43-6).141,148,199 A square knot has been described for securing tension band wire, but it is not a good choice for cerclage because it is not possible to maintain tension in the loop while the knot is completed.161 The twist knot is probably the most commonly used method for securing both tension band wires and cerclage. Tensioning and securing are performed at the same time. However, the process of twisting may damage the wire within the knot, making it more susceptible to fatigue failure. The twist can be created with a hand instrument, such as an old pair of needle holders or needle-nosed pliers, or with a specific instrument. A twist knot must be created so that the two strands of wire wrap around one another to optimize tension generation and knot security. Pulling up firmly and evenly on the strands while twisting is important (see Figure 43-6, A). Knot-forming instruments are designed to ensure that the knot is created optimally. Opinions vary about how to finish the twist knot. When wire is used as cerclage, tension in the formed wire decreases with any manipulation of the knot.149 Mechanical studies show that only one twist is necessary to maintain tension and to produce a secure knot, so the twist can be cut short to reduce concern that surrounding soft tissues may be irritated.150 For tension band wires, resting tension is less critical, and the twists often are more superficial. The twist may then be cut longer (four or five twists) and folded flat. In tightening a figure of eight tension band, it is easier to ensure appropriate tension in both arms by forming a twist in each arm. After preliminary placement of the wire, a loop is created in the continuous strand so that it may also be twisted to tighten (see Figure 43-3). The single-loop cerclage is created by using a wire with a small loop at one end and a tightening device.23 These wires may be made or purchased pre-formed; in making your own, be certain that at least The double-loop cerclage uses a similar tightener except that there are two cranks for the two arms. To form a double-loop cerclage, a single strand of wire, approximately 13 to 14 inches long, is folded in half close to its midpoint. The folded end is passed around the bone, and the two straight ends are fed through the loop. Both arms are introduced into the tightener, and each is attached to a crank. The cranks are tightened simultaneously and independently to ensure that equal tension is generated in the two arms. Once final tension is achieved, the tightener is bent over to lock the knot. Both cranks are loosened approximately A mechanical study of common knotting methods highlighted several differences between the twist and loop methods and revealed some features of cerclage.149 A twist knot loosens by untwisting. Because of this, when a load is applied continuously, the load versus deformation curve recorded shows an increasing load, even after a number of millimeters of displacement. Loop cerclage wires loosen by unbending of the folded arm. Their load versus deformation curve reaches a peak with only a small amount of displacement. With further deformation, the load drops. If these two knots are compared by the peak load resisted, without regard for the deformation, the twist knot is superior. However, if a cerclage wire is deformed too far, it is not functional. In the study, the knots were compared on the basis of the load required to cause them to loosen. A cerclage wire was classified as loose if the resting tension was less than 30 N. The load was determined by applying a stepwise loading regimen in which the testing jig was returned to its original position after each loading event, and the resting load determined. Initial tension was lower in twist knots than in loop knots, but the former resisted similar load before loosening (Table 43-2). The double-loop cerclage generated more tension than both twist and single-loop styles and was able to resist a greater load before being classified as loose (see Table 43-2). Table • 43-2 Loop Tension and Load Resisted Before Loosening for Twist, Single-Loop, and Double-Loop Cerclage †The ability of a cerclage knot to resist loosening was determined by applying a stepwise increasing load. Cerclage wires were considered loose when their resting tension was reduced to less than 30 N. Data from Roe SC: Mechanical comparison of cerclage wires: introduction of the double-wrap/loop and loop/twist types. Vet Surg 26:310, 1997. N, Newtons. In trials before this study, it was found that any manipulation of the twist knot after it was completed caused a drop in the resting tension. Vibration during cutting caused a drop of approximately 10 N. If the twist was pushed over to lie flat on the tying jig, the resting load dropped by a large amount. On the basis of these observations, cutting the twist short rather than flattening the twist after cutting is recommended. Previous studies have shown that as few as Multifilament cables have been used for some applications in human orthopedics and may have some benefits in veterinary patients.18 The cables are much stronger because of their larger diameter, but they retain the flexibility needed because of multifilament construction. They cannot be knotted. Specific instruments apply tension to the cable, and it is locked with a crimp or screw clamp (see Figure 43-6, D). Several principles of application, if followed, help ensure the success of a cerclage. Cerclage wires are most effective when applied to oblique fractures. Full cerclage is usually easy to apply if the length of the fracture is 2.5 to 3 times the diameter of the bone. At least two wires are used, and use of more wires is better. They can be spaced about half of a bone diameter apart. Just as a barrel requires all of its boards to be in place to remain stable, so too does a bone held together with cerclage. The shaft of the bone is rebuilt completely because the cerclage relies on all of the fragments contacting each other for stability. If a fragment is missing, movement and collapse, with subsequent loosening of the cerclage, are much more likely (Figure 43-7). Full cerclage causes shearing of short oblique fracture interfaces. A Kirschner wire as a skewer pin can prevent this (Figure 43-8). The pin is oriented approximately perpendicular to the plane of the fracture. The size of the pin depends on the size of the bone and the gauge of the wire. The cerclage is placed so that as it is tightened; the pin prevents its orientation perpendicular to the axis of the bone and directs compression across the fracture interface. Because these fractures are shorter, sometimes only one skewer pin and wire can be placed. This is rarely sufficiently stable to prevent rotation at the fracture, and adjunct fixation is used. Cerclage may be used as an adjunct technique to inhibit rotational forces and to maintain reduction of a transverse fracture. In a mechanical study of multiple techniques, the use of two Kirschner wires placed across the fracture with a full cerclage anchored around each was found to provide the greatest resistance to torsional forces.126 Cerclage wires were blamed for failure to heal in some fractures,199 and the mechanism was thought to be damage to the blood supply. Extensive investigation of the blood supply to the callus has shown that it is not affected by a stable cerclage.196 Immature bones continue to grow normally around a well-placed cerclage. It is more likely that failures attributed to cerclage were caused by improper application of the wires. The cerclage wires were too loose at the time of application or became loosened because of fragment collapse or excessive loading. The principle use of Kirschner wires is to skewer small fragments or as an adjunct to other implants across more major fracture lines (see skewer pin technique, see Figure 43-8). They act to counter bending but are relatively weak except in very small patients. For this reason, they are rarely used alone (see tension band technique, see Figure 43-3) but are often used to counter rotation by being placed in pairs or added adjacent to a lag screw. To counter rotation, Kirschner wires are best placed parallel to, and separated from, each other. However, if used alone to maintain fragment position, such as in a physeal fracture, they are angled relative to each other (Figure 43-9). Larger-diameter pins are often termed Steinmann or intramedullary pins and are made from 316L stainless steel. Diameters range from Pins resist bending. Their strength and stiffness are determined by their area moment of inertia. The formula for area moment of inertia uses the radius to the fourth power, so pins with larger diameters are relatively much stronger and stiffer in bending than are those of smaller diameter (Table 43-3).131 A general recommendation is to fill at least 70% of the medullary diameter (when the pin is used as the only intramedullary device). In general, the larger the intramedullary pin, the better it is for fracture stability and implant strength. Table • 43-3 Area Moment of Inertia of Pins of Various Diameters From Roe S: Internal fracture fixation. In Slatter DH, editor: Textbook of small animal surgery, ed 3, Philadelphia, 2003, Saunders/Elsevier. Pins do not resist forces aligned with or around their axes well, because there is little friction between the bone and the smooth surface of the pin. Rarely, if ever, is an intramedullary pin used as the sole implant for repair of a shaft fracture. Fractures that are fairly transverse or have any level of comminution are not stable with an intramedullary pin alone; rotational instability is present with transverse fractures, and axial compression occurs with comminuted fractures because of lack of load sharing (Figure 43-10); thus additional implants are required. Wires, external skeletal fixators, or a plate may be used to provide axial and rotational stability (Figure 43-11). “Stacked” pinning, in which multiple small-diameter pins are used rather than a single large pin, has been suggested to improve rotational stability. Mechanical evaluation failed to show a significant advantage over a single pin, and other methods of augmenting stability are recommended.182 In most instances, pins protrude from the bone into which they are placed. Once the final position is confirmed, the end is cut as close to the bone as possible, or it is left long, protruding above the skin, for use in tie-in configurations with external skeletal fixators1 or to prevent damage to the sciatic nerve (femoral fractures). If the cut end of the pin is left below the skin but protruding from the bone, it often irritates the soft tissues, causing a seroma, limitation of limb use, and in some cases (femoral fractures) severe or irreversible nerve damage. For simple fractures close to a joint, a crossed-pin technique using small-diameter pins started from the sides of the joint may maintain alignment. Some rotational stability is achieved if the pins are placed separate from one another at the level of the fracture. In the standard crossed-pin technique, the pins gain purchase by penetrating the cortex opposite. So-called dynamic crossed-pins do not penetrate the opposite cortex and are intended to generate a “spring” effect. The pins are driven at such an angle that they glance off the endosteal surface of the opposite cortex and continue up the medullary canal (Figure 43-12). Stability is greater when the conventional crossed-pin technique is used, and no documentation supports the dynamic (Rush pin) technique.173 Concerns about physeal damage caused by pin techniques are moot because physeal damage in most cases is such that physeal closure occurs in most cases, irrespective of fixation technique.101 Interlocking nails are intramedullary rods (nails) that are designed to accommodate a locking mechanism that allows the implant/bone construct to resist bending, rotation, and axial load (Figure 43-13). The nail is secured to the cortices with specific locking devices. The main indication for interlocking nail fixation is the treatment of comminuted diaphyseal fractures of the long bones, except of the radius. The first interlocking nail was placed by the German physician Gerhard Küntscher in 1939.110–113,120 Advancements in interlocking nail equipment and placement techniques, combined with excellent cosmetic results and fast healing times, make interlocking nail fixation the current standard treatment for long bone fractures in human beings.* Limited access to fluoroscopy, which is routinely used by surgeons to facilitate interlocking nail repair of long bone fractures of human beings, has prevented interlocking nails from becoming similarly popular in small-animal surgery. The first reported use of interlocking nail fixation in a dog was presented by Johnson and Huckstep in 1986.102 However, modification of instrumentation to allow application without intraoperative fluoroscopy has resulted in the development of interlocking nail systems for use in small animals. Interlocking nail systems are commercially available worldwide. Examples include designs by Duhautois (France),50–53 Durall (Spain),41,54–59 Brunnberg (Germany),68,162 and Endo and Nagaoka (Japan).63 In the United States, a system resulting from the work by Dueland is available.43–49 In the following text, it is referred to as regular interlocking nail (see Figure 43-13, A-B and Table 43-4). Another system developed by Déjardin is referred to as angle-stable interlocking nail (see Figure 43-13, C through E).38,39,115 Table • 43-4 An Outline of Various Diameters, Hole Diameters, and Spacing, and Lengths for Interlocking Nails From Roe S: Internal fracture fixation. In Slatter DH, editor: Textbook of small animal surgery, ed 3, Philadelphia, 2003, Saunders/Elsevier. Most interlocking nails currently available for use in dogs and cats are constructed from heavily cold-worked 316L stainless steel.39,47,51,57,63 One titanium model exists for very small dogs and cats.68,162 Although hollow or slotted nails are occasionally used in human beings, early studies on dogs revealed that the use of solid nails is recommended for small animals.21 The nails are cylindrical or hourglass-shaped implants that may have sharp or blunt tips. Nails are of various lengths and diameters and are manufactured as multiple or three- to four-hole models; holes in the nails (nail holes) accommodate the locking devices.39,47,51,57 The distance between holes varies between models.145,147 These design variations allow proper selection for a given fracture. With the aid of specifically designed instrumentation (described later), locking devices are placed through holes drilled in the bone cortex and then through preexisting holes present in the nail, thereby securing (i.e., locking) the nail to the cortices to create the construct known as the interlocking nail. Options for locking devices include screws, bolts, and screw-cone pegs (see Figure 43-13, B-E).* The bolts engage the bone by a threaded region near the head of the bolt; this threaded region is slightly wider than the diameter of the main shaft of the bolt. A nut is not placed on the opposite side to secure the bolt. Screw-cone pegs are engineered as self-locking and self-centering Morse tapers, creating a solid interaction between the nail and the locking device.39,115 Explicit instructions on equipment and interlocking nail placement are available from the manufacturer of each system. Designated instruments are used during interlocking nail placement, and although each system differs slightly, the basic components are similar between systems (see Figure 43-13, A). The reader is referred to the section on general technique and instrumentation for further discussion. When compared with conventional bone plates, interlocking nail fixation has certain biomechanical advantages.15,16,147 First, nails are placed within the neutral axis of the bone, and the interlocking nail construct experiences direct axial compressive loading during weight bearing.46,114,147,152,194 In contrast, bone plates are placed eccentric to the neutral axis of the bone and therefore are exposed to bending forces during axial compression.94,96,144 This can predispose plates to failure at lower loads when compared with interlocking nails, especially in unstable situations such as highly comminuted fractures and large fracture gaps.15,16 Second, the large area moment of inertia of the nail makes this implant more resistant to bending when compared with bone plates of similar size (Table 43-5).131,147 Area moment of inertia influences implant bending strength and stiffness; calculation of the moment of inertia for a nail uses the radius to the fourth power, and for a plate the thickness to the third power.131 The area moment of inertia in the solid section of an 8 mm interlocking nail is approximately 6.8 times that of a 3.5 mm dynamic compression plate and approximately 3.5 times that of a 3.5 mm broad dynamic compression plate, respectively.147 Third, the locking mechanism of interlocking nails provides stability in torsion and compression.39,47,51,57 Based on these biomechanical advantages, the risk for implant failure using interlocking nail systems is lower compared with conventional bone plates when used to treat highly comminuted fractures. Table • 43-5 Area Moment of Inertia for Plates and Interlocking Nails *Because the area moment of inertia depends on the direction of bending, the values for interlocking nails have been calculated for bending both with the hole and across the hole. From Roe S: Internal fracture fixation. In Slatter DH, editor: Textbook of small animal surgery, ed 3, Philadelphia, 2003, Saunders/Elsevier. Biomechanical disadvantages have been discovered with some interlocking nail systems. Breakage or bending of the nail was a concern with first-generation regular interlocking nails. This problem resulted from a combination of technical errors and the decreased area moment of inertia at the level of the locking device hole, making the nail more susceptible to failure (Table 43-5).47–49,147 Interlocking nails are weakest when bending occurs in a plane parallel to the long axis of the screw hole (bending with the hole).46 The screw holes act as stress concentrators, promoting fatigue failure of the nail though a hole.26,47,49 Decreasing the hole size resulted in a stronger nail and a significantly decreased incidence of this problem with the currently available second-generation regular interlocking nail.45,49,147 Indeed, decreasing the screw hole diameter to accommodate a 2.7 mm instead of a 3.5 mm cortical screw in a 6 mm interlocking nail resulted in a 52-fold increase in the nail fatigue life.49 However, with a decrease in nail hole size, the diameter of cortical screws used as locking devices was also diminished, making the screw more susceptible to bending forces and subsequent deformity or breakage.5,44,170 Therefore, the use of bolts as locking devices was promoted. Bolts have smooth shafts and thus a higher area moment of inertia than screws of comparable size, providing greater resistance to bending Table 43-6). In addition, implant stability is increased through improved contact between the bolt and the nail. Therefore, the risk for breakage of the locking device (Figure 43-14) or of the nail at the level of the hole is decreased.5,27,44 Table • 43-6 From Roe S: Internal fracture fixation. In Slatter DH, editor: Textbook of small animal surgery, ed 3, Philadelphia, 2003, Saunders/Elsevier. (The values in this table have been corrected since the table’s original appearance in the Slatter text and since the first printing of this text.) Rotational instability was first described in a biomechanical comparison between regular interlocking nail and plate-rod constructs.184,185 Plate-rod constructs (see later section) provide an alternative method of fixation to interlocking nails in the treatment of comminuted long bone fractures. A comparison of regular interlocking nails locked with cortical screws and similarly sized plate-rod constructs revealed significant instability, or slack, in regular interlocking nail constructs in bending, and more severely in torsion (up to 33 degrees of slack).184,185 This slack was attributed to a mismatch of nail hole and screw diameter and to deformation of screw threads and nail holes. Based on the results of that study, plate-rod constructs may represent a biomechanically superior fixation method compared with the regular interlocking nail. The clinical effect of rotational instability despite interlocking nail application was delayed union or nonunion in people and sheep.20,31,104,158 Rotational instability is likely responsible for a reported nonhealing rate of 14% in dogs treated even with second-generation regular interlocking nail.9,169,170 The previously reported “spring-back” mechanism that was suggested to be of benefit in the use of regular interlocking nail fixation194 is likely a misinterpretation of this rotational instability. Additional stabilization to overcome rotational instability was necessary in 12% of small animal cases to achieve bone healing.8,10 Techniques used to increase stability include the use of bolts instead of screws, placement of intramedullary pins in addition to regular interlocking nail, excessive angling of screws, and the use of bolts attached to an external fixator.* Results of biomechanical comparison of interlocking nail–external skeletal fixator with bolted regular interlocking nail suggest that this construct could diminish interfragmentary motion at the fracture site and potentially improve bone healing when compared with a regular interlocking nail.77 Development of the angle-stable interlocking nail is an attempt to overcome concerns with instability in bending and torsion seen with the use of the regular interlocking nail.39 The shape of the holes in the angle-stable interlocking nail and the self-tapping Morse-tapered screw-cone pegs used as locking devices eliminate slack.38,39,115 Therefore, this system provides stability when exposed to stress from various angles and is designated as being angle-stable. Another advantage of the angle-stable interlocking nail is related to its hourglass shape. The larger diameter at each end increases its area moment of inertia.39,115 This design allows placement of locking devices with larger diameter, thus area moment of inertia, when compared with regular interlocking nails of comparable size. Therefore, the risk for mechanical failure of the nail at the level of the nail hole, or of the locking device itself, is decreased.39,115 Comparative biomechanical studies between regular interlocking nails of various diameters locked with screws or bolts, a dynamic compression plate, and the angle-stable interlocking nail determined that the latter eliminates all slack in both bending and torsion.39,115 Similarly, a study comparing the regular interlocking nail with the angle-stable interlocking nail in mediolateral and craniocaudal bending showed significantly smaller maximal deformation and absence of slack in both bending planes with the angle-stable interlocking nail.38 It is important to note that with the regular interlocking nail, acute construct slack contributed up to 50% of the total deformation in this study. Findings of these two studies suggest that interfragmentary motion will likely be reduced with use of angle-stable interlocking nail, compared with the regular interlocking nail. Therefore, in the clinical setting, the use of angle-stable interlocking nail may be more conducive to bone healing.37 Most biomechanical studies have evaluated interlocking nail constructs used in medium-size and large dogs, but only a few have investigated smaller models appropriate for use in small dogs or cats (Figure 43-15).98,162 A biomechanical study using a feline fracture gap model compared a custom-made titanium interlocking nail with a self-interlocking implant made of nitinol. Titanium interlocking nail-bone constructs had increased stiffness and strength in torsion, compression, and bending when compared with the nitinol constructs.98 Many of the biologic advantages of interlocking nails are associated with the ability to place implants in accordance with the principles of biological osteosynthesis.* Healing and allograft incorporation in a sheep model were similar when interlocking nails and compression plates were used.129 Controversy continues about securing locking devices in both fragments or in only one major fragment, resulting in interlocking nail placement in “static” or “dynamic” mode, respectively.18,59,93,105,176 Securing the implant to only one fragment (dynamic mode) requires a fracture configuration that permits axial load sharing (see Figure 43-10); when used in this manner, the nail prevents bending deformation but provides minimal resistance to rotational deformation, and the locking mechanism prevents implant migration.51,75 Dynamization, or destabilization, of a nail placed in static mode can also be achieved by removing one or more locking devices 6 to 10 weeks after surgery. The potential positive effect of the dynamic mode is increased axial micro-movement at the fracture gap; this may be associated with more rapid bone healing and earlier limb function.51,75 The authors of one study concluded that stifle joint ankylosis was prevented by dynamization.59 However, this technique has been reported to be associated with prolonged bone healing time and the need for a second surgical procedure for removal of the locking device(s).176 The effect of reaming of the medullary cavity during interlocking nail placement is controversial.62,110,113,168,191 Reaming is mechanically advantageous because it allows placement of a larger-diameter nail, which is more resistant to bending stress.107 However, reaming can be associated with loss of bone and medullary blood supply, potentially leading to delayed healing.21,24,30 In contrast, nonreaming allows preservation of the medullary blood supply, is associated with less infection and fat embolism, and histologically has proved to be associated with more rapid healing times.156 The hourglass shape of the angle-stable interlocking nail is designed to allow increased vascularity of the diaphyseal medullary cavity because of the smaller diameter of the midportion (longitudinally) of the nail. Although not evaluated directly, an in vivo comparison of angle-stable interlocking nails versus regular interlocking nails supports this speculation; 5 mm mid-diaphyseal tibial-fibular ostectomies were performed in 11 dogs of similar age, size, and weight.38 An angle-stable interlocking nail or a bolted regular interlocking nail of similar size was implanted, time to clinical union monitored, and specimens harvested and tested in torsion until failure, followed by histologic examination of callus. All angle-stable interlocking nails were stable immediately after surgery, whereas regular interlocking nail specimens showed residual instability. Up to 8 weeks after surgery, lameness scores were significantly lower in the angle-stable interlocking nail group. Clinical union occurred as early as 8 weeks and was completed in all angle-stable interlocking nail dogs at 10 weeks postoperatively. In contrast, in the regular interlocking nail group, clinical union was reached in one of five dogs at 12 weeks and in three of five dogs at 18 weeks. Biomechanical tests showed that the angle-stable interlocking nail–implanted specimens were stiffer and stronger under torsional loads. Histologically, they showed more mature callus when compared with regular interlocking nail–treated specimens. Based on the results of this study, angle-stable interlocking nails may represent a valid alternative to regular interlocking nails or other orthopedic implants used in the treatment of long bone fractures.37 The choice of nail size and length depends on the weight of the animal, the diameter of the isthmus of the bone, and the length of the bone.195 In general, nails 3.5 to 4.7 mm in diameter are appropriate for use in cats and small dogs weighing between 5 and 15 kg. The 6 mm nail is appropriate for dogs between 15 and 30 kg. Nails measuring 8 to 10 mm are used in large and giant breed dogs with body weight exceeding 30 kg. Locking devices are specific for the chosen nail size. Templates are useful for implant selection. They should be adjusted for radiographic magnification36 and applied to orthogonal radiographs of both the injured and the contralateral normal limb. The diameter of the nail chosen should be as large as possible, without exceeding 70% to 90% of the diameter at the isthmus, to prevent iatrogenic fracture during implantation.45,46,152 The nail should span most of the length of the bone.152 The key to successful clinical outcome is proper alignment of the most proximal and distal fragments. In contrast to conventional bone plating techniques, anatomic reduction and apposition of the fragments are not necessary. Sharp nail tips should be blunted to prevent inadvertent penetration of the subchondral bone plate. Implants with a blunted or bullet-shaped distal tip seat firmly in metaphyseal bone by crushing cancellous bone.39,115 A specific set of instruments is necessary for proper interlocking nail placement (see Figure 43-13). In most fractures, interlocking nail application occurs in normograde fashion.48 First, an entry hole is made into the medullary cavity from the appropriate point of insertion, using drills or intramedullary pins of increasing diameter. This facilitates nail insertion. The nail is connected to an extension piece, which acts as a coupling device and allows the nail end to be recessed in the bone. Recession of the nail end prevents interference with joint function or soft tissues. Next, a handle is placed onto the extension piece, and the nail inserted. Controlled impaction using a mallet rather than twisting the nail into the medullary cavity may provide more secure implantation. During implantation, it is imperative to avoid applying heavy leverage (i.e., the nail should not be used to achieve alignment of the fragments), as this can result in malalignment of the alignment guide and the nail holes, preventing proper locking device insertion. Vigorous handling may also lead to permanent deformation of equipment. Insertion should occur such that the locking devices can eventually be placed in a frontal plane. Etch marks present on the extension piece allow assessment of the depth of placement. The handpiece is removed once satisfactory nail placement has been achieved. An alignment guide is then locked to the end of the extension piece. Locking device placement is achieved by using sleeves of varying sizes, as well as various trocars, drills, taps, and depth gauges, and a driver for the locking device. If a minimal approach to the fracture site is necessary, simultaneous autologous cancellous bone grafting should be considered, as this will promote early formation of callus. Similarly, if open reduction is necessary, cerclage wires can be applied to prevent fissure formation or propagation. Two locking devices should be placed into the most proximal and distal (farthest from the nail/alignment guide attachment) segment of the interlocking nail (static mode). This will reduce the risk of locking mechanism failure (failure of the nail at an open nail hole or failure of a locking device) and counter the potential for fragment rotation around a single fixation bolt.31,145 Locking devices should be placed at a distance one to two bone diameters from the fracture gap to reduce the risk of development of fissures extending from the nail hole to the fracture gap.26,48 Using bolts with regular interlocking nails is associated with decreased slack in torsion and bending when compared with screws.5,27,44,77,115 A study on the fatigue life of 2.7 mm bolts used in 6 mm interlocking nails suggested that at least one bolt should be placed in metaphyseal bone to prevent implant failure with exposure to axial or torsional stress.27 Placement of the most distal locking device seems to be one of the most challenging problems, especially if the distal bone fragments are very short.124 The locking device is not successfully placed through the hole in up to 28% of cases.48,53,58 Suggestions that may facilitate appropriate placement include (1) locking devices that are closest to the nail/alignment guide attachment (i.e., the most proximal locking devices) should be placed first, as this adds stability to the nail/alignment guide system (this stability facilitates correct aiming and placement of the distal locking devices); (2) the leg should be placed on a Mayo stand when possible to provide stability and maintain orientation; (3) the alignment guide should not be leveraged while drilling; (4) a system with an adjustable alignment/drilling guide that can be moved closer to the bone should be used; (5) use of conical bolts or bolts that link the aiming guide temporarily to the bone should be considered; (6) using a drill bit with a sharp point at the tip (e.g., Stick-Tite drill bits; Imex Veterinary, Inc. Longview, TX) may prevent skidding of the drill bit at the beginning of the drilling process; (7) the bone should be drilled under visual guidance with the use of a “feeler-pin,” which should “drop” through the cis cortex, then pass through the nail hole and extend through the trans cortex.81,103,118,135,193
Internal Fracture Fixation
Fracture Reduction Planning
Open Anatomic Reconstruction
Biological Osteosynthesis
Open But Do Not Touch
Minimally Invasive Osteosynthesis
Orthopedic Wire
GAUGE
DIAMETER, mm
RELATIVE TENSILE STRENGTH*
16
1.2
1.4×
18
1.0
1.0
20
0.8
0.64×
22
0.6
0.36×
24
0.5
0.25×
 twists are present in the loop. The straight end of the wire is passed around the bone and through the loop. It then is introduced into the wire tightener and anchored to the tightening crank. The crank is rotated to tighten the cerclage, and while the tension on the crank is maintained, the wire is secured by bending the tightener over. The crank is reversed
  turns, and the tightener is slid up the wire so that it can be pushed flush with the bone. After further loosening, the wire is cut. The arm is pushed to the bone surface to prevent catching on tissue (see Figure 43-6, B).
 turns, and the arms are pushed flush to the bone. After further loosening, the wires are cut. The arms are pushed to the bone surface to prevent catching on tissue (see Figure 43-6, C).

 twists are needed to keep a twist knot secure.150 If the twist must be flattened, the flattening process and final twisting must occur together.149 When twist knots are used for tension band wires, the resting tension is less critical. Because these twists are frequently located in regions with minimal soft tissue covering, the twist knot is usually cut with three twists remaining and pushed flat.
Kirschner Wires
Steinmann Pins
 to
to  inch. The most frequently used tip design is the three-faced trocar, but diamond and bayonet points are also available. Pins with thread on a small portion of one end have been proposed to improve the security of engagement, but because the diameter of the pin is reduced in the region of the thread, it is weaker and more susceptible to failure.131 Use of threaded pins and consideration of thread design are critical when these implants are used as transfixation pins for external skeletal fixation; the presence of a threaded end does not provide an advantage when the implant is used as an intramedullary pin.91
Interlocking Nails
Designs
Equipment
Biomechanics
Biology
Guidelines for Appropriate Selection of Interlocking Nails and Preoperative Considerations
General Technique and Instrumentation
![]()
Stay updated, free articles. Join our Telegram channel

Full access? Get Clinical Tree


