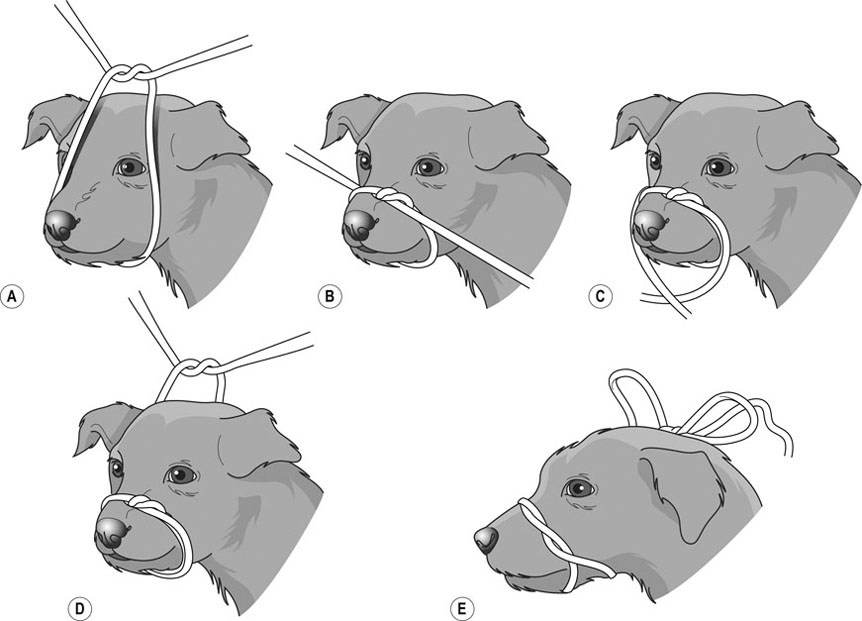
1. Action: Place the dog in a sitting position on the floor. 2. Action: Ask an assistant to stand astride the dog and grasp the scruff on either side of the head just behind the ears. 3. Action: Using a length of cotton tape or bandage, tie a loop in it. 4. Action: Approach the dog slowly and deliberately, crouching down to its level. 5. Action: Place the looped tape over the nose and tighten quickly and firmly with the knot over the nose. Rationale: Any delay in tightening the loop may allow the dog to shake its head free. 6. Action: Bring the long ends of the tape down and cross over under the chin. Rationale: Further throws around the nose before finally crossing over will strengthen the muzzle. 7. Action: Take the two ends of the tape backwards and tie them in a bow behind the ears. Rationale: A bow allows a quick release if the dog becomes distressed. 8. Action: Ask the assistant holding the dog to keep the head pressed downwards. Rationale: This position prevents the dog from lifting its forefeet to pull off the muzzle. 9. Action: If the dog is a brachycephalic or short-nosed breed, insert another piece of tape under the loop over the nose and under the piece at the back of the head. Rationale: This prevents the muzzle from slipping off over the short nose. 10. Action: Bring the two ends of this piece together and tie into a bow on the bridge of the nose. 11. Action: Never leave a muzzled animal unattended. Rationale: There is a risk of asphyxiation by vomit or saliva. (For example, cocker spaniels, beagles, etc.) 1. Action: Keep your back straight and, with your legs slightly apart, bend your knees. Rationale: This ensures that the weight of the dog is borne by your spine and your pelvic girdle. 2. Action: Place one arm around the front of the dog’s chest and the other around its back end, over the tail. 3. Action: Hold the dog close to your chest. Rationale: This will prevent the dog from struggling as it is lifted. 4. Action: Straighten your legs, so raising the dog off the ground. 5. Action: Place it firmly on the table. 6. Action: Do not leave the animal unattended while it is on the table. Rationale: The dog may attempt to jump off the table, injuring itself, and it may then escape. (For example, labradors, springer spaniels, etc.) 1. Action: Arrange for another person to assist you. Rationale: Never attempt to lift a heavy dog by yourself. You may do permanent damage to your back! 2. Action: Both people stand on the same side of the dog. 3. Action: Keep your back straight and, with your legs slightly apart, bend your knees. Rationale: This ensures that the weight of the dog is borne by your spine and your pelvic girdle. 4. Action: You take the head end by placing one hand under the chest and the other under the neck. 5. Action: Hold the head close to your chest. Rationale: If the head is held close to you the dog cannot turn its head round to bite. 6. Action: Instruct your assistant to adopt the safe lifting position. 7. Action: Instruct your assistant to place one hand under the abdomen and the other around the back end over the tail. 8. Action: At the same time both people straighten their legs and lift the dog on to the table. (This can also be used for cats.) 1. Action: Approach the animal quietly and with care. Rationale: It may be frightened and in extreme pain, leading to unpredictable behaviour. 2. Action: If appropriate, apply a tape muzzle. Rationale: This will prevent the dog biting you as you lift it. 3. Action: With a straight back and bent knees, place your arms around the chest. 4. Action: Straighten your knees and lift the animal, allowing the legs to hang downwards. 5. Action: Gently place the animal on its side on a suitable non-slip surface ready for examination. Rationale: Care must be taken to avoid causing further pain. 1. Action: Arrange for another person to assist you. 2. Action: Find something that can be used as a ‘stretcher’, such as a blanket or sheet, an ironing board or a solid plank of wood. 3. Action: Approach the animal quietly and with care. Rationale: It may be frightened and in extreme pain, leading to unpredictable behaviour. 4. Action: If appropriate, apply a tape muzzle. Rationale: This will prevent the dog biting you as you lift it. 5. Action: With the help of your assistant and adopting the correct lifting position, lift the dog on to the blanket or plank. 6. Action: If using a plank, tie the dog on to it using tapes or bandages. 7. Action: Gently carry the dog to the table and place it on the table, still on the blanket or plank. Rationale: The ‘stretcher’ can be removed from under the dog later on. 1. Action: Using the correct procedure, lift the dog on to a stable examination table covered in a non-slip mat. 2. Action: Stand to one side of the dog. 3. Action: Place one arm under the dog’s neck and pull the head close to your chest with your hand. Rationale: If the head is held firmly against your chest, the dog cannot move to bite you. 4. Action: Place the other arm over the dog’s back with your elbow pointing towards the far side. 5. Action: Apply pressure with your elbow and forearm along the spine, making the dog sit down. (Continuing from the previous procedure.) 1. Action: Keep one arm under the neck, pulling the head close to your chest. Rationale: If the head is held firmly against your chest, the dog cannot move to bite you. 2. Action: Move the other arm and place it under the abdomen, gently lifting the dog into a standing position. 3. Action: Pull the body close to your chest by bringing your forearm up under the abdomen. 4. Action: If you are required to restrain the dog for a long period of time, move your hand to lie over the spine, but be careful that the dog does not sit down again. Rationale: This position may be more comfy for you, while still maintaining control over the dog. 5. Action: If the dog starts to move or object to the examination, quickly return to the previous position. Rationale: You must be aware of the dog’s ‘mood’ and respond quickly to prevent anyone being bitten. 1. Action: Apply a tape muzzle if appropriate. 2. Action: Using the correct lifting procedure, lift the dog and place it on a stable table covered in a non-slip mat. 3. Action: With the dog in a standing position, stand to one side of the dog. 4. Action: Reach over the dog and grasp the foreleg and hind leg furthest away from you at the level of the radius and tibia. 5. Action: As quickly and as firmly as possible, pull the legs away from you, supporting the dog’s spine against your chest. Rationale: This move must be done quickly before the dog begins to struggle and change position. 6. Action: Gently lower the body down to the table. Rationale: Avoid letting the body drop to the table as this may injure or frighten the animal. 7. Action: Place your arm across the chest and neck and apply firm pressure to keep the dog’s head on the table. 1. Action: Place the dog on its side as previously described. 2. Action: Ask an assistant to hold both the back legs and you hold both the forelegs. Rationale: If the dog is small, this may be performed by one person. 3. Action: Roll the dog over until it is lying on its back. 4. Action: Extend the forelegs and hind legs, presenting the ventral abdomen for examination. 5. Action: The sides of the neck can be grasped between the forelegs to give greater restraint if necessary. 1. Action: Place the dog in a sitting position or in sternal recumbency on a suitable non-slip surface. 2. Action: If necessary ask an assistant to hold the tail end of the dog. Rationale: This will prevent the dog from standing up or moving backwards. 3. Action: Place one hand over the top of the muzzle and, using your fingers and thumb, gently raise the head and open the mouth. Rationale: Raising the head makes the lower jaw relax, making it easier to open. 4. Action: Hold the tablet in the fingers of your other hand and with your forefinger pull down the lower jaw. 5. Action: Place the tablet on the back of the tongue. 6. Action: Close the mouth and hold it closed with one hand. Rationale: This also prevents the dog from spitting the tablet out. 7. Action: Stroke the neck until you feel the dog swallow the tablet. 1. Action: Place the dog in a sitting position or in sternal recumbency on a suitable non-slip surface. 2. Action: If necessary ask an assistant to hold the tail end of the dog. Rationale: This will prevent the dog from standing up or moving backwards. 3. Action: Place one hand over the top of the muzzle and, using your fingers and thumb, gently tilt the head upwards and to one side. Rationale: This position restrains the head while encouraging the jaw to relax and open. 4. Action: Open the mouth slightly, creating a pocket at the angle of the jaw. Rationale: The pocket holds the liquid as it runs into the main part of the oral cavity. 5. Action: Using a syringe filled with the liquid, insert it into the side of the mouth. Rationale: Try to avoid scraping the syringe over the gums as you may damage the mucous membranes. 6. Action: Slowly depress the plunger so that the liquid trickles into the back of the mouth. Rationale: If you depress the plunger too quickly the liquid will squirt out over you and the dog. 7. Action: Continue until the syringe is empty and repeat as necessary. 8. Action: When the procedure is complete, wipe the mouth clean and wipe up any spillage on the dog’s coat. 1. Action: Place the dog in a sitting position or in sternal recumbency on a suitable non-slip surface. 2. Action: If necessary apply a tape muzzle. Rationale: Some dogs may object to the application of ear medication. 3. Action: Stand to one side of the dog. 4. Action: Place one arm under the dog’s neck and over the muzzle. Pull the head towards your chest. 5. Action: Place the other arm over the dog’s back with your elbow pointing towards the far side. 6. Action: The veterinary surgeon will stand on the other side of the dog and apply the medication to the nearest ear. Rationale: The applicator is introduced down the vertical part of the ear canal and squeezed. 7. Action: The ear is gently massaged to disperse the drops or ointment.
Handling and restraint
INTRODUCTION
DOGS
Procedure: Tying a tape muzzle (Fig. 1.1)
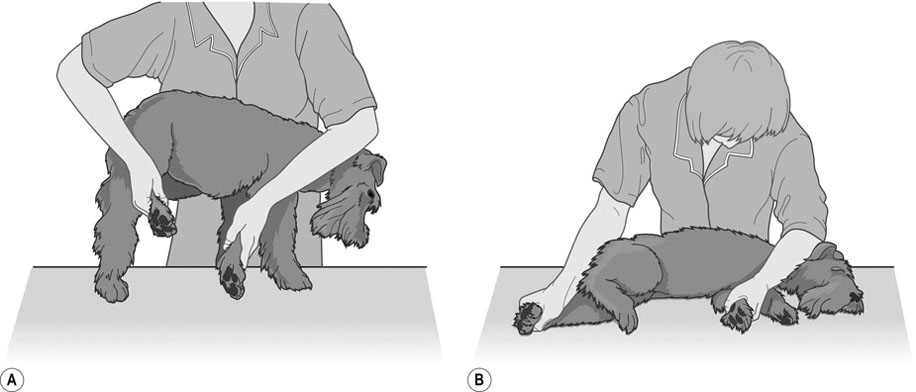
Procedure: Lifting dogs up to 15 kg bodyweight
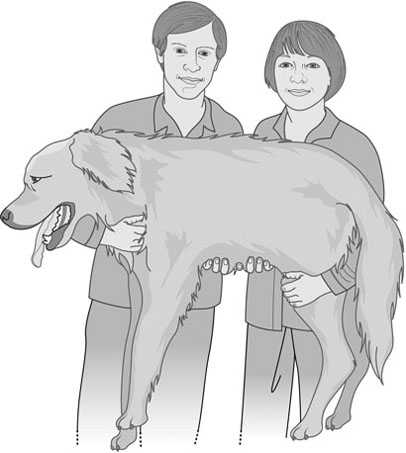
Procedure: Lifting dogs over 20 kg bodyweight (Fig. 1.2)
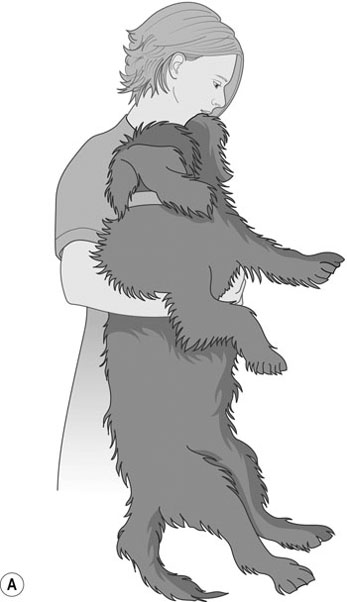
Procedure: Lifting small dogs with spinal damage (Fig. 1.3)
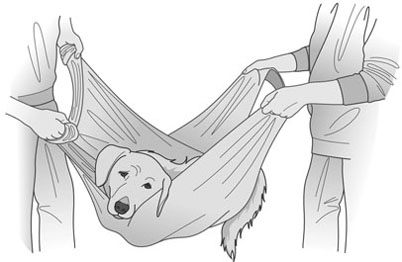
Procedure: Lifting large dogs with spinal damage (Fig. 1.4)
RESTRAINT FOR GENERAL EXAMINATION
Procedure: To examine the cranial end of the body
Procedure: To examine the caudal end of the body or take the rectal temperature
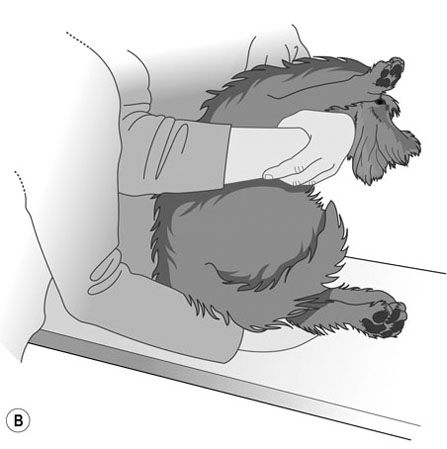
Procedure: To examine the dog on its side or to provide stronger control (Fig. 1.5)
Procedure: To examine or restrain the dog on its back
RESTRAINT FOR THE ADMINISTRATION OF DRUGS
Procedure: Administering a tablet (Fig. 1.6)
Procedure: Administering a liquid feed or medication
Procedure: Applying ear medication
![]()
Stay updated, free articles. Join our Telegram channel

Full access? Get Clinical Tree