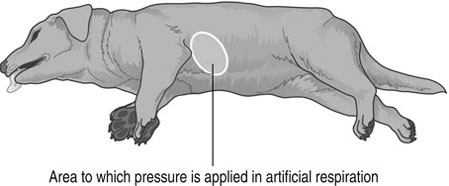
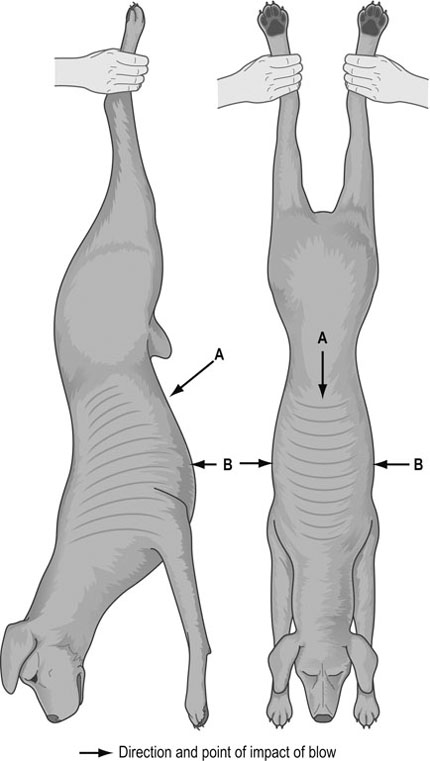
1. Action: Call a veterinary surgeon as soon as possible. 2. Action: Ensure that the environment is safe to treat the animal. 3. Action: Stand back from the animal and evaluate the situation. What are you presented with? 4. Action: Make sure that the patient is restrained appropriately. If the animal is breathing normally, it may be necessary to apply a tape muzzle (see Chapter 1). 5. Action: Check that the animal has a patent airway (see resuscitation techniques). 6. Action: Check the animal is breathing. If not, check that the heart is beating, and begin artificial respiration (see resuscitation techniques). Rationale: Lack of oxygen to the body will kill the animal within a few minutes. 7. Action: Check that the animal has a heart beat. If not, start cardiac massage and artificial respiration (see resuscitation techniques). 8. Action: Once the patient is stable, check for haemorrhage and control it (see Control of haemorrhage). Rationale: Loss of blood may cause the animal to go into shock. 9. Action: Examine the patient for fractures and immobilize (see Fracture management in Chapter 8). 10. Action: Check the patient’s capillary refill time, mucous membrane colour, pulse and temperature. Record all the information (see Chapter 2). Rationale: These all indicate the condition of the animal. 11. Action: Examine the patient for other wounds. Rationale: These can be cleaned and dressed as appropriate once the patient is stable. Examples of conditions requiring emergency treatment are shown in Table 9.1. Table 9.1 Conditions requiring emergency first aid 1. Pre-ictal phase – patient may be anxious or excitable 2. Ictal phase – patient collapses and has convulsions. Body is tense with limbs extended and often paddles its limbs. Head and neck are extended. The jaws champ and saliva becomes foamy. Eyes are fixed and stare ahead. Respiratory rate is increased. The patient may urinate and defecate 3. Post-ictal phase – the patient calms down but is dazed and exhausted 1. Action: Place the animal in a comfortable position on a table or at a comfortable height for you. Rationale: If the animal feels uncomfortable it will try to escape. 2. Action: Ask an assistant to restrain the animal so that it is relaxed and secure and the wound is accessible for treatment. 3. Action: Clean your hands with a surgical scrub (see World Health Organization (WHO) hand-washing technique in Chapter 7 and Fig. 7.1) and put on sterile gloves. Rationale: It is important not to introduce infection into the wound. 4. Action: Assess what type of haemorrhage you are presented with (Table 9.2). Table 9.2 5. Action: Control the haemorrhage using one of the methods described in Table 9.3. Table 9.3 First aid treatment of haemorrhage 6. Action: Once haemorrhage has been controlled, check for signs of shock and treat if necessary (see Treatment of shock). 7. Action: Monitor the animal closely. If blood soaks through the dressing you have applied, place further dressing material on top. Rationale: Removing the previous dressing will pull off any clot formed and restart the haemorrhage. 1. Action: Ensure the environment is safe to treat the animal. 2. Action: Place the animal in a comfortable position. Rationale: The animal may be in extreme pain and may try to escape and/or bite. 3. Action: Ask an assistant to restrain the animal so that it is relaxed and secure, and the burn is accessible for treatment. 4. Action: Clean your hands with a surgical scrub using the WHO method (Fig. 7.1) and put on sterile gloves. Rationale: It is important not to introduce infection into the wound. 5. Action: Cool the area with cold water. A shower hose is ideal as it covers a large area with little pressure. Continue for at least 10 minutes. 6. Action: Keep the patient warm by wrapping it in dry blankets. Care must be taken, as the animal will be in severe pain. 7. Action: Clean the area gently with sterile saline. 8. Action: Dress the wound with wound gel and/or paraffin tulle. Rationale: The wound must be kept moist at all times. 9. Action: Apply a light, non-adhesive dressing on top. 10. Action: Apply a polythene bag or cling film over the dressing. Rationale: This will prevent moisture evaporating from the area. 11. Action: Gently place a cold wet towel on top. Replace regularly. Rationale: This will keep the area cool. 12. Action: Observe and treat for shock. Rationale: Fluid therapy is essential to replace the fluid lost from the wound. 13. Action: Consult the veterinary surgeon on the administration of antibiotics and analgesia. Rationale: A burn is extremely susceptible to infection so antibiotic cover is essential. 1. Action: Ensure the environment is safe to treat the animal. Rationale: Do not attempt to treat the animal if there is any risk to you. 2. Action: Place the animal in a comfortable position. Rationale: The animal will be in pain and will try to escape and/or bite. 3. Action: Ask an assistant to restrain the animal so that it is relaxed and secure, and the frost burns are accessible for treatment. 4. Action: Clean your hands with a surgical scrub using the WHO method (Fig. 7.1) and put on sterile gloves. Rationale: It is important not to introduce infection into the wound. 5. Action: Apply warm water (body temperature) to the areas. Continue until all areas are warmed to body temperature. Rationale: This will gradually warm the area, reducing the number of cells destroyed. 6. Action: Do not rub the area. Rationale: This will shatter frozen cells. 7. Action: Observe and treat for shock. Rationale: See Treatment of shock procedure. 8. Action: Consult the veterinary surgeon on the administration of antibiotics and analgesia. Rationale: Frostbite wounds are susceptible to infection so antibiotic cover is essential. 1. Action: Clear any blockages from the mouth and pharynx by opening the mouth and removing any obstruction. 2. Action: Loosen and/or remove collar. 3. Action: If the animal has water or a foreign body blocking the trachea then the Heimlich manoeuvre can be used. Rationale: This technique is designed to force foreign matter from the trachea. 4. Action: Hold the animal up by its hind legs, or for larger animals, hang it upside down over a table or door frame. Rationale: The obstructing material may move downwards by gravity. 5. Action: Administer a sharp punch to the abdominal wall, above the xiphisternum, angled down towards the diaphragm (Fig. 9.1). 6. Action: Repeat up to four times. Rationale: Repeating the procedure too often can inflict damage. 7. Action: If attempts to remove the blockage are unsuccessful, provide an emergency airway by pushing a wide-gauge needle through the ventral midline of the neck into the trachea. Rationale: This will act as an air inlet/outlet until a proper tracheotomy can be performed. 8. Action: Prepare the animal for a tracheotomy by clipping and scrubbing the ventral throat area. (See Tracheotomy procedure) Rationale: This is a surgical procedure carried out by the veterinary surgeon. 1. Action: Restrain the patient in sternal recumbency on the table. 2. Action: Clip and clean the area selected for the tracheotomy, with surgical scrub and warm water, until aseptic. 3. Action: A small incision is made in the skin, between the fifth and sixth tracheal rings, in the ventral midline of the neck. This is usually done with a size 15 scalpel blade. 4. Action: Separate the pair of longitudinal neck muscles which overlie the trachea. Rationale: This exposes the cartilaginous tracheal rings. 5. Action: Incise between the tracheal rings and insert the tracheotomy tube. Rationale: The incision should be one-third of the circumference of the tracheal rings. 6. Action: Secure the tube in place with sutures placed cranially and caudally. 7. Action: If the tube is left in place for some time the area must be cared for correctly (Box 9.1). Rationale: The wound is liable to infection which may compromise the patient’s recovery. 1. Action: Place an endotracheal tube of an appropriate size in the larynx and trachea of the unconscious animal. 2. Action: Check that the endotracheal tube is free from blockages. Rationale: The airway must be clear to allow air to pass through. 3. Action: Place the animal in the recovery position (Fig. 9.2). Connect the endotracheal tube to an oxygen supply via a closed anaesthetic circuit. 4. Action: Squeeze enough oxygen out of the rebreathing bag to raise the chest slightly. Use gentle pressure at approximately two breaths per second. Rationale: This rate mimics the patient’s own panting. 5. Action: Rest every 15 seconds for 5 seconds. Rationale: This time allows you to monitor for the recommencement of the animal’s own breathing. 6. Action: If there is no oxygen supply to hand, then blow down the tube at 1 second intervals. Rationale: The carbon dioxide in your own respiration will act as a respiratory stimulant. 7. Action: Continue until the animal begins to breathe on its own. 1. Action: Lay the animal on its right side. Extend the head and neck and pull the tongue forwards. Pull the front legs forward so that the upper leg does not lie on the chest. Rationale: This is the optimum position for maximum air intake. 2. Action: Place the palm of your hand in the middle of the chest wall (Fig. 9.2). Rationale: This hand is used to push the chest wall on to the lungs, forcing air in and out. 3. Action: Apply firm steady pressure downwards and then release. Rationale: The elastic rib cage springs back, drawing air into the lungs. 4. Action: Apply the pressure at ½ to 1 second intervals, depending on the size of the animal. Rationale: The smaller the patient, the faster the respiration rate should be. 5. Action: Continue until the animal begins to breathe on its own.
First aid procedures
INTRODUCTION
Procedure: Evaluation of the emergency patient
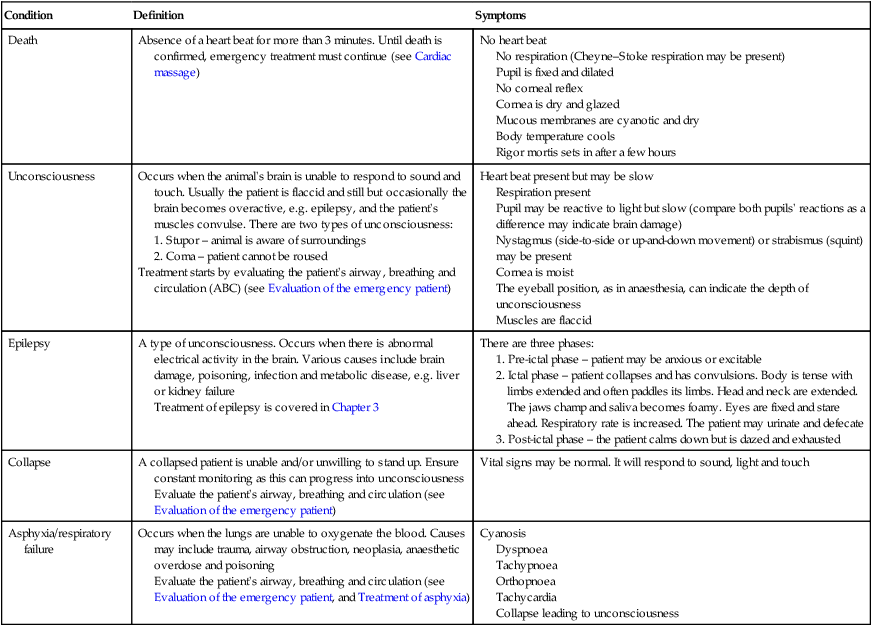
Condition
Definition
Symptoms
Death
Absence of a heart beat for more than 3 minutes. Until death is confirmed, emergency treatment must continue (see Cardiac massage)
No heart beat
No respiration (Cheyne–Stoke respiration may be present)
Pupil is fixed and dilated
No corneal reflex
Cornea is dry and glazed
Mucous membranes are cyanotic and dry
Body temperature cools
Rigor mortis sets in after a few hours
Unconsciousness
Occurs when the animal’s brain is unable to respond to sound and touch. Usually the patient is flaccid and still but occasionally the brain becomes overactive, e.g. epilepsy, and the patient’s muscles convulse. There are two types of unconsciousness:
Treatment starts by evaluating the patient’s airway, breathing and circulation (ABC) (see Evaluation of the emergency patient)
Heart beat present but may be slow
Respiration present
Pupil may be reactive to light but slow (compare both pupils’ reactions as a difference may indicate brain damage)
Nystagmus (side-to-side or up-and-down movement) or strabismus (squint) may be present
Cornea is moist
The eyeball position, as in anaesthesia, can indicate the depth of unconsciousness
Muscles are flaccid
Epilepsy
A type of unconsciousness. Occurs when there is abnormal electrical activity in the brain. Various causes include brain damage, poisoning, infection and metabolic disease, e.g. liver or kidney failure
Treatment of epilepsy is covered in Chapter 3
There are three phases:
Collapse
A collapsed patient is unable and/or unwilling to stand up. Ensure constant monitoring as this can progress into unconsciousness
Evaluate the patient’s airway, breathing and circulation (see Evaluation of the emergency patient)
Vital signs may be normal. It will respond to sound, light and touch
Asphyxia/respiratory failure
Occurs when the lungs are unable to oxygenate the blood. Causes may include trauma, airway obstruction, neoplasia, anaesthetic overdose and poisoning
Evaluate the patient’s airway, breathing and circulation (see Evaluation of the emergency patient, and Treatment of asphyxia)
Cyanosis
Dyspnoea
Tachypnoea
Orthopnoea
Tachycardia
Collapse leading to unconsciousness
Procedure: Control of haemorrhage
Type
Identification
Treatment
Arterial
Bright red and pumps out in spurts. Bleeding point is easy to identify
Very serious. Haemorrhage must be arrested immediately. Use directed digital pressure on the ends of the vessels until a more long-term method can be instigated
Venous
Darker red and flows in a steady stream. Bleeding point is easy to identify
Slightly less serious than an arterial bleed. However, haemorrhage must be arrested quickly. Use direct digital pressure or a pressure bandage
Capillary
Multiple, pinpoint haemorrhages. The wound will ooze with little force. Commonly seen in incisional wounds
Less serious than arterial and venous haemorrhage. However, capillary bleeding over a long period of time can be serious. Use of a pressure bandage is recommended
Mixed
Commonly seen. This is a combination of the above
Treatment depends on the extent of the haemorrhage
External
Haemorrhage on the outside of the body. Easy to identify
Treatment depends on the extent of the haemorrhage
Internal
Haemorrhage inside the body. Difficult to identify and therefore treat
Treatment depends on the area affected. Possible treatments are a pressure bandage, ice pack, immobilization of the area and/or treatment for hypovolaemic shock
Type
Method
Comments
Direct digital pressure
With a clean finger and thumb apply pressure to the wound on either side. Care must be taken not to push a foreign body or bone fragments deeper
Quick and easy; however, this is a temporary measure and a pressure bandage must be applied as soon as possible
Pressure bandage
Apply direct pressure by using a sterile dressing and firmly applied bandage. Ensure breathing is not impeded
Deep wounds may need packing with sterile gauze before bandaging. If foreign bodies or bone fragments are suspected, use a ring pad to remove the pressure from the site
Pressure points
An artery is pushed against a bone in order to reduce the flow of blood in that vessel. Can be used in the brachial, femoral and coccygeal artery
The artery is not always easy to find. Venous bleeding will still continue. This is a temporary measure and a pressure bandage must be applied as soon as possible
Tourniquet
A ready-made or improvised strap is applied above the haemorrhage on a limb. Pressure should be such that it just stops the haemorrhage
This is used as a last resort. The tourniquet should be applied for no longer than 15 minutes, before resting for 1 minute, and then reapplying closer to the wound
Procedure: Treating burns and scalds
Procedure: Treating frostbite
Procedure: Treatment of asphyxia
Procedure: Tracheotomy
Procedure: Artificial respiration in the intubated patient
Procedure: Artificial respiration with no endotracheal tube in place – assume no damage to chest wall
![]()
Stay updated, free articles. Join our Telegram channel

Full access? Get Clinical Tree