Chapter 27 Endoscopy
Endoscopic Instrumentation
Overview of Endoscopy Systems
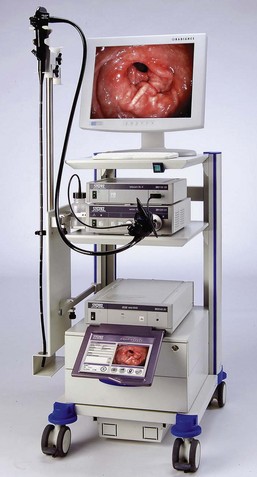
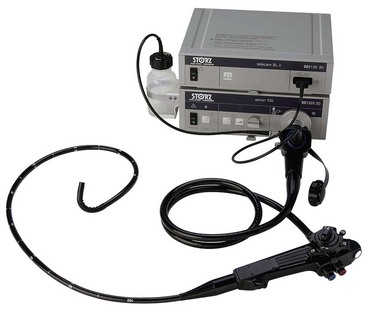
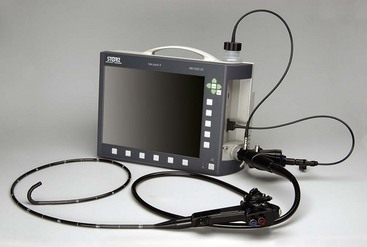
Figure 27-1 illustrates a simple gastrointestinal endoscope “tower.” A mobile cart improves portability and accessibility, and should be capable of accommodating all of the components of the endoscope system. Much of the equipment (e.g., light source, camera, monitor) can be used for other endoscopic applications including arthroscopy, laparoscopy, cystoscopy, bronchoscopy, and video otoscopy.
Flexible Gastrointestinal Endoscopes
• Four-way tip deflection (up, down, left, and right);
• At least 180° deflection in the up direction;
• Insufflation, to distend the gastrointestinal tract;
• Irrigation, to clean the distal lens or gastrointestinal mucosa; and
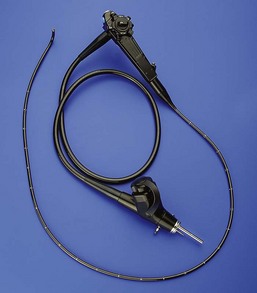
A typical gastrointestinal endoscope consists of three main components: the hand piece, the insertion tube, and the umbilical cord (Fig. 27-2).
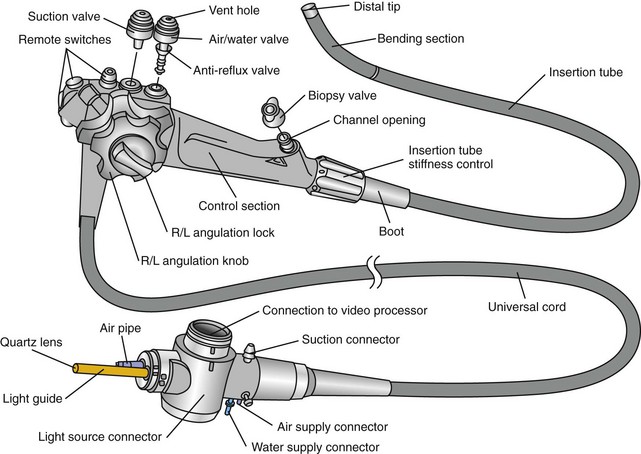
Figure 27-2 External anatomy of an Olympus flexible video endoscope.
(Reprinted with permission of Olympus America Inc.)
Endoscope Hand Piece
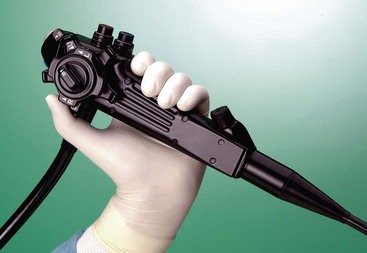
The hand piece is held in the left hand as shown in Figure 27-3. The index and middle fingers of the left hand control the suction and air/water valves. Fully depressing the suction or air/water valves will activate suction or irrigation (lens cleaning), respectively. Insufflation is activated by simply covering the hole in the top of the air/water valve using either the index or middle finger. The left thumb is used to control one or both deflection control knobs, which cause the bending motion of the insertion tube. The right hand is used to advance the insertion tube and to turn the deflection control knobs when the left thumb cannot easily reach them.
Endoscope Insertion Tube
• It contains glass fiber bundles and should not be crushed or excessively bent.
• It can be bitten by the patient if an oral speculum is not securely in place.
• Instruments passed through the channel may cause damage with excessive force.
• It is easy to bang the tip on a hard surface or to close it in a carrying case.
• In the case of video endoscopes (see next section), it contains the sensor chip.
Endoscope Umbilical Cord
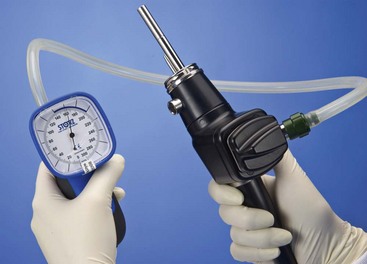
The pressure compensation valve found in this part of the endoscope serves two important functions. Before and after every procedure, a simple leakage test should be performed by attaching the manometer provided by the manufacturer (Fig. 27-4) and following factory instructions. Detecting leaks early can minimize costly repairs. The other purpose of the valve is to equalize the pressures between the interior and exterior environment during ethylene oxide gas sterilization or air shipment. The pressure compensation cap should never be left in place when the endoscope is being submerged in fluid, as this will cause fluid to leak into the endoscope.
The video cable connection with tight cap pictured in Figure 27-2 is a feature of true video endoscopes, but not fiberscopes (see next section). It is here that a video cable would be attached to connect the endoscope to a video processor.
Endoscope Dimensions
The key dimensions of an endoscope are its working length, outer diameter, and channel size. The preferred working length depends upon patient size. For example, a working length of 140 cm or more may be required to reach the duodenum of some giant breed dogs, whereas that length would be inconvenient and unnecessary in feline only practice. A small outer diameter (less than 8 mm) is most convenient for traversing the pylorus of cats and small dogs, but a large working channel (2.8 mm) is preferred to maximize the size of biopsy and foreign-body retrieval devices. Because of the diversity in body size and species differences, the desired combination of options may not be available in one model. The most versatile gastrointestinal endoscope for general small animal use will be at least 125 cm in length, no more than 9 mm in outer diameter, with a biopsy channel of at least 2.2 mm. Figure 27-5 shows a gastrointestinal endoscope designed for small animal use with these parameters in mind.
Fiberscopes Versus Video Endoscopes
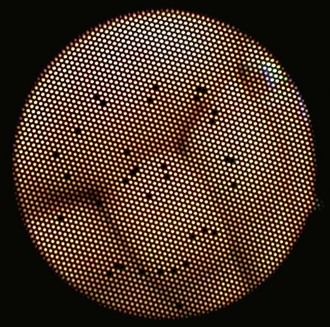
Before the advent of endoscopic video technology, all flexible endoscopes were dependent upon fiber optics to transmit an image from the tip of the scope to the eyepiece. Thousands of long thin fibers of optical glass are bundled into “coherent image bundles” capable of transmitting images over long distances while curving and bending through tortuous anatomy. Fiberscopes, as they are known, are still very much in use today, especially small-diameter models that are commonly used for respiratory and urinary endoscopy. However, they are most commonly used with a video camera attached to the eyepiece (Fig. 27-6), which enables the endoscopist and other members of the endoscopy team to view an enlarged image on a video monitor.

True video endoscopes were introduced into medical and veterinary practice in the mid-1980s. A video endoscope image is initially sensed by a computer chip (image sensor) in the tip of the endoscope and transmitted electronically to a video processor, and finally onto the viewing monitor. While these endoscopes come at a higher cost, the images are not dependent on fiber technology, consequently they produce images of superior quality. The resolution of fiberoptic images is limited, and they often appear pixelated because of the cladding that surrounds individual glass fibers. Furthermore, it is inevitable that individual fibers in the image bundle will break over time, causing small black spots in the image (Fig. 27-7).
Accessories and Instruments for Flexible Endoscopes
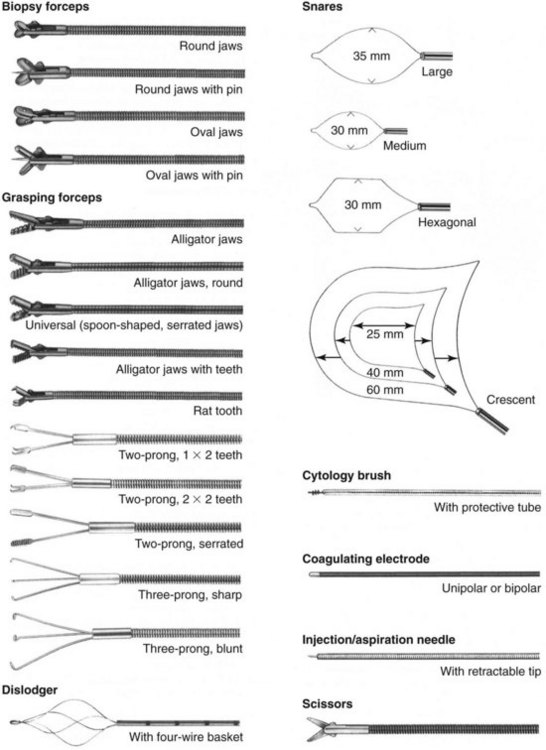
A variety of instruments and accessories are available for flexible endoscopes, which may be designed for single or multiple usage (Fig. 27-8). Although single-use instruments have the advantage of being new and sharp, the multiuse instruments tend to be more cost-effective over time. A typical veterinary practice should have at least two biopsy forceps, three or more foreign-body graspers, and two or three balloon dilators available for immediate usage (see Chapter 55). Among the most popular styles of foreign-body retrieval instruments used by veterinarians are two-prong graspers, basket retrievers (dislodgers), and snares. Additionally, a cytology brush with protective tube is useful for both gastrointestinal and respiratory sampling. It is critical that only instruments of the appropriate size, style, and specification are used with any given endoscope. Channel damage by inappropriate instrumentation is a common cause of fluid invasion, which can result in costly repairs. Above all, instruments should never be forced through the channel against obvious resistance. If resistance is met while trying to pass an instrument through a deflected tip, it is recommended to straighten the tip, then pass the instrument before repositioning the tip.
Light Sources and Pumps
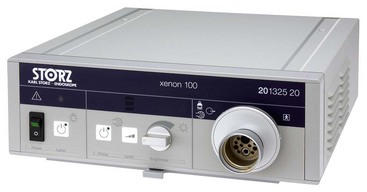
Light sources designed for gastrointestinal endoscopes typically have an integrated air pump and connector that accommodate both the light post and air inlet of an endoscope (Fig. 27-9). The air pump also provides the pressure for irrigation from the water bottle. In some instances the light source and air pump may be separate units, requiring connection by using a special light source adapter and tubing to connect the light source to the air pump.
Endoscopic Cameras and Monitors
Video cameras and monitors offer the following distinct advantages:
• Enlarged image provides better view of anatomy, pathology, and foreign bodies.
• Ergonomic operation during procedures makes procedures easier to perform.
• Viewing of live video by multiple persons during a procedure facilitates assistance and training.
• Ability to record images or video for medical records, clients, and colleagues.
The basic components of an endoscopic camera system are the processor or “box” and the camera head, which contains an integral cable and connects to the eyepiece of an endoscope (see Fig. 27-6). As camera systems are usually designed to work with specific endoscopes, it is important to consider the compatibility of one with the other before making a purchase. Some camera systems are more versatile than others. The camera head contains a sensor (either CCD or CMOS) similar to the one found in the tip of a video endoscope. A camera head is only necessary, therefore, when using a fiberscope or rigid endoscope with an eyepiece. A video endoscope on the other hand will attach directly to the camera processor (also known as a camera control unit [CCU]) with a cable adapter that is inserted into the same receptacle for a camera head (Fig. 27-10).
Capturing Images and Video
One of the most significant advantages to endoscopic video technology is the capability to capture images during a procedure for review at a later time. This can be achieved in a number of ways, from simply printing images on paper during the procedure to capturing digital images and videos with a dedicated archiving system that can store and manage the data for later retrieval (a searchable database). Some systems also have networking capability, including Digital Imaging and Communications in Medicine (DICOM) compatibility, so that the patient information and image data can be transmitted directly to a hospital’s central patient database. Newer digital image capture systems are contained within the same housing as the camera itself, which provides the advantages of space savings and portability (Fig. 27-11).
Esophageal Endoscopy
Indications
Regurgitation is the most important clinical sign associated with esophageal disease in the dog and cat. The initial diagnostic plan usually involves survey thoracic radiographs, barium esophagram, or fluoroscopic evaluation. Endoscopy is often utilized after radiographic studies to obtain supplemental diagnostic information or to provide direct therapy. Esophageal endoscopy with biopsy may assist in the diagnosis of esophagitis, granulomas associated with Spirocerca lupi infection, neoplasia, and strictures, as well as to facilitate removal of impacted foreign bodies and stricture dilation.1–5 A thorough endoscopic examination of the esophagus should also be undertaken whenever gastroduodenoscopy is performed. Chapters 21 and 55 provide more details about the clinical signs related to esophageal disease.
Instrumentation
A flexible endoscope with a working length of at least 100 cm, an outside diameter less than 10 mm, and a 2.8-mm diameter biopsy channel is appropriate for endoscopic examination of the esophagus in most dogs and cats.6–8 A flexible endoscope should also have four-way distal tip deflection, automatic water–air insufflation, and separate suction pump to evacuate fluid and gas from the gastrointestinal tract. In addition to channel biopsy with a flexible endoscope, rigid biopsy forceps can be passed alongside the endoscope, directly through a rigid endoscope (see the following), or a suction biopsy capsule can be used to obtain samples of the intact esophageal mucosa.
Although not optimal, rigid proctosigmoidoscopes have been used to examine the proximal portions of the esophagus. These instruments are inexpensive and available in a variety of diameters and lengths.9,10 Rigid biopsy forceps permit sampling of larger pieces of tissue than those obtained with flexible biopsy forceps. Care must be taken during this procedure to grasp only mucosa and submucosa, so as not to perforate the esophageal wall. Rigid endoscopes do have some obvious limitations compared with flexible endoscopies. With rigid endoscopes, the ability to visualize the entire circumference of the esophagus is limited by the rigidity of the scope. Moreover, rigid endoscopes do not have the clarity of mucosal visualization and forceps dexterity associated with flexible endoscopes. Despite these limitations, rigid endoscopes are useful in the removal of foreign bodies lodged in the esophagus.9,10
Patient Preparation and Restraint
Endoscopic examination of the esophagus requires the withholding of food, but not water, for at least 12 hours prior to the procedure.6,11 If esophageal dilation or obstruction is present, endoscopy should be delayed until the esophagus is cleared of ingesta, which may require at least a 24-hour fast. Small amounts of fluid or food within the esophagus can be suctioned or lavaged into the stomach. Larger amounts of food impair visualization and increase the risk of aspiration during extubation and anesthetic recovery. Endoscopic examination of the esophagus requires general anesthesia to restrain the patient and protect the endoscope.6,12,13
Diagnostic Procedures
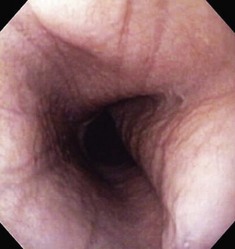
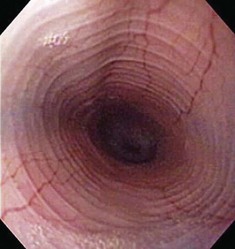
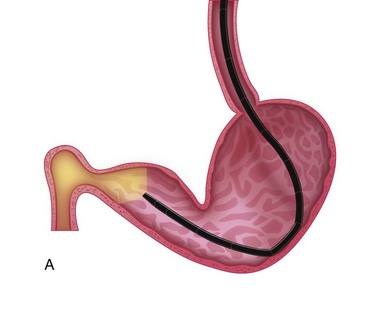
The patient should be positioned in left lateral recumbency.14 A mouth speculum should be placed between the left upper and lower canine teeth to protect the endoscope from rubbing along the surface of the teeth, and to protect the endoscope if the patient were to awaken during anesthesia. To facilitate passage of the endoscope, the tongue should be grasped and the head and neck slightly extended by an assistant. The insertion tube of the flexible endoscope is passed over the base of the tongue, through the pharynx dorsal to the endotracheal tube, and into the proximal esophagus. The tip of the endoscope should be deflected slightly downward (ventrally) to follow the normal anatomic bend between the mouth and pharynx. The endoscopic tip usually passes easily through the upper esophageal sphincter during the initial insertion, generally making lubrication of the endoscope unnecessary. The proximal esophagus is best examined at the end of the procedure as the endoscope is withdrawn while air is being insufflated (Fig. 27-12).
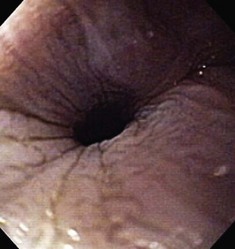
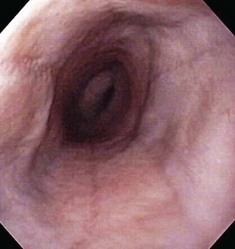
The esophageal lumen is usually in a state of collapse and when slightly distended has visible longitudinal folds (Fig. 27-13).6,11,13,15 Constant air insufflation may be necessary to distend the proximal esophagus to allow visualization of the lumen and safe advancement of the endoscope. The endoscopic tip should be centralized within the esophageal lumen by adjusting the inner and outer control deflection knobs. Only minor tip adjustments are necessary, as the esophagus is a relatively straight tube from proximal to distal. By advancing the endoscope only when the lumen is clearly visible, the endoscopist will reduce the risk of esophageal perforation. The endoscope should be advanced until the tip veers away from the center of the lumen. The control knobs should be adjusted slightly to reposition the tip within the center of the lumen, and the endoscope advanced further along the esophagus. In this manner, the endoscope is slowly advanced through the esophagus and into the stomach. Although the entire esophageal mucosa can be visualized as the endoscope is slowly advanced, biopsy and cytologic samples should not be collected until the endoscope is slowly withdrawn at the end of the procedure. Otherwise, hemorrhage could obscure visualization of the esophagus distal to the biopsy site.
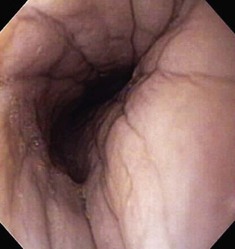
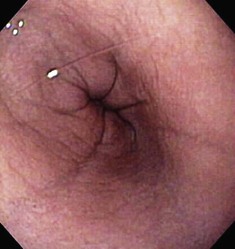
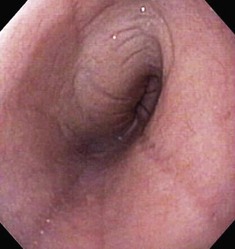
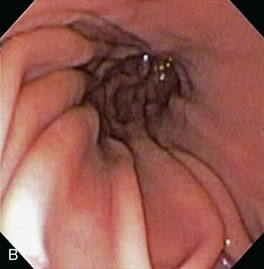
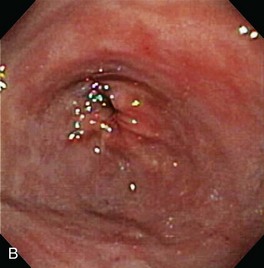
The normal esophageal mucosa is pale pink, smooth, and glistening. In health, the esophageal lumen is usually devoid of food and fluid. The trachea will indent the distended esophagus, and the tracheal rings should be clearly visible (Fig. 27-14). At the tracheal bifurcation, it is common to see pulsation of the heart and/or aorta. The distal esophageal lumen often remains distended and air insufflation is less necessary. As the esophagus passes through the diaphragm and into the abdomen it may deviate as much as 30° toward the animal’s left side.15 The gastroesophageal junction is normally closed and often assumes a stellate mucosal pattern (Figs. 27-15, 27-16, and 27-17). A small amount of red gastric mucosa can be seen within the distal esophageal lumen.6
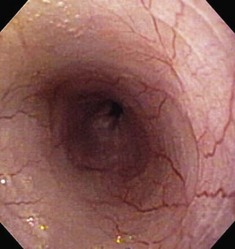
Besides the obvious length and diameter differences between dogs and cats, there are several other differences encountered when performing esophagoscopy in cats.15,16 First, transverse folds are normally evident in the distal one-third of the feline esophagus as the muscular layer consists entirely of smooth muscle (Fig. 27-18). Second, it is common to visualize superficial blood vessels throughout the length of the feline esophagus (Fig. 27-19).
Therapeutic Procedures
Esophageal Stricture Balloon Dilation
Esophageal strictures are best managed with mechanical dilation (Fig. 27-20). Dilation may be achieved with balloon dilation catheters or bougienage tubes.4,17–19 Esophageal tears have been reported with balloon dilation catheters, but the technology is still thought to be relatively safe in applying radial forces to the stricture site. A greater risk of perforation because of shearing forces applied by the instrument has been attributed to the use of bougienage tubes, although one recent report showed outcomes similar to those reported for balloon dilation.20 Table 27-1 outlines the parameters needed for a successful balloon dilation. Multiple redilations at 1- to 2-week intervals may be necessary until the stricture is resolved.3,4,17,21 Esophageal dilation is best performed with direct observation at the time of endoscopy, but it could be performed with videofluoroscopy.
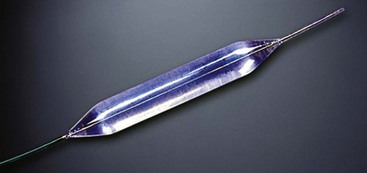
Figure 27-20 Saline-filled balloon dilation catheter for esophageal dilation.
(Courtesy of Cook-Medical.)
Table 27-1 Strategies for Balloon Dilation Treatment of Esophageal Strictures
| Intervention | Rationale | Implementation |
|---|---|---|
| Barium swallow | Determine location, length, and number of strictures | Barium suspension—30% weight/volume |
| General anesthesia | High-pressure esophageal dilation stimulates visceral pain | Inhalant anesthesia—e.g., sevoflurane, isoflurane |
| Patient positioning | Inspection of esophagus and stomach poststricture dilation | Left lateral recumbency for maximal maneuverability |
| Endoscopes | Direct observation, balloon placement, postdilation trauma | 7.5- to 8.5-mm insertion tube, 2.8-mm biopsy channel |
| Balloon dilation catheters | Multiple catheter lengths and balloon diameters | 8 mm × 8 cm to 18 mm × 8 cm balloon catheters* |
| Procedure | Repeated balloon dilations to achieve increase in luminal diameter | 1 to 3 cycles of balloon inflation and deflation/procedure |
| Manometry | Monitoring of inflation and deflation pressures | Vacuum to 160 psi pressure gauges |
| Gastrostomy tube placement | Nutritional maintenance during recovery phase with severe strictures | Low-profile gastrostomy tube systems |
| Recovery phase | Protect esophageal mucosa, inhibit acid secretion, promote healing | Sucralfate, histamine H2-receptor antagonists |
| Recurrence/prevention | Most esophageal strictures require 2 to 4 successive balloon dilations | Repeat endoscopy at 13-day intervals as needed |
* Sure-Flex Esophageal Balloon Dilation Catheters, Rigiflex Esophageal Balloon Dilation Catheters
Esophageal Foreign-Body Retrieval
Esophageal foreign bodies should be removed promptly. Prolonged retention increases the likelihood of esophageal mucosal damage, ulceration, and perforation. Rigid or flexible fiberoptic endoscopic retrieval should be the initial approach to treating an esophageal foreign body although fluoroscopic-guided retrieval is also possible.22 A rigid endoscope is most useful in retrieving large foreign bodies, particularly bones or bone fragments.23 Large grasping forceps are passed through the rigid endoscope to retrieve the foreign body, and in many cases, the foreign body can be pulled into the endoscope for safe removal. Large foreign bodies that cannot be safely removed through the mouth can occasionally be pushed into the stomach and removed by gastrotomy. Smaller foreign bodies are best managed with a flexible fiberoptic endoscope and basket, tripod, or snare retrieval forceps.24 Flexible endoscopes are particularly useful in retrieving fishhooks.2
Gastric Endoscopy
Gastric endoscopy (gastroscopy) is a valuable diagnostic tool for evaluating gastric mucosal disease in dogs and cats.1 The gastric mucosa can be visualized directly and tissue samples can be obtained quickly under endoscopic guidance for histopathologic and/or cytologic evaluation. Gastroscopy is usually performed in conjunction with esophagoscopy and duodenoscopy, and is considered more sensitive than barium-contrast studies for the diagnosis of gastric mucosal disorders.1 Knowledge of normal versus abnormal appearances, biopsy techniques, and specimen handling are essential to making the correct diagnosis. Therapeutic interventions may also be performed and include foreign-body removal and placement of feeding tubes.
Clinical Indications
Indications for gastroscopy include clinical signs of vomiting, hematemesis, anorexia, nausea, and/or melena. Endoscopically detectable gastric diseases have multiple underlying pathogeneses (Table 27-2). Although gastroscopy is usually performed in animals with chronic signs of gastric disease, it should also be considered in animals with acute vomiting caused by gastric foreign body or gastric ulceration causing hematemesis. Followup gastroscopy may be used to monitor effects of therapy in patients with chronic gastritis or ulcers.2 Initial diagnostic testing (e.g., complete blood count, serum chemistry, urinalysis, abdominal imaging) serves to eliminate common metabolic disorders (e.g., renal failure, hepatobiliary disease, hypoadrenocorticism, or feline hyperthyroidism) that might mimic primary gastric disease. Endoscopic examination should only be performed after thorough history, physical examination, and diagnostic testing have failed to identify the cause of clinical abnormalities.
Table 27-2 Gastric Diseases or Interventions That Typically Require Gastroscopy
| Clinical Problem | Biopsy Recommended |
|---|---|
| Gastritis (varied causes) | Yes |
| Gastric neoplasia | Yes |
| Ulcer erosions | Yes |
| Chronic hypertrophic gastropathy | Yes |
| Foreign bodies | No |
| Physaloptera rara | No |
| Percutaneous endoscopic gastrostomy (PEG) tube placement | No |
Endoscopic Instruments
A flexible endoscope having a working length of at least 100 cm, an outer insertion tube diameter of 9 mm or less, and four-way tip deflection is ideal for most gastroscopic examinations. Endoscopes with an accessory channel diameter of greater than 2.2 mm will accommodate larger biopsy forceps and foreign-body retrieval devices. For inexperienced endoscopists and feline practitioners, an outer insertion tube diameter of 7.9 mm or less will permit easier duodenal intubation when performing esophagogastroduodenoscopy. Video endoscopes are the current gold standard for clinical practice as they provide superior optics with higher resolution when compared to conventional fiberoptic endoscopes. Video endoscopes also permit simultaneous viewing of procedures by multiple personnel (advantageous for training or assistance with interventions such as gastric foreign-body retrieval) and image capture options, such as video recording. The obvious disadvantage of the video endoscopic systems is their cost. Fiberoptic endoscopes are less expensive, and are equally useful for performing a detailed gastroscopy with collection of targeted mucosal biopsies by an experienced endoscopist.3
Performing Gastroscopy
A proper gastroscopic procedure should include direct visual inspection of all areas of the stomach.1 A working knowledge of the normal gastric mucosal anatomy and anatomic landmarks will help the endoscopist to correctly maneuver the endoscope for viewing the gastric fundus, body (corpus), cardia (retroflexed view), incisura angularis (key anatomic structure), antrum, and the pylorus prior to duodenoscopy. Recognition of the location and appearance of normal gastric landmarks will also help to distinguish morphologic abnormalities of these structures, such as focal ulcers that may occur along the incisura or chronic pyloric mucosal hypertrophy, which might obscure the pyloric orifice.
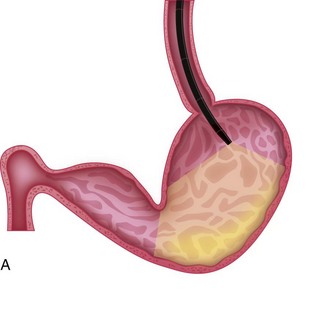
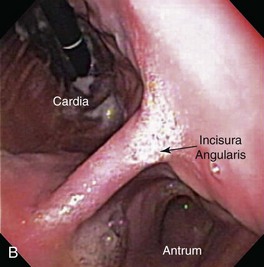
As the endoscope is advanced along the distal esophagus toward the gastroesophageal sphincter (GES), the endoscopist should note the tone (i.e., open vs. closed) and position of the sphincter orifice. Using gentle forward pressure while insufflating air, the endoscope is directed through the GES and passed with minimum resistance into the gastric lumen. Once the GES is traversed, the endoscope is advanced only a short distance while variable degrees of air are insufflated to gently separate the rugal folds. This allows the endoscopist to achieve spatial orientation within this viscus by visualizing the gastric body (corpus), antrum, and incisura angularis. This “birds-eye” view of the stomach permits a panoramic view of the gastric body and greater curvature of the stomach as the insertion tip is moved laterally in a sweeping fashion using both left and right tip deflections (Fig. 27-21). Care is taken to control insufflation such that moderate separation of the rugal folds occurs without overly distending the stomach. A combination of insufflation and aspiration of air optimizes visualization of individual rugal folds and the mucosa along the greater curvature of the gastric body. Once these structures are adequately visualized, the endoscope is advanced through the proximal stomach toward the antrum until the incisura angularis can be identified (Fig. 27-22). This key anatomic landmark appears as a distinct ridge of tissue that serves to separate the body of the stomach from the antrum. The identification of the angularis also allows the endoscopist to orient themselves to the location of the lesser curvature (to the right) and the greater curvature (to the left) when the animal is in left lateral recumbency.
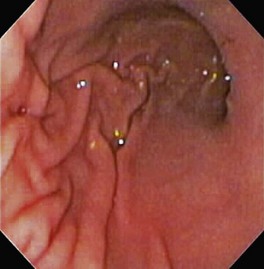
The next endoscopic maneuver performed is the retroversion or J-maneuver, which allows a “head-on” visualization of the angularis and the cardiac and fundic regions of the stomach.1 This procedure begins as the endoscope tip is positioned at about the level of the angularis or is deflected off the greater curvature proximal to the antrum while the endoscope tip is deflected maximally in an upward direction. With slight forward advancement of the endoscope, the endoscope tip is then rotated laterally until the angularis is visualized “head-on.” This view allows the endoscopist to see both the antrum located below this structure and the air-distended gastric body located above it (Fig. 27-23). This “head-on” view of the angularis may not be possible in cats because of anatomic constraints when manipulating the endoscope. To view the cardia and fundus, the endoscope tip is now rotated 180° and retracted toward the esophagus. The endoscope tip is rotated laterally left and right to closely inspect these areas and to view the endoscope as it passes into the stomach through the cardia (Fig. 27-24). Although these regions of the stomach are less commonly affected by mucosal disease, this procedure is generally performed quickly and can identify foreign bodies or gastric ulcers, especially in dogs. Retroversion is slowly reversed by advancing the endoscope forward until the proximal antral mucosa and angularis return into view.

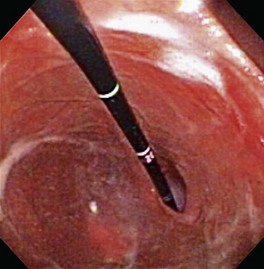
The antrum is readily identified by the location of the angularis, the absence of rugal folds, and the observation of peristaltic waves of contraction (usually seen in dogs) that propagate down toward the pylorus. In cats, passage of the endoscope past the angularis and into the proximal antrum may result in a temporary “red out” as the endoscope tip abuts against the antral mucosa. Advancing the endoscope forward with the tip deflected in an upward direction results in observation of the antral canal and pylorus. In most dogs the endoscope can easily be passed around the angularis and through the antral canal. The pylorus is easily visualized in most animals. Exceptions include patients with retained ingesta or accumulated fluids within the pyloric canal. In dogs, the pyloric orifice is often located off center and is partially obscured by fold(s) of mucosa (Fig. 27-25). Cats have a pyloric orifice that is more centrally located in the pyloric canal. Passage of the endoscope through the pylorus may be easy or difficult. The key to successful passage is keeping the pylorus in the center of the endoscopic field.1 The position of the pylorus can change as a consequence of antral contractions or breathing patterns by the animal, necessitating slight directional changes of the endoscope tip as it is advanced toward the pylorus. In many dogs, the endoscope is often passed through the pylorus with relative ease. However, in other patients the endoscopist may find it challenging to intubate the duodenum through a closed or “spastic” pylorus. This situation is further complicated by mucosal “red out” as the endoscope tip contacts the pyloric mucosa. Slow gradual directional changes of the endoscope tip will usually be successful in identifying the pyloric orifice in these instances. Steady forward pressure is then applied to advance the endoscope. Excessive force should never be used. Gentle insufflation and careful repositioning of the endoscope tip while advancing will result in eventual success in traversing the pylorus. Pharmacologic manipulation to decrease pyloric tone and facilitate passage of the endoscope through the pylorus has not proven successful in either dogs or cats.4,5
Technical Concerns
Gastroscopy can be easily and safely performed in most dogs and cats. Cardiopulmonary complications related to anesthesia or excessive prolonged air insufflation causing gastric distention are uncommon.6 If respiratory compromise is noted, the stomach should be rapidly deflated to stabilize the patient. The respiratory rate may increase in patients while advancing the endoscope through the pylorus. Passing the endoscope into the antral canal and pylorus of large dogs (>30 kg body weight) may result in inadvertent retroversion (e.g., looping) of the endoscope in the stomach.1 This situation may occur when excessive air insufflation causes gastric distention and the endoscopist loses orientation within the cavernous lumen. If loop formation occurs, the endoscopist should retract and reposition the endoscope while suctioning off air until the angulus can be viewed. This procedure allows the endoscopist to regain spatial orientation and once again advance the endoscope forward to the pylorus. Small diameter endoscopes (7.9 mm or less) should be used in cats as they are more maneuverable and permit easier duodenal intubation. Gastric perforation is a potential complication of gastroscopy but is rare.
Abnormal Endoscopic Appearance
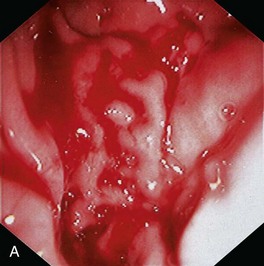
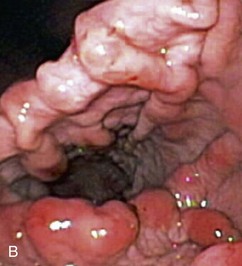
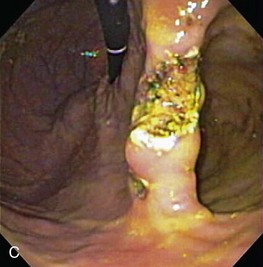
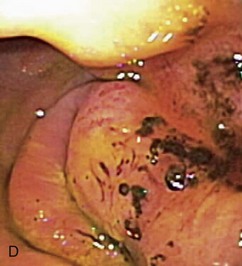
Gross mucosal abnormalities are commonly seen in dogs and cats with gastric disease (Fig. 27-26). Lesions may be focal or diffusely distributed throughout the entire gastric mucosa; consequently, careful inspection of all gastric regions will enhance the likelihood that mucosal abnormalities will be detected. Endoscopic lesions of mucosal friability, granularity, and ulcers or erosions are commonly associated with histopathologic abnormalities.7–10 Friability describes the ease with which the mucosa bleeds upon contact with the endoscope or biopsy instrument (see Fig. 27-26A). An increase in mucosal texture is termed increased granularity (see Fig. 27-26B). Mucosal ulceration-erosion refers to an endoscopically visible breach in the mucosal surface that is often associated with active hemorrhage. Ulcers are focal defects that extend deeply into the adjacent mucosa and often contain hemorrhage and a fibrinonecrotic center (see Fig. 27-26C). Erosions are discrete, superficial mucosal defects that do not have raised margins or necrotic centers (see Fig. 27-26D). Erythema denotes mucosal redness that can be a pathologic or a physiologic response to altered mucosal blood flow, which, in turn, is associated with anesthesia. Mass lesions may be benign (e.g., antral polyp) or malignant (e.g., tumor) and are not readily differentiated based on appearance alone. The presence of food or large volumes of gastric fluids in a properly prepared patient is suggestive of gastric retention. Gastric nematodes (P. rara) may also be observed along the gastric body of a dog with a history of chronic vomiting. Finally, alterations in the distensibility of the gastric wall suggest submucosal infiltrative disease or extragastric compression.
Gastric Biopsy
Gastroscopy is usually performed to obtain gastric-tissue biopsies. Tissue samples should be obtained during gastroscopy whether or not endoscopic abnormalities can be identified.1,3 Histopathologic lesions of the stomach may be present in patients with an endoscopically normal gastric mucosa. Several different styles of biopsy forceps should be available, including those with smooth or serrated cups, with or without a central spike (Fig. 27-27).11 Personal preference and operator experience are often the main reasons for selection of specific types of forceps. Serrated cup forceps without a central spike are often preferred because they cause fewer biopsy artifacts. The diameter of the endoscope’s accessory channel will dictate what size forceps may be used. A channel size of 2.8 to 3 mm facilitates the use of large forceps for mucosal biopsy. The advantage of large forceps is the ability to sample larger and more diagnostic tissue samples. However, the use of forceps that can be passed through smaller diameter endoscopes might still yield excellent quality biopsies for diagnostic purposes.12

If gastric lesions are not obvious, the best biopsy samples are obtained from rugal folds along the gastric body. The rugae are prominent and it is easy to grasp large-size tissue samples for diagnostic evaluation. The biopsy forceps are advanced at a 45° to 90° angle into the rugal folds and six to eight mucosal biopsies are collected. Cytologic specimens obtained with a sheathed cytology brush or cytologies made as imprints directly from tissue samples will complement mucosal histopathology.13 Gross abnormalities of mucosal friability or increased granularity may be biopsied directly. Superficial mucosal erosions should be biopsied at the edge of the lesion. Gastric ulcers require that tissue sampling be performed along the rim of the ulcer at the interface of abnormal and normal tissue. Taking biopsies from the ulcer pit is not advised as the diagnostic yield is minimal and there is some risk of perforation during the procedure. Masses should be biopsied deeply to avoid necrotic surface debris and superficial cells, which may confound the diagnosis. If diffuse neoplasia is suspected, multiple biopsy specimens collected from deep within the lamina propria should be obtained from both the normal and abnormal appearing mucosa.
Stay updated, free articles. Join our Telegram channel

Full access? Get Clinical Tree


