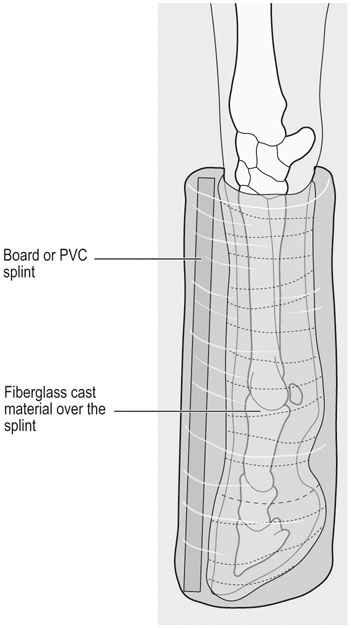
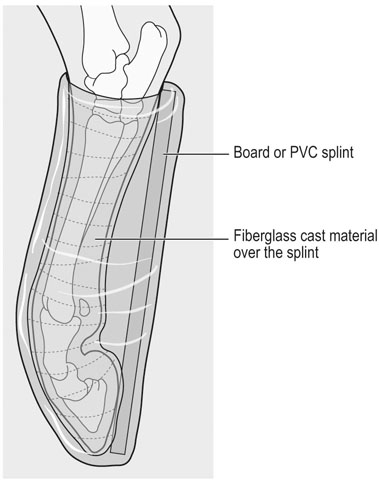
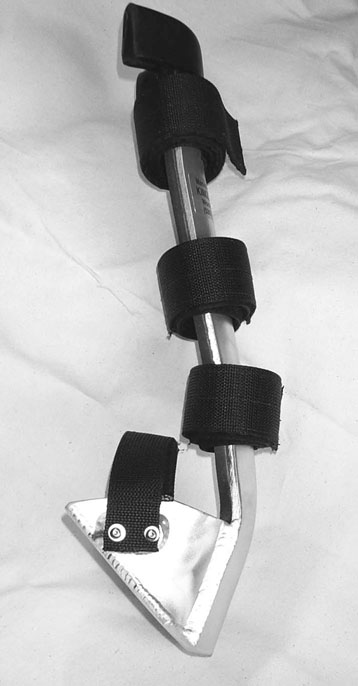
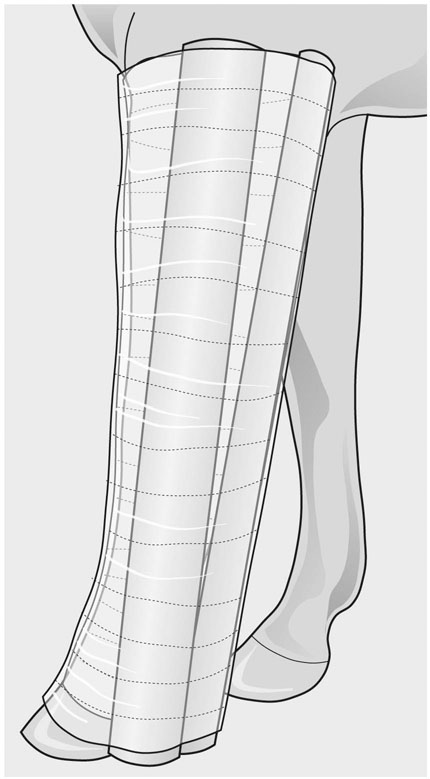
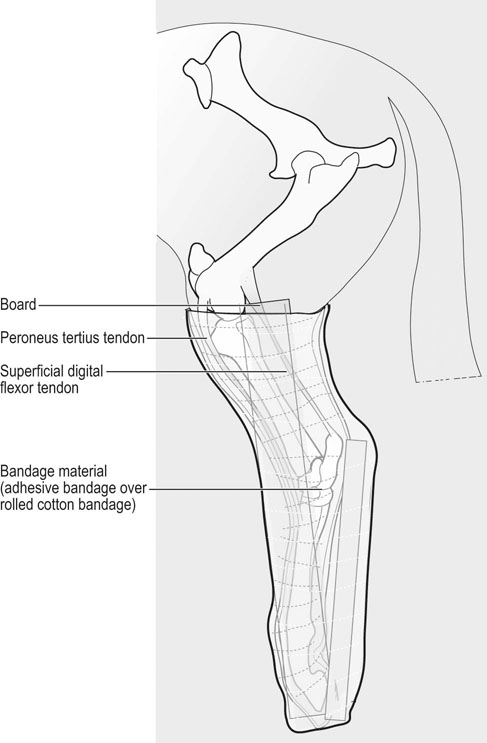
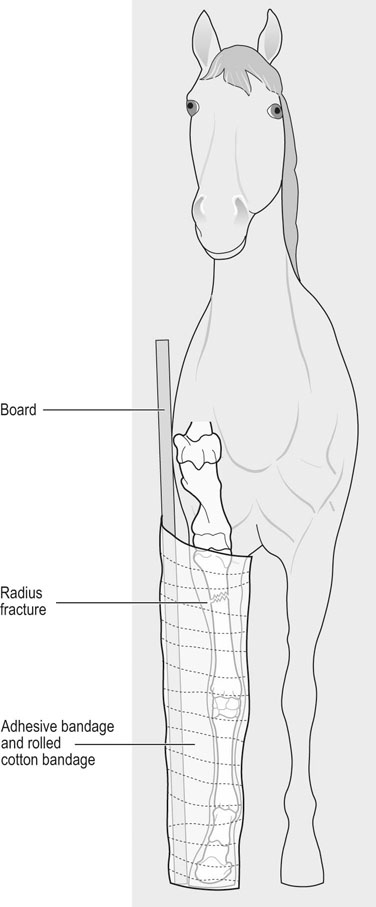
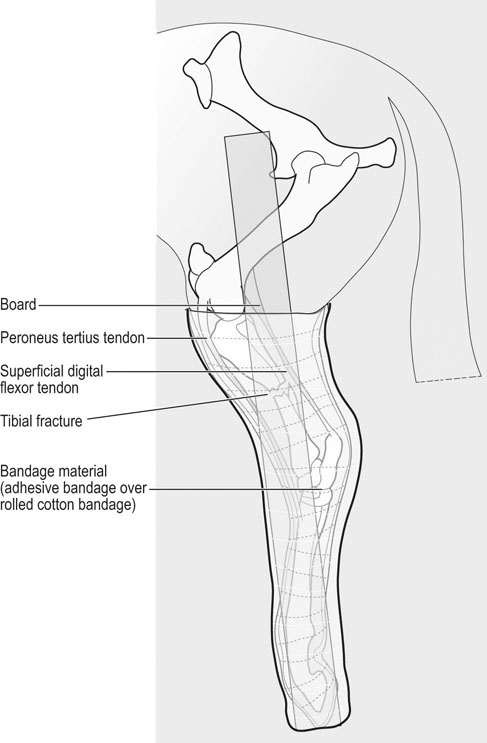
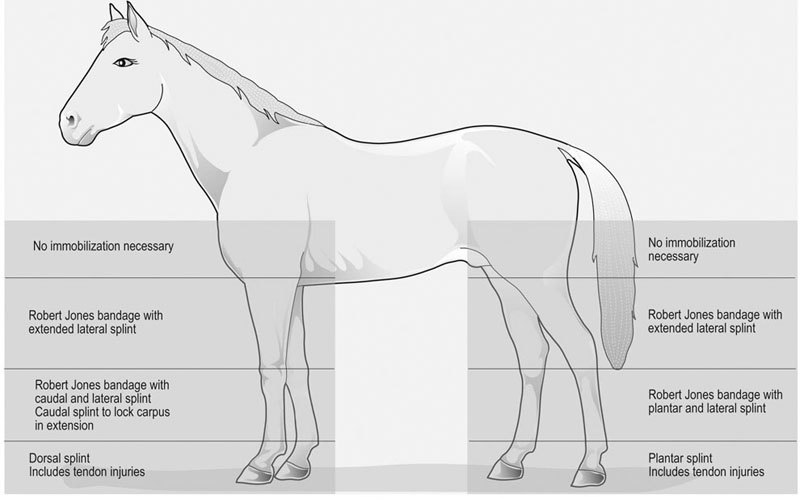
• A thorough physical examination is warranted for any athletic horse injury. • Completion of physical examination can be complicated by the severity of the injury, and other factors such as anxiety, exhaustion, dehydration, and owner/trainer anxiety. • The goals of initial coaptation of fractures are to relieve anxiety; prevent further injury; and allow safe transportation for additional evaluation. • Emergency coaptation of unstable limbs should be performed before radiographic evaluation or transportation to a surgical facility. • Appropriate transportation of the injured horse is important. If the horse is recumbent, examination should be completed before attempting to stand the horse. If the horse is standing, examination should be completed before attempting to move the horse. Sedation and a twitch can be used to help restraint. For sedation, an alpha2 agonist such as xylazine, or xylazine and acepromazine can be used. If sedation is needed immediately after maximal exercise, up to double the standard dosage regimen may be required to achieve effective sedation.1 Butorphanol or detomidine should be reserved for horses that are not controlled with xylazine. It is important to remember that alpha2 agonists will often cause the horse to lean forward, which may increase the weight on an injured forelimb and decrease the ability to manipulate the limb. Therefore the minimal effective dose should be used. In addition, heavy sedation will prolong the exercise-induced increase in body temperature, which may be significant in a hot humid environment. Active cooling by washing with cold water is an effective method of facilitating heat dissipation.2 If the horse is recumbent and there is concern for a serious injury, general anesthesia should be induced and maintained until further assessment is made. General anesthesia can be safely induced in horses following maximal exercise using sedation with a combination of xylazine and acepromazine, followed by induction of anesthesia with ketamine and diazepam or tiletamine–zolazepam. The combination of guaifenesin and thiopental produces more hypotension and is less desirable.3 Once the general status of the patient has been assessed, location and assessment of the injury follows. It is useful to divide the limbs into four levels, which will help define the method of coaptation (Fig. 58.1).4 Note that flexor tendon injuries located at the level of the metacarpus/metatarsus are considered level 1 injuries. Laboratory determinations of biochemistry profile indices are more commonly available even in field situations. If available, parameters of hydration and electrolyte balance are useful to dictate fluid volume and type. In particular, measurement of lactate concentration using point-of-care equipment can provide a good evaluation of perfusion.5 The principles of emergency coaptation include: • appropriate wound care before application of external coaptation • provision of adequate padding to prevent skin abrasions • immobilization of the joint below and above the area of injury • prevention of latero-medial and cranio-caudal motion • never ending a splint in the middle of a long bone segment, or at the end of a fracture line. Any wound should be carefully cleaned and debrided. An antiseptic ointment can be applied and held in place with conforming gauze. Cotton padding is applied to the entire length of the segment to be immobilized, and held in place with gauze followed by non-stretch bandage material. The bandage should be snug, to avoid loosening with packing of the cotton material. The splints are then applied and held in place, ideally with fiberglass casting tape. Whenever using casting tape, at least six layers should be applied. Casting tape is particularly useful if there is a luxation, as these can be difficult to keep stabilized. If unavailable, heavy tape can be used. It is important to make sure the splints are well padded to avoid the development of sores. See Box 58.1. In order to facilitate emergency coaptation of unstable injuries, a classification system based on the location of the injury has been recommended (Fig. 58.1).4 It is important to note that tendon lacerations located below the carpus/hock are considered level 1 injuries. In forelimb injuries, immobilization is best accomplished by aligning the cannon bone with the phalanges, to establish a straight column (Fig. 58.2). The horse will bear weight on its toe. To accomplish this goal, the forelimb is held above the carpus, bandaged, and the splint is applied on the cranial aspect of the distal limb, extending from the toe to the carpus. If there is latero-medial instability, a lateral splint can also be applied. Alternatively, the splint can be held in place using casting tape. In the hindlimb, the reciprocal apparatus prevents extension of the distal limb if the animal is non-weight bearing. Therefore the limb is best immobilized by applying the splint on the caudal aspect of the limb, from the toe to the point of the hock (Fig. 58.3). Again, if there is latero-medial instability, a lateral splint should also be placed or casting used to immobilize the splint. A cranial splint can also be placed; however, to facilitate placement, the limb can be pulled forward to straighten the fetlock. A commercially available splint is available for level 1 injuries (Fig. 58.4). The advantages of this splint are that it is readily available, easy to apply and is effective in achieving immobilization. Two configurations are available: one with a slightly forward angled bar (for the forelimb) and one with a backward angle with the curve at the level of the fetlock (for the hindlimb). In the author’s experience, the forward angle configuration is more effective for either fore- or hindlimb injuries. When used for prolonged immobilization, the stall should be deeply bedded to improve support of the foot. Alternatively, a heel piece can be welded onto the splint to increase weight-bearing surface area. Non-slip tape should be placed on the foot plate to make it less slippery, particularly on cement floors. In level 2 injuries, two splints are needed, applied at 90-degree angle, with one splint lateral and one splint caudal. The splints need to extend from the hoof to the elbow (Fig. 58.5). For olecranon fractures and radial nerve paralysis, the goal of immobilization is to prevent tendon contracture and injury to the dorsal aspect of the limb. Only a caudal splint is needed for these types of injuries. As in the forelimb, two splints are needed, one applied laterally and the other applied caudally, from the hoof to the stifle. The angle of the hock makes it difficult to apply a caudal splint. Therefore the caudal splint can end at the point of the hock, rather than at the stifle (Fig. 58.6). Alternatively, if possible, a splint can be molded to the hock so it can be applied. If the horse is deemed severely injured and needs to remain recumbent, it can be pulled onto the trailer using a large tarp or blanket. A glideb is commercially available to help move recumbent horses. The horse should be kept sedated during transport, to avoid injuries. A head protectorc or bandage can be used to protect the eye and head from self-induced trauma. Bandages should be applied to the lower limbs, also to avoid trauma caused by paddling. • First step: identification of all involved structures • Determine need for referral based on the presence of: • Provide tetanus prophylaxis, analgesia, and appropriate antibiotic therapy
Emergency procedures and first aid for the equine athlete
Fractures and luxations
Initial assessment
Physical examination
Laboratory examination
Emergency treatment
Therapy
Bandage and splint application
Classification of injuries
Immobilization of level 1 injuries
Forelimb
Hindlimb
Use of the Kimzeya apparatus
Immobilization of level 2 injuries
Forelimb
Hindlimb
Guidelines for safe transportation
Wounds and lacerations
Emergency procedures and first aid for the equine athlete