Haematology analysers allow regular and accurate evaluation of single blood parameters but for complete confidence one should carry out a blood smear (see Differential white blood cell count procedure) to assess irregularities in cell morphology and to ascertain whether anaemias are regenerative or non-regenerative. I have described no specific methodologies for the range of haematology analysers currently available but it is appropriate to describe briefly the three types of technology employed: 1. The QBC Autoread (IDEXX): this utilizes qualitative buffy coat analysis. Cells have different densities and the QBC system employs a combination of an oversized haematocrit tube and a float to expand the buffy coat to quantify each type of white cell. In addition, the tube is coated with a fluorescent dye which stains cellular components when subjected to blue violet light. 2. Electronic impedance technology: the principle of this type of analyser is that cells are diluted with an isotonic solution, counted and sized by passing them through an aperture on the instrument. Each cell is identified and classified using its resistance to an electrical current. 3. Laser flow technology (Lasercyte – IDEXX): this type uses lasers through which a stream of cells is passed. The system counts and identifies cells using the principle that individual types of cell reflect laser light differently depending on their size and granularity. Enzyme-linked immunosorbent assay (ELISA) tests for feline leukaemia virus, feline immunodeficiency virus and Giardia are now so commonly used and are so simple to perform that specific instructions have not been included. This type of test falls into two groups, the read-by-eye test, which is designed for practice use, and more complex plate ELISA methods, which require a photometer plate reader to assess optical densities and interpretation. The latter is more suited to commercial laboratories. Whilst undertaking laboratory procedures observe the following guidelines: • Wear a long-sleeved laboratory coat, gloves, mask (where necessary) and eye protection at all times. • Wear the minimum of jewellery. • The use of nail varnish is not acceptable and nails must be kept short and clean. • Do not lick gummed labels or your fingers or suck the ends of pencils or pens. • A wash basin reserved for hand washing should be available equipped with antibacterial soap and paper towels. • Hands should be washed on entry to the laboratory and on leaving the room. • All work surfaces should be cleaned and disinfected daily and after every hazardous procedure. • As soon as you have finished with equipment, store it away tidily to avoid accidents. • Samples and contaminated equipment should be disposed of safely and correctly. • Sharps containers and clinical waste bags must be available in the laboratory at all times. • If hazardous chemicals are used, take note of warning labels and act accordingly. • Many bacteria are potential pathogens and should be handled in a contained environment such as a safety cabinet. • Know where the first aid kit is stored, what action to take in an emergency and be familiar with the accident book. • It is a good idea to list all procedures in a laboratory manual so that all staff members use the same methodologies. • The use of external quality assurance or quality control schemes ensures confidence in your results. 1. Action: Autoclaving is the most reliable method for sterilizing culture media and laboratory equipment. 2. Action: Before use check that there is sufficient water to cover the element. Rationale: Autoclaves must not be allowed to boil dry. 4. Action: Place an indicator strip near to the middle of the load. Rationale: These strips change colour to indicate when full sterilization has taken place. 5. Action: Do not overfill the chamber. 6. Action: Check that the steam discharge tap is open. 7. Action: Adjust the safety valve to the required pressure. 8. Action: Allow steam and air mixture to escape until all air has been eliminated from the chamber. Rationale: You will see the steam escaping. 9. Action: Close the discharge tap. 10. Action: When pressure reaches the required level, the safety valve will open – at this point start to time the load. Rationale: A minute timer is useful. 11. Action: When the time is complete, turn off the heater and allow the autoclave to cool. Rationale: When cool the gauge should read 0 lb/sq. inch (atmospheric pressure). 12. Action: Open the discharge tap. 14. Action: Pour out any water left in the chamber and wipe clean with a soft cloth. 1. Action: Always make sure that the balance is placed on an even and stable surface. Rationale: Balances are extremely delicate instruments and can be damaged by excessive vibration. 2. Action: Items placed on the top pan must be centred for accurate weight distribution. Rationale: Use forceps to place items carefully into the middle of the pan. 3. Action: Instrument accuracy can be checked using calibrated weights. 4. Action: Before weighing, zero the balance using the TARE button. Rationale: If using a balance boat, place the boat on the balance before zeroing the machine. 5. Action: Weigh the item under test. 7. Action: Carefully remove the item from the pan. Rationale: Use forceps for small items. 8. Action: Turn off the power supply to the balance. 9. Action: Clean the pan using a damp soft cloth (if spillage has occurred) or a soft clean lint-free tissue. 1. Action: Important – if the glassware contains hazardous material, autoclave the glassware with the contents intact at 121 °C for 45 minutes prior to discarding the contents. 2. Action: If autoclaving is not required, proceed as follows: rinse the glassware immediately after use and place in a solution of non-toxic commercial laboratory detergent. 3. Action: Using disposable gloves and a soft brush, remove any material present on the glassware. Rationale: Use a test tube brush for narrow tubes – hard brushes scratch the surface of the glass. 4. Action: Transfer glassware to a fresh solution of detergent and leave to soak for 20–30 minutes. Rationale: Heavy soiling may require a longer soaking. 5. Action: Once the glassware is visibly clean, rinse in tap water two or three times. 6. Action: Transfer to a container of distilled/deionized water and rinse. Rationale: Two or three changes of distilled water are recommended. 8. Action: Dry in drying oven at 160 °C for 1 hour or allow to dry in the air. Rationale: If air-drying, the atmosphere must be dust-free. 9. Action: If glassware is to be used for sterile procedures, sterilize in an autoclave at 121 °C for 15 minutes. 10. Action: Always cool glassware slowly. Do not put hot glassware on to a cold surface. Rationale: Glass will crack if it is subjected to sudden temperature changes. 11. Action: Check for cracks and chips and store in a dust-free atmosphere until use. Rationale: Cracks or chips reduce thermal strength, leading to sudden breakage. 1. Action: Always ensure that the centrifuge is placed on an even and stable surface. 2. Action: Only use tubes recommended by the manufacturer. 3. Action: The top of the centrifuge tube must not protrude above the top of the bucket. When using a microhaematocrit centrifuge, ensure that the plasticine end of the capillary tube is against the outer ring of the instrument. 4. Action: Vacutainer tubes may be spun with their stoppers in place. Rationale: If the tube is opened or broken, aerosol contamination of the environment could occur. 5. Action: Lock the lid of the centrifuge securely. 6. Action: Set the spin speed as appropriate. Rationale: For example, urine requires a lower speed than heparinized blood for biochemistry. 7. Action: After use turn off the power supply. 8. Action: Take out the buckets. 9. Action: Wipe the rotor and buckets with a soft cloth and mild disinfectant solution. Rationale: To prevent contamination of the next sample. 1. Action: Remove all media from the incubator. 2. Action: It is sensible to clean the instrument when workload is low but it should be done at least once a week. Rationale: Incubators are used to culture bacteria so the risk of contamination of samples is high. 3. Action: Remove all the shelves and racks. Rationale: These are more easily cleaned when out of the incubator. 4. Action: Using a mild detergent and soft cloth, wipe all the incubator surfaces and the shelves. 6. Action: Using a disinfectant solution and fresh cloth, wipe all the incubator surfaces and shelves. Rationale: The disinfectant used must be bactericidal and fungicidal to be effective. 8. Action: Replace the shelves. 9. Action: Place a thermometer in glycerol in the middle of the incubator. Check that the bulb is covered. Switch on the incubator. 10. Action: Read the thermometer after 1 hour. 11. Action: Every month check on the door seal, electrical wiring and thermostat. Rationale: If in doubt about any component inform the practice or laboratory manager. 1. Action: Always ensure that the microscope is placed on an even and stable surface. Rationale: Slight vibration will make it difficult to view the object. 2. Action: Before use, clean the eyepieces, condenser and objective lenses with lens tissue. Rationale: Lens tissue is lint-free and prevents bits being left on the surfaces. 3. Action: Clean the oil immersion lens with cleaning fluid. Rationale: Isopropanol is most commonly used. 4. Action: Turn the light control to a minimum. 5. Action: Turn on the instrument. 6. Action: Adjust the eyepieces. Rationale: Use both eyepieces and position them so that both fields converge as one. 7. Action: Place the slide on the stage. Some instruments have clips to hold the slide. 8. Action: Move the slide by using the knobs on the mechanical stage. 9. Action: Examine the slide using the × 10 objective lens. 10. Action: Focus first with the coarse and then with the fine adjustment knobs. Rationale: Always focus upwards from the slide to prevent accidental damage to the slide. 11. Action: If using oil immersion, place a drop of oil on to the slide. 12. Action: Rotate the nosepiece until the × 100 objective lens is above the slide. 13. Action: Drop the objective lens into the drop of oil. Always watch what you are doing – do not look at it through the eyepiece, as you will find it impossible to judge distances and may smash through the slide. 14. Action: Focus using the fine control. Rationale: You may need to adjust the light to improve your view. 15. Action: After use remove the slide from the stage. Rationale: Move the clips before trying to remove the slide. 16. Action: Reduce the light and turn off the power. 17. Action: Turn the objective lenses on the nosepiece until the lowest power is in position above the stage. Rationale: Ready for use next time. 18. Action: Remove any oil from the objective lenses using lens tissue and if necessary lens-cleaning fluid. Rationale: Ready for use next time. 19. Action: Cover the instrument when not in use. Rationale: This will prevent the build-up of dust on the objective and eyepiece lenses. 1. Action: The Vernier scale is a graduated device attached to the stage of the microscope. 2. Action: One scale lies along a vertical edge and another along a horizontal edge. Rationale: Use both position numbers to give a grid reference similar to that on a map. 3. Action: Place the slide on the microscope stage and fix it with the clips if present. Rationale: The slide must not move around as this will invalidate your scale references. 4. Action: Locate the object you wish to identify. 5. Action: Look at the scale on the vertical axis. 6. Action: Record the number where the zero mark on the Vernier plate meets the main scale. Rationale: Record the lower number if it falls between two divisions. In Figure 11.2 the zero mark falls between 31 and 32. 7. Action: Make a note of which of the marks on the Vernier plate is exactly opposite a division on the main scale. Rationale: In Figure 11.2, mark number 6 is exactly opposite a division on the main scale. 8. Action: Record this reading, placing it after the decimal point. Rationale: In Figure 11.2 this will give a reading of 31.6. 9. Action: Repeat steps 6–8 using the horizontal axis. Rationale: You now have two readings, e.g. 31.6 and 90.1. 10. Action: You now have a grid reference for that object on that slide, provided the slide is placed in the same position on the stage. Rationale: By tradition, slides are placed on the stage with the label to the right. 11. Action: Record your grid reference using the horizontal reading followed by the vertical reading. 1. Action: After use, place the pipette in a jar of disinfectant. Rationale: Hypochlorite solution containing 1000 mg/l of free chlorine is most commonly used. Rationale: This removes bacterial contamination. 3. Action: Rinse the pipette several times in tap water. 4. Action: Rinse the pipette several times in distilled water. Rationale: This leaves a clean surface on the glass. 5. Action: Rinse the pipette in methylated spirits. Rationale: This removes any grease. 6. Action: Rinse the pipette in ethanol. Rationale: Ethanol evaporates and leaves the inside of the pipette dry. 7. Action: Plug the pipettes with non-absorbent cotton wool. 8. Action: Pack into metal pipette canisters for autoclaving at 121 °C for 15 minutes. Rationale: The pipettes are sterilized ready for aseptic procedures. 1. Action: Using a soft cloth, clean the external parts of the pipette with a weak solution of commercial laboratory detergent. Rationale: This removes grime accumulated by daily handling. 3. Action: Wipe the barrel end of the pipette (not the plunger) with isopropanol. Rationale: Wiping with spirit disinfects the part of the pipette that is attached to the tip. 4. Action: Some pipettes require the seals to be greased regularly – refer to the manufacturer’s instructions. Rationale: Special grease is usually included in the maintenance kit supplied with the pipette. 5. Action: When needed for use, attach a disposable tip. 6. Action: Depress the plunger, place the tip in the solution and slowly release the plunger. Rationale: The fluid will be aspirated into the tip. 7. Action: Transfer the tip to your next vessel, e.g. a test tube, and place against the inner side of the vessel. Depress the plunger slowly. Rationale: The fluid will run down the side of the vessel. Rationale: Tips should not be used more than once to avoid cross-contamination. 9. Action: The accuracy of your dispensing may be checked using a weight and balance. Rationale: Calibrate the pipette by weight, e.g. 1 ml of distilled water weighs 1 g. 10. Action: Pipettes should be stored in a pipette rack or in the box provided when not in use. Rationale: If pipettes are not stored properly, the dispensing end may be damaged. 1. Action: If possible, samples and contaminated agar plates should be placed in autoclave bags and autoclaved in a steam autoclave at 121 °C for 45 minutes. 2. Action: It is good practice to include an indicator, e.g. TST strip, to confirm that complete sterilization has taken place. Rationale: If this device fails, the load is still unsafe and it must be reprocessed. 3. Action: Once sterilized, place the unopened autoclave bag into yellow hazardous waste bags and send away for incineration by a licensed waste disposal firm. Rationale: This further reduces the risk of contaminating the environment with the waste material. 4. Action: Sharps and other disposable items must be placed within a yellow commercial sharps bin, which is sealed and sent for incineration. 5. Action: Metal items may be cleaned using non-hypochlorite disinfectants. Rationale: Hypochlorite disinfectants will react with metal. 6. Action: Some equipment may need special cleaning and disinfection. 7. Action: Clean all work surfaces with disinfectant after every procedure. 8. Action: At the end of each working day leave the laboratory clean and tidy. 1. Action: Turn off the power supply. 2. Action: Remove the thermometer and shelf. 3. Action: Pour away the water. 4. Action: Wipe all the surfaces with detergent. Rationale: The base tray must be covered – never run a water bath when it is empty. 6. Action: Replace the thermometer. Rationale: Holders sited on the side of the bath should hold thermometers in place. 7. Action: Switch on the power. 8. Action: Reduce heat loss by using a lid. This should not be used for open test tube work. Rationale: Condensation accumulates on the lid and drips into the fluid in the test tubes. 9. Action: Check that the correct temperature has been reached. Rationale: Allow 20–30 minutes for the bath to warm up. 10. Action: Put the items in a rack inside the bath and set the timer. Rationale: Always use the rack – bottles and tubes may float if free-standing. 11. Action: After the incubation time is complete, remove the items. Rationale: Always use tongs to remove very hot bottles and tubes. 1. Action: Place the sample/fluid in a centrifuge tube and centrifuge at 1500 rpm for 2–3 minutes. Sediment can also be produced in the bottom of the tube by leaving it to stand for about 30 minutes. 2. Action: A smear may be made by touching a slide against a lesion. 3. Action: FNAs may be prepared without centrifugation if sufficient cells have been harvested. Deposit cells on the slide by pushing the plunger of the syringe. Rationale: FNAs are usually rich in cells. 4. Action: Decant the supernatant liquid from the centrifuge tube and discard. This leaves the sediment in the bottom of the tube. Rationale: The use of a conical tube helps in the separation of the sediment from the supernatant. 5. Action: Resuspend the cells by flicking the tube with your finger. 6. Action: Using a pipette, place one or two drops on to the centre of a microscope slide. 7. Action: Make two smears using the ‘squash’ method (Fig. 11.3). 8. Action: Allow the smears to air-dry. Rationale: The use of artificial heat will damage the cells. 9. Action: Stain the smear with Leishman’s, Gram’s or Sudan 3 as appropriate. 1. Action: Faeces may be collected from the ground immediately after defecation. 2. Action: Faeces may be collected using a gloved finger inserted through the anal sphincter into the rectum. 3. Action: Place the sample in a sterile container. There should be sufficient faeces to fill the container. Rationale: Too much air in the container encourages parasite eggs to hatch prior to examination. 4. Action: Store the faeces in the fridge before examination. 5. Action: Bacterial tests must be carried out as soon as possible after collection. 1. Action: Weigh 3 g of faeces into a beaker. Rationale: The faeces should be fresh and moist. 2. Action: Measure 45 ml of saturated sugar solution using the measuring cylinder and pour it into the beaker. 3. Action: Mix the solution with a spatula. 4. Action: Pour the solution through the sieve into a second beaker. Rationale: This removes large particles but allows the eggs to go through. 5. Action: Discard the debris remaining in the sieve. 6. Action: Mix the solution in the beaker gently. 7. Action: Allow the solution to stand at room temperature for 5–10 minutes. Rationale: This allows the worm eggs to float to the top of the saturated sugar solution. 8. Action: If using a single-chamber type of McMaster slide, prepare it by placing the coverslip grid-side down. Rationale: Some slides have only one chamber and use a coverslip grid, while others have two chambers with integral grids (Fig. 11.4). 9. Action: Withdraw approximately 2 ml of the solution using a Pasteur pipette. 10. Action: Fill the counting chamber and apply the coverslip (Fig. 11.4). 11. Action: Leave the counting chamber on the bench for 5–10 minutes. 12. Action: Examine the counting chamber using the × 10 objective on the microscope. 13. Action: Count all the eggs seen over the grid (Fig. 11.5).
Diagnostic laboratory techniques
INTRODUCTION
HEALTH AND SAFETY IN THE LABORATORY
CARE OF LABORATORY EQUIPMENT
Procedure: Care and use of autoclaves
Procedure: Care and use of the balance
Procedure: Care and cleaning of glassware
Procedure: Care and use of the centrifuge
Procedure: Care and cleaning of the incubator
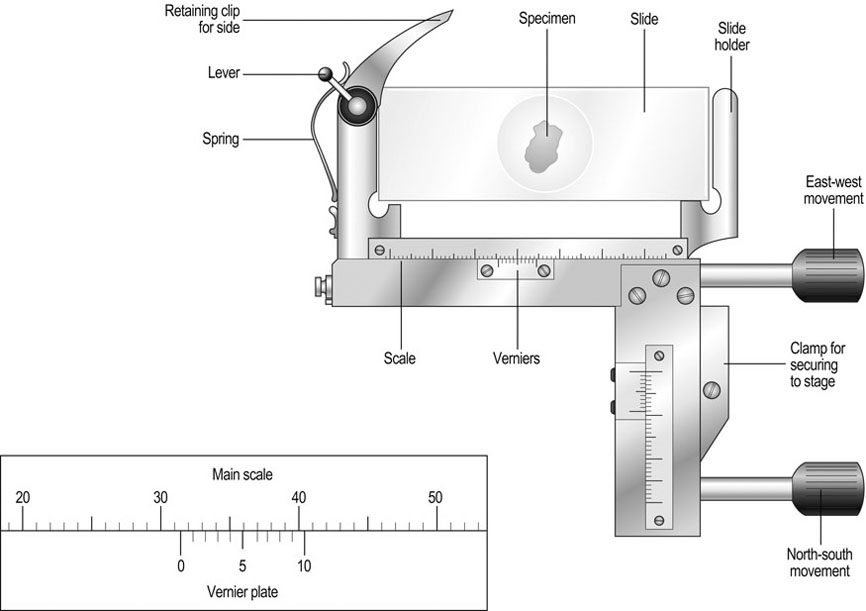
Procedure: Care and use of the microscope (Fig. 11.1)

Procedure: Use of the Vernier scale (Fig. 11.2)
Procedure: Care of glass pipettes
Procedure: Use of volumetric and automatic pipettes
Procedure: Decontamination and disposal of laboratory waste
Procedure: Care of the water bath
PRACTICAL LABORATORY TECHNIQUES
CYTOLOGY
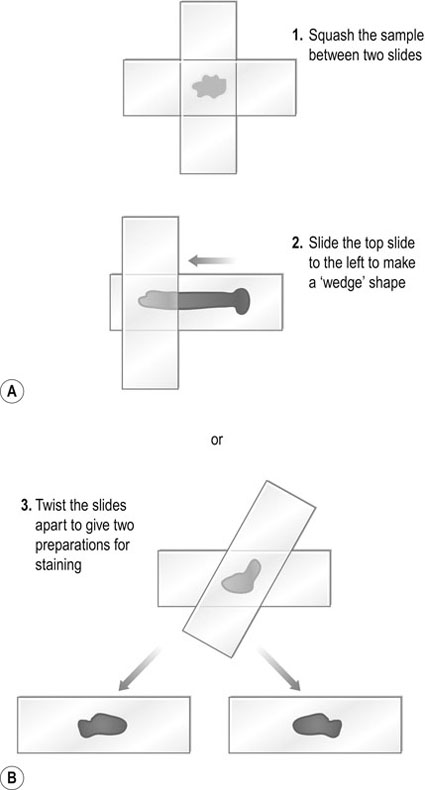
Procedure: Preparation of a smear using samples from fine-needle aspirate (FNA) biopsies and thoracic fluid
Equipment
FAECAL EXAMINATION
Procedure: Preparation and storage of faeces for examination
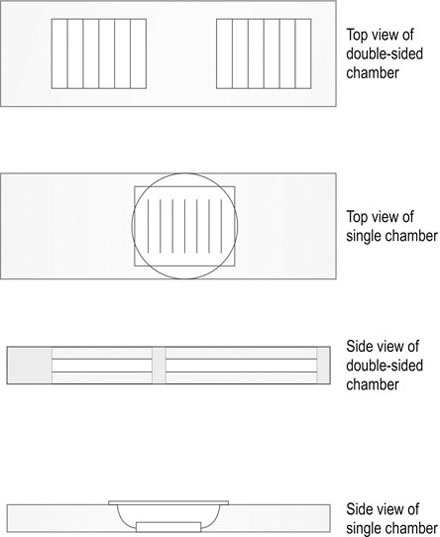
Procedure: Worm egg count – modified McMaster method
Equipment
![]()
Stay updated, free articles. Join our Telegram channel

Full access? Get Clinical Tree