1. Action: Place the X-ray machine in the designated room or controlled area. 2. Action: Make sure that the radiation warning signs are displayed and visible. 3. Action: Plug the machine into the mains. Rationale: Most machines rely on mains electricity to work. 4. Action: Switch the X-ray machine on at the console or the main body of the machine. Rationale: The machine must be plugged in prior to switching on the machine. 5. Action: Check that the mains voltage compensation is accurate. 6. Action: Adjust the mains voltage compensation if needed. 7. Action: Set the X-ray tube to the correct height above the film. 8. Action: Set the exposure factors suitable for the examination, patient type and the equipment being used. 1. Action: Place the X-ray machine in the room and ensure that the correct exposure factors are set. 2. Action: Place the cassette on the table and centre it under the centre of the X-ray tube. 3. Action: If a stationary grid is being used, place this in the correct position over the cassette. Rationale: Incorrect use of the grid will result in poor-quality/non-diagnostic images. 4. Action: Place sandbags, ties and foam pads so that they can be easily reached if needed to position the patient. Rationale: Sandbags, ties and foam pads are used to hold the patient in the required position. 5. Action: Remove unnecessary equipment from the room. 6. Action: Remove any distractions from the room. Rationale: Anything that may prevent the animal cooperating or cause unnecessary distress. 1. Action: Ensure that there is a valid clinical indication for the examination. 2. Action: Use some form of chemical restraint – either sedation or general anaesthesia – as appropriate to the patient. 3. Action: Remove any artefacts from the patient, e.g. leads, collars, clips, matted or wet hair. Rationale: Artefacts may distract the attention from and may overlie the main point of interest. 4. Action: If required for the procedure, ensure that any preparation of the patient, e.g. fasting, use of an enema or emptying the bladder, has taken place. 5. Action: Position the animal correctly for the radiograph. Table 10.1 Table 10.2 General principles of positioning 1. Action: Place the patient in right lateral recumbency. Rationale: This is the conventional position for a thoracic radiograph. 2. Action: Extend the forelegs and secure them using sandbags or ties. 3. Action: Place a pad under the sternum. 4. Action: Place sandbags over the neck and hind legs to hold them in place. Rationale: The hind legs should be secure but should not be extended as this rotates the chest. 5. Action: Centre the beam (indicated by the cross of the light beam diaphragm) midway between the sternum and spine, level with the caudal border of the scapula. Rationale: This ensures that the centre of the primary beam coincides with the base of the heart. 6. Action: Collimate the beam to include the front of the shoulder and the edge of the sternum. Rationale: All regions of the lung field will be included. 7. Action: Expose on inspiration. 1. Action: Place the patient in sternal recumbency. Rationale: This is particularly used for examination of the heart. 2. Action: Support the chin on a pad. 3. Action: Place a sandbag over the neck. Rationale: To prevent movement. 4. Action: Extend the forelegs and adduct them with the elbows out to the sides. Rationale: This prevents the muscle mass of the shoulder girdle overlying the thoracic cavity. 5. Action: Centre the beam (indicated by the cross of the light beam diaphragm) in the midline on the caudal border of the scapula. Rationale: This ensures that the heart base is in the centre of the image. 6. Action: Collimate the beam to include the skin surfaces laterally, the thoracic inlet and the diaphragm. Rationale: The image will include the cranial and caudal extent of the lung field. 7. Action: Expose on inspiration. N.B.: A ventrodorsal view of the thorax may be used to examine the lungs; however, if the animal is in respiratory distress, this position should be avoided as it may make respiration even more difficult. 1. Action: Place the patient in right lateral recumbency. Rationale: This is the conventional position for viewing the abdomen. 2. Action: Place a pad under the sternum. Rationale: A pad will support the sternum to keep the body in a horizontal plane. 3. Action: Extend the fore- and hindlimbs and secure them with sandbags or ties. Rationale: To prevent movement. 4. Action: Centre the beam (indicated by the cross of the light beam diaphragm) at the 11th/12th intercostal space, just cranial to the last rib. Rationale: This ensures that the entire abdomen is included. 5. Action: Collimate the beam to include the dorsal and lateral skin edges, the diaphragm and pubic symphysis. If the patient is large, then move the beam towards the diaphragm or pubic symphysis depending on the area of interest. Rationale: The top of the liver should be included in all radiographs of the complete abdomen. 6. Action: Expose on expiration. 1. Action: Place the patient in dorsal recumbency. Rationale: Care must be taken if the animal is only lightly anaesthetized. 2. Action: Extend each foreleg cranially and secure with a tie or sandbag placed over the carpus. 3. Action: Make sure that the body does not rotate so that the sternum and spine are in vertical alignment. Rationale: The use of a trough or sandbags placed on either side may help to support this position. 4. Action: Centre the beam (indicated by the cross of the light beam diaphragm) on the midline at the level of the umbilicus. This point may be adjusted towards the diaphragm or the pubic symphysis in larger breeds of dog. Rationale: This ensures that the whole abdominal area is included. 5. Action: Collimate the beam to include the lateral skin surfaces, the diaphragm and the pubic symphysis. Rationale: The cranial border of the liver must be shown in an abdominal radiograph. 6. Action: Expose on expiration. 1. Action: Place the patient in right lateral recumbency. Rationale: This is the only way of providing a true lateral projection of the pelvis. 2. Action: Place pads between the hind legs. Rationale: This ensures that the pelvis does not rotate. 3. Action: Centre the beam (indicated by the cross of the light beam diaphragm) over the greater trochanter of the left femur. Rationale: This ensures that the wings of the ilium and the acetabulum are visible. 4. Action: Collimate the beam to include the entire pelvic area. 1. Action: Place the patient in dorsal recumbency ensuring that the body is straight. 2. Action: Extend the hind legs caudally so that the hips and stifles are fully extended. Secure with ties at the hocks. Rationale: This will further ensure that the pelvis is straight. 3. Action: Rotate the hind legs medially so that the femurs lie parallel to each other and the patellae are centred over the distal femurs. 4. Action: Hold the femurs together by placing a tie around the level of the mid-femurs. Sticky tape may be a convenient way of doing this. Rationale: The use of ties will ensure that the patient remains in this position. 5. Action: Added security may be achieved by placing another tie around the legs at the level of the mid-tibia. Again sticky tape may be of use. 6. Action: Centre the beam (indicated by the cross on the light beam diaphragm) in the midline over the pubic symphysis. Rationale: This should provide equal detail on either side of the pelvic girdle. 7. Action: Collimate the beam to include the wings of the ilium and the proximal half of the femurs. 1. Action: Place the patient in dorsal recumbency. Rationale: This ensures that the skull is as close as possible to the film. Rationale: Extension makes sure that the head is horizontal. 3. Action: Place a foam pad under the neck. Rationale: This forces the head back, so that the hard palate is parallel to the table top. 4. Action: Centre the beam (indicated by the cross on the light beam diaphragm) in the midline at a point halfway along the interpupillary line. Rationale: This point may vary with the area to be examined. 5. Action: Collimate the beam to include the entire skull. Rationale: If necessary collimate more tightly over the area of interest, e.g. tympanic bulla. 1. Action: Place the animal in dorsal recumbency, with the hard palate perpendicular to the cassette. Tip the nose slightly past the vertical. 2. Action: Hold the mouth open to form a V-shape, using tapes around each jaw, or place an old needle case (with one end cut off to create a hole) between the teeth of the upper and lower jaws. Rationale: In this position, the mandible and the maxilla are removed from the area of interest. 3. Action: Orientate the primary beam parallel to the hard palate and centre it (indicated by the cross of the light beam diaphragm) on the base of the tongue. Rationale: The tympanic bullae are located directly behind the base of the tongue in this position. 4. Action: If the animal is intubated, remove the endotracheal tube before exposure. Rationale: The endotracheal tube will be superimposed on the tympanic bullae if not removed. 1. Action: The patient must be fully anaesthetized. 2. Action: Place the animal in sternal recumbency. Rationale: The position of the head is straighter if the neck is extended. 4. Action: Place a sandbag over the neck. Rationale: This prevents the head from rotating. 5. Action: Place a non-screen film into the mouth, corner first, as far into the mouth as possible. Rationale: Non-screen film is used as it provides excellent definition. 6. Action: Centre the beam (indicated by the cross on the light beam diaphragm) on a line midway between the external nares and the interpupillary line. Rationale: This allows visualization of the entire area of the nasal chambers. 7. Action: Place a left/right marker on the relevant side. 1. Action: Place the patient in lateral recumbency. Rationale: This will provide radiographic access to the nasopharynx. 2. Action: Place pads under the nose and under the neck. Rationale: These maintain the skull in a horizontal line and prevent rotation. 3. Action: Pull the forelegs caudally to lie against the wall of the thorax using ties. 4. Action: Centre the beam (indicated by the cross on the light beam diaphragm) on the mid cervical area to include the pharynx and thoracic inlet. Rationale: The areas cranial and caudal to the pharynx must be included. 5. Action: If the animal is intubated, remove the endotracheal tube before exposure. Rationale: The endotracheal tube may mask a stricture or a mass.
Diagnostic imaging
INTRODUCTION
Procedure: Setting up the X-ray machine
Procedure: Preparing the X-ray room for a radiographic examination
Procedure: Preparing the patient for a radiographic examination
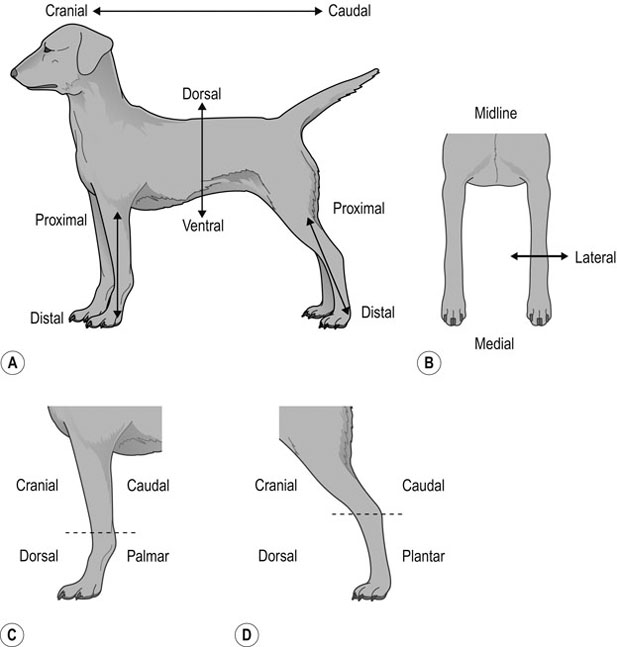
POSITIONING THE PATIENT (TABLES 10.1 AND 10.2, FIG. 10.1)
THORAX
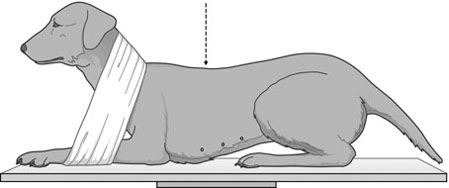
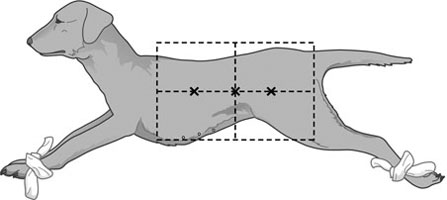
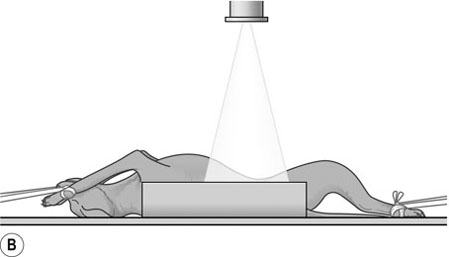
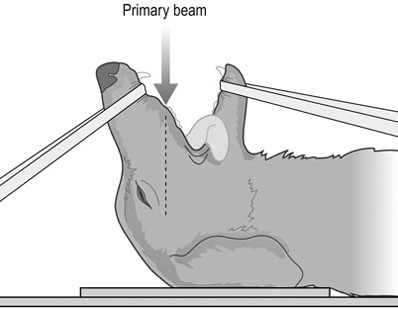
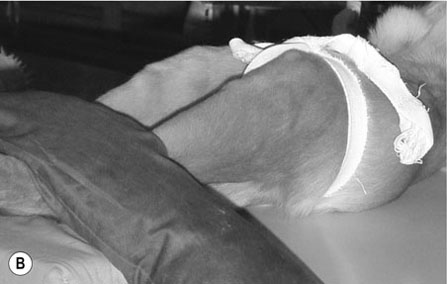
Procedure: Lateral thorax (Fig. 10.2)
Type
Use
Radiographic density
Troughs – range of sizes
To restrain animal on its back. Prevents rotation of the trunk
Radiolucent
Foam wedges – range of shapes and sizes
Covered in plastic for ease of cleaning
For lateral views to provide support and prevent rotation of the trunk and for accurate limb positioning. May be useful for supporting the spine and trunk to achieve a horizontal plane
Radiolucent
Sandbags – loose filling allows bending and twisting. Covered in plastic for ease of cleaning
Can be wrapped around to hold limbs in position or placed over the neck
Radiopaque – do not place in the primary beam
Tapes or ties – range of lengths
Looped around limbs to pull them into position and tie them to cleats on the table
Radiolucent
Wooden blocks
For raising the cassette up to the area of interest
Radiopaque – do not place in the primary beam
Action
Rationale
Centre the primary beam over the main point of interest
To prevent distortion of the area by an oblique view
Place the area of interest as close as possible to the film
To prevent gross magnification of the part due to an excessive object–film distance. The image may also be blurred
Ensure that the centre of the primary beam is at right angles to the film
To avoid distortion of the image. This is important when examining joint or intervertebral disc spaces
Collimate the beam to as small an area as is realistically possible
To reduce the amount of scattered radiation
Take two views at right angles to each other
To assist in accurate location of a lesion and to visualize the area completely
Try to contain the whole area of interest on a single film
To reduce the number of exposures. If this means that important parts are viewed obliquely, e.g. whole spine, it is better to take views of several smaller areas
When imaging the spine, the body must be supported so that the vertebrae are in the same horizontal plane
To prevent distortion and magnification of individual vertebrae and of the intervertebral disc spaces
Procedure: Dorsoventral thorax (Fig. 10.3)
ABDOMEN
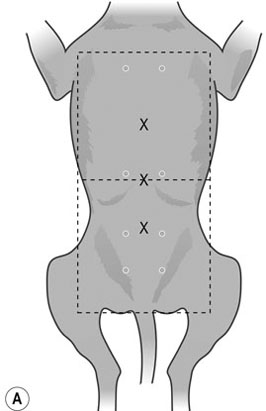
Procedure: Lateral abdomen (Fig. 10.4)
Procedure: Ventrodorsal abdomen (Fig. 10.5)
PELVIS
Procedure: Lateral pelvis (Fig. 10.6)
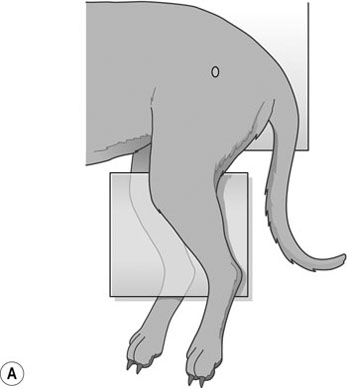
Procedure: Ventrodorsal pelvis (extended hip position) (Fig. 10.7)

SKULL
Procedure: Ventrodorsal skull (Fig. 10.8)
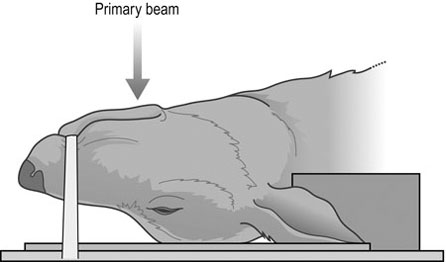
Procedure: Open-mouth rostrocaudal view of the tympanic bullae (Fig. 10.9)
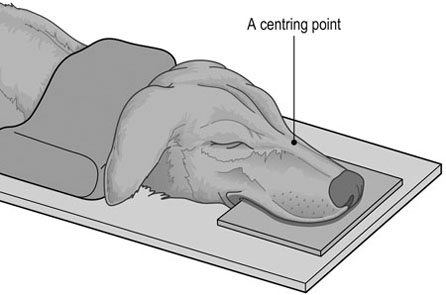
Procedure: Dorsoventral intraoral view of the nasal chambers (Fig. 10.10)
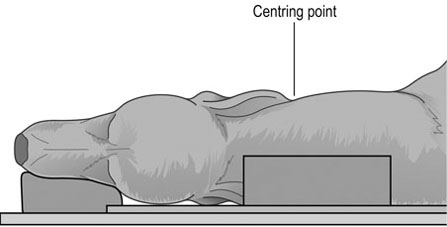
Procedure: Nasopharynx (Fig. 10.11)
![]()
Stay updated, free articles. Join our Telegram channel

Full access? Get Clinical Tree