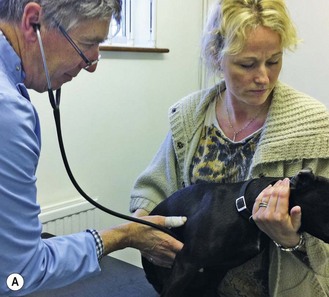
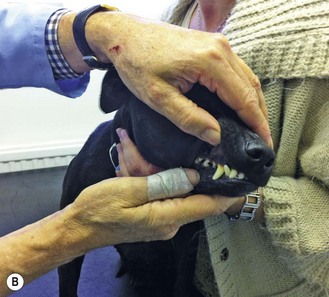
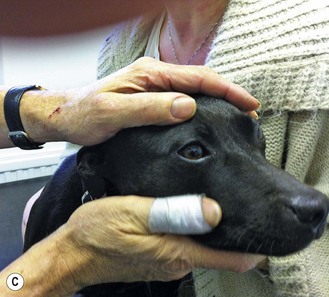
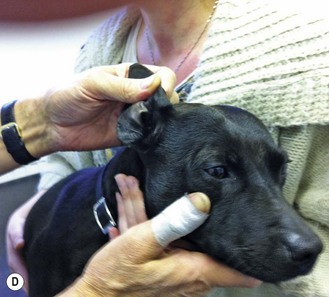
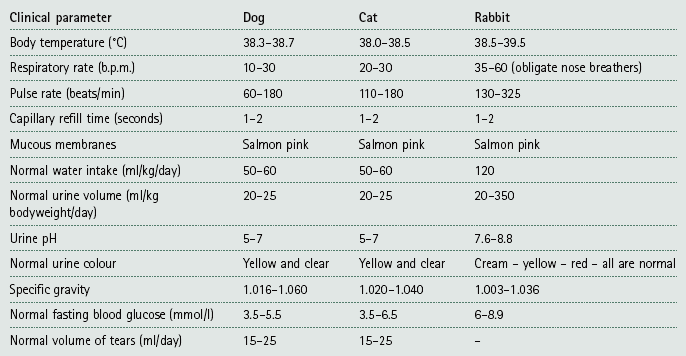
Chapter 2 Basic consulting room techniques Procedure: Squeezing the anal sacs Procedure: Clipping a dog’s claws Procedure: Clipping a bird’s beak Procedure: Fluorescein test for the diagnosis of corneal ulcers or for assessing the patency of the tear duct Procedure: Schirmer tear test to measure the amount of aqueous tear production Procedure: Measurement of intraocular pressure using a Schiotz tonometer Procedure: Measurement of intraocular pressure using a Tono-Pen® Procedure: Collection of samples for ectoparasite identification 1. History – This must be taken early on in the consultation process and should be as detailed as possible. a. When taking the history, remember to listen to the answers. Sometimes your brain is ‘talking’ to you, especially if you are nervous, and you do not hear what is actually being said to you. b. Avoid asking leading questions, that is, those that suggest something to the client; e.g. ‘Is your cat drinking a lot?’ suggests to the client that it is, even if it is not. c. Avoid asking closed questions, that is, those that can only be answered by Yes or No; e.g. ‘Is your cat drinking a lot? It is better to ask an open question such as ‘How much is your cat drinking?’ d. Take notes – either directly on to the computer, or use a note pad for later transcription – it may be difficult to write a full history within the allotted time. • Client’s details – name, address and telephone number. Some practices may also take the email address. These details may have been taken by the receptionist and will appear on your computer screen in the consulting room. Find out the animal’s name and use it! Get the sex of the animal right – if you consistently refer to him rather than to her, this is what the client will pick up on not on whether you have made the diagnosis of the century! • Patient details – species, breed, age, vaccination status, any previous medical history, how long they have had him / her. Weigh the animal – this will be useful for calculating dose rates, but is also a useful measure of health. In any animal on a diet this is a useful measure of progress. All these details may already be on the computer screen in front of you, but checking the facts is a good way of getting into a conversation. • Presenting sign – this is the symptom that has made the client get off the sofa and bring the dog to the surgery. It will be the most obvious sign to them (e.g. the dog is drinking a lot, diarrhoea, vomiting, scratching, etc.) although not necessarily the most significant diagnostically. Ask questions to develop your understanding of this presenting sign (Box 2.1), then ask questions about other relevant symptoms as you begin to extract the facts and widen your knowledge of the patient, e.g. diet, how much, when was it last wormed or defleaed. 2. Initial examination – First stand back and observe. Delay your thorough clinical examination for a short time. As soon as you start to touch the animal you destroy some of the evidence; for example, the heart rate and respiratory rate may rise if the animal is nervous. Observe the animal’s behaviour, including such things as the respiratory rate, as it stands on your table. Look at the animal’s general demeanour. This may be done at the same time as you are taking the client’s details – as you become more experienced you will find that you can multitask! 3. Clinical examination – This must be done in a logical order to avoid missing a piece of evidence (Fig 2.1). Develop your own system and follow it every time. For example, you could start by examining all structures on the head, then progress to the trunk, then the legs and finally the perineum; or you could examine the respiratory system, the digestive system, etc.; or you could examine the parts of the animal alphabetically. It does not matter how you do it, but you must develop your own system and stick to it. In this way you should not miss anything significant. Always make notes and record your findings, both normal and abnormal. It is a good idea to start with the basic assessment of temperature, pulse and respiration, check the mucous membranes and the palpable lymph nodes (Table 2.1). This provides essential clinical information and extra thinking time. (Note how clients always start to talk when you are listening to the chest!) Examine the following systems making notes about the indicated parameters. • Palpable lymph nodes – these are indicators of local infection and inflammation: 1. Action: Submandibular and parotid. Rationale: Around the angle of the jaw and the base of the ear. Rationale: In front of the shoulder. Rationale: Caudal to the stifle joint within the gastrocnemius muscle. 1. Action: Auscultate the heart using a stethoscope. Rationale: Listen to the rate and rhythm and make a note of any murmurs. 2. Action: Feel the pulse – use the femoral artery. Rationale: Count the rate for 15 seconds then multiply by 4. Notice the character. 3. Action: Check the colour of the mucous membranes. Rationale: Take note of any change from the normal salmon-pink colour. Rationale: To check for the level of hydration. 5. Action: Feel the extremities. Rationale: Note the temperature – are they cold or excessively hot? 6. Action: Look for signs of oedema. Rationale: Check the paws, legs, ventral abdomen and prepuce. 1. Action: Note the respiratory rate. Rationale: Identify one area and watch it move over a period of 15 seconds then multiply by 4. 2. Action: Auscultate the chest using a stethoscope. Rationale: Listen to several areas to locate specific problems. 3. Action: Percussion of the chest. Rationale: To identify areas of consolidation. 4. Action: Check the colour of the mucous membranes. Rationale: To check for levels of oxygenation. 5. Action: Listen to the patient breathing. Rationale: Note whether any noise occurs during inspiration or expiration. 6. Action: Note any evidence of dyspnoea. Rationale: Inspiration or expiration? Rationale: By gently squeezing the larynx, note the type – dry and hacking or moist and productive. Rationale: Unilateral or bilateral? 9. Action: Check lymph nodes around pharyngeal area. 1. Action: Note any faeces on thermometer or around the anus. Rationale: Look at colour and smell. Note the presence of blood. 2. Action: Examine lips, inside of the mouth and teeth. Rationale: Check for colour, ulceration, injury and presence of gum or dental disease. 3. Action: Check tongue and smell the breath. 4. Action: Check pharyngeal lymph nodes. Rationale: For signs of infection. 5. Action: Check salivary glands. Rationale: For signs of mucocoele. 6. Action: Palpate the abdomen. Rationale: Take note of any pain, very hard or soft areas, guarding. 7. Action: Observe the patient’s stance. Rationale: Arched back, praying stance, guarding. 8. Action: Obtain a faecal sample. Rationale: Note colour, form and frequency. Faecal egg count will identify worm infestations. 9. Action: Ask owner or obtain a sample of vomit. Rationale: Note colour, smell and contents. Note timing in relation to eating. 1. Action: Palpate the bladder. Rationale: Note whether full or empty; presence of bladder stones. 2. Action: Palpate the kidneys. Rationale: Size and consistency; painful or not. 3. Action: Obtain a urine sample. • Reproductive system – female: Rationale: For patency and injury. 2. Action: Palpate vagina digitally. Rationale: To assess patency and potential damage. 3. Action: Examine vagina with a speculum. Rationale: To assess mucous membranes for damage. 4. Action: Check mammary glands. Rationale: Look for mammary tumours or evidence of false pregnancy. 5. Action: Check inguinal lymph nodes. Rationale: For evidence of metastases or infection. 6. Action: Timing and appearance of most recent season. 1. Action: Check scrotum and testes. Rationale: The penis should move easily within the prepuce, with no evidence of infection or trauma. Rationale: For damage or infection. Rationale: In larger dogs this may just be palpated per rectum. 1. Action: Look at coat quality. Rationale: Provides a good indicator of general health. 2. Action: Look for areas of alopecia. Rationale: Note the site and whether the areas are symmetrical. 3. Action: Identify whether skin is pruritic. Rationale: May indicate parasite infestation. 4. Action: Look for areas of scurf. Rationale: May indicate poor nutrition or parasite infestation. 5. Action: Check for even pigmentation. Rationale: May indicate hormonal problems. 6. Action: Variation in skin thickness. Rationale: May indicate trauma due to scratching or hormonal problems. Rationale: For damage or infection. 2. Action: Examine external ear canal visually and with an auroscope. 3. Action: Examine the tympanic membrane. Rationale: Using an auroscope. Look for damage due to infection or trauma. • Eyes – always examine in a darkened room: 1. Action: Note any evidence of photophobia, chemosis, blepharospasm and epiphora. Rationale: These clinical signs may indicate eye problems that require further investigation. 3. Action: Check eyelids – remember to evert them as well. Rationale: Look for injury and foreign bodies. Rationale: Look for bruising, haemorrhage. 5. Action: Look at both eyes together and compare them. Rationale: Both eyes should look the same and function together. Rationale: Should be the same. 7. Action: Check pupillary light response. Rationale: Pupil constricts in response to bright light. 8. Action: Check menace reflex. Rationale: Using an ophthalmoscope – look for evidence of cataracts. 10. Action: Check patency of the tear ducts.
Procedure: Basic clinical examination
![]()
Stay updated, free articles. Join our Telegram channel

Full access? Get Clinical Tree


Basic consulting room techniques
Only gold members can continue reading. Log In or Register to continue

