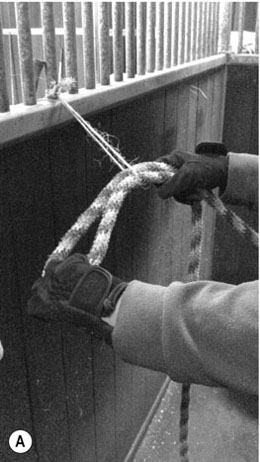
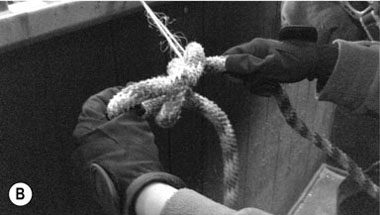
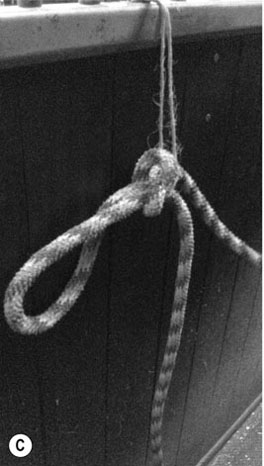
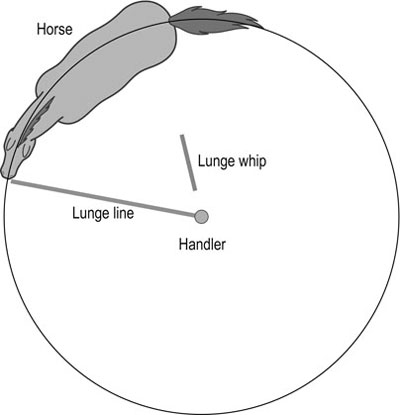
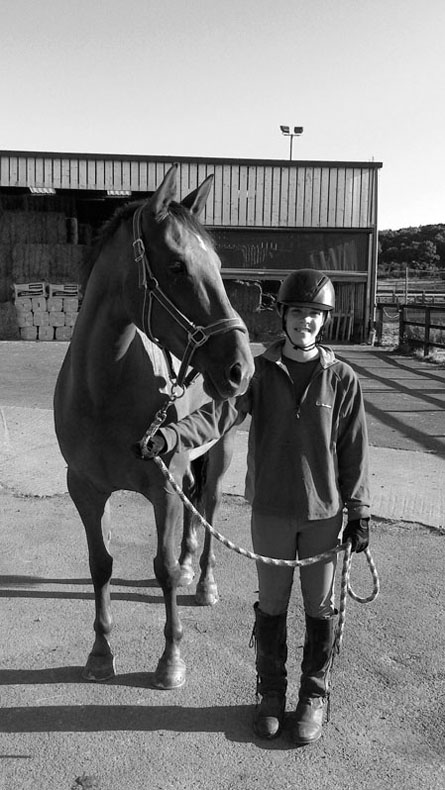
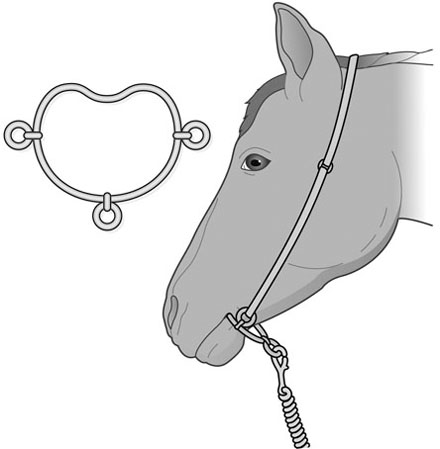
When carrying out any task with a horse it is important that health and safety is adhered to at all times. Long hair should be tied back, jewellery should not be worn and personal protective equipment (PPE) should be utilized. PPE should include a skull cap, gloves and suitable clothing, e.g. a long-sleeved top, trousers, overalls and suitable footwear (Fig. 14.1). In order to carry out any clinical examination or clinical procedure in the safest possible way, there is a range of recommended handling techniques that should be used. 1. Action: Ensure that you have a suitable head collar and lead rope for the size of the horse. 2. Action: Approach the horse as described above. Rationale: This is safest practice. 3. Action: Stand next to the horse’s left shoulder, facing forwards. 4. Action: Place the lead rope around the horse’s neck or over your shoulder. 5. Action: Insert the horse’s nose through the nosepiece (Fig. 14.2A) and place the noseband over the nose. Rationale: Use both hands to do this as this will give you greater control. 6. Action: Using your right hand, take the longest strap up and over behind the ears (Fig. 14.2B) and secure the fastener/buckle on the left side of the horse’s cheek. Rationale: This will ensure that the head collar is secure, and ready for use. 7. Action: Ensure that you can fit a hand’s width between the noseband and the horse, and that the noseband is approximately two fingers’ width below the facial crest. Rationale: This will ensure that the head collar is not too tight, and suitably fitted for control (Fig. 14.2C). Some animals may require the use of a Chifney or antirearing bit. This is a bit with a shallow inverted-port mouthpiece that has three rings – two for the cheek pieces and one for the bridle (Fig. 14.3). However, this must only be used by experienced handlers as it can cause injury or damage because of the way that it acts upon the horse’s tongue if it tries to rear or pull. Some horses, such as foals and young animals, may not be used to having a bit in their mouth. This must be taken into consideration and the appropriateness of use assessed on an individual basis. 1. Action: Approach the horse as described. Rationale: This is safest practice. 2. Action: Standing at the left shoulder, move your right hand under the horse’s mandible and around the front of the head. Rationale: This will secure the horse’s head in a suitable position. 3. Action: Hold the head piece of the bridle up against the front of the head, and with your left hand place the bit across the horse’s mouth (Fig. 14.4A). Then place your thumb in behind the incisors. Rationale: This will encourage the horse to open its mouth to accept the bit. 4. Action: Gently push the bit into the horse’s mouth, ensuring that it sits on top of the tongue. 5. Action: Once the bit is in the horse’s mouth, carefully place the head piece over and behind the horse’s ears (Fig. 14.4B). Rationale: This will keep the bit in position. 6. Action: Adjust the head piece to fit the horse, ensuring that there are no more than two creases at the edge of the mouth and that the bit is not dangling too low in the mouth. Rationale: This will ensure that the bit is comfortable and effective. 7. Action: Secure the throat lash (if applicable), ensuring that you can fit approximately a hand’s width between the throat lash and the horse. 8. Action: Attach a lead rope to the bit (Fig. 14.4C). Rationale: This will allow you to lead and restrain the horse safely and effectively. 9. Action: To remove the bridle, undo the throat lash (if applicable), and gently push the head piece forwards over the horse’s ears and slowly allow the bit to drop out of the mouth. A hand should be used to catch the bit as it leaves the horse’s mouth. Rationale: This prevents the bit from causing damage to the incisor teeth. 1. Action: Apply the head collar and/or bridle as described. Rationale: This is safest practice. 2. Action: Using a lead rope, stand at the horse’s shoulder and where possible on the same side as the person carrying out the examination or procedure. 3. Action: Face towards the front of the horse or towards the person examining the horse depending on the procedure being carried out. 4. Action: The rope should be held with the near-side hand below the jaw (approx. 20 cm) and the remaining rope in the other hand. 5. Action: The remaining rope should never be wrapped around the hand. Rationale: This could cause serious damage to your hand if the horse pulls or rears. 1. Action: Apply the head collar or bridle as described. Rationale: This is safest practice. 2. Action: Using a lead rope, the handler should face forwards and lead the horse from its left shoulder (Fig. 14.5). 3. Action: The rope should be held with the right hand below the jaw (approx. 20 cm). Hold the remaining rope in the left hand. 4. Action: The remaining rope should never be wrapped around the hand. Rationale: This can cause serious damage to your hand if the horse pulls or rears. 5. Action: Walk the horse out slowly and if necessary increase the pace to a trot. If you are on the left side the vet will observe the horse from the right side then as it walks towards him or her and then from back view. 6. Action: To turn the horse, steady to a walk and turn it away from you in a fairly wide circle. 1. Action: Fold the lead rope and thread it through baler twine (or a similar commercial product) that has been attached to a secure metal ring, and create a small loop (Fig. 14.6A). 2. Action: Twist the loop and thread the lead rope through the loop (Fig. 14.6B). Rationale: This will produce a second loop. 3. Action: Pull the knot (Fig. 14.6C). Rationale: This will secure the knot. 4. Action: Do not leave the horse completely unsupervised. When lunging, the handler should stand in the centre of the circle slightly behind the level of the horse’s shoulder, which encourages the horse to move forward (Fig. 14.7). 1. Action: Prepare the equipment and the horse ready for lunging. Equipment should include your own PPE, i.e. hat, gloves and sensible footwear, and a lunge whip. The horse may be fitted with a lightweight lunging cavesson which should have adequate padding to the noseband. A long lunge rein is attached by means of a swivel joint and clip. 2. Action: Move the horse to the designated lunging area. 3. Action: Position yourself in the centre of the area (Fig. 14.7). If you are lunging to the left, hold the lunge rein in your left hand and the whip in your right hand. Rationale: You should be forming a triangle, with the horse’s body, the lunge rein and the whip. 4. Action: Hold the lunge rein with the excess held in loops in your hand. 5. Action: Carry the whip pointing slightly behind the horse and pointing down when not in use. Keep your wrists, arms and shoulders relaxed and supple. 6. Action: Control the horse’s speed and pace with voice aids, using commands such as ‘stand’, ‘walk on’, ‘trot on’, ‘canter’, ‘steady’. 7. Action: Keep the horse from turning in on the circle by pointing the whip at the horse’s shoulder. 8. Action: To stop the horse, ask the horse to slow and point the whip in front of the horse. Rationale: This will encourage the horse to slow down and eventually stop. 9. Action: Lunge the horse on the opposite rein to the one that you have started on. A skin twitch applied to the neck, by firmly grasping a small amount of skin cranial to the shoulder, can encourage the horse to stand still for a procedure. A nose twitch (Fig. 14.8) is made of a length of wood, metal or rubber with a loop of rope attached at one end. Commercial humane twitches are also available but tend to have less effective results. 1. Action: Ask a handler to restrain the horse. Rationale: Restrain the horse as previously described. 2. Action: Stand on the same side as the handler. 3. Action: Place one hand on the handle of the twitch and the other hand on the rope loop. Rationale: This prepares you for applying the twitch. 4. Action: Holding the upper lip, place the rope loop over the horse’s upper lip (Fig. 14.8). Ensure that you have a firm grip on the handle of the twitch and on the horse’s nose at this point. 5. Action: Twist the handle until a firm amount of the skin has been gripped by the rope loop (Fig. 14.8). 6. Action: Hold the handle firmly or twist the horse’s lead rope over the handle. 7. Action: Monitor the horse’s behaviour carefully throughout, and remove the twitch immediately if there are any concerns. Rationale: Some horses will suddenly react or strike out when twitched. 8. Action: To remove the twitch, slowly unwind the twitch and gently release the horse’s upper lip, ensuring that the handle is held firmly at all times. 1. Action: Ensure that the horse is adequately restrained. 2. Action: Allow and encourage the horse to stand square and weight bear on all four limbs. 3. Action: Stand at the horse’s shoulder, beside the appropriate leg and facing the tail (Fig. 14.9).
Basic clinical procedures in the horse
HANDLING AND RESTRAINT
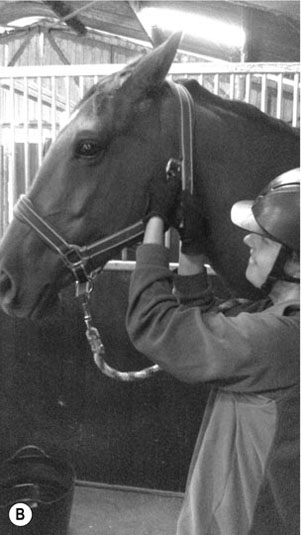
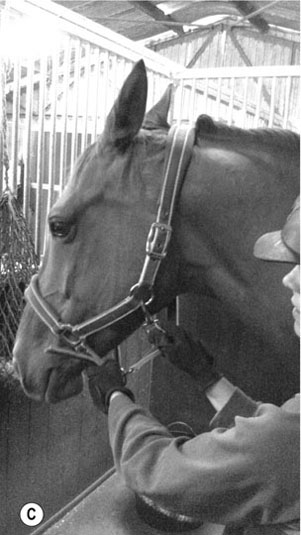
Procedure: Putting on a head collar and lead rope
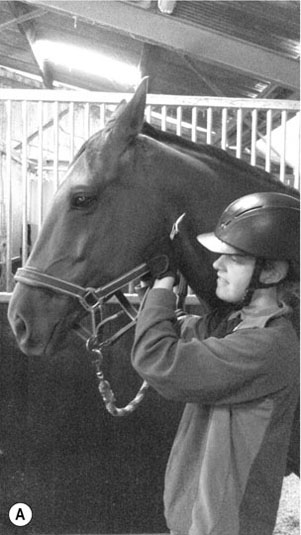
A, Insert the horse’s nose through the nosepiece of the head collar.
B, Take the longest strap up and behind the horse’s ears.
C, The head collar and lead rope are now fitted correctly.
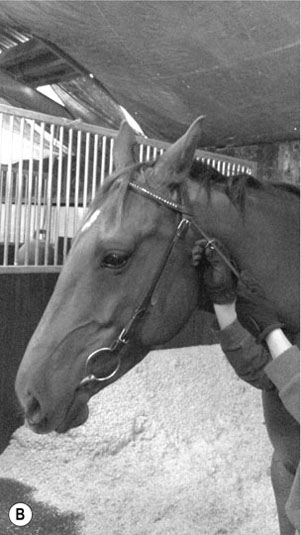
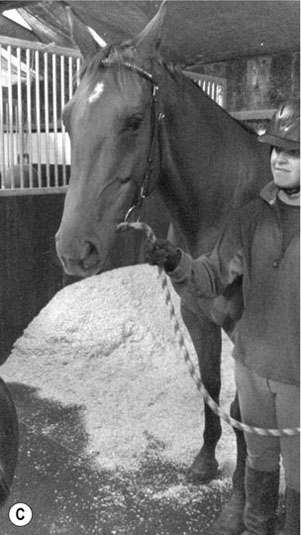
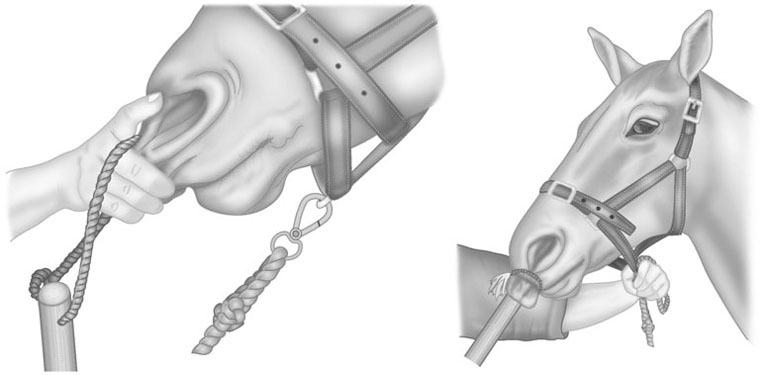
Procedure: Putting on a bridle with a bit
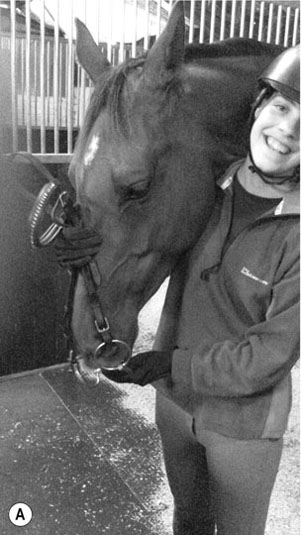
A, Using the left hand, place the bit across the horse’s mouth, then place your thumb behind the incisors to encourage the horse to open its mouth.
B, Take the head piece over the horse’s ears and secure the throat lash.
C, Attach a lead rope to the bit.
Procedure: Holding a horse for examination
Procedure: Leading a horse
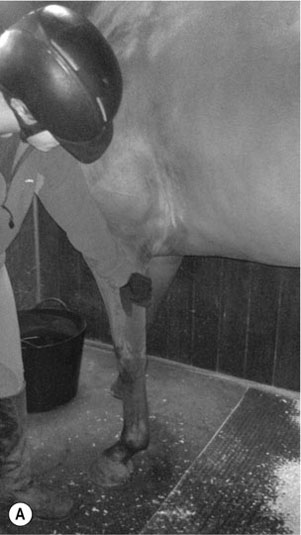
Procedure: Tying up a horse using a quick-release knot
Procedure: Lunging a horse
ADDITIONAL METHODS OF RESTRAINT
Procedure: Applying a nose twitch
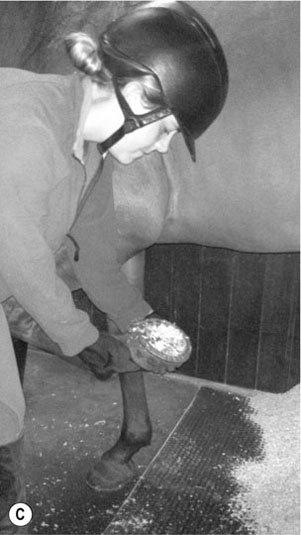
Procedure: Lifting a forelimb to examine the foot
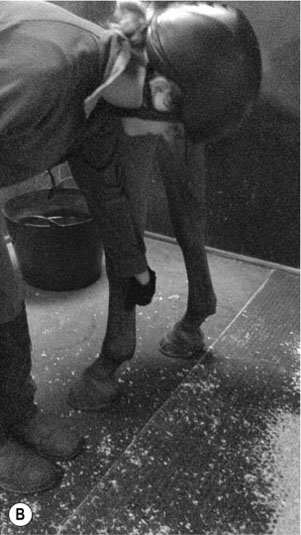
A, Run your hand down the back of the leg.
B, Apply gentle pressure to the back of the leg to encourage the horse to pick up its foot.
C, Support the hoof in the palm of your hand.![]()
Stay updated, free articles. Join our Telegram channel

Full access? Get Clinical Tree