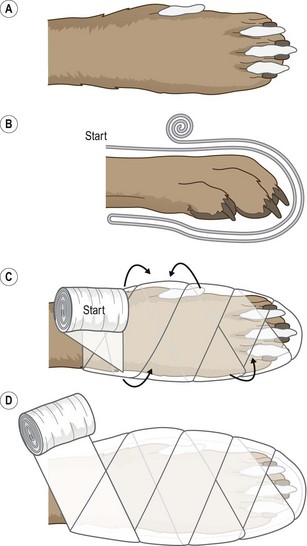
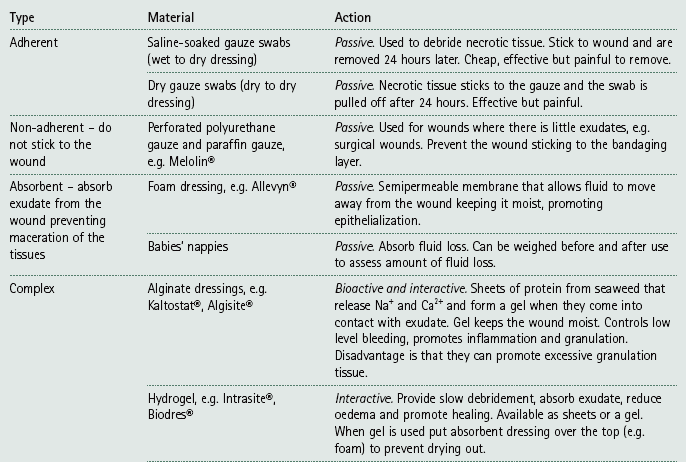
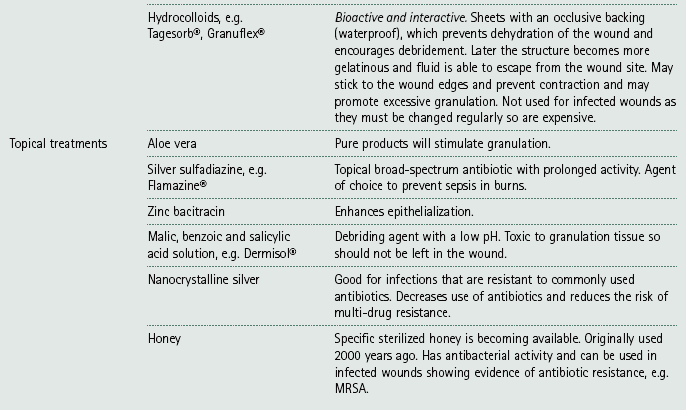
Chapter 4 Bandaging techniques Bandages have a number of functions and the main ones are shown in Table 4.1. Table 4.1 1. Action: Wash your hands thoroughly before you start. 2. Action: Collect all your equipment together and make sure that is it close at hand. 3. Action: If applicable, remove any soiled bandages and dispose of them in the clinical waste bin. Rationale: To prevent the spread of infection the clinical waste will eventually be incinerated. 4. Action: When bandaging a lower limb, always include the foot. 5. Action: If the foot is included always place cottonwool pads between the toes (Fig. 4.1). 6. Action: Keep the bandage rolled up and always have the roll on the top as you unwind (Fig. 4.1). Rationale: This helps you to control the bandage and to maintain tension. 7. Action: Always overlap the layers of a bandage by half of its width. 8. Action: If bandaging tails or limbs always work from the distal to the proximal end of the area. 9. Action: Never use safety pins to secure the ends – use sticky zinc tape instead, although this is not recommended. 10. Action: When immobilizing a fracture, always include the joints above and below the area. Rationale: To prevent movement of the area. 11. Action: On completion, check that the bandage is not too tight – you should be able to get two fingers under the layers. 12. Action: On completion, check that the bandage is not too loose. Before applying the bandage the wound must be decontaminated: 1. Clip and clean the skin surrounding the wound – all hair must be removed to keep the wound clean and to promote rapid healing. • Use disinfected, unchipped clipper blades to prevent dermatitis. • Prevent hairs going into the wound by applying water soluble gel or by temporarily closing it with towel clips or a continuous suture, or by covering it with a sterile swab. 2. Lavage – wash the wound thoroughly with large volumes of sterile saline to remove any debris and to dilute any bacteria present. Do not be too vigorous as this will further damage the tissues. • Avoid the use of tap water as it is not sterile although it may be used initially. • Be aware that antiseptics will not stay in the wound for long enough to work. • Detergents in some surgical scrubs may irritate the wound. 3. Debridement – this is the single most important step in promoting wound healing and is the removal of infected, necrotic or contaminated tissue from the wound that would otherwise delay healing. Tidy up the wound edges if surgical repair is to be attempted. There are three main ways of debriding a wound: • Surgical – under strict aseptic conditions, scrape away the necrotic or damaged tissue until the wound is clean. • Dressings – apply dressings such as dry or saline-soaked swabs to the wound and leave on for no more than 24 hours. These provide an optimal environment for healing to start and when removed they strip off the necrotic tissue. • Enzymatic – enzymes (available commercially) are applied to the wound and their action ceases when granulation tissue starts to form. Maggots (available in a sterile form) secrete enzymes that destroy necrotic tissue and allow granulation to begin. Most bandages consist of the following layers: 1. Wound dressings – this layer is in direct contact with the wound and the aim is to promote healing and to prevent further harm. Dressings provide an environment that is neither too wet nor too dry; the different types are summarized in Table 4.2. 2. Primary layer – this holds the dressing in place and absorbs any exudate. It also distributes the pressure evenly and provides padding to the wound. The most common materials are orthopaedic wool (e.g. Sofban®) and cottonwool sheets. 3. Secondary layer – the primary layer is stabilized using some form of conforming bandage that has a degree of stretch in it. It is important not to overstretch the material resulting in an overtight bandage, which will restrict blood supply to the area and could cause gangrene. Do not confuse firmness with tightness: the bandage must be firm but not too tight and you should be able to get two fingers under it. 4. Tertiary layer – this consists of an elastic cohesive bandage that protects the whole structure and prevents interference by the patient. This layer is very often coloured or may even have words printed on it, which is purely for the benefit of humans! At the top of the bandage the tertiary layer should not extend over the secondary layer as it may rub. Never use an adhesive tape to stick the bandage to the skin or fur as this will cause irritation and can be difficult to remove. If bandaging a lower limb always cover the foot. Increased protection from moisture and mud may be gained by covering the foot with a commercial canvas boot or by using an empty drip bag. Do not leave an impervious cover on the foot all the time as it restricts air and moisture flow and may lead to skin complications. 1. Check the bandage every 4 hours for the first 24 hours. 2. Check twice daily for the duration of the bandage. This may be done by the owners, but the animal should be seen in the surgery every 4–5 days. 3. Make sure that the owners understand their responsibility to the patient and are aware of what to look for. 4. Exercise restriction is usually indicated, but this depends on the need for the bandage. In some cases exercise restriction may need to be enforced. 5. Monitor the bandage for the following: smell, wetness, swollen toes, cold toes, soiling, slippage and patient interference. Change the bandage if any of these have occurred. 6. If an open wound is present the bandage must be changed regularly – at least once a day. If no wound is present the bandage should be changed every 8–10 days. 7. Complications may include: maceration of the skin, swelling of the limb, wound contamination, dermatitis, necrosis of the skin and gangrene of the limb. This is used to support and protect wounds, reduce pain and swelling and prevent movement. 1. Action: Gather all your equipment together and arrange it within reach of the examination table. Rationale: This enables you to complete the bandage quickly and efficiently. 2. Action: Place the animal on a stable examination table covered in a non-slip mat. Rationale: If the animal feels secure it will be less likely to try and escape. 3. Action: Ask the owner or an assistant to restrain the animal appropriately so that you have access to the affected limb (see Ch. 1). 4. Action: Apply cottonwool padding between the digits of the affected limb (Fig. 4.1). 5. Action: Apply an appropriate wound dressing to the affected area. 6. Action: Apply the primary padding layer. Start on the cranial aspect of the limb, run the bandage down over the toes to the caudal aspect of the limb and then go back again (Fig. 4.1). Rationale: This holds the dressing in place, provides support and helps to absorb any exudate. 7. Action: Turn the bandage through 90° and, working from the distal to the proximal part of the limb, cover the toes in a figure-of-eight arrangement. Rationale: This makes the bandage firm and protective. 8. Action: Work up the limb until you are over the joint above the injury. Rationale: This helps to distribute the pressure of the bandage evenly. 9. Action: Apply a tertiary layer to the limb following the same pattern and working from distal to proximal. Rationale: This will hold everything together and protect the limb from daily wear and tear. 10. Action: Check the tension on the bandage. This is used to protect the tail after traumatic injuries. 1. Action: Gather all your equipment together and arrange it within reach of the examination table. Rationale: This enables you to complete the bandage quickly and efficiently. 2. Action: Place the animal on a stable examination table covered in a non-slip mat. Rationale: If the animal feels secure it will be less likely to try and escape. 3. Action: Ask the owner or an assistant to restrain the animal in a standing position or sitting with the tail extended. Rationale: This depends on the size and nature of the patient. 4. Action: Apply an appropriate dressing to the wound on the tail. Rationale: This will promote healing. 5. Action: If the wound is on the end of the tail, cover the dressing with a large empty syringe case pierced with hole to provide ventilation. 6. Action: If the wound is higher up the tail, then apply a layer of conforming bandage over the dressing. 7. Action: Cover either the syringe case or the conforming bandage with a layer of cohesive bandage, working from the caudal end to the proximal end of the tail. 8. Action: As you progress proximally towards the top of the conforming bandage, start to work the animal’s tail hair into the cohesive bandage. 9. Action: Check that the bandage is secure and not too tight. Rationale: Overtight bandages cause tissue damage and eventual necrosis.
Function
Comment
Protection
From infection and dirt and from the environment. Also prevents self mutilation.
Support
Applies to fractures, strains, sprains, dislocations. Adequate support helps to reduce pain and swelling and promotes more rapid healing.
Pressure
To stop haemorrhage and reduce swelling.
Immobilization
Restricting the movement of joints or surrounding soft tissues will reduce pain and make the animal more comfortable.
Security
To hold an intravenous catheter in place, preventing infection and interference.
Bandaging rules
Wound management
Anatomy of a bandage
Care and maintenance of bandages
Types of bandage
Procedure: Limb bandage
Procedure: Tail bandage
![]()
Stay updated, free articles. Join our Telegram channel

Full access? Get Clinical Tree


Bandaging techniques
Only gold members can continue reading. Log In or Register to continue
