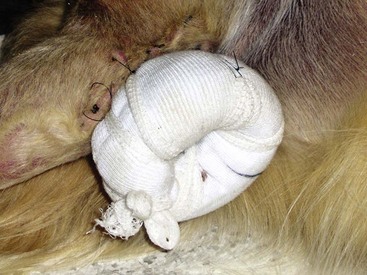
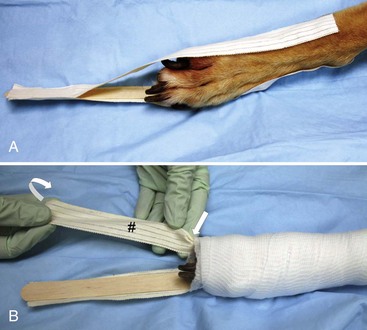
Chapter 20 The contact or primary layer of the bandage is the dressing in direct contact with the wound. It is critical to establishing a wound environment that supports healing.7 Functions of the primary layer include serving as a final barrier between the wound and external contaminants, absorbing or transferring exudate to the secondary layer, and maintaining a moist wound environment that supports selective autolytic debridement, granulation, epithelialization, and/or contraction as appropriate to the current needs of the wound. Additional information on primary dressings is found in Chapter 76, Open Wounds. The primary layer is selected so that its absorptive ability matches the current exudate level of the wound, and is applied so that the wound bed is kept moist (to promote healing) and the peri-wound skin is kept dry (to prevent maceration and excoriation). The primary layer should be sterile and applied in a sterile manner that includes hand washing and the use of sterile gloves.56,81 This is likely especially important before the formation of healthy granulation tissue, when the wound is most susceptible to infection. Moisture retentive dressings should fit within the confines of the wound; this can be achieved by gently placing the dressing on the wound to create an imprint from the wound fluid and by cutting the dressing to the shape of the imprint with sterile scissors. Specific guidelines should be followed when applying some dressing types. Dressings with an adhesive perimeter should be used only on peri-wound skin that is healthy and dry. Close clipping of hair is required to ensure adherence of these dressings.7 Skin irritation can result if the adhesive dressing is applied under tension.48 Some dressings with adhesive perimeters may interfere with wound contraction and should be used with caution after granulation tissue has formed.42 Hydrocolloid sheets can be pre-warmed in the hands before the package is opened, thereby softening the material so that it better conforms to wound contours.61 Calcium alginate should not be packed tightly into a wound cavity because this reduces its absorptive ability, and because the material swells as it absorbs fluid and becomes a gel.22 The primary layer should be changed when its absorptive capacity has been reached, or when its properties are no longer appropriate for the stage of wound healing and/or the amount of exudate. For example, highly absorptive dressings such as hypertonic saline, calcium alginate, and dry polyurethane foam dressings can dehydrate the wound and become uncomfortable as exudate production begins to decrease.8,29,78 Time between bandage changes for a noninfected wound treated with a moisture retentive dressing increases from every 2 to 3 days during the inflammatory/debridement phase of wound healing to every 4 to 7 days as the repair phase progresses. Dressing changes typically are needed more frequently in infected wounds than in noninfected wounds.22,54 When a bandage is changed, the new primary layer should be selected to match the current state of the wound.7 A yellow tinge and an unpleasant odor are normal characteristics of gelled dressings (e.g., calcium alginate, hydrocolloid, hydrogel) and of the exudate that accumulates under a film dressing, and should not be misinterpreted as signs of infection.32,54,76 Examination of the wound bed, the wound exudate, and the entire patient for clinical signs of infection allows the clinician to determine whether actual infection is present.76 Additional guidelines for the removal of specific dressing types are as follows: Nonadherent dressings that maintain their shape or that change into a coherent gel (e.g., calcium alginate) are easily lifted from the wound. Any fragments of alginate left in the wound are broken down into Ca2+ and simple sugars and do not elicit a foreign body reaction.11 Gels that are squeezed onto the wound can be gently rinsed out with sterile saline.11,61 Polyurethane foams are changed when absorbed fluid comes within 1 inch of the foam edge.54 Dressings designed to stick to peri-wound skin can be removed by holding the film with one hand while lifting up a corner with the other and stretching the film parallel to the skin to break the adhesive seal.21 Hydrocolloid sheets, which adhere to peri-wound skin, are changed when the sheet feels like a fluid-filled blister.61 Calcium alginate should not be removed before it has turned into a gel (which takes 1 or more days) because the nongelled form may adhere to the wound, causing damage when removed.46 If the primary dressing appears to have continued absorptive ability after the tertiary and secondary layers of a bandage have been removed during a routine bandage change, the wound can be rebandaged without removing the primary dressing. A dressing may adhere to the wound bed if (1) its absorptive ability is greater than the amount of wound fluid produced, (2) a gelling dressing has not been in place long enough to convert to a gel, (3) the dressing has been left in place so long that it has dried out (drying time ranges from 4 to 6 hours for a gauze dressing [even when premoistened]3 to more than a week for some moisture retentive dressings), or (4) dried exudate, granulation tissue, or new epithelium has invaded the pores or open weave of a dressing.47,61,69,72 Even the use of a nonadherent dressing does not always prevent adherence to the wound, as many “nonadherent” dressings adhere to some degree.6,47,49 Application of nonhydrophilic dressings that adhere to the wound is no longer recommended, as they damage the wound bed when removed and may leave foreign material behind, delaying healing and causing chronic inflammation.7,28,54 Moistening an adhered dressing with sterile saline or 2% lidocaine a few minutes before removal increases comfort and may allow it to be removed without traumatizing the wound bed47,65; this technique is not effective for dried petrolatum-impregnated dressings, as the petrolatum is hydrophobic.19 As reported by people and observed in veterinary patients, removal of adhered dressings is more painful than removal of moisture retentive dressings.29 Appropriate analgesia should be provided for bandage changes to ensure patient comfort, the safety of personnel, and the ability to properly evaluate and care for the wound. The contact (primary) layer of the bandage is held in place by the intermediate (secondary) layer, which in turn is covered by the outer (tertiary) layer. The intermediate and outer layers of bandages on the head, neck, limbs, tail, and torso are typically applied in a circumferential (i.e., wrap-around or spiral) manner, with each new wrap overlapping the previous one by 50%. The material should be applied with even tension and without wrinkles. If a roll of bandage material runs out before the layer is complete, the next roll is started so as to continue the 50% overlap pattern with minimal overlap of the end of the previous roll, thus preventing ridge formation. Limbs and the tail are wrapped starting from distal to proximal, continuing proximal to distal, and ending distal to proximal. The total number of layers is tailored to the patient’s needs; each layer should continue for the entire length of the bandage, and the last layer should end proximally. These guidelines help avoid an encircling tourniquet effect,2 as well as wrinkles or ridges that could become points of increased pressure in the finished bandage. According to Laplace’s law, the pressure applied at each point under a bandage is proportional to (N × T)/(R × W), where N is the number of bandage layers, T is the bandage tension, R is the radius of curvature of the body part being bandaged, and W is the width of the bandage material under tension.17,70,71 Because limb circumference and thus the radius of curvature (R) generally increase in a distal-to-proximal direction, the pressure gradient under an evenly applied bandage naturally decreases proximally. Exceptions arise when a proximal area is narrower than a more distal site, such as the regions just proximal to the digits, carpi, and tarsi.1 These sites are at risk of a tourniquet effect and were the most commonly affected locations in a case series of ischemic bandage injuries in dogs and cats.1 Additional padding placed to effectively increase the diameter of narrow sites helps restore a gradual, proximally directed decrease in the pressure gradient.1 The tension-to-extension ratio describes the amount of tension generated relative to the extent to which a bandage material is stretched.1 Materials such as cotton cast padding generate low tension even when fully extended, and thus are difficult to put on too tightly. On the other end of the scale, elastic materials (often used in the tertiary layer) can generate high tension even when only partially stretched. Unrolling and rerolling elastic bandage material before applying makes it easier to place in a relaxed, nonstretched position (decreasing T in the Laplace equation).7 After a standard, nonpressure, soft padded bandage has been applied, it should be easy to insert a finger between the bandage and underlying tissue. The use of multiple layers distributes the pressure over a larger surface area and thus helps to compensate for small tension differentials in a single layer of material.2 Pressure applied with the tertiary layer should be appropriate to the needs of the underlying tissue. Contact between each adjacent layer of bandage material is important for transfer of fluid; however, excessive pressure limits fluid absorption and transfer.49,69 When bandages are applied around the head, neck, thorax, or abdomen, care should be taken to not compromise the patient’s ability to ventilate. Excessive pressure can also damage nerves and obstruct lymphatic and venous drainage,18,69 leading to edema, tissue swelling, and even more pressure, with further collapse of vessels, including arterioles.1 Ultimately, this results in tissue ischemia and can lead to auto- or surgical amputation.1,28 Blood flow to the skin, where the normal closing pressure of arterioles is ≈30 mm Hg, is more easily compromised by compression than is blood flow to the underlying muscles, where normal closing arteriolar pressure is ≈50 mm Hg.43 Thus the skin can be ischemic even in the presence of palpable peripheral pulses and muscle contraction. Initial pressures under a Robert Jones bandage (which consists of a thick roll of cotton compressed with elastic gauze and tape and is designed to exert pressure that stabilizes the limb and prevents edema and minor hemorrhage)43 can be 50 to 60 mm Hg.41 This pressure declines during the first 15 minutes after application but in people may be sustained at 20 mm Hg or greater.43 After elective open-abdominal surgery in normothermic, well-hydrated people, subcutaneous tissue oxygen tension was decreased by placement of a standard compressive bandage, suggesting that postoperative compression of surgical incisions should not be routine.45 Inappropriately high pressure can be caused by overall bandage tightness or a pressure differential in the bandage by which a more proximal site of the body is under a higher pressure than a more distal site. Furthermore, flexion or extension of the bandaged limb can stretch elastic material within the bandage. The resulting increase in tension can sharply increase bandage pressure around the joints.1 This is a problem especially with elastic cohesive (self-adherent) bandage material because it cannot move relative to itself to redistribute the increased pressure.1 Removal of an overly tight bandage, although important, does not necessarily restore blood flow because the tissue is still subjected to reperfusion injury and the pressure exerted by edema.1 With second intention healing, new skin is established over a wound through a combination of epithelialization (whereby epithelial cells migrate over the granulation bed and build new skin) and contraction (which pulls preexisting skin over the wound). The contraction process covers the wound with full-thickness haired skin that is more robust than that created by epithelialization.67,69 For a wound that overlies the flexion surface of a joint, joint immobilization favors epithelialization, and joint movement favors contraction.67 When peri-wound skin is adequate to close the wound by contraction (and there are no underlying musculoskeletal problems requiring stabilization), the limb should be bandaged in such a way as to allow some joint movement so as to favor healing by contraction and thus robust skin coverage. Proper assessment of available skin is important, because favoring contraction in the absence of adequate peri-wound skin can lead to contracture, which ultimately restricts joint mobility. Wounds that are near but not over joints generally are not significantly influenced by mobility of adjacent joints.67 The intermediate or secondary layer of the bandage holds the primary dressing in place, keeping it in contact with the wound and helping to eliminate dead space where serum or blood might accumulate. The intermediate layer typically has two components: an inner absorbent material covered by a stabilizing material. The thickness and composition of the intermediate layer depend on the needs of the underlying tissue for exudate absorption, pressure, support, immobilization, and protection. The intermediate layer should not be allowed to contact the wound, as it will adhere and will be difficult to remove41; however, the intermediate layer does need to be in contact with the primary layer to absorb excess exudate.69 Exudate not bound by the primary dressing is wicked into the absorbent portion of the intermediate layer, preventing maceration and excoriation of the skin. As the fluid in the bandage evaporates, the exudate becomes concentrated, and bacterial growth is inhibited.69 Cotton is the material used most often for absorption in the intermediate layer; common forms are cast padding and bulk roll cotton. Cast padding is the easiest to apply and is less bulky.41 Cotton impregnated with antimicrobial agents such as polyhexamethylene biguanide may help reduce bacterial growth in the intermediate layer as exudate is absorbed.60 The absorbent, inner portion of the intermediate layer is typically stabilized by wrapping it with conforming gauze, which can be applied with or without compression, as required by the underlying tissues (see later).41 Guidelines for bandaging limbs include leaving the nails and a very small part of digits III and IV visible when possible, so they can be monitored at least twice a day for excess swelling,31,41 divergence,41 changes in sensation, and hypothermia or hyperthermia. Limbs should be bandaged at a normal functional angle, unless otherwise indicated by specific orthopedic or neurologic conditions. When needed, splints and reinforcing rods are placed on top of the intermediate layer and are held in place by the outer bandage layer. The intermediate layer should be changed before exudate soaks through to the tertiary layer.56 It is helpful to record the number of layers in the intermediate layers under a splint. This same number then can be reapplied during a bandage change to ensure that the splint will fit properly (with recognition that adjustments may be needed to account for changes in tissue swelling).7 The outer or tertiary layer of the bandage (and in some cases, the stabilizing wrap of the intermediate layer) establishes the sub-bandage pressure. Benefits of appropriate pressure include controlling hemorrhage, limiting intercellular fluid accumulation and dead space, preventing seroma and hematoma formation, countering centrifugal expansion of wound edges, decreasing the spread of wound microflora, supporting underlying tissue, and holding other bandage layers in place.18,66 The tertiary layer also protects underlying layers from external contamination and damage. Materials used may be elastic or inelastic, cohesive (self-adherent) or adhesive (tape), porous or waterproof, and cut on site to fit the patient or commercially made to fit a given region of the body. Porous materials are preferred for the outer layer, so that fluid absorbed by the intermediate layer can evaporate, avoiding maceration and decreasing the risk of bacterial growth in the bandage.61 Special precautions should be taken when waterproof materials are used on the paws, as sweat from the pads can add considerable moisture.44 Commercial products made to fit a variety of body locations and sizes are available to serve as the outermost layer of the bandage for dogs and cats. These products typically are made of breathable, washable fabric and are held in place with a hook and loop fastener system (Velcro).28 Depending on the purpose of the bandage and the need for pressure or support, these products may be used in addition to or in place of the traditional tertiary layer of bandage. Examples can be found at http://www.dogleggs.com/, http://www.k9topcoat.com/, http://lexwrapit.com/, http://medivetproducts.com/, http://www.therapaw.com/, and http://medicalpetshirts.com/. Dogs wearing snug spandex body suits tolerated moderate ambient temperatures well and were not found to be prone to overheating in warm environments.50 The tertiary layer can be augmented with messages to the veterinary staff or client. The outline of underlying structures (e.g., wound, pinna) can be drawn on the outside of the bandage, so that they can be avoided when the bandage is cut off. Fragile repairs and grafts can be marked as such, so veterinary staff knows to contact the clinician if the bandage needs to be changed. Messages may be written with a permanent marker on white tape and adhered to the bandage, although this method is limited in terms of clarity and amount of text. Commercial labels (e.g., http://www.wrapart.net/) on cohesive material that stick to a cohesive tertiary layer can be used to more clearly convey information on bandage care to the owner, or even to apply a logo or icon as part of positive client relations. Methods of creating a “doughnut” bandage include (1) rolling up a tube of stockinette (Figure 20-1), (2) cutting a hole in the center of multiple layers of cast padding folded together into a square (fold the square in half, cut a half-circle along the fold, and reopen the square), (3) cutting a hole in the center of a piece of thick medium density (≈5 lb/cu foot) viscoelastic foam, (4) making a window in a piece of pipe insulation split along its long axis (pieces can be stacked and taped together for additional thickness), and (5) forming a circle with a rolled up towel or laparotomy pad and wrapping the circle tightly with tape.62,64,68 The hole of the doughnut is centered over the area needing pressure relief and is incorporated into the secondary layer of the bandage. Additional layers are placed peripheral to the doughnut to allow even pressure distribution. The doughnut must be secured so it does not slip and end up putting pressure on the tissue it is supposed to be keeping pressure-free. A bandage window is a full-thickness defect in the bandage that allows direct access to the wound without the need to remove the whole bandage.7 This may be desirable when the bandage is large, expensive, and/or difficult to apply, or when the bandage is immobilizing musculoskeletal injuries. As each wrap of the intermediate and outer layers is placed over the wound, a mark is made with a felt-tipped marker to indicate the borders of the wound.63 A scalpel blade and/or scissors are used to cut a full-thickness window in the bandage over the wound as identified by these marks; the window should be slightly larger than the wound. Adhesive tape can be placed on the window border to maintain its shape and provide a barrier between the environment and the exposed intermediate layer. The wound then is separately covered with appropriate primary, intermediate, and tertiary layers, and only these materials are removed during each bandage change. Care should be taken to avoid increased pressure at the edge of the window when the tertiary layer is applied. Occasionally, the best way to relieve pressure is to apply a splint that makes the physical application of pressure difficult. For example, a brace placed on the cranial aspect of the elbow prevents joint flexion, keeping the olecranon, a common site for pressure sores, from contacting the ground if the patient attempts sternal recumbency. The brace can be made from a rectangle of thermoplastic splinting material or from an aluminum rod that is bent into a rectangle with the ends taped together to form an elbow loop splint.61 The long sides of either splint are bent to conform to the natural angle of the elbow joint, and the short sides are bent to fit the transverse curve of the cranial aspect of the humerus or radius (taking into account the thickness of the underlying bandage). The splint then is securely taped over a thick intermediate bandage layer on the cranial aspect of the elbow. Weight-bearing pressure on the metacarpal foot pad is best dissipated by centering a doughnut made from a medium-density (≈5 lb/cu foot) viscoelastic foam pad over the metacarpal pad and by securing a metal splint paw cup over the secondary layer of the bandage.68 The pressure on all palmar pads is minimized by using a clam-shell splint in which two metal splint paw cups are secured to the secondary layer of the bandage, with the splints extending ~2.5 cm distal to the digits.68 A piece of folded gauze taped to the bottom of the splints provides traction and prevents damage to the flooring. Side splints made from aluminum rods can be incorporated into a torso bandage with the rods extending caudal to the tuber ischii to prevent the perineum from contacting the ground when the dog attempts to sit.64 Stirrups are commonly used to anchor limb bandages (Figure 20-2). Two strips of surgical adhesive tape are placed on healthy skin in a proximal-to-distal direction on the limb, starting at the carpus/tarsus, with stirrup length being twice the distance from the carpus/tarsus to the tips of the toes (Figure 20-2, A). Stirrups are placed as close to 180 degrees apart as possible (e.g., lateral and medial or cranial and palmar/plantar sides of the limb) while avoiding the wound. Holding a hand against the tape on the patient’s skin for a short time will soften the adhesive, making it more adherent.65 The free ends of the stirrups are temporarily adhered to a tongue depressor for ease of handling, and the contact and intermediate layers of the bandages are put in place. The tongue depressor then is removed, and the free end of each stirrup is twisted 180 degrees, folded proximally, and adhered to the intermediate layer of the bandage (Figure 20-2, B). Long hair that adheres to the exposed adhesive at the twist of the stirrup is trimmed so it is not pulled (causing discomfort) when the dog ambulates. The outer layer of the bandage is placed over the stirrups and intermediate layer. When the bandage is changed, the stirrups are cut at the level of the twist, leaving the proximal portions adhered to the skin. New stirrups are then adhered to the old ones to avoid the discomfort and possible skin damage that can occur with repeated removal of tape from the skin.
Bandages and Drains
Bandages
Contact (Primary) Layer
Guidelines for Circumferential Layers
Intermediate (Secondary) Layer
Outer (Tertiary) Layer
Pressure Relief
Anchoring the Bandage
< div class='tao-gold-member'>
![]()
Stay updated, free articles. Join our Telegram channel

Full access? Get Clinical Tree


Bandages and Drains
Only gold members can continue reading. Log In or Register to continue
