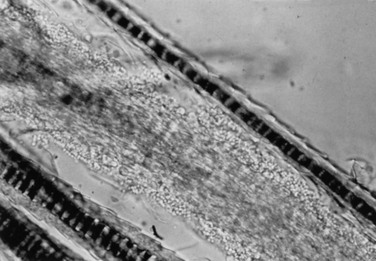
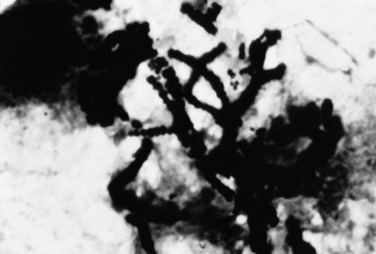
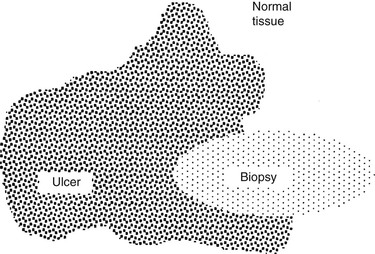
Stephen D. White *, Consulting Editor It is important to remember that the skin has a limited repertoire with regard to its presentation; many diseases with various causes may manifest with similar lesions. However, certain patterns of response to disease are also recognized. In order to manage skin problems successfully, the veterinarian must use a systematic approach by obtaining a complete history, performing a thorough physical examination, and, when appropriate, using one or more simple diagnostic techniques.1 The following sections discuss the materials and methods necessary to perform techniques commonly used to diagnose large animal skin disease. To obtain a differential diagnosis list, the questions listed on the sample history form (Fig. 11-1) should be answered. Often it is helpful to repeat the questions to the owners at a later time or to give them a history form to complete at their leisure, which allows them greater opportunity to remember details relevant to the skin disease. The goals should be to determine the initial features of the skin disease, how the problem has progressed, and what factors have influenced its progression to the present state. The diagrams and terms listed on the sample form (Fig. 11-2) may serve as a useful guide for recording the physical findings. The animal’s overall condition should be assessed, and a general physical examination should be performed to determine if the disease is limited to the skin or if systemic signs of disease are also present. The distribution, morphology (e.g., papules, nodules, wheals, patches of alopecia), and size of skin lesions should be noted. The mucous membranes also should be examined, and the skin surface palpated to determine features not readily noted visually (e.g., crusts beneath the hair, dryness, ability to epilate hairs, and presence of peripheral lymphadenopathy). The practitioner’s goal should be to describe accurately the animal’s clinical appearance in a written record for future reference. For most of the techniques that follow, a good-quality microscope equipped with ×4, ×10, ×40, and ×100 (oil immersion) objectives is recommended. Skin scrapings are used primarily to demonstrate microscopic ectoparasites, specifically mites. Scraping is a quick, simple, inexpensive diagnostic technique that is more useful in ruminants than in horses because equine mite infestations are relatively uncommon. The materials needed to perform a skin scraping are a sterile container, mineral oil, a medical-grade spatula (Fisherbrand Microspatula with Flat-Ended Blade, catalogue no. 21-401-20, Fisher Scientific, Pittsburgh; www.fisherscientific.com), glass slides, and cover slips. Although a No. 10 scalpel blade may be used, a medical-grade spatula will not cut the skin in cases of sudden movement of the animal yet is just fine enough to be able to scrape deep enough to find Demodex species mites, if indicated. If the hair coat is thick, a small area should be clipped before scraping. Multiple superficial scrapings that cover large surface areas should be performed, as well as several scrapings covering a small area that are deep enough to create capillary oozing. The collected material should be placed in a container until it can be examined microscopically. Some of the sample can then be placed on a glass slide and finely dispersed in enough mineral oil to provide a confluent layer without air bubbles beneath a cover slip. The slide should be scanned systematically with the ×10 objective. If something of importance is noted, the ×40 objective can be used to examine the specimen in more detail. The materials necessary to perform a dermatophyte culture include dermatophyte test medium, mosquito forceps, a medical-grade spatula, and sterile empty containers such as evacuated blood collection tubes. The forceps should be sterile, and each lesion to be sampled should be wiped gently with either water or isopropyl alcohol (there is some controversy as to which is better; I use water out of concern that the alcohol may inhibit fungal growth on the culture medium) to remove as many bacterial and fungal contaminants as possible and allowed to dry. Multiple small, scaling, and slightly crusted lesions should be sampled; the samples should be stored in individual containers. Broken hairs, scales, and crusts from the periphery of the lesions are collected (because dermatophytes cause peripherally expanding lesions). A spatula may be useful for scraping scales and debris from the skin surface. The forceps are used to pluck broken hairs. If the clinician’s practice performs its own fungal cultures, the samples should be removed from the containers with a sterile forceps in a clean working area and gently pressed onto, but not buried beneath, the culture medium. The top of the culture dish or vial should be loosely replaced to allow sufficient ventilation for the culture to grow. Most dermatophytes grow at room temperature, except for some strains of Trichophyton verrucosum that require incubation at 37° C (98.6° F). The colony usually first appears in 5 to 7 days, although all cultures should be allowed to incubate for 3 weeks before a negative result is declared. Dermatophyte test medium is an amber-colored Sabouraud’s dextrose agar containing phenol red, a pH indicator, and several antibacterial and antifungal agents to inhibit growth of contaminant organisms. Dermatophytes preferentially use the protein in the medium as they begin to grow, producing alkaline metabolites that cause the medium to turn red. The dermatophyte colony is typically a white to beige, powdery to fluffy growth; the colonies are never dark colored. Most saprophytic (contaminant) fungi metabolize the carbohydrates first, producing acidic metabolites that do not change the color of the medium. It should be stressed that after the carbohydrate source has been depleted, saprophytes use the proteins and produce a red color change. Positive identification of a dermatophyte is made in most instances if a white to beige, powdery to fluffy colony begins to appear on the medium at the same time or within 24 hours of the appearance of a red color change in the medium (Fig. 11-3). An infrequently encountered exception to this rule is growth of the saprophyte Scopulariopsis brevicaulis, a tan to light brown, smooth or mealy colony that produces a concurrent red color change in the medium. It is essential to check the cultures daily to determine if the red color change and colony growth occur nearly simultaneously. If any doubt exists about the type of colony growth, the sample should be submitted to a diagnostic laboratory for specific identification. A potassium hydroxide (KOH) preparation may permit immediate diagnosis of dermatophytosis. However, examination of KOH preparations requires considerable experience because fungal elements may be easily overlooked (false-negative result) and numerous artifacts such as fibers, cholesterol crystals, or oil droplets may be mistaken for fungal elements (false-positive result). It is always advisable to perform a dermatophyte culture in conjunction with a KOH preparation. The materials necessary to perform a KOH preparation include mosquito forceps, a medical-grade spatula, a sterile empty container, glass microscope slides, cover slips, a Bunsen burner, and clearing solution. As with a dermatophyte culture, it is important to sample several lesions to increase the chances of obtaining a diagnostic sample. Hairs and scales are collected from the periphery of the lesions with the mosquito forceps and the spatula. The samples are stored in the sterile container until a microscopic examination can be performed. A drop of the KOH clearing solution is placed on a glass slide, hairs and scales are added to the solution, and a cover slip is placed over the material. The slide should be scanned systematically with the ×10 objective for abnormal-appearing hairs with a fuzzy internal structure. If these features are noted, a higher-powered objective should be used for more detailed examination. A positive result with a KOH preparation demonstrates hyphae, which are usually uniform in width and septate. Beadlike chains of arthroconidia may be seen as well (Fig. 11-4). The purpose of the clearing solution is to dissolve the hard keratin and bleach the melanin of the hair shaft so that the fungal hyphae and arthroconidia can be identified more readily. Care should be taken not to spill any clearing solution on the microscope because it can damage the lenses. Several types of clearing solutions are available. If 15% KOH is used, the slide should be heated for 15 to 20 seconds to facilitate clearing before examination. As an alternative, the preparation can be allowed to stand at room temperature for 30 minutes before viewing. Acetate tape preparations for parasites are used primarily to diagnose infection with Oxyuris equi, although they may also be used to diagnose Chorioptes species. The materials required to perform an acetate tape preparation include acetate (nonfrosted) tape, mineral oil, and glass microscope slides. A piece of the tape is pressed over several areas in the anal and perianal region when looking for O. equi or over an affected region that has been lightly clipped when looking for Chorioptes species. The tape is then placed with the adhesive side down on a line of mineral oil that was placed lengthwise on a glass microscope slide. The purpose of the oil is to help clear the debris and facilitate examination of the preparation for parasites. The preparation is scanned with the ×10 objective for organisms. This test is used as an aid in identification of Dermatophilus congolensis. Crusts should be removed from the patient and the excess hair carefully trimmed from the crusts with a small pair of scissors. The crusts are minced with the scissors and mixed with several drops of saline on a glass slide. After the crusts have softened in the saline for several minutes, they should be crushed with the tip of an applicator stick. The excess debris is removed, and the slide is allowed to air dry. The slide should then be heat fixed; stained with Gram, Giemsa, or Wright stain; and examined for the characteristic bacteria. D. congolensis organisms are gram-positive, branching, filamentous bacteria that divide horizontally and longitudinally, forming parallel rows of cocci (zoospores) that are commonly described as resembling “railroad tracks” (Fig. 11-5). Cytologic studies are of value when dealing with crusts, scales, pustules, vesicles, nodules, or tumors. They can quickly indicate the presence of infectious organisms and provide a rough assessment of the spectrum of cell types present in a lesion (e.g., neoplastic, acantholytic, or inflammatory). The surface of the lesion should be gently shaved (if necessary); particular care must be taken not to rupture fragile pustules and vesicles or remove crusts. Crusts and scales may be evaluated by performing a superficial scrape with a spatula, placing the material on a dry (i.e., no mineral oil) microscope slide, heat fixing, and then staining with Gram, Giemsa, or Wright stain. Alternatively, acetate tape may be used to collect the material, and instead of placing the tape on a slide that has mineral oil (as is done when looking for parasites), the tape is placed on a slide on which several drops of the “blue” solution from the Wright stain have been placed. With either of these methods, the slide is scanned for areas of sufficient stain with the ×4 objective and then examined using the ×100 objective with immersion oil. Cytologic evaluation of intact pustules and vesicles is best accomplished by gently opening an intact lesion with the tip of a sterile No. 15 scalpel blade or 25-gauge needle and smearing the contents on the surface of a glass slide. The slide should be air dried, heat fixed, stained with one of the previously mentioned stains, and examined. Nodules, tumors, and swellings are best evaluated by fine-needle aspiration. A 25- or 22-gauge needle on a 12-mL syringe is introduced into the mass, and negative pressure is applied. Several passes through the mass at different angles should be performed. After negative pressure has been released, the needle is removed from the mass. The needle is then removed from the syringe, the syringe is filled with air, and the needle is reattached. Alternatively, just the needle is introduced into the mass in several places and then attached to a syringe filled with air. The contents of the needle are pushed out onto glass slides, which are subsequently dried, fixed, and stained as described previously. The following materials are necessary to perform a skin biopsy: • 6-mm and 4-mm biopsy punches • No. 2-0 or 3-0 nonabsorbable suture • 3-mL syringe with a 22- to 25-gauge needle • Tongue depressor or cardboard • Gauze It is important not to surgically prepare a lesion that is going to be biopsied for histopathologic examination. Shaving and scrubbing remove crusts and epithelial tissue that may be important in reaching a diagnosis. Cutaneous infections caused by biopsies taken in this manner are extremely uncommon. If the clinician is concerned about infections, surgically prepare the site after the biopsy has been taken, before suturing. Local anesthesia is sufficient for obtaining most skin biopsies. A 22- to 25-gauge needle is inserted at the margin of the lesion until the bevel is buried in the subcutaneous tissue beneath the lesion. The 2% lidocaine (0.5 to 1 mL) is injected, allowing 1 to 2 minutes for the anesthetic to take effect. Infiltration of the dermal or epidermal tissue with lidocaine should be avoided because this causes artifactual changes in the specimen. Four techniques can be used to biopsy skin: the excisional, wedge, punch, and elliptic techniques. When the lesion to be sampled is a single nodule, the ideal biopsy technique is excisional because the lesion can be eliminated at the same time the histologic diagnosis is made. If the lesion is a tumor and too large to be excised, a generous wedge biopsy should be performed, which ideally extends from the margin to the center and includes the full depth of the lesion. Most lesions can be sampled with a 6-mm biopsy punch. A disposable biopsy punch (Baker’s Biopsy Punch, Chester A. Baker Laboratories, Miami, Fla.) can usually be used to obtain two or three biopsies before its edge is dulled and it must be discarded. The punch is placed directly over the lesion and rotated in a continuous circular motion while pressure is applied until the blade of the punch is in the subcutaneous tissue. If the punch has cut to a sufficient depth, when it is removed the tissue sample is free of the adjacent dermis and remains only loosely attached to the underlying subcutaneous tissue by a thread of connective tissue. A small pair of curved mosquito forceps is used to gently grasp the subcutaneous part of the biopsy and elevate it from the surrounding tissue. The specimen is then cut free with a pair of sharp scissors. It is important to avoid handling the epidermal and dermal parts of the sample during this procedure to minimize artifactual changes in the tissue sample. The sample is gently blotted to remove any surface hemorrhage and immediately placed in 10% buffered formalin for fixation. The site from which the sample was taken may then be cleaned with an antiseptic solution and closed with either two simple interrupted sutures or a cruciate stitch using No. 2-0 or 3-0 nonabsorbable sutures. Although punch biopsies are convenient and easy to use, they are not appropriate for vesicular, bullous, and ulcerative lesions (unless the first two are small enough to be completely enclosed within the biopsy punch). For these lesions the method of choice is a surgical elliptical biopsy. The biopsy of vesicular and bullous lesions should encompass the entire lesion. Biopsy of samples of ulcerations should include abnormal tissue, the leading edge of the lesion, and normal tissue. Because an ulcer lacks epithelial tissue, the leading edge where epithelium remains may be the most rewarding in providing a histologic diagnosis. Thus the skin is biopsied so that the long axis of the ellipse crosses perpendicular to the leading edge of the ulcer (Fig. 11-6). It is important to mount surgical elliptical biopsies before placing them in formalin or they will curl during fixation, resulting in distortion of the histologic features during sectioning. To mount the specimen, the subcutaneous surface is placed on a small piece of a wooden tongue depressor or cardboard while gentle pressure is applied to the tissue so that it adheres to the surface. Then the specimen is placed in the formalin. Ideally biopsy specimens should be submitted to a veterinary histopathologist with special interest and training in dermatopathology. Submission of adequately biopsied specimens of properly chosen lesions is the clinician’s responsibility. To further increase the chances of securing clinically valuable information from the biopsy samples, the clinician must also provide the pathologist with a concise history of the skin problem, physical findings, a description of the morphology and location of the lesions (and if possible, images of the lesions), and a list of differential diagnoses. When the suspected clinical diagnoses are provided, the pathologist’s efforts can be directed specifically toward confirming or ruling out those diagnoses. Immunopathology may be used as an adjunct to conventional histologic testing when the clinician suspects that the patient has an immune-mediated skin disease. The two methods used are direct immunofluorescence, which requires a special medium for fixation (Michel’s fixative), and immunoperoxidase techniques, which may be performed on the paraffin block prepared for the histopathologic study (i.e., the formalinized tissue section). The materials and the technique for biopsy for immunopathology are essentially identical to those for a routine histologic examination. Administration of corticosteroid medications within 3 weeks of testing may be associated with false-negative test results. It is advisable to bisect biopsy samples along their long axis, submitting half for direct immunopathology and half for histopathologic examination. It should be borne in mind that histopathology of the lesions, rather than immunopathology, is often the more accurate of the two methods in the diagnosis of autoimmune diseases; thus if faced with the choice (because of financial reasons or paucity of lesions) the clinician should always choose the former. The microfilarial preparation technique is applicable to the diagnosis of cutaneous onchocerciasis in horses, stephanofilariasis in cattle, and elaeophorosis and parelaphostrongylosis of sheep and goats. After selecting the lesion to be sampled, a 6-mm punch biopsy is used to obtain the tissue sample in the same manner as for the histopathologic biopsy. The tissue should be split, and half preserved in 10% buffered formalin for routine histologic studies. The other half is placed on a dampened gauze sponge in a tightly closed container until the preparation can be performed. A small piece of the tissue that includes the dermis is placed on a glass slide and minced with a razor blade; a few drops of nonbacteriostatic saline are added. Bacteriostatic saline should not be used, because it kills the microfilaria and thus makes their identification more difficult. The specimen is incubated at room temperature for 15 minutes. The slide is then scanned with the ×4 objective along the margins of the tissue debris while the clinician searches for indication of motion in the saline. If the characteristic whiplash movement of the parasite is noted, a higher-powered objective should be used. If the preparation result is negative, a small amount of water is added to a Petri dish, the glass slide is rested on two wooden sticks above the water, and the cover is replaced on the dish. The preparation should be incubated for several hours or overnight and reexamined. The Petri dish helps prevent the sample from drying out. The method of bacterial culture depends on the type of lesion. All haired lesions should be gently shaved. Nodules and tumors should be cultured by aseptically excising the lesion or by obtaining a generous wedge of the tissue. To prevent culture contamination by surface bacteria, the nodules should be gently shaved, washed with an antiseptic soap, and dried with a sterile gauze pad. A perilesional injection of 2% lidocaine is used to anesthetize the tissue. The sample is placed in a transport medium and sent to a microbiology laboratory for culture. A papular eruption (rash) is best cultured by obtaining a sterile 6-mm punch biopsy of skin. Crusts may be lifted up and the underside cultured via a sterile culturette. Ulcerative lesions should not be cultured because any bacteria isolated are more likely to be opportunistic rather than primary pathogens. If the lesions are fluctuant (vesicles, pustules), the overlying skin can be opened gently with a No. 15 blade and some of the contents of the lesion transferred with the blade to the tip of a sterile culture swab. Although some older literature recommends not using sterile culturettes directly on the skin surface, due to concerns that nonpathogenic bacteria from the skin surface may be cultured,1 the author has used this method of culturing papular eruptions or scale when a biopsy is not feasible. Subcutaneous and deep fungal cultures should be performed on nodules, tumors, and swellings. The technique is identical to that described for bacterial culture of these lesions. Pruritus is an unpleasant sensation that provokes the desire to scratch. It is designated a primary cutaneous sensation, along with heat, cold, pain, and touch. There are two broad categories of pruritus. Physiologic or spontaneous itch is a sharp, well-defined, pruritic sensation that is sufficiently intense to prompt scratching but that does not result in significant irritation of the skin; this is a frequent daily occurrence in normal individuals. Pathologic itch is the less well-defined pruritus that occurs in a variety of primary and secondary skin disorders and in systemic diseases. It is an intense cutaneous discomfort that provokes vigorous scratching.2 The investigation of the mechanism of pruritus has been primarily in laboratory animals and humans. It is presumed that much of this knowledge is applicable to other animal species. Pruritus is a distinct sensory quality transmitted from an arborizing network of nerve endings situated at or near the dermoepidermal junction. The sensation is carried to the spinal cord through small, unmyelinated C fibers. The fibers enter the dorsal root of the spinal cord and ascend in the ventrolateral spinothalamic tract through the posterior ventral nucleus of the thalamus to the sensory cortex. The pruritic sensation may be modified in the sensory cortex by behavioral factors or competing stimuli.3,4 Many physical and chemical stimuli can evoke pruritus, and many substances have been implicated as mediating pruritus in humans. Examples of these mediators, which are assumed to have importance in domestic animals as well, include the following4: Many factors can potentiate existing pruritus. Neurologic factors such as boredom and fatigue can potentiate a pathologic itch and possibly transform a physiologic itch into a pathologic itch. Local axonal reflexes can potentiate pruritus; that is, if a second stimulus is applied to an area close to one that is pruritic, the second stimulus, irrespective of its type, is perceived as an itch. In addition, skin with chronic dermatitis has limited perception of stimuli, and any stimulus applied to the affected region may be perceived as either a burning sensation or an itch. This phenomenon is known as “conversion itch.” Secondary bacterial infections, vasodilatation, and inflammation result in a local increase in proteases that potentiate pruritus.3 Pruritus can be diminished by several nonpharmacologic mechanisms, the most common being application of competing stimuli. Pruritus is a minor sensation compared with the other primary sensations of heat, cold, touch, and pain; thus local application of a competing stimulus to a pruritic area often suppresses the pruritic sensation. Scratching is an example of a competing stimulus. Scratching may relieve pruritus by disturbing the rhythm of afferent impulses traveling toward the central nervous system. An alternative theory is that scratching may cause transient damage to nerve fibers that convey the pruritic sensation. Unfortunately the effect is short-lived because the epidermal damage induced by scratching causes the release of epidermal proteases that may later increase the degree of pruritus. Centrally acting factors such as diversions or distractions can also diminish the perception of pruritus by providing competing stimuli directly to the cortex rather than locally to the skin.3 Pruritus is the most common sign of cutaneous disease. Most often in large animals it is caused by ectoparasites or a hypersensitivity reaction, or both (e.g., Culicoides hypersensitivity), but it may also be caused by cutaneous bacterial or fungal infections (e.g., dermatophytes, Malassezia species) (Box 11-1). Because pruritus may be a feature of a more generalized disease process, it is important to take the patient’s general health into account. Hypersensitivity reactions, which are commonly pruritic, may or may not be limited to the skin. For example, anaphylaxis is a life-threatening hypersensitivity reaction that may manifest as pruritus in its early stages. Other pruritic skin diseases include immune-mediated diseases such as atopic dermatitis or pemphigus foliaceus; direct irritation by chemicals; and photoactivated dermatoses. It is helpful to formulate a differential diagnosis by considering each of these broad categories of diseases and using historic information, other cutaneous signs, and appropriate diagnostic tests to narrow the list of differential diagnoses. Box 11-1 Most Common Causes of Pruritus in Horses and Ruminants
Alterations in the Skin

General Approach to Diseases That Alter the Skin
History

Physical Examination
Diagnostic Techniques
Skin Scrapings.
Dermatophyte Culture.
Potassium Hydroxide Preparation.
Acetate Tape Preparation.
Dermatophilus Preparation.
Cytologic Studies.
Biopsy for Routine Histopathologic Examination.
Biopsy for Immunopathology.
Microfilarial Preparation.
Bacterial Culture.
Subcutaneous and Deep Fungal Culture.
Pruritus
Definition
Mechanisms of Pruritus
Approach to the Diagnosis of Pruritus

Alterations in the Skin
Chapter 11