Chapter 13 Tooth extraction is commonly indicated in small animal practice. The procedure is often time consuming and fraught with difficulties. The problems experienced are usually attributable to poor equipment and instrumentation, as well as lack of familiarity with extraction techniques. The purpose of this chapter is to aid the general practitioner in making optimal choices for equipment and instrumentation (see also Ch. 1) and selecting the correct techniques to extract teeth with minimal trauma. Common conditions that generally require extraction include the following. Resorptive lesions are detailed in Chapter 11. The current treatment recommendation for most teeth affected by resorptive lesions is extraction. However, if there is no radiographic evidence of endodontic involvement and the roots are seen to be undergoing replacement resorption, crown amputation and flap closure is justified, but this procedure requires long-term postoperative radiographic monitoring. Traumatic tooth injuries are common and may involve fracture of the tooth or damage to the periodontium. The management of these injuries to the permanent dentition is detailed in Chapter 12. While many tooth crown fractures can be managed by endodontic therapy and restoration, oblique crown root fractures are an absolute indication for extraction. • Bizarre root morphology, with bends or spirals • Extensive root resorption ± ankylosis • Periodontally sound upper and lower canines (the roots are curved and are wider below the cemento-enamel junction than above it). Situations where an open technique may facilitate extraction include: • Any multirooted tooth which is periodontally sound, i.e. there is no loss of alveolar bone (an open technique will make access to the furcation and individual roots possible) Equipment and instrumentation requirements for extraction are detailed in Chapter 1. A new extraction instrument, called the ‘Extraktor’ has recently been developed (Fig. 13.1). The Extraktor has been specifically designed to fit the shape of canine and feline tooth roots, thus optimizing the forces used. It can be used to exert apical pressure and cut the periodontal ligament. It can also be used for leverage. The Extraktor can be used both as a luxator (cutting in an apical direction) and as an elevator (exerting horizontal leverage). In addition to these modes of action, the Extraktor, because of its sharp lateral edges, can be used to cut laterally, sliding around the tooth to cut the periodontal ligament. This mode of use is unique to the Extraktor. The correct use of the Extraktor is critical for success. The technique is a modification of traditional techniques using luxators and elevators and will be detailed in this chapter. Correct use always entails amputating the tooth crown to allow the Extraktors to fit snugly to the root surface. If performed correctly, the Extraktor technique results in minimally traumatic extraction in a reasonable time period. Fig. 13.1 The Extraktor Some guidelines for the use of dental luxators, elevators and Extraktors: • Select the appropriate size of instrument for the size of the root • The size of instrument required may change as the tooth loosens, i.e. smaller diameter instruments may be required to cut periodontal ligament apically than required at the start of the extraction • Luxators should not be used for leverage as this will damage the fine working end • Elevators and Extraktors are used with a combination of apical pressure and leverage • Amputating the tooth crown prior to extraction is useful when using luxators and elevators • Amputating the tooth crown prior to extraction is mandatory when using Extraktors • Extraktors are also used in a lateral sliding motion to cut the periodontal ligament. Procedure – using luxators and elevators: 1. Cut the gingival attachment around the whole circumference of the tooth using either a No. 11 or 15 scalpel blade in a handle or a sharp luxator (Fig. 13.2). Fig. 13.2 Cutting the gingival attachment to the tooth 2. Select a luxator of the appropriate size. Its concave surface should equal the curvature of the root being extracted. This is often a larger size than initially estimated. The instrument is held with the handle along the palm of the hand and the index finger resting on the shaft, with the tip of the finger close to the cutting end (Fig. 13.3). The fingertip functions as an emergency stop should you slip, thereby avoiding iatrogenic damage to surrounding structures. With an average-sized hand, this will leave the end of the handle resting against the wrist, where it can be gripped with the other fingers. This grip prevents the excessive force which can be applied if the handle end rests in the center of the palm, forming a straight line of force from the elbow! Fig. 13.3 The correct grip for a dental luxator, elevator or Extraktor 3. The luxator is advanced into the gingival sulcus at a slight angle to the tooth, i.e. following the surface of the tooth, and pressed into the periodontal ligament space (Fig. 13.4). If the luxator is not inserted into the gingival sulcus in the described fashion, it is likely to slide over the margin of the alveolar bone and raise the gingiva off the bone. This will lacerate the gingiva rather than break periodontal ligament fibers! Fig. 13.4 Inserting a luxator, elevator or Extraktor into the periodontal ligament 4. The luxator is worked, applying gentle apical pressure, into the periodontal ligament space around the whole circumference of the tooth (Fig. 13.5). The sharp luxator will cut the periodontal ligament fibers. Once sufficient space has been created between the tooth and the alveolar bone, an elevator can be used. Some clinicians prefer to perform the whole extraction using luxators of increasing size, i.e. do not switch to elevators. This is acceptable procedure as long as the luxators are used in the correct fashion, i.e. in an apical direction, without rotation, to cut the periodontal ligament fibers. Luxators should not be rotated, as this will damage the fine end of the instrument. Fig. 13.5 Using a dental luxator, elevator and Extraktor 5. The elevator (gripped in the hand in the same way as a luxator) is also worked circumferentially around the tooth, with a steady gentle rotational pressure held at each point for 10–15 s to fatigue the deeper periodontal fibers. Hemorrhage will be created at the same time, which adds hydraulic pressure to the process of breaking down the fibers. The other hand should be used to support the jaw and prevent any undue stress on the jawbone. In addition, the thumb and index finger of the other hand should be placed on the buccal and palatal/lingual aspect of the tooth root (around the alveolus of the tooth). This will allow tactile feedback as well as minimize iatrogenic damage should slippage occur with the elevator. As the periodontal ligament fibers break and the tooth begins to loosen, the elevator can be pushed further apically, and rotated more. It is essential to work around the whole circumference of the tooth. It is tempting to concentrate elevation at the points where the tooth is most mobile. The opposite should be performed, i.e. the elevator should be worked more in positions where the tooth is least mobile. When the tooth is loose in its socket, it is tempting to use extra force to speed up the extraction. Try to avoid this, as it usually results in fracture of the root, which then needs to be retrieved. 6. When the tooth is loose, it can be drawn out of the socket with fingers or forceps. In my experience, the use of dental forceps usually results in fracture of the apical portion of the root. I do not use them or recommend their use. However, if they are used, make sure that the forceps are applied as far apically as possible on the root and use gentle rotational force applied in a back and forth manner along the long axis of the tooth. 1. Cut the gingival attachment around the whole circumference of the tooth using either a No. 11 or 15 scalpel blade in a handle (Fig. 13.2B) or a sharp Extraktor (Fig. 13.2C). 2. Amputate the tooth crown at the cemento-enamel junction. 3. Select an Extraktor of the appropriate size. Its concave surface should equal the curvature of the mesial and distal surface of the root being extracted. This is often a larger size than initially estimated. The instrument is held in the same way as a luxator or elevator (Fig. 13.3). 4. The Extraktor is advanced into the gingival sulcus at a slight angle to the tooth, i.e. following the surface of the tooth, and pressed into the periodontal ligament space (Fig. 13.4). 5. The Extraktor is worked, applying gentle apical pressure, into the periodontal ligament space at the mesial and distal surfaces of the tooth root (Fig. 13.5). The instrument is also encouraged to slide buccally and palatally/lingually (Fig. 13.6) to cut periodontal ligament fibers around the whole circumference of the tooth. The spoon-shaped Extraktor is sharp at its apical termination but also on part of its lateral wings and will thus readily slide bucally and palatally/lingually. Extraktors are also of sufficient metal thickness to allow some rotation (unlike luxators). Fig. 13.6 Engaging the side cutting edges with the Extraktor
Tooth extraction
Introduction
Indications
Extensive destruction of dental hard tissue
Traumatic tooth injuries
Choice of extraction technique
Extraction techniques
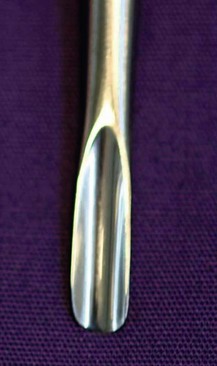
This instrument has been specifically developed (by a Swedish company called Accesia) for extraction of feline and canine teeth. Its use requires modification of standard techniques. If performed correctly, the use of the Extraktor results in minimally traumatic extraction in a reasonable period of time.
Closed extraction
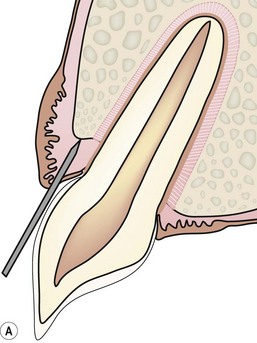
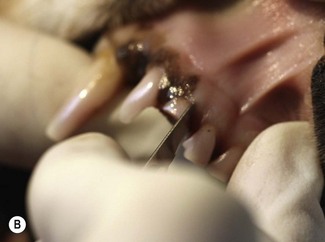

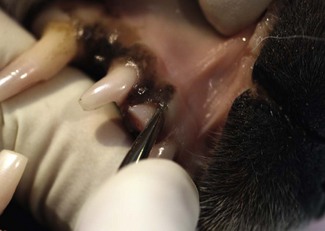
The first step of any extraction, irrespective of whether a closed or open technique is planned, is to cut the gingival attachment around the whole circumference of a tooth. There is no attempt to enter the periodontal ligament space at this stage. The purpose of this cut is just to free the gingival attachment (A). A scalpel blade (B) or a sharp luxator or Extraktor (C) can be used to cut the gingival attachment. The sharp instrument is inserted into the gingival sulcus until the instrument contacts the margin of the alveolar bone. The gingival attachment to the tooth surface is released in this way around the whole circumference of the tooth.

The instrument is held with the handle along the palm of the hand and the index finger resting on the shaft, with the tip of the finger close to the cutting end. The fingertip functions as an emergency stop should you slip, thereby avoiding iatrogenic damage to surrounding structures.

The luxator, elevator or Extraktor is advanced into the gingival sulcus at a slight angle to the tooth, i.e. following the surface of the tooth, and pressed into the periodontal ligament space.
These instruments are used circumferentially around the tooth. The luxator is limited to gentle apical pressure while the elevator and Extraktor can also be used with a steady gentle rotational pressure held at each point for 10–15 s to fatigue the deeper periodontal fibers. In addition, lateral pressure can be used with the Extraktor to engage the side cutting edges and slide around the tooth circumference.
The instrument is encouraged to slide buccally/palatally.![]()
Stay updated, free articles. Join our Telegram channel

Full access? Get Clinical Tree


