7 The Complete Prophy
When you have completed this chapter, you will be able to:
• List the instruments and equipment needed to perform a complete dental prophy.
• List the steps in performing a complete dental prophy.
• Explain the rationale for performing endotracheal intubation prior to anesthetizing a patient for a dental prophy.
• Describe circumstances under which the veterinarian may prescribe antibiotics for dental patients.
• Describe the proper use of a mouth gag during the dental prophy.
• Explain the purpose of the water flow through the ultrasonic dental scaler.
• Describe the general technique used for scaling teeth with an ultrasonic scaler.
• Describe the instrument used and general technique for evaluating depth of the sulcus.
• Describe the modified pen grasp for holding dental instruments.
Veterinarians and technicians often speak of performing a “prophy” or “dental.” This usage is incorrect and may often mislead the client with regard to the patient’s true condition. Because the word prophylaxis, which means prevention of or protective treatment for disease, is sometimes confused with “prophylactic” or “condom,” the dental profession shortened the word to prophy. The difference between performing a prophy and periodontal therapy is extremely important. The term prophy is often used incorrectly to indicate the treatment of periodontal disease rather than its prevention. This important distinction must be kept in mind when discussing treatment plans with the client. One analogy is to compare a prophy with a vaccination for a disease rather than the treatment for that disease. Once the patient has periodontal disease, far more extensive treatment is required. In this case the clinician should discuss with the client the necessary steps and options (which may include extractions) to treat the condition. A complete prophy requires several important instruments and pieces of equipment (Box 7-1).
Box 7-1
Instruments and Equipment Needed for the Complete Prophy
Preparation for the Procedure
1. Proceed with recommended procedures.
2. Attempt to call first; if the client cannot be reached, proceed with recommended procedures.
Steps to the Complete Prophy
The complete prophy entails several steps (Box 7-2). According to the general sequence, the oral cavity is evaluated, large pieces of calculus are removed, and the periodontal area is probed for pocket depth and the presence of subgingival calculus. Next, the subgingival calculus is removed, and the teeth are evaluated to ensure that they and the entire periodontal area are completely clean. Then, the degree of disease is evaluated, and further diagnostic tests are performed. Any pathologic condition of the oral cavity should be noted and charted. Home-care instruction should be given to the client either before (to assess compliance) or after the procedure.
Box 7-2
Steps to the Complete Prophy
Patient Care
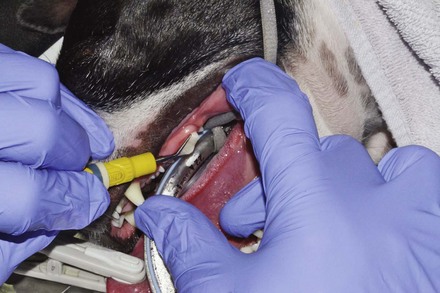
Once anesthetized, the patient should be positioned in lateral recumbency on a grate over a table sink or on a specially designed dental table that allows the fluids used in the dental procedure to drain. Mouth gags should not be used for more than a few minutes; when they are used, care should be taken not to overextend the mandible. Overextension of the mandible may lead to stretching and tearing of the ligaments and muscles of the jaw. Instead, the mouth should be propped open with the nonworking hand (Figure 7-1).
Step 2: Supragingival Gross Calculus Removal
Calculus removal forceps
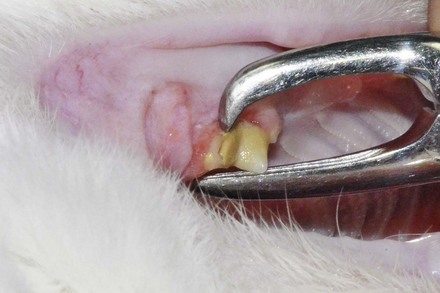
Use of calculus removal forceps is a fairly quick method for removing supragingival calculus. The longer tip is placed over the crown, the shorter under the calculus. The calculus is cleaved off when the tips are brought together (Figure 7-2). When using calculus removal forceps, the operator should be extremely careful not to damage the gingiva or create an iatrogenic slab fracture.
Ultrasonic or sonic scalers
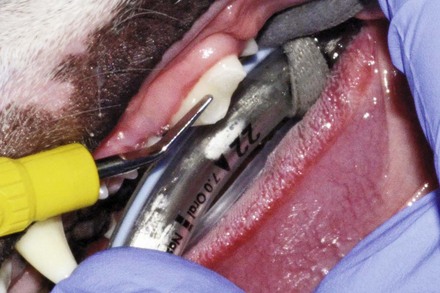
Ultrasonic or sonic scalers are used to quickly remove the smaller deposits of supragingival calculus. Ultrasonic scalers vibrate in the range of 18,000 to 45,000 cycles per second. When properly applied, this vibration breaks up or pulverizes calculus on the surface of teeth. Because ultrasonic instruments can damage teeth by mechanical etching or thermal heating, they should be used with caution (Figure 7-3). For supragingival scaling, use of the side of a beaver tail tip is preferable rather than the end of the tip. This section of the chapter discusses supragingival scaling, but the same principles apply to the use of ultrasonic or sonic scalers in subgingival scaling. Often, supragingival and subgingival scaling are performed at the same time.
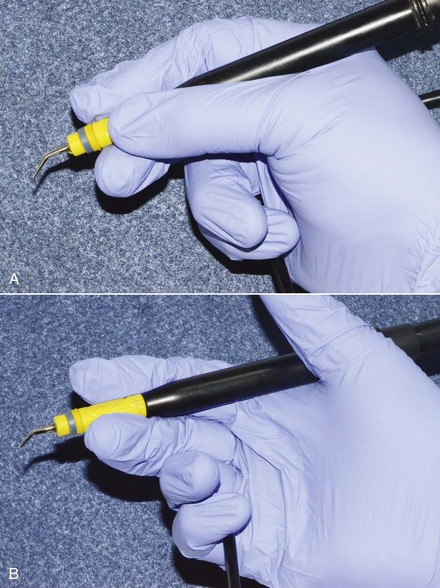
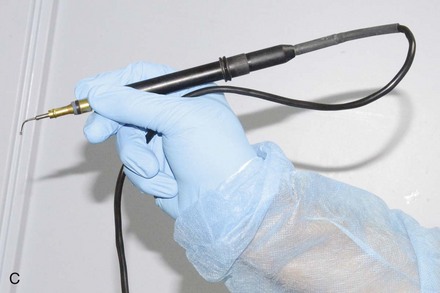
Power instrument grasp
The ultrasonic instrument should be grasped lightly, not tightly. It should feel balanced in the hand, with minimal pull from the handpiece cord. The handpiece, not the hands, must be allowed to do the work (Figure 7-4, A). The handpiece is balanced on the index or middle finger. A modified pen grasp is not as important in holding the ultrasonic or sonic scaler as it is with hand instruments (Figure 7-4, B). To decrease stress on the hand from the pull on the handpiece cord, the cord may be looped over the little finger (Figure 7-4, C). As opposed to hand instruments, in which a fulcrum is used to provide leverage for the pulling stroke, ultrasonic scalers do not require a fulcrum. The hand is used as a guide for the ultrasonic handpiece.
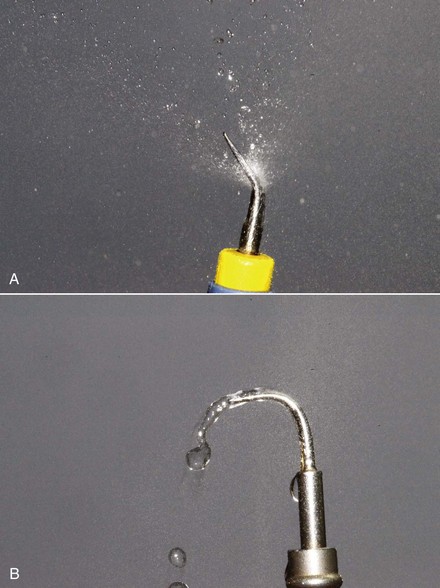
Water flow
Water flow is required to prevent overheating of the teeth and damage to the pulp. With the broad-based, beaver-type inserts, an ample supply of water is necessary for irrigation (Figure 7-5, A). Less water is required to cool the smaller tips. The water flow can be adjusted to a smaller halo, almost a drip, just enough to cool the tip (Figure 7-5, B).
Stay updated, free articles. Join our Telegram channel

Full access? Get Clinical Tree


