CHAPTER 1 Sample Collection and Preparation
Collection and preparation of cytologic specimens is definitely a skill gained only through experience and refinement of technique based on the results obtained. Many clinicians (and owners) are understandably frustrated when a sample submitted is determined to be nondiagnostic. Fortunately, an understanding of some basic principles of sample collection and familiarity with some of the more common pitfalls related to cytologic sample preparation (often learned by hard experience) can eliminate many nondiagnostic results.1–5 Finally, knowing which samples have a high probability of yielding diagnostic information and which samples do not is important in determining when to use cytology and in preparing the owner for the results that are likely to be obtained.
METHODS OF SAMPLE COLLECTION
There are several methods of collecting samples for cytologic analysis. The indications for each are outlined in Table 1-1.
Table 1-1 Indications for Various Methods of Sample Collection
| Collection Method | Indications for Uses | Comments |
|---|---|---|
| Fine-needle biopsy (aspiration or nonaspiration method) | Masses (surface or internal) Lymph nodes Internal organs Fluid collection | Best method for minimally invasive sampling of internal organs/masses Best method for cutaneous/subcutaneous masses because it avoids surface contamination |
| Impression smear | Exudative cutaneous lesions Preparation of cytology samples from biopsy specimens | Most useful for identification of infectious organisms May yield only surface cells and contamination (problem with ulcerated tumors) With biopsy specimens, it is imperative to blot excess blood from sample Impression smears of biopsy specimens must be made before exposure of biopsy sample to formalin |
| Scraping | Used with flat cutaneous lesions that are not amenable to fine-needle biopsy Preparation of cytology samples from poorly exfoliative biopsy specimens | With dry cutaneous lesions (e.g., ringworm), it is important to scrape sufficiently to obtain some blood/serum to help cells stick to slide |
| Swab | Vaginal smears Fistulous tracts | Generally used only when anatomic location not amenable to collection by other means With fistulous tracts, most useful in classifying type of inflammatory response and identifying infectious organisms |
Fine-Needle Biopsy
Fine-needle biopsy (FNB) can be performed using a standard syringe and needle with or without aspiration (described later). This is probably the best overall method for sampling any mass or proliferative lesion, as well as for sampling any subcutaneous glandular organ, such as lymph node, mammary gland, or salivary gland.4 FNB is also best suited for minimally invasive sampling of internal organs or masses. FNB allows collection of cells from deep within the lesion, avoiding surface contamination with cells and organisms that often plague impression smears, swabs, or scrapings.
Aspiration Procedure
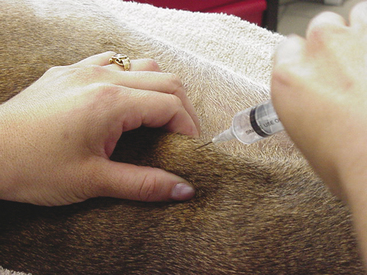
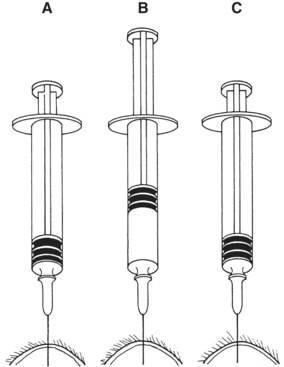
With the standard aspiration method of FNB, the mass is stabilized with one hand while the needle, with syringe attached, is introduced into the center of the mass (Figure 1-1). Strong negative pressure is applied by withdrawing the plunger to about threefourths the volume of the syringe (Figure 1-2). If the mass is sufficiently large and the patient sufficiently restrained, negative pressure can be maintained while the needle is moved back and forth repeatedly, passing through about two thirds of the diameter of the mass. With large masses, the needle can be redirected to several areas within the mass to increase the amount of tissue sampled. Alternatively, several different areas of the mass can be sampled with separate collection attempts. Care should be taken to not allow the needle to exit the mass while negative pressure is being applied because this can result in either aspiration of the sample into the barrel of the syringe (where it may not be retrievable) or contamination of the sample with tissue surrounding the mass.
Nonaspiration Procedure (Capillary Technique, Stab Technique)
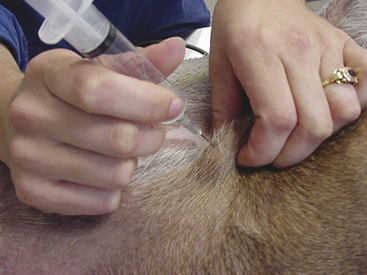
Many people prefer to collect FNB without the application of negative pressure, and this technique can yield samples of equal or better quality than those obtained with the standard aspiration technique.4,5 The nonaspiration technique works well for most masses, especially those that are highly vascular.1,4 This technique is similar to the standard fine needle aspiration biopsy technique, except no negative pressure is applied during collection. The procedure is performed using a small-gauge needle on a 5- to 12-ml syringe. The barrel of the syringe is filled with air prior to the collection attempt to allow rapid expulsion of material onto a glass slide. The syringe is grasped at or near the needle hub with the thumb and forefinger (much like holding a dart) to allow for maximal control (Figure 1-3). The mass to be aspirated is stabilized with a free hand, and the needle is inserted into the mass. The needle is rapidly moved back and forth in a stabbing motion, trying to stay along the same tract. This allows cells to be collected by cutting and tissue pressure. Care must be taken to keep the needle tip within the mass to prevent contamination with surrounding tissue. The needle is then withdrawn and the material in the needle is rapidly expelled onto a clean glass slide, and a smear is made using one of the techniques listed later in this chapter (see “Preparation of Slides”). Having the syringe pre-filled with air allows the sample to be expelled onto a slide more quickly, thereby helping to avoid desiccation (drying out) of the collected cells and coagulation of the sample. Generally, material sufficient for only one smear is collected. If possible, it is optimal to perform multiple collection attempts at various sites within the mass to increase the chance of obtaining diagnostic material and to ensure a representative sampling of the lesion.
Collection Tip
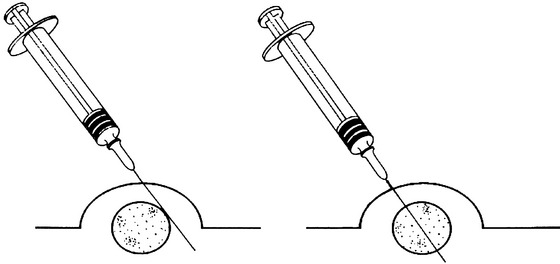
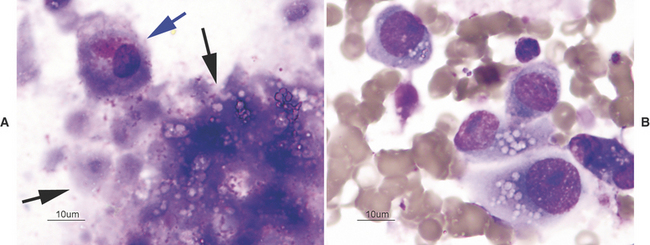
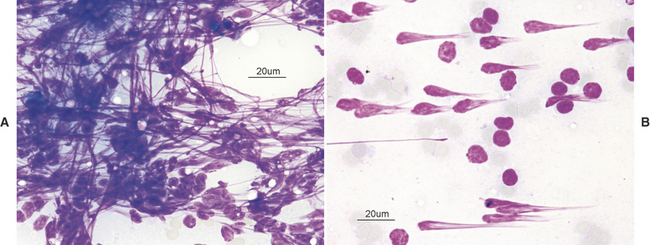
There are many reasons why any one slide may be nondiagnostic. The slide may not have any diagnostic cells because the needle missed the lesion during collection (geographic miss) (Figure 1-4) or may have been in a nonrepresentative portion of the lesion (e.g., an area of inflammation or necrosis within a neoplasm (Figure 1-5). In addition, some lesions simply do not exfoliate cells well. Even if adequate cells were collected, many times the cells do not spread out well and the slides are too thick to evaluate (especially common with lymph node aspirates) or all of the cells are ruptured during smear preparation (Figure 1-6). Even in the hands of clinicians who are highly experienced in sample collection, it is not unusual to evaluate multiple slides from a single lesion and have all but one of the slides be nondiagnostic for one reason or another.
Impression Smears
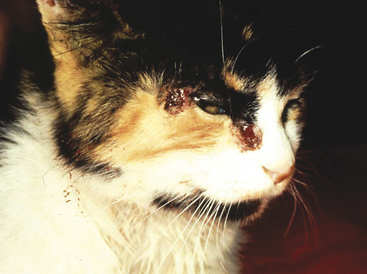
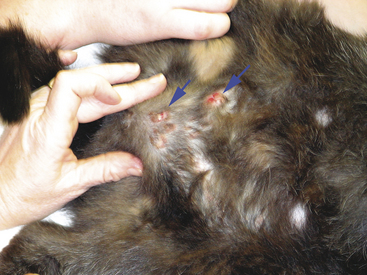
Impression smears can be made from ulcerated or exudative superficial lesions (Figure 1-7) or tissue samples collected at surgery or necropsy. Impression smears from superficial lesions often yield only inflammatory cells even if the inflammation is a secondary process; neoplastic cells may not exfoliate in exudates or impression smears of ulcerated masses. If possible, FNB of tissue under the ulcerated/exudative area should be collected in addition to the impression smears. Inserting the needle at a nonulcerated area will help reduce contamination during collection. Impression smears of exudates or ulcers are most beneficial for determining if bacterial or fungal organisms are present. Keep in mind that bacteria may reflect only a secondary bacterial infection.
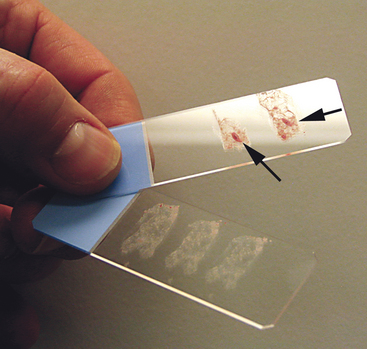
To collect impression smears from tissues collected during surgery or necropsy, the tissue should first be cut so that there is a fresh surface for imprinting (Figure 1-8). Next, the excess blood and tissue fluid should be removed from the surface of the lesion being imprinted by blotting with a clean absorbent material (Figure 1-9). Excessive blood and tissue fluids inhibit tissue cells from adhering to the glass slide, producing a poorly cellular preparation. Also, excessive fluid inhibits cells from spreading and assuming the size and shape they usually have in air-dried smears. After excess blood and tissue fluids have been blotted from the surface of the lesion, the surface of the lesion is touched (pressed) against the middle of a clean glass microscope slide and lifted directly up (Figure 1-10). This should be repeated several times so that several tissue imprints are present on the slide. If the excess blood has been adequately removed, the tissue will stick somewhat to the slide and will appear to peel off the slide, if removed slowly. Properly made slides will have slightly opaque areas at the areas of the impressions but should not have excessively thick areas of blood (Figure 1-11).
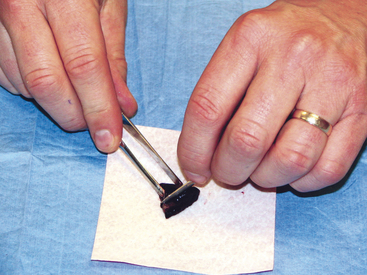
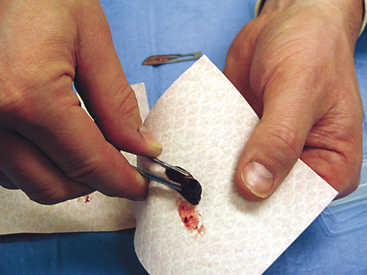
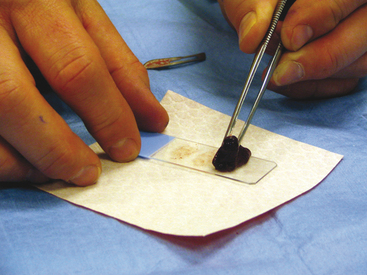
Figure 1-10 The tissue is gently pressed (not smeared) several times against the surface of a clean glass slide.
(Courtesy Oklahoma State University teaching files.)
Scrapings
Scrapings can be made from external lesions or tissue obtained from surgery or necropsy. Generally, scrapings will result in more cellular slides than will impression smears; however, like impression smears, scrapings may contain mostly surface contamination or inflammation if made from the surface of ulcerated cutaneous lesions. Generally, scrapings are not as valuable for diagnosing neoplasia as slides made from FNB. Scrapings are valuable in collecting samples from cutaneous lesions that are flat and dry and thus not amenable to FNB or impression and from samples collected at surgery or necropsy (Figure 1-12).4 Two examples of lesions in which scrapings are beneficial are feline eosinophilic granuloma complex lesions and dermatophytosis. Scrapings are prepared by holding a scalpel blade perpendicular to the lesion’s blotted surface and pulling the blade toward oneself several times. When scraping dry, nonulcerated lesions, such as dermatophyte lesions, scrapings should be sufficiently deep to cause exudation of serum/blood. This proteinaceous fluid will help the cells (and hairs when looking for dermatophytes) collected to adhere to the slide and prevent them from being washed off during staining. The material collected on the blade is transferred to the middle of a glass microscope slide and spread either by smearing gently with the scalpel blade or by one of the techniques described later for preparation of smears from aspirates of solid masses.
Stay updated, free articles. Join our Telegram channel

Full access? Get Clinical Tree


