Fig. 1.
This toluidine blue-stained, semi-thin resin section shows areas of the spinal cord on the right and a Schwann cell implant on the left. The oligodendrocyte-myelinated axons appear close together due to the lack of intervening extracellular matrix. The Schwann cell-myelinated axons are more separated and occasionally show an adjacent nucleus (see arrows). This is one of the main clues for identifying Schwann cell-myelinated axons; oligodendrocyte nuclei in relation to the myelin are not evident because their nuclei are distant from the myelin sheaths that they formed. Scale bar, 20 μm.
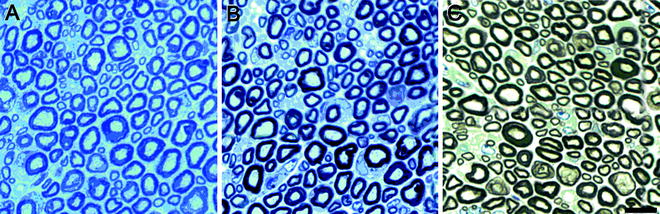
Fig. 2.
Transverse, semi-thin sections of the sciatic nerve from a normal mouse (40 days old). Sections were stained with toluidine blue (a) or both p-phenylene diamine and toluidine blue (b, c) to highlight myelin. (c) Myelin is further emphasized following bright field background correction. Scale bar, 10 μm. (Courtesy of Paul Morton, Miami Project to Cure Paralysis).
One percent p-phenylene diamine (PPD), a good stain for myelin (Fig. 2), is prepared in 1:1 methanol/isopropanol. It should be stored in an amber bottle and allowed to rest at least 5 days before using. As PPD is a toxic and permanent stain, gloves should be worn and work should be done in the fume hood. It is filtered with Whatman #1 filter paper before each use into a staining jar and slides are submerged for 20–30 min and rinsed ×2 in isopropanol until the rinses are clear. PPD can be stored for reuse. Because of rinsing after staining with 2–3 changes of isopropanol, a pencil, not a Sharpie, should be used to label the slides. A final rinse in DDW prepares the slide for the application of Richardson’s stain next to reveal more cellular detail in the section. Ethanol may be substituted for isopropanol in this procedure.
2.3 Staining Sections for the EM
For typical electron microscopy, 150 mesh, formvar-coated grids are used for viewing sections in the transmission EM. Formvar-coated grids may be purchased (EMS) or grids can be coated in the laboratory by using a 0.5% formvar solution in dichloroethane. Because success in coating grids may be inversely related to the humidity in the atmosphere, in Miami we buy the formvar-coated grids. Formvar-coated slot grids (2 × 1 mm, EMS) also may be used to be able to view the entire section without interfering grid bars. These may be purchased coated, or grids can be coated in the laboratory by using a 1.0% formvar solution in dichloroethane.
Sections on grids are stained in two steps, first with uranyl acetate and then with lead citrate. Uranyl acetate is prepared at least 1 day prior to staining and must be crystal clear before using. Uranyl acetate (4% in methanol) is passed through a 0.22 μm acetate syringe filter. The grids are stained in uranyl acetate for 20–22 min before rinsing in 50% methanol, then DDW. Uranyl acetate is stored, undisturbed, in the dark at RT. Lead citrate (0.25%) is filtered as well. The grids are stained in lead citrate for 3–5 min, followed by rinsing in DDW. Lead citrate is stored in a polypropylene-capped tube at 4°C. Allow it to come to RT before staining grids. Place 25 mg of lead citrate in 9 ml DDW, add 2–4 drops of fresh 10 N NaOH and shake until dissolved. Add DDW for a final volume of 10 ml. An example of a thin section so stained appears in Fig. 3.
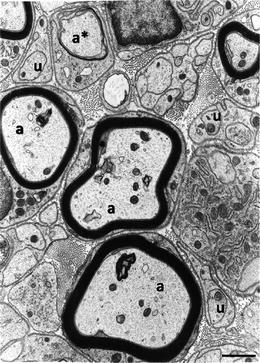
Fig. 3.
This electron micrograph illustrates sheaths of myelin formed around larger diameter axons (a) by Schwann cells. Smaller diameter axons (u) are not myelinated but ensheathed by Schwann cell cytoplasm. At the a* is an axon around which the Schwann cell is in the process of forming myelin. Extracellular matrix, including collagen fibrils, fills the space in between the Schwann cells. A basal lamina is seen to coat the Schwann cell exterior. Scale bar, 1 μm.
2.4 Anti-GFP (aGFP) Immunocytochemistry for the LM and EM
Vibratome sections or 250–300 μm thick slices are dehydrated and rehydrated for better penetration. A steady and experienced hand is able to cut slices with a double-edged razor blade at approximately 200–300 μm thickness. These sections can be floated in the reagents in a multi-well dish to enable immunostaining on both sides of the slice. The critical blocking of endogenous peroxidases step includes 1% H2O2 in methanol before absolute ethanol and rapid rehydration. The blocking solution used is tris-buffered saline (TBS), and blocking agents are 5% normal goat serum (NGS) and 0.5% bovine serum albumin (BSA). Throughout the antibody incubations, 3% NGS in TBS is used. After antibody incubation for development of staining, TBS alone is used, and final rinses of the immunostained tissue are in 0.15 M PO4. All steps of the protocol are performed at RT on a rotator.
The primary antibody is polyclonal chicken aGFP (1:500, Millipore, Temecula, CA) and the secondary antibody is biotinylated goat anti-chicken IgG (1:1,000, Santa Cruz Biotechnology, Santa Cruz, CA), both diluted in 3% NGS/TBS. For chromagen precipitate development, tissue slices are first incubated in horseradish peroxidase streptavidin (Vector, Burlingame, CA) in TBS, followed by rinses in TBS, then staining monitored with a Vector VIP substrate kit for peroxidase (1:100 in TBS) for optimal staining intensity. Tissue slices are rinsed in 0.15 M PO4 for viewing in the LM. Positive staining will be purple. Slices should not be allowed to dry.
Embedding the reacted tissue sections for the EM entails a 2-h fixation in EM fixative followed by an overnight fixation in 1% OsO4 in 0.1 M Sorensen’s PO4. This could be shortened to 2 h on a rotator in the fume hood. The embedding procedure proceeds as stated in processing tissue for the transmission EM.
Penetration of the reagents is limited to the surface of the tissue, perhaps 50 μm deep, so care should be taken not to section through the VIP stain when cutting 1 μm sections for viewing in the LM. Examine the sections either unstained or after a short time (10 s) in Richardson’s stain, to optimize visualization of the aGFP chromagen. When the stained area is located, it can be thin sectioned and placed on grids to be examined in the EM. First examine and photograph unstained grids for best visibility of the reaction product. A 5–10 min exposure to 4% uranyl acetate after the aGFP staining enables a better view of the morphology.
When immunostaining semi-thin resin sections not destined for examination in the EM, they require an incubation with sodium methoxide to remove OsO4 bonds and to unmask the antigens. Sodium methoxide, a strong oxidizing agent, is a saturated solution of sodium hydroxide in 100% methanol. It should not be used until it has matured in the dark for 4 weeks.
3 Methods for Tissue Preparation
3.1 Preservation by Perfusion
Whole body perfusion by injection of fixative into the heart is best for adequate tissue preservation. Typically animals are perfused with ice cold 4% paraformaldehyde in 0.1 M phosphate buffer, pH 7.4, following an initial injection into the left ventricle of the terminally anesthetized rat of 100 μl of heparin followed by perfusion of cold physiological saline. In an adult rat weighing 200 g, for example, 300–400 ml of saline and 300–400 ml of cold fixative are introduced sequentially into the animal. The spinal cord including the spinal column is carefully extirpated and placed in the same fixative overnight at 4°C. Usually the cord is not removed from the bony encasement until after the overnight fixation. Glutaraldehyde may be added to paraformaldehyde but the concentration of the former must not exceed 0.1% if the tissue is to be immunostained. Because some antigens are hardier than others, a higher percent of glutaraldehyde may be used to improve ultrastructure. It is best to determine the allowable amount of glutaraldehyde for satisfactory immunostaining when starting a new experiment.
3.2 Dissection of the Tissue
The spinal cord is removed extremely carefully from the bony encasement. Great care should be taken not to touch the spinal cord. The tissue then may be cut into variously sized segments for immersion in 30% sucrose in PBS or 0.1 M phosphate buffer (+0.01% sodium azide) if only general light microscopy and immunostaining are to be performed on frozen cryostat (10–20 μm thick) or paraffin sections. Tissue should be kept in the sucrose solution until it sinks to the bottom of the vial, 1–2 days.
Tissue destined for the EM must not be exposed to this concentration of sucrose or frozen. Thus, separate animals need to be prepared, or the tissue can be subdivided after the post-perfusion preservation so that some slices of the spinal cord are set aside for electron microscopic preparation. A technique used in our laboratory for the complete transection/Schwann cell injury model is to take a 0.5–1 mm transverse slice from the middle of the Schwann cell bridge for electron microscopy and then subject the remaining neighboring bridge/spinal cord segments to sucrose treatment, freezing, and immunostaining.
When preparing tissue for frozen sectioning, it may be surrounded by gelatin for stability. Twelve grams of gelatin are added to warmed 100 ml PBS +0.01% sodium azide. The gelatin is then layered on the bottom of an embedding chamber and gelled in the cold room. The piece of tissue with excess sucrose solution removed is placed and oriented on the gelatin. Careful rostral and caudal labeling, etc., should be done at this time. Fresh gelatin is added slowly to cover the tissue and then placed in the cold room. The tissue block is now ready for sectioning longitudinally or transversely.
3.3 Processing Tissue for the Transmission EM
Preparing spinal cord for EM assessment requires considerable time due to four overnight steps. It involves fixation in glutaraldehyde (overnight), followed by secondary fixation in OsO4 (overnight), then dehydration and penetration of the embedding resin (overnight) and ending with polymerization in a mixture of E/A (overnight). The tissue must be trimmed to a size appropriate for penetration of fixatives and resins, having at least one dimension no greater than 1 mm in thickness. If orientation is important, i.e., rostral vs. caudal, it may be necessary to mark the tissue in some way, such as making a notch or adding a suture, when embedding. Once trimmed, the specimen is placed in the EM fixative and left overnight or up to 1 week.
Specifically, the method is as follows:
1.
Place trimmed cord slices in EM fixative in labeled 3-ml capped glass shell vials at 4°C and, after 1 rinse of this fixative, leave overnight or up to 1 week. A variation is to use 2.5% glutaraldehyde in 0.1 M cacodylate buffer plus 5% sucrose (1).
2.
While working in the fume hood and wearing latex gloves, and after rinsing ×3 in 0.15 M PO4 buffer, 5–10 min each, replace buffer with 1% OsO4 in 0.1 M Sorensen’s P04 [or cacodylate (1)] buffer. Still in the fume hood, place vials on a rotator at a slow setting, covered, for 30 min to 1 h before storing the vials overnight at 4°C. Because it is a heavy metal, the penetration of OsO4 is limited, particularly in the lipid-rich milieu of the spinal cord that is densely packed with myelin membranes. Penetration of the fixative is approximately 0.5 mm, making the 1 mm or less dimension of the trimmed tissue essential in an intact spinal cord. For injured spinal cords, penetration may be much better because of the loss of integrity of the tissue and cavitation. If the osmium does not reach the center of the specimen, the central tissue will remain white and the inadequately fixed membranes will be too poor to assess. Therefore, 1% OsO4 and overnight fixation is employed rather than 2% OsO4 and 1 h fixation that is generally used. Do not leave in OsO4 longer than overnight. If necessary, the tissue can be rinsed in 0.1 M PO4 buffer and stored in the buffer at 4°C until ready to proceed. The use of OsO4 serves a dual purpose because it is both an excellent cross-linking agent and provides contrast to the tissue for imaging. Because the tissue will become black on contact with OsO4, most distinctive physical markings will be lost, necessitating the orienting maneuver recommended earlier.
3.
The next day, place the stock E/A resin in the fume hood and allow to come to RT for later use. Uncap the specimens in the fume hood and remove OsO4 by pipette. Discard into a labeled waste container for pick-up by Environmental Health and Safety. Do not discard into the sink. Rinse ×3 in 0.15 M PO4, 5–10 min each, while on the rotator in the hood. Place rinses in the same waste container.
4.
Dehydrate tissue in a series of chilled graded ethanols, 25, 50, 70 and 95% at ×2 for 5–7 min each, continuing to use the rotator in the hood. Further dehydrate in 100% ethanol ×5 at RT for 10 min each. Use a different pipette for each change to ensure that all water is removed. If necessary to halt at this stage, hold in 70 or 95% ethanol. Once the dehydration sequence is started, it should continue to embedding if possible.
5.
Before exposing the specimen to the embedding resin mixture, perform two changes in PO at 5 min each. The resin is not compatible with ethanol but because PO is miscible with both ethanol and resin, it is used to facilitate the penetration of resin. PO can be used only in glass or polypropylene vessels, not polystyrene or tissue culture plastic that will soften. PO is highly volatile and should be used in the fume hood while wearing gloves. PO is added very quickly to the vials after the absolute ethanol is removed to avoid drying of the tissue. Extreme care also must be taken while rinsing in PO to avoid evaporation from the surface of the tissue.
6.
Replace PO with a mixture of 1:1 PO and E/A with DMP-30 (see Materials) to aid resin penetration into the tissue. Because of viscosity of the resin, polyethylene disposable pipettes are used to transfer resin. Cap vials and keep in the hood overnight but no longer.
7.


The next morning, allow the stock E/A once again to come to RT in the hood. We prepare enough embedding resin to not only penetrate the specimens but also for the actual embedding of the tissue in molds. Add DMP-30 (see Materials) to the E/A in a tripour beaker and thoroughly but carefully stir to mix evenly. Bubbles are unavoidable, but should be minimized as much as possible. When ready, remove the PO/resin mixture and add E/A with hardener to the tissue. Place the vials of tissue in a vacuum desiccator for 2–4 h. The remaining embedding medium is capped and covered with parafilm and stored at 4°C. Leaving the tissue in fluid resin for more than 5 h can result in partial polymerization within the vial and make it difficult to remove tissue from the vials for embedding.
< div class='tao-gold-member'>
Only gold members can continue reading. Log In or Register to continue
Stay updated, free articles. Join our Telegram channel
Full access? Get Clinical Tree
