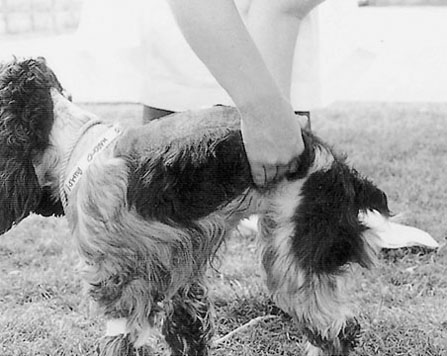
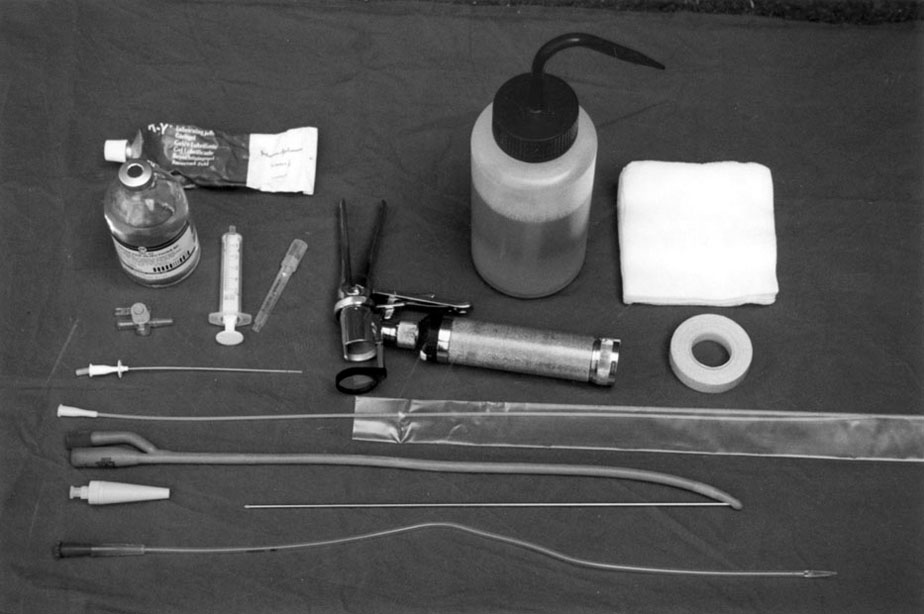
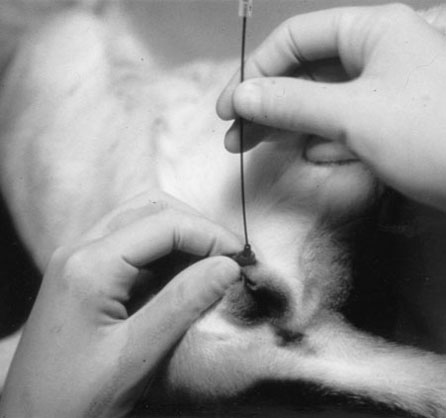
1. Action: Observe the patient in its kennel and record any abnormalities. Rationale: Handling the patient will involve some stress, which may influence clinical signs. 2. Action: Remove the patient and place in a comfortable position suited to a full examination. 3. Action: Ask an assistant to reassure and restrain the patient. 4. Action: Examine the patient starting at the cranial end, identifying any abnormalities, including discharges, wounds, lumps and painful areas. 5. Action: Temperature, pulse and respiration (TPR) parameters should be taken at this time. 6. Action: Record all findings on the patient’s hospital card. 1. Action: Staff should be allocated solely to the isolation facility and not allowed to nurse patients in the general ward. 2. Action: Personal protective clothing such as disposable gloves, aprons and foot covers should be worn. This should be placed in the clinical waste after use. 3. Action: Patients who are most likely to spread disease should be cleaned out and treated after all other patients in the isolation facility. 4. Action: Each patient in the isolation facility should be allocated its own equipment, i.e. food bowl, water bowl, litter tray. This should be washed and disinfected, or sterilized separately from others. Bedding should all be disposable and should be placed in the clinical waste. 5. Action: All findings must be recorded on the patient’s hospital sheet. Report all abnormalities to the veterinary surgeon. Barrier nursing notices should be displayed. • Examples of uses include emptying the rectum, as a diagnostic aid or to administer drugs. • Examples of solutions used: water (rectal lavage), soapy water (soap flakes), oily substances (such as liquid paraffin/mineral oil), phosphate enemas (proprietary brands). For cats a proprietary mini-enema is usually the product of choice. 1. Action: Prepare all equipment – including enema solution at body temperature (and associated tubing, catheters, Higginson’s syringe as required), disposable gloves, aprons and absorbent tissue. Lubricant will also be required. 2. Action: Restrain the patient in a suitable environment – near to an outside door. Two members of staff will be required for this procedure and should wear gloves and aprons to prevent contamination. Place the patient in a standing position. 3. Action: The end of the tubing to be inserted into the rectum should be lubricated before insertion. The assistant should raise the patient’s tail and the anal area should be cleaned with some warm water to remove any faecal material or debris. 4. Action: Place the end of the tubing in the patient’s anus and gently twist until it is in the rectum. The enema solution should be introduced slowly either by gravity or by pump depending on the method used. The solution may be administered until a back flow is seen. 5. Action: Once the solution has been delivered, the dog should be allowed free access to a run area to evacuate its bowels. 6. Action: When bowel evacuation is complete, the patient should be cleaned appropriately and a note made of the amount and type of excreta passed. • Examples of procedures include short-term catheterization to obtain a sterile urine sample, or indwelling catheterization, useful in recumbent patients. • Examples of catheter types include conventional plastic or Foley silicone dog catheters (Fig. 3.1). 1. Action: Prepare all the equipment, including sterile catheter and any application equipment, e.g. stylets to assist with introduction, lubricant, disposable gloves, apron, sterile sample container or collecting vessel such as a kidney dish, syringe, three-way tap or bung. If measurement of urine output and input is required, a urine collection bag will need to be prepared. Absorbent material such as swabs/tissue will be useful and suture material may be required for indwelling catheters. 2. Action: The assistant should restrain the patient on the examination table. Gloves and aprons should be put on. The preputial area should be cleaned and the penis extruded. 3. Action: Remove the catheter from its outer packaging and cut the end from the inner packaging, which is used as a feeder sleeve. 4. Action: The catheter tip should be lubricated, introduced into the urethra and then advanced using gentle pressure. Urine will flow back down the catheter when the bladder is reached and may require collection. The bladder may need flushing depending on the procedure to be carried out. Suturing or sticking the catheter to the prepuce will be required if the catheter is to be indwelling. 5. Action: Remove the catheter slowly and dispose of it correctly. Clean and dry the patient before returning it to its kennel. • Examples of procedures include short-term catheterization such as to obtain a sterile urine sample, or indwelling catheterization useful in recumbent patients. • Examples of catheter types include Foley indwelling bitch catheters and Tiemann catheters for the bitch. A vaginal speculum (sterile) will be required unless the insertion is to be carried out using the sterile digital method (Fig. 3.1). 1. Action: Prepare all the equipment, including sterile catheter and any application equipment (such as vaginal speculum and stylets to assist with introduction if required), lubricant, disposable gloves, apron, sterile sample container/collecting vessel (such as a kidney dish), three-way tap or bung. If measurement of urine output and input is required, a urine collection bag will need to be prepared. 2. Action: Put on gloves and an apron. Ask the assistant to restrain the patient, either in lateral or dorsal recumbency, or in a standing position depending on the insertion method used. If the catheter is to be inserted using the digital method, sterile gloves should be worn by the person carrying out the procedure. 3. Action: The vulval area should be cleaned and free from debris. Rationale: Cleaning the area will prevent introduction of infection to the urogenital tract. 4. Action: The catheter should be removed from its outer wrapping, exposing the tip from the inner sleeve, and lubricated. Do not use petroleum-based lubricants on latex catheters. If using a Foley catheter the stylet should be placed and the balloon checked for easy inflation (Fig. 3.1). 5. Action: Place the speculum blades between the vulval lips. If working with the patient in dorsal recumbency, the blades should be inserted as far caudally as possible, then the speculum should be inserted vertically into the vestibule, turning the handles cranially. If working with the patient standing, the speculum should be inserted at a slight angle towards the spine, then horizontally. Rationale: In dorsal recumbency the blades should be inserted to avoid the clitoral fossa. 6. Action: Once the speculum is in place, open the blades and identify the urethral orifice. 7. Action: If using the sterile digital method, the first finger of one hand (usually the non-writing hand) should be lubricated and placed into the vestibule, feeling along the ventral surface for a raised area. 8. Action: The tip of the catheter should be inserted into the urethral orifice and gradually advanced until it reaches the bladder. 9. Action: If a Foley catheter is to be indwelling, the balloon should be inflated, the stylet removed and a collection bag attached. An Elizabethan collar may be used. 10. Action: When the appropriate procedure has been completed, remove the catheter slowly, having first deflated the balloon in the Foley catheter, and dispose of it correctly. Ensure that the patient is clean and dry before being returned to its kennel. • Examples of procedures include short-term catheterization to obtain a sterile urine sample, indwelling catheterization useful in recumbent patients, or hydropropulsion – using water pressure to dislodge blockages. • Examples of catheter types include conventional cat catheters, Jackson and silicone catheters for use in the cat. 1. Action: Prepare all the equipment, including sterile catheter and any application equipment, e.g. stylets to assist with introduction if required, lubricant, disposable gloves, apron, sterile sample container or collecting vessel (such as a kidney dish), three-way tap or bung. If measurement of urine output is required, a urine collection bag will need to be prepared. 2. Action: Put on gloves and apron. Position the cat in lateral or dorsal recumbency, ensuring that the tail is out of the way. Rationale: In this position the perineal area and the penis can be easily accessed. 3. Action: Remove the catheter from its outer packaging and cut the end from the inner packaging, which is used as a feeder sleeve. Lubricate the tip of the catheter. 4. Action: Extrude the penis by applying gentle pressure on either side of the prepuce, and introduce the catheter into the urethra (Fig. 3.2). If a Jackson cat catheter is used, remove the metal stylet. Rationale: Gentle preputial pressure should result in extrusion of the penis. 5. Action: Continue with the procedure – collection of sample, drainage of bladder, hydropropulsion, etc. 6. Action: Remove the catheter slowly and dispose of it correctly. Return the cat to its kennel when it is clean and dry. • Examples of procedures include short-term catheterization to obtain a sterile urine sample, indwelling catheterization useful in recumbent patients or hydropropulsion – using water pressure to dislodge blockages. • Examples of catheter types include conventional cat catheters, Jackson and silicone catheters for use in the cat. 1. Action: Prepare all the equipment including sterile catheter and any application equipment, e.g. stylets to assist with introduction, lubricant, disposable gloves, apron, sterile sample container or collecting vessels such as a kidney dish, three-way tap or bung. If measurement of urine output is required, a urine collection bag will need to be prepared. 2. Action: Put on gloves and apron. Restrain the cat and ensure that the tail is also restrained. Rationale: Restrain the cat either in a standing position or in lateral recumbency. 3. Action: Remove the catheter from its outer packaging and cut the end from the inner packaging, which is used as a feeder sleeve. Lubricate the tip of the catheter. 4. Action: Place the catheter between the vulval lips and introduce into the urethra by angling the catheter ventrally, using gentle pressure until the catheter enters the urethral orifice. 5. Action: Continue with procedure – collection of sample, drainage of bladder, hydropropulsion, etc. 6. Action: Remove the catheter slowly and dispose of it correctly. Return the cat to its kennel when it is clean and dry. Manual expression of the bladder may be required in recumbent patients or those suffering from bladder paralysis. Natural elimination of the bladder is preferable to urinary catheterization but it should not be attempted where there is any possibility of urethral obstruction. 1. Action: Put on gloves and apron and prepare urinary collection equipment (if required) and absorbent tissue. 2. Action: An assistant should restrain the patient in a standing position in a suitable area that is clean and easy to disinfect. 3. Action: Isolate the bladder by palpation of the caudal abdomen and place one hand either side of it on the external abdominal wall. 4. Action: Apply gentle pressure to the abdominal wall on either side of the bladder to encourage urination. Urine should flow freely and be directed into a collection container (Fig. 3.3). Do not be tempted to squeeze the bladder – if there is any resistance and no urine flow, stop the procedure. 5. Action: When the flow ceases release the pressure. Measure the volume; note its colour, turbidity, smell and the time it was passed. Record your results on the patient’s hospital record. 6. Action: Ensure that the patient is clean and dry before replacing it in its kennel. All areas where urination has occurred should be cleaned and disinfected and disposable clothing placed in the clinical waste.
Medical nursing procedures
INTRODUCTION
Procedure: General examination of the dog or cat
Procedure: Barrier nursing – avoidance of cross-infection
Procedure: Application of an enema (dogs)
Procedure: Catheterization of the dog
Procedure: Catheterization of the bitch
Procedure: Catheterization of the tomcat
Procedure: Catheterization of the queen
Procedure: Manual expression of the bladder

![]()
Stay updated, free articles. Join our Telegram channel

Full access? Get Clinical Tree


