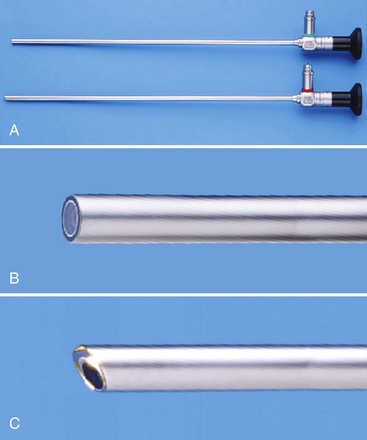
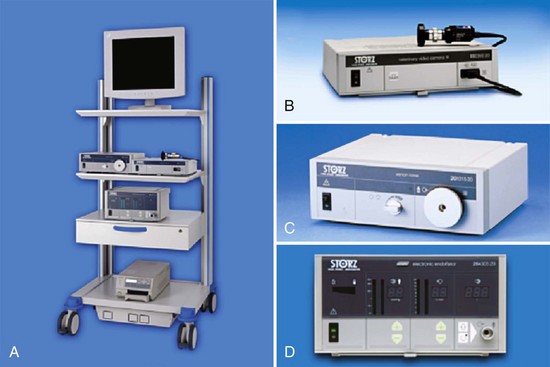
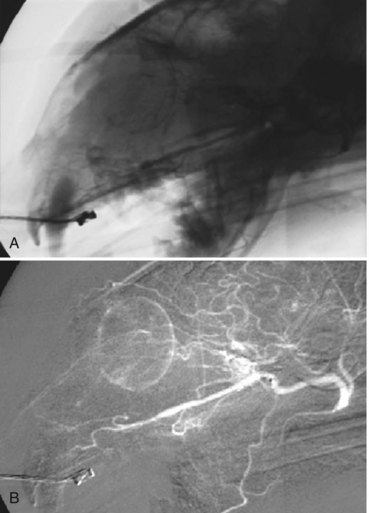
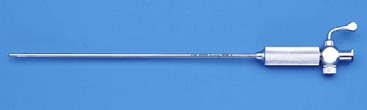
Equipment for Minimally Invasive Surgery

Chapter 24


Equipment for Minimally Invasive Surgery


Laparoscopy and Thoracoscopy


Laparoscopic and thoracoscopic techniques provide minimally invasive access to the abdominal and thoracic cavities, respectively. They allow diagnostic evaluation of various organs and tissues and provide an ever growing armamentarium of therapeutic interventions to be carried out through small port incisions. The need for “open” surgical access to body cavities is thus obviated, resulting in less pain14,47 and a more rapid return to normal activity,12,29 as well as a lower rate of postoperative wound infection in clean and clean-contaminated wounds.30 Other advantages have been demonstrated in studies of these techniques when used on human beings, although many of these techniques remain to be studied in veterinary patients.


Performing minimally invasive surgery successfully relies heavily on patient selection and adequate training, but equally important is using equipment of good quality. Attempting these procedures without the correct equipment might compromise the safety of the patient and can be very frustrating for the surgeon.


Before a minimally invasive procedure is performed, it is important that owners are informed of the possible need to convert to an open approach if the need arises. It is therefore essential to have regular instrumentation for open surgery available on the operating room table should conversion to open surgery become necessary.


Interventional Radiology/Interventional Endoscopy


Diagnostic angiography has played an important role in human radiology since percutaneous arterial access was described by Seldinger in the 1950s.41 Since that time, advances in imaging technology and medical devices have transformed a once purely diagnostic modality into a widespread and evolving therapeutic subspecialty of human medicine with constantly expanding potential. Interventional radiology is defined as the use of these contemporary imaging modalities to gain access to different structures throughout the body to deliver therapeutic materials for a variety of conditions. Interventional endoscopy uses endoscopes instead of, or in addition to, fluoroscopy to facilitate access into different structures, most commonly through natural orifices. Interventional radiology and interventional endoscopy techniques have provided therapeutic options for diseases once deemed untreatable and have even become considered the standard of care for a variety of human conditions.


Similar potential can be found in veterinary medicine; however, limitations in imaging equipment, lack of access to training, and material expense have hindered routine use of these procedures until recently. Similar to other forms of minimally invasive surgery, interventional radiology and interventional endoscopy have the potential to reduce perioperative morbidity and mortality rates and to shorten anesthesia times and hospital stays; procedures that are less equipment-intensive can also reduce procedure costs. Although these benefits of interventional radiology and interventional endoscopy have been clearly demonstrated in a variety of human settings, similar studies have not been performed routinely in veterinary medicine to date. The real benefit of these procedures is not simply that they replace more invasive and complicated surgical procedures with excessive associated morbidities, but rather that they provide options to patients for whom standard traditional therapies have been declined because of excessive morbidity, or in whom these treatments have failed or have been associated with poor outcomes. Disadvantages of these techniques are mostly relative but include the required technical training that is not yet routinely available in most veterinary programs and the considerable expense and investment in capital equipment required to perform these procedures, as well as the inventory of guide wires, sheaths, catheters, balloons, stents, and embolics that needs to be maintained.


Equipment


Operating Rooms/Angiography Suites


As the volume of ancillary equipment used in operating rooms increases, so do the size requirements of those operating rooms. For minimally invasive surgery, it is imperative that the room is large enough to house the tower (multitiered cart; see later) in a location that is far enough away from the operating table so as not to interfere with sterility of the surgical field. In most cases, it is also important to be able to move the endoscopy tower around the patient for many procedures in which different parts of a body cavity might need to be explored. Operating rooms measuring 175 to 200 square feet or larger should allow the use of an endoscopy tower with relative ease, although significantly larger operating rooms may be needed if the tower is to be used in conjunction with other modalities such as intraoperative fluoroscopy (C-arm), lithotripters, lasers, or vessel-sealing systems. Fully integrated hybrid operating theaters are not routinely available in veterinary medicine, but the flexibility provided when procedures are performed may encourage their introduction.


Imaging: Rigid Telescopes


The telescope allows transmission of the visual image from the surgical site to the camera. The quality of telescopes has risen rapidly in recent years, especially with the introduction of the rod lens system. These telescopes use a series of glass lenses arranged in a narrow tube to transmit light. Important variables to consider when choosing a telescope include its diameter, length, and angulation at the tip. Probably the most versatile telescope for laparoscopy and thoracoscopy in small animals is the 5 mm diameter telescope. This is adequate for most dogs and cats. Larger, 10 mm telescopes, often inherited from human medicine, are also used routinely but are larger than necessary for small-animal patients. A smaller, 3 mm diameter, 14 cm long telescope (Karl Storz GmbH & Co. KG, Tuttlingen, Germany) or a traditional 2.7 mm arthroscope can be used for smaller dogs and cats. When telescopes smaller than 3 mm are used, it is recommended that a sheath be employed to avoid damage to the telescope from torque placed on the lens during procedures. Telescopes smaller than 3 mm usually do not provide adequate light transmission within the peritoneal or thoracic cavity of larger animals; they are used more commonly for cystoscopy or rhinoscopy. The 5 mm telescope is available in a variety of lengths, but the 29 cm telescope generally is adequate for exploration of the thorax and abdomen in even the largest dogs.


Angulation of the tip of the telescope dictates the direction of the field of view. The 0 degree telescope will provide an image of what lies directly in front of the tip of the scope, which is adequate for most abdominal procedures. The 30 degree telescope provides a view that is offset by 30 degrees. Although these telescopes are somewhat more difficult to manipulate initially, they are helpful in that rotation of the light post (and therefore the telescope) allows a greater field of view (Figure 24-1). In addition, angled telescopes allow the operator to view spaces that might be difficult to maneuver the scope into otherwise, such as around the lung, heart, or liver lobes. This feature is especially helpful when procedures are performed in the thoracic cavity, making a 30 degree telescope an ideal choice for thoracoscopy. Telescopes with more acute angulations are available but are used less commonly.


Rigid cystoscopy is commonly performed in female animals (dogs and cats) to facilitate urethral, urinary bladder, and ureteral access. Recommended telescope diameters range from 1.9 to 6.5 mm, depending on the size of the patient. Similar scopes are used for antegrade rhinoscopy. The scope sheath has a smooth rounded edge to protect the mucosa and provides three ports: (1) fluid irrigation, (2) fluid drainage, and (3) a working channel for interventional procedures (e.g., biopsy, needle injection, basket retrieval, laser fibers, guide wires, stents). The 30 degree angle of view is the most commonly used in veterinary medicine; it allows excellent viewing of the nasal cavity and bladder wall, as well as the ureteral orifices. Image quality is significantly different with each telescope, and the best quality is associated with the larger, more rigid telescopes, rather than the smaller, more flexible ones. Typically, flexible endoscopes are used for cystoscopy in male dogs (see later).


Imaging: Cameras


In the past, many veterinarians viewed endoscopic images through the eyepieces of flexible and rigid endoscopes. Although this approach may be adequate for some indications such as otoscopy, it is not practical for performance of minimally invasive surgical procedures. Video endoscopy therefore is mandatory when laparoscopy and thoracoscopy are performed, to allow the surgeon unimpeded viewing and the freedom to move around the patient during the procedure. The basic equipment needed for laparoscopy and thoracoscopy is usually housed on a multitiered cart that is often referred to as the “tower” (Figure 24-2). Basic components mounted on the tower include the monitor, camera control box, light source, and insufflators, along with data recording devices. The image that is transmitted through the lenses of the telescope is captured by the camera and turned into a video image. The camera attaches to the head of the telescope and has a cord that feeds into the camera control box housed on the tower. The quality of the endoscopic video camera depends on the camera control unit or “chip.” One-chip cameras use a single computer chip to process the colors the camera sees, whereas with a three-chip camera, each chip processes a separate primary color, namely, red, green, or blue. One-chip cameras are satisfactory for most applications, but three-chip cameras provide superior optical clarity and color reproduction with images of photographic or broadcast quality. Alterations of the focus and the field of vision size are usually controlled by rings located on the camera head; more modern cameras allow the operator control of multiple functions such as white balance, other menu alterations, and image and video recording via buttons also located on the camera head.


Imaging: Tower Components


The Light Source


Modern light sources are usually powered by halogen or xenon. Xenon is preferable, as it emits a high intensity light that reproduces the color of natural light closely. Light sources between 150 and 300 watts are recommended to ensure good picture quality. Care of the fiberoptic light cable is also essential for optimal performance, because if the fibers break or the tips are not regularly cleaned, image quality will suffer. Care should always be taken to know where the tip of the telescope or light cable (when not attached to the telescope) is while the light source is fully powered. When one is resting on the table adjacent to drapes or body cavities or against tissues, thermal burns can occur rapidly. When it is not directly in use, the power to the light source should always be turned down.


The Insufflator


During laparoscopy, a mechanical insufflator regulates the flow of gas (usually carbon dioxide [CO2]) into the abdomen during creation of a pneumoperitoneum. A pneumoperitoneum allows the working space necessary to manipulate instruments and organs during laparoscopic procedures. During thoracoscopy, working space is created by formation of a pneumothorax, which occurs when air passes into the thoracic cavity through thoracic cannulas. The rigidity of the ribs prevents collapse of the thoracic wall during thoracoscopy, and so in most cases, no insufflation is required. Open cannulas, which allow air to pass into and out of the thoracic cavity freely, can be used for thoracoscopy. Insufflation can be used to increase the working space during thoracoscopy but is less well tolerated than a pneumoperitoneum; even 3 mm Hg pressure in the thoracic cavity causes significant cardiorespiratory depression.13 Insufflation is therefore used infrequently for thoracoscopic interventions.


Modern insufflators allow monitoring of pressure within the abdominal cavity and prevent pressure rises above preset levels. In dogs, intraabdominal pressure of 15 mm Hg is considered to result in physiologically acceptable levels of cardiorespiratory depression, while providing more than adequate working space in most patients.15 Intraabdominal pressures of 8 to 10 mm Hg generally provide adequate working space in most dogs and cats.


Insufflation hosing transmits the gas from the insufflator unit to the body cavity via the cannula. This hose should contain an inline microporous filter to prevent particulate matter or bacteria from passing from the gas cylinder into the patient, or conversely to prevent bodily fluids from moving in the opposite direction and contaminating the insufflator. Retrograde flow can occur when the CO2 canister is depleted intraoperatively, and pressure in the body cavity drives fluid retrograde along the hose.16 Movement of fluid in this manner can ultimately result in insufflator damage and cross-contamination of the next patient in whom the unit is used.


Carbon dioxide is the most widely used insufflation gas in veterinary medicine. It does not support combustion as nitrous oxide (N2O) does, and it can therefore be used with various forms of electrocautery. It is cheap and colorless and is rapidly excreted from the circulation. Because of its high solubility, it is unlikely to form gas emboli. However, evidence now suggests that CO2 has detrimental effects on cellular, hormonal, and immunologic functions; this has led some surgeons to investigate the use of helium and other gases for insufflation.33 It is hypothesized that helium causes fewer changes in cardiorespiratory and immunologic status when compared with CO2.33


The Monitor


Usually located at the top of the “tower,” a high quality medical grade cathode ray tube or flat panel monitor is essential for clear viewing of structures; it should be large enough that the surgeon can see images from across the surgical table. Ideally, multiple viewing monitors should be placed on opposite sides of the operating room, as is commonplace in modern, integrated, minimally invasive operating suites in human hospitals. The principal benefit of multiple screens is that each operator can view the monitor directly across from where he or she is standing, irrespective of position in the operating room. Similarly, if one surgeon wants to move to the other side of the patient, it will still be possible to maintain a straight viewing axis between the operator, the lesion/organ being operated, and the monitor. If this orientation is not maintained, hand-eye coordination is significantly compromised, often leading to increases in surgical time and possibly to an increased chance of iatrogenic damage to tissues. Because of the cost limitations of multiple viewing monitors, it is commonplace to have only one monitor located at the top of the tower. When this is the case, it becomes important to consider optimal tower location for any given procedure during preoperative planning. This minimizes the need for cumbersome intraoperative relocation of the tower, while maximizing maintenance of the straight line viewing axis previously discussed.


Imaging: Fluoroscopy


Fluoroscopy is an essential tool for performing interventional radiology procedures. The units most commonly found in veterinary hospitals include multipurpose units (fixed, stationary units with radiography capabilities) and mobile C-arms (smaller units that can rotate around a patient, providing tangential views but sacrificing the power and image quality of the fixed units). Larger floor-mounted or ceiling-mounting C-arms combine the flexibility of the C-arm with the power of the stationary unit, but they are significantly more expensive, and their availability in veterinary hospitals remains limited. When the more common mobile C-arms are used in surgical suites, it is important to have a radiolucent table. Some standard operating room tables are thin enough to permit fluoroscopy when the patient is small and is placed at the end of the table. Alternatively, the C-arm and the patient may be positioned such that imaging can be performed in lateral fashion across instead of through the table. If possible, carbon fiber or Plexiglas tables can be used to facilitate fluoroscopy in the operating room. More expensive fluoroscopy tables are equipped with a “floating” tabletop configuration to facilitate patient positioning without moving the bulkier C-arm.


Radiation exposure can be substantial during prolonged interventional procedures, so the operator should review radiation safety guidelines and reduce exposure as much as possible. Nonessential personnel should not be in the suite during fluoroscopy, particularly when “runs” (a series of rapidly recorded images) are performed, as radiation exposure levels are often increased. Proper protective shielding should be worn at all times, preferably with double shielding used in front when possible, and placing one’s back to the machine during exposures should be avoided. Radiation badges should be worn and regularly evaluated to monitor for increased exposure.


Standard fluoroscopy is acceptable for most of the more common respiratory, urinary, and gastrointestinal procedures; however, digital subtraction angiography is recommended for vascular procedures, particularly when performed in small caliber vessels with overlying structures such as bone and gas-filled intestine. Digital subtraction angiography is a computer software processing program that permits taking an initial noncontrast fluoroscopic image (the “mask”) and subtracting it from every subsequent image during a “run,” or series of recorded images. This permits improved vascular imaging and resolution without overlying structures obscuring the view, and allows the operator to access smaller structures more reliably without excessive amounts of contrast material (Figure 24-3). “Roadmapping” capabilities on some systems permit saving these contrast studies and placing them over real-time fluoroscopy images to obtain an actual map for guide wire, catheter, embolic, or stent manipulations.


Laparoscopy/Thoracoscopy Instrumentation and Techniques


Principles of Abdominal Access: Veress Needle Technique


A Veress needle is a specialized instrument used for creation of a pneumoperitoneum or pneumothorax (Figure 24-4). It consists of a sharp-tipped needle component that houses within it a blunt-tipped obturator loaded on a spring-like mechanism.46 The sharp component of the needle will penetrate the body wall, whose resistance will force the blunt obturator to retract into the shaft. Upon penetration of the body wall, however, resistance is lost, allowing the blunt-tipped obturator to spring forward, thereby shielding the abdominal viscera from injury.


To place the Veress needle, a small, 2 mm skin incision is made just cranial to the umbilicus, and the needle is introduced by holding the outer hub of the needle so that the internal blunt obturator is freely movable. Before the abdomen is insufflated, a “hanging drop test” is performed to confirm the position of the Veress needle within the peritoneal cavity. A drop of saline is placed on the hub of the needle; if the needle is within the peritoneal cavity, the negative pressure of the cavity will pull the saline into the needle, whereas if the needle is in the subcutaneous space or has penetrated an organ, no pressure difference will exist, and the saline will remain on the hub. Once entry into the abdominal cavity has been confirmed, the hub of the needle is attached to the gas insufflator to produce a pneumoperitoneum. After the abdomen is insufflated to approximately 8 to 10 mm Hg, the trocar-cannula assembly is introduced. A sharp trocar can be utilized to penetrate the peritoneal cavity, as the pneumoperitoneum will help prevent injury to the abdominal organs. The trocar should be grasped so that the surgeon’s index finger is near the tip of the trocar-cannula unit. If the trocar is grasped firmly using this grip, then as the trocar penetrates the abdominal wall, the index finger will contact the external surface of the body wall, and this will prevent inadvertent deep penetration of the trocar into the abdominal cavity.


Principles of Abdominal Access: Hasson Technique


The modified Hasson technique avoids the blind introduction of a sharp needle and cannula into the peritoneal cavity. It is performed by making a 1 cm skin incision just caudal to the umbilicus; this is followed by blunt dissection to the linea alba. A 3 to 4 mm incision is made through the linea alba, and a trocar-cannula assembly is introduced into the peritoneal cavity. A blunt-tipped trocar should be used to prevent injury to the abdominal organs. Penetration into the peritoneal cavity can be confirmed by observation of falciform fat through the incision before insertion of the trocar. The insufflator line is attached to the cannula, and the abdomen is insufflated. Upon establishment of a pneumoperitoneum, the abdominal cavity should become tympanic. Improper placement of the Veress needle or cannula can cause inadvertent insufflation of the subcutaneous space, resulting in subcutaneous emphysema. Further evidence of improper placement is demonstrated on the insufflator: If initial pressure within the peritoneal cavity is high (>6 mm Hg) and flow of CO2 is low, this suggests that the end of the trocar might not be positioned within the peritoneal cavity.


Principles of Thoracic Access


The major difference between access to the thoracic and peritoneal cavities is that with thoracoscopy, there is no need for insufflation because the ribs form a rigid frame that maintains a working space for the surgeon. For this reason, there is also no need to maintain a tight seal around cannulas that are placed into the thoracic cavity. Access into the thoracic cavity can be initiated with a Veress needle to allow a pneumothorax to develop, or a cannula without a diaphragm can be placed directly into the thoracic space; this allows air to enter when the trocar penetrates. Once the first cannula has been positioned, the telescope enters the chest, and additional instrument ports can be placed as needed under visual guidance. Some procedures can be performed just by using the visual access created by formation of a pneumothorax. When more advanced interventions are performed that require viewing of certain areas within the thoracic cavity, other techniques may have to be employed, such as one-lung ventilation or thoracic insufflation. Thoracic insufflation is not well tolerated even at low intrathoracic pressures.13 One-lung ventilation can be achieved in a variety of ways, including the use of bronchial blockers, selective intubation, or double-lumen endobronchial tubes.


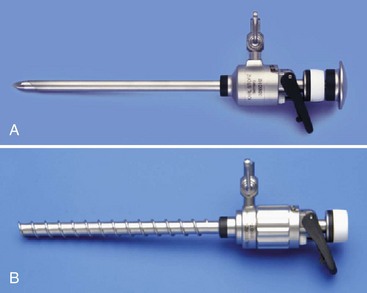
Trocars and Cannulas


Establishing access ports with the use of cannulas is essential for laparoscopic and thoracoscopic procedures to allow atraumatic repeated instrument exchanges. For laparoscopy, and in thoracoscopic cases where insufflation is used, maintenance of an airtight seal to prevent leakage of insufflation gas during laparoscopy is also accomplished by using cannulas. During thoracoscopy, if no insufflation is used, cannulas are, in theory, not essential, as an airtight seal is unnecessary. However, cannulas should still be used to avoid iatrogenic damage to the body wall or lungs as instruments are repeatedly inserted.


A large variety of sizes and designs of trocars and cannulas are available (Figure 24-5). Choices to be considered include single-use disposable versus resterilized nondisposable cannulas, blunt versus sharp trocars, and trocar-cannula assemblies versus trocar-less cannulas. Single-use disposable cannulas are generally made of lightweight plastic and are unlikely to slide out of port incisions—a common occurrence in small dogs and cats.


Some disposable cannulas have universal access seals that make changing instrument diameter (from 5 to 12 mm) easy and obviate the need for reducer caps. Some also have shielded trocars that can reduce penetration injury to abdominal or thoracic organs. Disadvantages of nondisposable cannulas include their heavy weight and the possibility that sharp-tipped cannulas may become dull over time. Changing instrument size intraoperatively is somewhat cumbersome, as reducer caps are required to ensure that a seal is maintained. The principal advantage of resterilized cannulas is the cost reduction. Resterilization of single-use cannulas intended for use in people is controversial, as the cannulas can be challenging to clean adequately and resterilize.


Blunt trocars should always be used during establishment of the first (camera) port to avoid iatrogenic damage to underlying organs before establishment of a pneumoperitoneum or pneumothorax. Instrument ports can then be established safely by using sharp-tipped trocars that can be placed under direct viewing from within the body cavity. Trocar-less threaded cannulas (Endotip, Karl Storz, GmbH & Co. KG) are popular for use in small animals. These blunt-tipped threaded cannulas are screwed into position and are well retained by the body wall because of threads present on the cannula shaft. They allow the laparoscope to be inserted into the cannulas during placement for observed penetration of the body cavity during entry.

< div class='tao-gold-member'>

Stay updated, free articles. Join our Telegram channel

Jul 18, 2016 | Posted by in PHARMACOLOGY, TOXICOLOGY & THERAPEUTICS | Comments Off on Equipment for Minimally Invasive Surgery

Full access? Get Clinical Tree

Get Clinical Tree app for offline access