Camelid Management, Handling Techniques and Facilities, and Herd Management
Containment versus Restraint
Restraint is the act of holding back or the loss of freedom. As an example, injections or other medical procedures often begin when the animal is tied up, pushed against a wall, tied in a chute, or held still. Restraint is applied before the procedure begins. The animal fights restraint. Handlers react by using more restraint, and the animal fights harder. All this fighting occurs before the needle touches the animal’s skin, so the procedure cannot be the issue. It is the restraint that provokes the fight. For the animal, most herd management procedures pale in comparison with the ordeal of being physically subdued by humans. Most camelids will accept routine procedures without restraint if given the opportunity and if they feel safe.
Chuting the Camelid
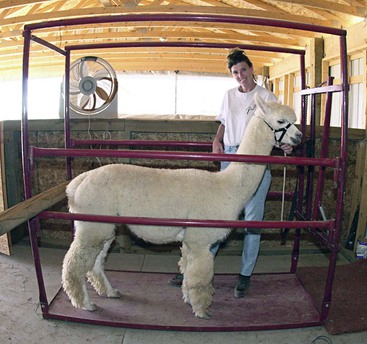
Upright shoulder supports are humane, safe, and very useful for certain procedures that involve the head and neck (Figure 7-2). When the shoulder supports are not needed they should be tied together, and the animal should be placed kitty-cornered in the chute. If the shoulder supports are not used, a front gate should be put on the chute to discourage the animal from pushing forward past the supports to escape out the front of the chute. Shoulder supports limit movement in the front half of the body without restraining the head.
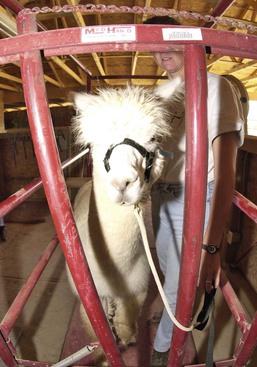
A rear barrier is the key to using a chute for containment rather than restraint. The animal is restricted to the chute by virtue of the butt board in the back and the gate or shoulder supports in front, so the animal does not need to be tied (Figure 7-3). This is a very important modification that the author considers essential for all chutes. When using a rear barrier, it is not necessary to tie the llama or alpaca in the chute. A handler may stand at the front of the chute, offer food and prevent the animal from turning with signals on the lead rope. When the handler is working alone, the animal should be tied in the chute with enough slack in the rope so that the animal can back up and touch the rear barrier. In this way, the rear barrier stops the animal before it runs out of rope and panics. A butt board or rear restraint changes this restraint chute into a container, and the handler will not need to take the time to catch, halter, or lead the animals into a chute. To be effective for containment rather than restraint, a chute must have a butt board.
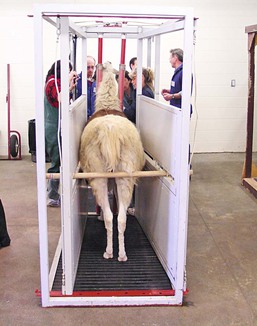
Figure 7-3 A rear barrier is key to containment. The animal is restricted to the container by the rear barrier and not tied by the head.
Camelids are much less likely to panic if restricted to the chute from the back. If tied in a chute without a rear barrier, most camelids lean back on the rope at first and remain balanced against the rope. When the procedure begins, they struggle and may leap forward into or through the shoulder supports. Alternatively, they lean back on the rope with the head high and the back dropped in a very uncomfortable position.
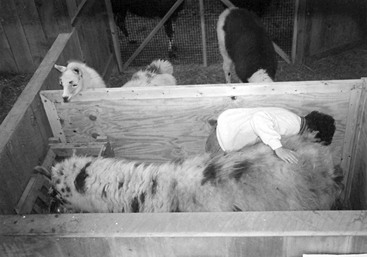
The Mini-Catch Pen
The ideal mini-catch pen is built into the corner of the catch pen or another convenient place in the barn. A mini-catch pen may be wider and longer than a chute, allowing more freedom for the animal and comfort for the handler. A sturdy box, 4 × 6 feet, seems to be an ideal size for llamas and 3 × 4 feet for alpacas. Cutouts on the side are a great feature allowing smaller animals to see out. A feed dish and a hay manger, which fits inside the end of the mini-catch pen so that the animal can stand comfortably and eat, will complete the set up (Figure 7-4). The mini-catch pen is also a very useful tool for initial handling of untrained crias and weanlings. A standard size catch pen is too large for them because of their small size. A mini-catch pen may be used in place of a standard catch pen for teaching balance and halter acceptance.
The Neck Wrap: Putting It on and Taking It off
A neck wrap is an elastic wrap that begins at the base of the neck, continues in a crisscross fashion, and ends just below the ears, where it is fastened. The neck wrap is particularly useful for routine medical procedures, but it is also useful for animals that cannot settle down in the catch pen or as support for the first leading lesson outside the catch pen. Why this tool or technique works so effectively with camelids is a bit of a mystery, but it likely has to do with the length of these animals’ necks. Keeping an animal in balance is key to helping them remain calm. When the head is used as the point of connection and control, the length of the neck makes this difficult. The length and flexibility of the neck allow the animal to move its body freely even when restrained by the head. The neck wrap, however, creates a physical connection between the head and the rest of the body, and this settles the animal. The neck wrap may go on at any time during the handling or training process. It can be used inside the catch pen, inside the mini-catch pen, or outside anywhere. Always put the neck wrap on inside a confined area. If the handler intends to leave the catch pen with the animal, the neck wrap should be placed on the animal in the catch pen prior to leaving. If the handler and animal are outside the catch pen and the handler decides that the animal might benefit from a neck wrap, the animal should be led back to the catch pen to put it on.
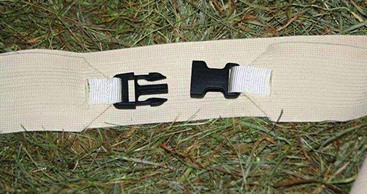
The author’s preferred neck wrap is a sturdy elastic wrap that features a fastex buckle at the end and is long enough to accommodate all sizes of animals (Figure 7-5). Smaller animals may end up with more wraps and larger animals with fewer wraps, but it does not seem to make much of a difference in terms of effectiveness. What is more important is that the wrap be snug enough to be felt along the length of the neck.
Begin by rolling the two ends of the neck wrap toward each other and meeting half way (Figure 7-6). This work should be done in a small space and the animal should be allowed to move as the wrap is placed. Alternatively, a second person can be used to help steady the animal as the handler works. Sometimes veterinarians may use a neck wrap for drawing blood from the jugular vein if the area for the venipuncture is left uncovered.
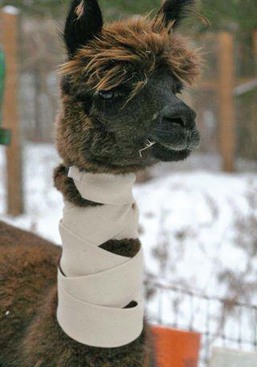
Figure 7-6 This animal is wearing a neck wrap. Begin wrapping at the base of the neck ending up at the top of the neck.
Trimming Toenails or Teaching the Camelid NOT to Pick up Its Feet
Why would anyone want to teach an animal not to pick up its feet? Trimming toenails, without a doubt, is the most problematic of management chores. Something could and should be done differently to make it easier for camelids to accept having their nails trimmed.
Some of the possible explanations for the difficulty of toenail trimming are as follows:
1. Camelids use their legs as their primary means of defense, that is, to run from what could be dangerous.
2. Male camelids bite the legs of other male camelids as part of a ritualized dominance process.
3. Males bite the legs of females to encourage them to lie down for breeding.
4. The way handlers go about the process of trimming toenails of camelids could be the problem.
If the handler is working with a helper, his or her job is to act as a balance spotter, that is, to help keep the animal in balance while not restraining it. A light support with one hand under the jaw and the other in the groove that is just behind the bottom lip, which the author has named “the bracelet,” is an effective technique (Figure 7-7). If working alone in a small space with a single animal, the handler may hang a bag of hay or offer grain to create some incentive for the animal to stand.
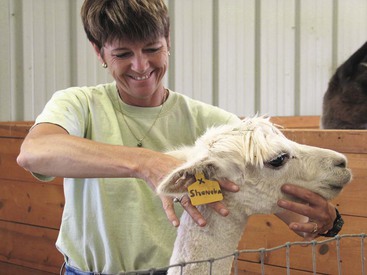
Figure 7-7 The bracelet is a very effective way of helping an animal remain in balance and therefore still. It is not a hold but a technique for using the head to keep the body in balance.
With the animal in balance, the handler should begin by standing next to the animal, facing its rear. The handler should place the hand or arm that is closest to the animal across the animal’s body. This allows the handler to manipulate the animal’s balance. The animal should place its weight on the leg that the handler is planning to work with. In this way, the animal learns to keep its foot on the ground—it is very difficult to pick up a foot with weight on it! Remember this is about teaching the animal to keep its the foot down, not picking it up. The animal will have to shift its weight before it can pick up the foot. With the handler’s hand across the animal’s back, the handler will feel the animal beginning to shift its weight and be able to correct it, and help the animal succeed (Figure 7-8).
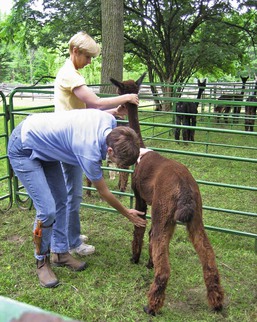
Figure 7-8 The two-handed approach for picking up feet is easier for the animal. One hand is on the top-line and the other on the upper part of the front leg.
Use the back of the other hand to make firm stroking motions, always beginning at the top-line and progressing down to just above the knee on the front leg and just above the hock on the back. Do not work slowly; each stroke should take a second or so. If at any time the animal begins to shift its weight, use the hand across the back to bring the weight back into neutral, and most important, bring the other hand back up to a place on the leg that does not create a reaction. The goal is to help the animal stand in balance without leaning toward the handler or leaning against the handler’s arm, and to teach the animal that you understand its body language. If the handler insists on moving on to a point that scares the animal and ignores early subtle indications of fear, the handler will push it to begin difficult behaviors that the handler is trying to avoid, such as picking up the foot, kushing, rearing, and so on.
Work with the rear legs in much the same way. Place the hand or arm closest to the animal across the back, and use it to guide the animal to shift its weight onto the leg that will be worked with (Figure 7-9). It is more difficult to work alone with the rear legs unless the animal is highly motivated by food. Be prepared that progress on the rear legs will be a bit slower. Remember that unless and until the animal is willing to stand quietly with the handler’s hand or arm resting across the back, the animal is not ready to move to the next step.
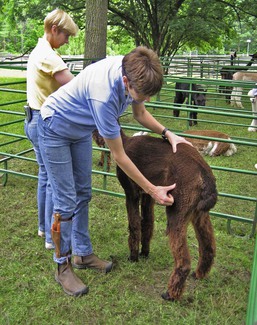
Figure 7-9 Using two hands, with one on the top-line, allows the handler to make the animal shift the weight on to the leg. In the case of the rear legs, this prevents unexpected kicking.
The two different elements to picking up a foot are as follows: (1) Now that the animal is not reflexively picking up its foot because of fear, the handler must get the animal to bend its leg and pick up the foot; and (2) Then the handler must help it shift its weight and keep its balance.
Most handlers go straight for the foot to pick it up. Although this would seem to make sense, the foot is the point on the body farthest from the center of mass and has the power to change the balance of the rest of the body. Assuming that the animal is standing in balance to begin with, the handler would be better served to choose a point on the leg closer to the center of mass. In this way, any movement made by the handler or by the animal will not be as likely to cause the animal to lose its balance. The handler can quite easily get the foot up off the ground by manipulating the upper leg of the animal (Figure 7-10). Moving the upper leg is easier for the animal to accept and also makes it easier for it to find and keep its balance. You should bear in mind how weight is normally distributed, as shown in Figure 7-11. Lifting a front leg obviously puts even more weight on the opposite leg as the animal cooperates.
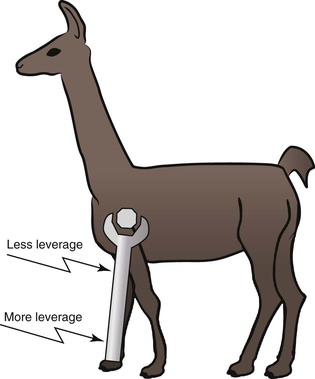
Figure 7-10 By using the upper leg, the handler is less likely to upset the animal’s balance, and for this reason, the animal feels safer.
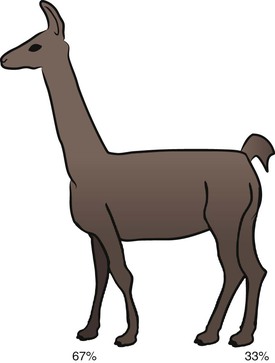
Figure 7-11 The average weight distribution for camelids is 67% carried over the front legs and only 33% over the back legs.
Now that the camelid is not automatically picking up its foot from fear, the handler must learn how to bend the animal’s knee. Learning to use a “ratcheting” signal is the key to bending the leg. The ratchet is a training technique for creating movement. The author uses a ratcheting signal for teaching an animal to lead and for getting it “unstuck” if it balks. Whatever the handler wishes to move—a leg, the head, or the whole body—the technique is the same. The author often ratchets an animal with her hip to move it around inside the catch pen. Look at the graphic representation of the three basic ways of giving a signal, as shown in Figure 7-12: (1) steady pull (or steady push), (2) tug-and-release (or push-and-release), and (3) ratchet.
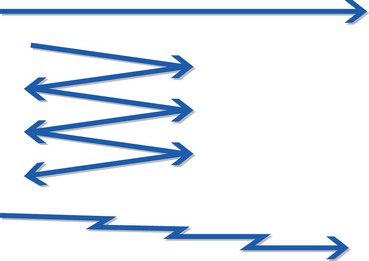
Figure 7-12 Force application options: direct, back and forth, and (the preferred) ratcheting. Top, All of the force in one direction. Middle, Application of force followed by total release. Bottom, Application of force with partial release resulting in movement (preferred approach to get movement).
Picking up a Front Leg
1. Put the left hand or arm on the top-line (first choice) or across the animal’s body on the opposite upper shoulder (Figure 7-13). The left hand will support the animal’s balance and help move its weight on to the left leg. The animal’s weight should be on the leg that is being worked with until the handler gets the right hand in place behind the front leg just above the knee.
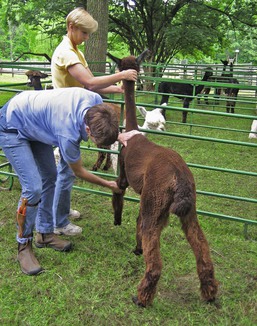
Figure 7-13 The handler is making the animal shift its weight to the front leg opposite to the leg being lifted.
2. Once the hand is in place, the handler should have the animal move its weight to the right front leg by guiding it with the handler’s hip or left hand while beginning to give ratcheting signals with the right hand in the direction that the animal’s leg should bend, that is, forward. Remember that the foot comes up off the ground as the knee bends. Your signal is going to be toward the front of the animal, not up. If you choose to, this is the time to offer verbal reinforcement. Make sure to give the command (e.g., Give!) at the instant that the foot comes up off of the ground and not before.
3. Once the foot is off of the ground, put it back on the ground immediately.
4. Repeat this process several times, 10 times or so. The handler is teaching the animal that he or she can be relied on to give the foot back.
5. If the animal accepts this process, the handler can begin to hold the foot up off the ground for a few seconds. The previous step should help the animal learn to shift its balance and learn to support itself on three legs; however, if the animal begins to lean on the handler, the author recommends ratcheting him away gently with the hip.
6. Once the animal is standing in balance with its foot off the ground, the handler can move the left hand from across the back or the top line to support the cannon bone, thereby freeing up the right hand (Figure 7-14).
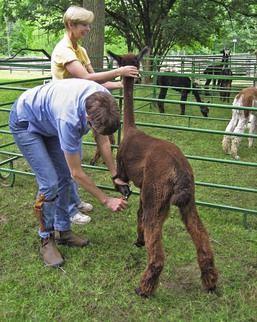
Figure 7-14 Once the leg is off the ground and the animal is in balance, the handler swaps hands to trim the toenails.
7. Once the leg is supported, the handler now has a free hand for trimming.
Picking up the left rear leg follows much the same process. The handler places the left hand on the top line or across the body on the opposite hip. If the handler finds that the animal is leaning left, it may help to slide the left hand further down the leg on the opposite side (Figure 7-15). The placement for the right hand picking up the foot is above and behind the hock. It will be much more difficult if working alone on the back legs unless the animal is motivated by food, in which case a flake of hay or a bowl of grain may serve as incentive to stand in place.
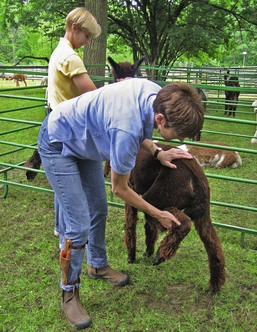
Figure 7-15 Using a hand on the top-line facilitates getting the leg off the ground and helping the animal maintain its balance.
The handler has now really managed the hard part. The animal has learned to feel safe and comfortable with its foot in the handler’s hand and off the ground. At this point, unless the handler is ambidextrous, some adjustment will likely have to be made for the trimmers to be in the appropriate hand (Figure 7-16). Remember to switch the directions above when trimming the right front and right hind leg (Box 7-1).
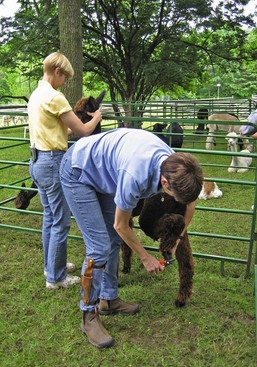
Figure 7-16 With the animal in balance, the handler switches hands and supports the fetlock joint to trim the rear toenails.
Medical Herd Management
The Medical Team
Communication is a key element in creating a highly efficient animal care team. Many veterinarians charge by procedure or visit and not necessarily for their time. For owners who are keen to try some of these new techniques, the author suggests that the owner or handler practice all of the elements that he or she can do alone before the veterinarian is involved. Handlers should learn how to put a neck wrap on the animals quickly and easily. It is neither fair nor appropriate to practice such things while your veterinarian is waiting.
Injections: A New Way
The needle for a subcutaneous (SQ; under the skin) injection is placed a half an inch or less under the skin, whereas an intramuscular (IM) injection is inserted an inch or more. However strong the handler, or how effective the chute is, the animal cannot be restrained in such a manner that it is incapable of moving even an inch. Given a camelid’s long neck, it is very difficult to eliminate body movement by merely tying the head, even when the animal is inside a chute. No matter how the animal is trussed for giving an injection, the handler must be prepared to move with the animal or it is going to move away from and off the needle. Since the handler has to learn to move with the animal anyway, simply contain the animal instead of restraining it, and plan to accommodate movement. The handler can then use his or her knowledge of animal movement to guide movement in a predictable direction, thus giving injections with no restraint. This no-restraint method offers many advantages (Box 7-2).
Get Organized
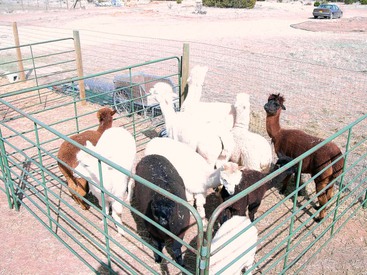
It is important to be organized when providing herd health care. Being organized makes the handler feel competent, and it also calms and increases trust and confidence in the animals that are on the other end of the needle. Being organized is important for the handler and doubly important to the animals waiting their turn to be treated. Even if the handler has a chute, the easiest way to give injections is still in a catch pen. Put as many animals as will comfortably fit inside the catch pen. The animals should be on the crowded side; 8 to 10 alpacas or 5 to 6 llamas in a 9 × 9 square foot pen are not too many (Figure 7-17). Aim for allowing about 20% empty space in the pen. If the handler has a small number of animals—only two or three—the handler may make the pen smaller with bales of straw or use the mini-catch pen. The author likes to crowd the animals up for two reasons: (1) They slow each other down; and (2) they feel safer in a group. A bag of hay may be hung inside or in each corner of the pen. More animals means more hay bags.
Many owners trim toenails on shearing day, especially if the animals are stretched out. This is acceptable, however, the author does not recommend giving injections on shearing day. The author thinks that the shearing process is stressful enough and that it is best to do injections another time.
Stay updated, free articles. Join our Telegram channel

Full access? Get Clinical Tree


