Fig. 2.1.
Schematic diagram of the retina. The retina has a laminar structure. Photoreceptors (whose cell bodies are located in the outer nuclear layer; ONL) capture photons and transduce light into neural signals in their outer segments (OS). Retinal is regenerated and OS supported by retina pigment epithelial (RPE) cells. Neural signals are processed in the inner retina composed of two layers of cell bodies (the inner nuclear layer [INL] and the ganglion cell layer [GCL]). The INL comprises bipolar (BP), horizontal (HC) and amacrine (AC) cells. Muller glial cell (MC) soma are also located in the INL. The GCL comprises displaced amacrine and ganglion (GC) cells. Processing occurs in two synaptic or plexiform layers (the outer and inner plexiform layers [OPL and IPL, respectively]).
Rod photoreceptors and the peripheral retina which is rod dominated are well conserved across mammalian species. In contrast, cones and the central retina differ greatly between primates and other mammals. Humans, apes, and old world monkeys have a cone-rich macula and a central cone-only foveola that enables high visual acuity. Other mammals lack this specialized macula although the retinas of some mammals have a visual streak, an area of increased photoreceptor density and therefore, acuity, across the central meridian. Additionally, the cones of human and non-human primates contain one of three opsins; other mammals have one or two cone opsins. Here, we will discuss methods as they apply to rodent vision, particularly the rod system, and we will mention briefly when differences are necessary for studying humans.
In the first part of this chapter, we will provide methods to analyze the distribution of ion channels, neurotransmitter receptors, and signal transduction proteins by immunohistochemistry. In the second part of this chapter, we will present methods to examine the electrophysiological responses of the eye to light stimuli. Finally, we will describe two behavioral tests used to measure vision in rodents: the Visual Water Task is a task used to examine visual acuity, similar to that measured in clinic, and the Virtual Optomotor System, which relies on a visually driven tracking reflex.
2 Materials
2.1 Immunohistochemistry
2.1.1 Aqueous Mounting Medium (AMM)
1.
Add 2.4 g Mowiol 4–88 (Hoechst) or Gelvatol 20–30 (Monsanto) to 6 g glycerol in a 50-ml conical tube. Stir to mix.
2.
While stirring, add 6 ml distilled water and leave for 2 h at RT on a rocker.
3.
Add 12 ml 0.2 M Tris (pH 8.5).
4.
Add NaN3 to a final concentration of 0.02% (optional).
5.
Incubate the tube at 50°C for 10 min or until Mowiol is dissolved.
6.
Clarify by centrifugation at 5,000 g for 15 min. Store 1-ml aliquots in microcentrifuge tubes at −20°C.
7.
Warm tubes to room temperature for use. Opened tubes can be stored at 4°C for approximately 1 month. Discard if any crystalline material is seen in the tube or on the slides.
8.
For fluorescence, add 1,4-diazobicyclo-(2.2.2)-octane (DABCO) to 2.5% to reduce fading. This is a free radical scavenger. Note: since this is an aqueous medium fluorescence quality can diminish overtime. It is best to image 1 day after tissue is coverslipped.
2.1.2 Paraformaldehyde Fixative (PFA)
1.
Heat 10 ml 0.1 M phosphate buffer, pH = 7.4 (PB) to 60°C in a microwave.
2.
In a fume hood, for a 4% solution, add 0.4 g paraformaldehyde. Caution: paraformaldehyde fumes are toxic.
3.
Stir until dissolved. If powder does not dissolve, add a drop of 5 N NaOH.
4.
Chill on ice. Filter and adjust pH to 7.4 if necessary. Keep for about 1 week at 4°C.
2.1.3 Antibody Incubation Solution (AIS)
1.
3% (v/v) normal horse serum. (Sometimes less background is obtained by substituting normal goat serum.)
2.
0.5% (v/v) Triton X-100.
3.
0.025% (w/v) NaN3 in phosphate buffer saline (PBS).
2.2 ERG Recording: Equipment
1.
ERG Recording System with Ganzfeld. There are several commercial ERG recording systems that include hardware/software and a Ganzfeld dome, e.g., Espion E2 (Diagnosys, Lowell, MA), UTAS (LKC Technologies, Gaithersburg, MD), RETI-port (Roland Consult, Brandenburg, Germany). (See Note 1.)
2.
Optometer for measuring flash intensity and background intensity. Commercial optometers/radiometers include the IL1400A (International Light Technologies, Peabody, MA) and the S350/S450 (UDT, San Diego, CA). Both have an integration mode that enables the measurement of light from a brief flash.
3.
A heating system to maintain core body temperature of the mouse between 36.0 and 37.5°C while the animal is anesthetized (see Note 2). Maintaining core body temperature is crucial for both animal health and obtaining maximal ERG amplitude, which drops dramatically with low body temperature. Loss of just a few degrees of body temperature is associated with reduced ERG amplitudes and prolonged latencies. A simple solution is to place the animal on a warmed sports injury heat pad (2). Commercial systems include a low voltage DC system that enables automated temperature control (Braintree Scientific, Inc., Braintree, MA) and water-circulated heating systems (Roland Consult, Brandenburg, Germany). (See Note 3.)
4.
A system for measuring core body temperature (if a non-automated system is used). We use the Thermalert temperature monitoring system with an RET-3 rectal probe for mice (Braintree Scientific, Inc., Braintree, MA).
5.
A system for visualizing the mouse eye in the dark. We use a simple headlamp for most work in the dark. For fine manipulation work such as connecting electrodes we use an OptiVISOR binocular headband with LX-7 lens (2.75 ×) and an attached VisorLIGHT (Donegan Optical Company, Inc., Lenexa, KS). Two layers of deep red film are taped over both light sources and any lighted equipment in the room (e.g., computer monitor and green LED’s used as ON lights on most equipment).
2.3 Medical Supply List for ERG Recordings
1.
Butterfly needle infusion set (25 ga × 3/4″ with 12-inch tubing; Abbott Laboratories, North Chicago, IL).
2.
Ketamine (100 mg/ml; Vedco, St Joseph, MO).
3.
Xylazine (20 mg/ml; Lloyd Laboratories, Shenandoah, IA).
4.
Saline solution (0.9% NaCl for injection; Hospira, Inc., Lake Forest, IL).
5.
Sterile mix bottle (10 ml).
6.
Murocel (1.0%; Bausch and Lomb, Tampa, FL).
7.
Phenylephrine (2.5%, store at 2–8°C; Bausch and Lomb, Tampa, FL).
8.
Tropicamide (1%; Akorn, Buffalo Grove, IL).
9.
Proparacaine (1.0%, store at 2–8°C; Akorn, Buffalo Grove, IL).
10.
Erythromycin ophthalmic ointment (5 mg/g, E Fougera & Co, Melville, NY).
11.
Oxygen tank.
12.
General supplies, including insulin syringes (0.5-ml 28 ga), 1-ml tuberculin syringes, fine forceps, tape, KY petroleum jelly, alcohol swabs, cotton-tipped applicators (Q-tips).
13.
Miscellaneous equipment: Kitchen cooking scale for weighing mice in the laboratory, aluminum foil for making electrodes shields, tooth brush, and nail file for cleaning electrodes.
3 Methods
3.1 Immunohistochemical Analyses
Our laboratories are interested in localizing molecules involved in retinal synaptic transmission. We perform immunofluorescent labeling of retinal cryosections, since this allows the localization of multiple antigens. Importantly, we have found that short fixation times are essential for preserving antibody staining of synaptic membrane proteins, such as receptors or ion channels. While obtaining lightly fixed human retinal tissue can be problematic, we will describe here our procedure using mice.
3.1.1 Tissue Preparation
1.
Mice are euthanized using an overdose of isoflurane or pentobarbital delivered via intraperitoneal injection.
2.
Eyes are rapidly enucleated with curved scissors (care must be taken to not damage the optic nerve otherwise the retina will pull away from the eyecup during dissection), and rinsed in cold 0.1 M PB with 2 mM Ca2+ and Mg2+ added.
3.
Eyecups are prepared by cutting just behind the ora serrata followed by removal of the lens. Eye is placed in a Petri dish filled with cold PB (with Ca2+ and Mg2+). Hold eye in place with forceps and puncture eye with a number 11 scalpel blade just behind the ora serrata. Roll eye onto optic nerve. Use microscissors to cut around the equator. It may be easier to rotate the eye with forceps as you cut. Gently peel the front portion of the eye away from the eyecup. Roll the lens out of the way. Tilt the eyecup on its side to drain the remaining vitreous. Note: Any remaining vitreous will crystallize when frozen and create problems for sectioning. The vitreous freezes at a different rate causing the nerve fiber layer and the ganglion cell layer to be pulled away from the remaining retina. Also the remaining vitreous will fracture during sectioning. This causes the block to cut unevenly. The section will buckle.
4.
Eyecups are transferred (via a cut plastic transfer pipette) to the fixative solution. Tissue is fixed for 5–20 min by immersion in 4% PFA. We use glass vials for fixation to avoid plastics that may leach from other containers. PB is used because PBS has a higher osmolarity that can cause tissue damage and poor tissue preservation.
5.
The fixed eyecups are washed in PB and then cryoprotected at 4°C by sequential immersion in ice cold 10, 20, and 30% (w/v) sucrose in PB. Use a cut plastic transfer pipette to gently move eyecups into each new solution. Allow each eyecup to sink to the bottom of the vial at each step. (About 10–30 min.) The eyecups can sit overnight in the 30% sucrose at 4°C. The eyecups are then immersed into OCT (Sakura Finetek, Torrance, CA). Gently mix to remove the extra 30% sucrose. You should be able to see the mixing of the sucrose and the OCT. If extra sucrose remains inside the eyecup this will also cause sectioning problems. The sucrose will crumble during sectioning and the retina will be pulled along with the sucrose.
6.
The tissue is then embedded in OCT (use plastic molds, such as the cap of a microcentrifuge tube, to help position the eyecups) and quickly frozen by immersion into isopentane/dry ice. Isopentane is placed in a glass beaker. Dry ice is packed around the beaker. Allow for the isopentane to equilibrate (otherwise freeze fracture will occur). The tissue is frozen and equilibrated when bubbles no longer form. The OCT-embedded eyecups can be stored at −80°C, but it is preferable to proceed to the sectioning.
7.
The eyecup is removed from the molds and cut at 12–15 μm on a cryostat at −18 to −21°C (2 h equilibration in the cryostat is best). Optimal cutting temperature is determined by the humidity in the cryostat chamber and section thickness. Sections are collected onto Super-Frost glass slides, air-dried (this helps keep the sections attached to the slide during immunostaining and gently dehydrates the tissue for best morphology), and stored at −80°C until used for staining.
3.1.2 Immunostaining of Retinal Sections
1.
Eyecup sections are thawed to room temperature (RT) and dried. Create a circle around the section with a PAP pen and allow to dry. Block by incubation at RT for 30–60 min in AIS.
2.
Aspirate off solutions to preserve the well created by the PAP pen. Incubate with primary antibody diluted in AIS for either 1–2 h at RT or at 4°C overnight. (Use a humid chamber to prevent the sections from drying. Use only enough antibody solution to cover the section. Otherwise the solution will flow over the well.)
3.
After three quick washes (5–10 min each) in PBS, the sections are incubated for 1 h at RT in the appropriate secondary antibody coupled to either Cy3 or Cy2 (Jackson ImmunoResearch Laboratories, West Grove, PA), or to Alexa Fluor 488 or Alexa Fluor 594 (Invitrogen, Carlsbad, CA) diluted 1:500 to 1:2000 in PBS or AIS. (Keep sections protected from light beyond this step.)
4.
The slides are washed again three times in PBS (5–10 min each) with one rinse with water (to reduce salt crystal formation) and then coverslipped with AMM. The coverslipped slides are left in the dark overnight to harden before oil immersion lenses are used. (Nail polish is used to seal the edges of the coverslip.)
5.
Slides are viewed on a fluorescence or confocal laser scanning microscope using 40× or 60× oil immersion objectives.
3.1.3 Wholemount Retina Staining
1.
Following dissection of a mouse retina, four radial cuts are made to flatten the tissue.
2.
The flattened retina is placed on a piece of filter paper to prevent the retina from folding or rolling up.
3.
The retina on the filter paper is fixed for 1–30 min by immersion in 4% PFA, and then washed in PBS.
4.
The tissue is gently removed from the filter paper (this becomes easy after fixation) with a fine paintbrush and is then incubated with primary antibody diluted in AIS for 1–3 days at 4°C on a gently rocking (or orbital) platform.
5.
After three 1-h washes in cold PBS, the tissue is incubated overnight at 4°C in the appropriate secondary antibody coupled to either Cy3 or Cy2 (Jackson ImmunoResearch Laboratories, West Grove, PA), or to Alexa Fluor 488 or Alexa Fluor 594 (Invitrogen, Carlsbad, CA) diluted 1:500 to 1:2000 in PBS, again on a rocking platform. (Keep dark.)
6.
The tissue is washed again three times for 1 h each in PBS and then carefully placed on a slide, photoreceptor side up. Using a fine paintbrush, the retina is gently flattened and unfolded and then coverslipped with AMM.
7.
The coverslipped slides are left in the dark overnight to harden before oil immersion lenses are used. The edges of the coverslip are sealed with nail polish.
8.
Slides are viewed on a confocal laser scanning microscope (such as the Olympus FluoView 1000) using 40× or 60× oil immersion objectives.
3.2 Electroretinogram (ERG) Recordings
We record the ERG from genetically altered mice to investigate the roles of different proteins in retinal signaling. Below we detail our particular methods for recording the ERG from the mouse. The associated Notes provide more in-depth discussion of methods that vary between laboratories. For a detailed description of ERG components and their cellular origin see Frishman (3). Peachey and Ball (4) and Weymouth and Vingrys (2) provide excellent overviews of the recording, analysis, and interpretation of rodent ERGs
1.
Prior to the day of ERG recording, make an anesthetic cocktail by mixing 0.5 ml ketamine (100 mg/ml), 0.25 ml xylazine (20 mg/ml), and 4.25 ml saline solution (0.9% NaCl for injection; Hospira, Inc., Lake Forest, IL) in a 10-ml sterile mix bottle.
2.
Weigh mice and then leave them in the dark to adapt overnight (>12 h).
3.
On the day of ERG recording, mice are anesthetized and prepared for recording under dim red light.
4.
Anesthetize mice via intraperitoneal injection of anesthetic cocktail (see Notes 4–6). Dose (ml) = weight (g) × 0.01 (e.g., for a 20-g mouse: dose = 20 × 0.01 = 0.2 ml). Larger doses should be split between two injection sites for better results.
5.
Anesthesia is maintained by subsequent injection of a one-third dose (0.07 ml for 20 g mouse) at 30 and 60 min after initial loading dose. For long procedures we taper anesthesia down to 1/4 dose (0.05 ml for 20 g mouse) for injections at 90 and 120 min after the loading dose.
6.
As soon as the mouse is sufficiently immobilized, it should be placed on the heating device to minimize any drop in core body temperature.
7.
Anesthetize the cornea with a drop of 1.0% proparacaine. After a minute, remove excess fluid with a cotton-tipped applicator (“Q-tip”) as excess fluid can reduce ERG amplitude. Mice can aspirate on drops so care should be taken to ensure excess fluid does not roll down snout.
8.
Dilate the pupils with a drop of phenylephrine (2.5%) and a drop of tropicamide (1%) and again remove excess fluid.
9.
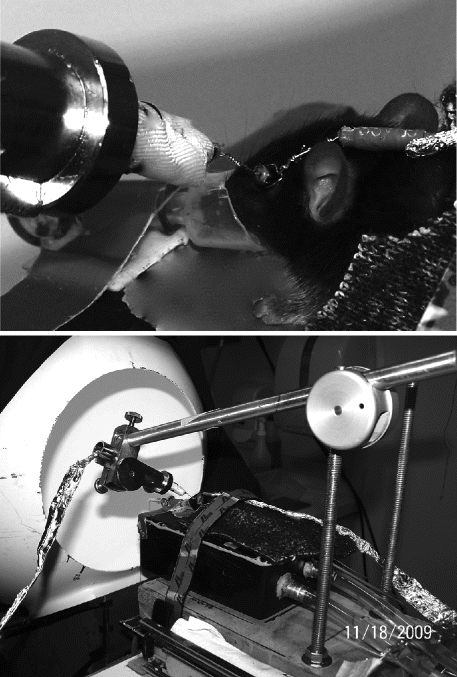
Place a wire loop behind the upper teeth and draw mouse into the nose cone. Start oxygen and fix the wire loop in place so that the head cannot move. (See Fig. 2.2, top, and Note 7.)
10.
Insert rectal temperature probe.
11.
Insert platinum subdermal needle electrode into tail to serve as ground.
12.
Insert butterfly needle into flank to allow delivery of anesthetic every 30 min or as required.
13.
Tape down temperature probe, subdermal needle, and butterfly needle to heating unit to ensure they do not move during recording.
14.
A blanket placed over the mouse will help maintain body temperature.
16.
To minimize 60 Hz interference, connect the foil shields covering each electrode wire to the amplifier input ground.
17.
Slide the mouse forward so that its head is inside the Ganzfeld.
18.
Record ERG to a single dim flash (e.g., −3 log sc cd s/m2) to ensure a good contact has been made.
19.
Dark adapt the mouse for a further 10 min before starting to record the ERG (see ERG protocol below).
20.
At the end of recording, wash the electrodes and contact lens in warm soapy water to remove old Murocel and any proteins, rinse with alcohol. Cleaning will extend the life of the electrodes.
Fig. 2.2.
Mouse ERG recording. Top: Loop electrode placed over the eye serves as reference. Contact lens electrode placed against the cornea serves as the active electrode. Mouse is stabilized by drawing snout into a nose cone that also delivers oxygen. Bottom: Overview of station that holds mouse during recording. Mouse placed on water-circulated heating box. Active corneal electrode held in place by a stand with manipulator at far end. Foil placed over electrode wires is input grounded on the amplifier to reduce 60 Hz interference. After setup is completed, mouse is slid into Ganzfeld dome for ERG recording.
3.2.1 Recording Conditions
Table 2.1 lists our standard protocol for ERG recordings from the mouse. Total recording time including setup is typically 1.5 h. This protocol is quite extensive and based on our requirements to examine retinal signaling. The full protocol may not be necessary depending on your requirements. For example, screening for retinal degenerations could be done using just the “b wave” and “photopic” parts of the protocol.


Table 2.1
Standard ERG protocol
< div class='tao-gold-member'>
Only gold members can continue reading. Log In or Register to continue
Stay updated, free articles. Join our Telegram channel
Full access? Get Clinical Tree
