CHAPTER 12 Technique
Poor-quality radiographs can contribute to inaccurate or missed diagnoses. Accurate and complete radiographic interpretation begins with high-quality radiographs. The first requirement for obtaining good radiographs is to have the correct radiographic equipment in good functional condition (see Chapter 13), the necessary supplies to develop the films, and the ability to use the equipment and supplies properly. Another important element is proper positioning. This chapter will discuss conventional dental radiography using dental x-ray film. Digital radiography will be considered in Chapter 13.
Film
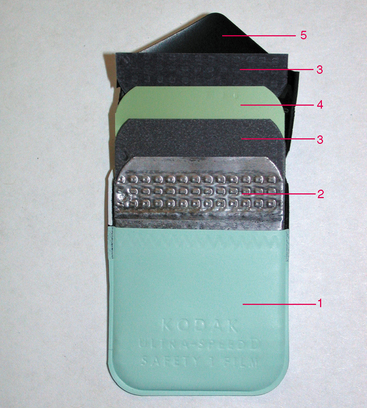
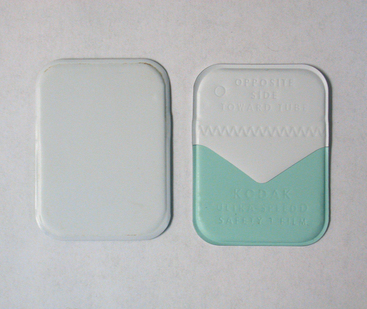
Dental film is supplied in packets (Figure 12-1) with an exterior nonabsorbent plastic envelope that acts as a barrier to moisture and light. Inside the plastic envelope, the film is enfolded in a black-paper light barrier. A thin sheet of lead foil is positioned behind the film to protect it from backscatter radiation from the patient’s tissues, which can “fog” the film. This lead sheet is not thick enough to protect the patient from pass-through radiation. The lead sheets frequently have a stippled embossment pattern. If the film is inadvertently placed backward exposing the film through the lead, the stipple pattern and underexposed image on the developed radiograph alert the operator to the error.
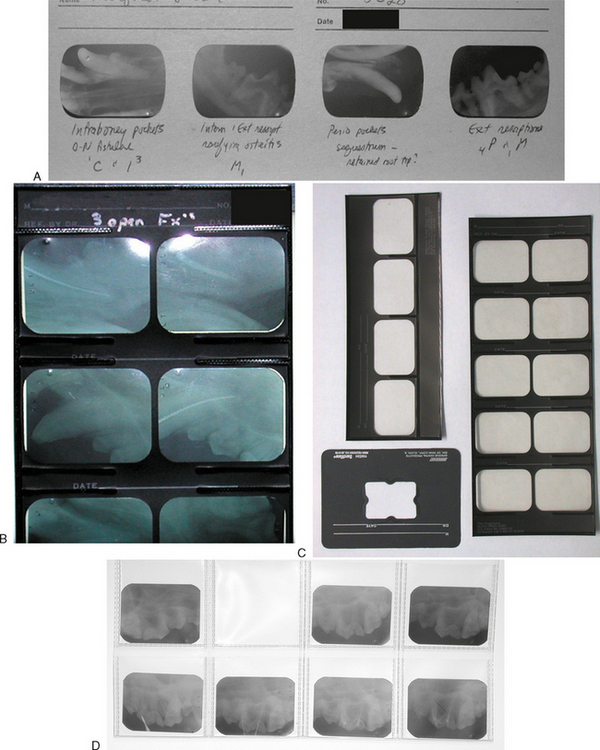
Dental film is available in sizes 0, 1, 2, 3, and 4. The most commonly used sizes in dogs and cats are the size 2 (periapical) film (1¼ × 1⅝ inches, 31 × 41 mm) and the size 4 (occlusal) film (2¼ × 3 inches, 57 × 76 mm) (Figure 12-2). Some operators find the size 0 (⅞ × 1⅜ inches) useful for cats and small dogs. Dental film is provided in single film packets, double film packets that make two identical radiographs, and duplicating film that is sensitive to incandescent light instead of x-rays. The backs of the packets are color-coded to indicate the type of film inside (Figure 12-3).
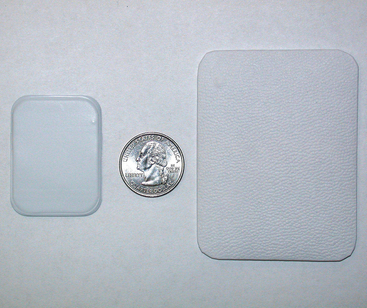
FIGURE 12-2 A quarter is positioned between size 2 (periapical) film (left) and size 4 (occlusal) film (right).
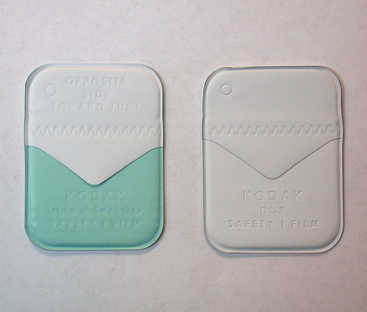
The film is oriented in the patient’s mouth with the front (Figure 12-4) toward the x-ray tube and the dimple (embossed circle in one corner) positioned coronally rather than apically. This is done to position the dimple away from the area of interest on the film.
Radiographs are best stored in film mounts where they can be correctly oriented and properly labeled. There are a number of mounts available for size 2 films (Figure 12-5). There are also larger cardboard mounts available for individual size 4 films. The mounted films can then be stored in marked envelopes and filed.
Positioning
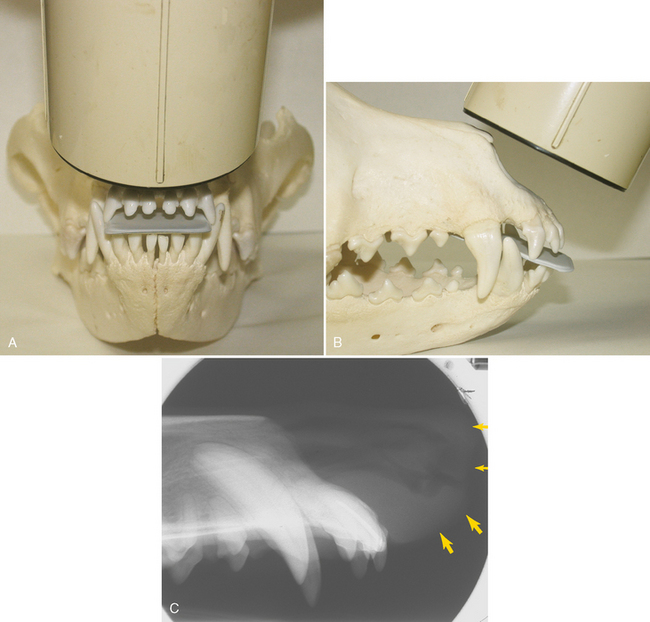
There are two basic positioning (film and tube-head) techniques used for making intraoral dental radiographs: parallel and bisecting angle. The parallel technique is used whenever it is technically possible to place the film parallel to the axis of the tooth roots (Figure 12-6). In dogs and cats, this applies to the distal mandibular teeth, and sometimes the mandibular incisor and canine teeth depending on film placement and interference of the canine teeth and soft tissues. The film cannot be placed parallel to the teeth in the rostral mandibular premolar region due to the mandibular symphysis and angle of the roots relative to the oral surfaces. Similarly, film cannot be intraorally placed parallel to any of the maxillary teeth due to the position of the palate and lack of a high palatal vault in dogs and cats.

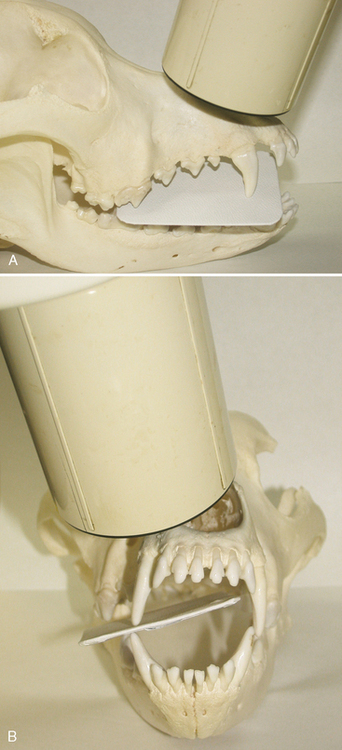
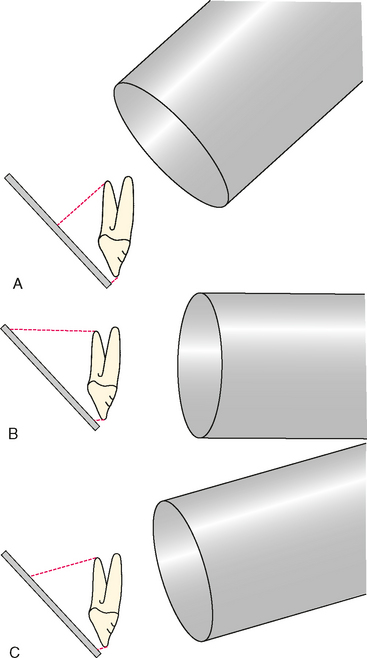
The bisecting angle technique uses a principle of geometry (the two sides of an isosceles triangle are equal in length) to prevent image elongation or foreshortening (Figure 12-7). The film is placed intraorally as close to the tooth as possible. Usually this involves placing the cusp tip at the extreme outside (aboral) edge of the film, or even off the film if it is not important to include the crown in the radiograph. This leaves the largest possible surface area of the film available for the roots. The film should not be bent, because any curvature of the film will cause distortion of the image. The x-ray beam (tube-head) is positioned perpendicular (at a right angle) to an imaginary line that bisects the angle formed between the film and the roots of the teeth being radiographed. Structures that are superimposed can be separated on the radiograph by shifting the tube-head in the third axis while maintaining the bisecting angle in the plane that includes the axis of the root and the edge (plane) of the film (Figure 12-8). For example, when making a radiograph of the premolar region, the tube-shift redirects the x-ray beam to a mesial-to-distal or distal-to-mesial direction while maintaining the bisecting angle position when viewed from the front of the patient (transverse plane). Shifting the tube mesially (mesiobuccal to distopalatal beam) moves objects that are closer to the tube-head distally on the radiograph image and objects that are closer to the film mesially. Conversely, when the tube-head is shifted distally (distobuccal to mesiopalatal beam), objects that are closer to the tube-head will move mesially on the radiograph, while objects closer to the film will move distally on the radiograph. In other words, objects on the radiograph that move the same direction that the tube was shifted are on the palatal/lingual side, while objects that move the opposite direction from which the tube was shifted are on the buccal/labial side. A helpful acronym to remember this relationship is the “SLOB rule,” which stands for “Same Lingual Opposite Buccal” (Figure 12-9).
POSITIONING FOR MAKING RADIOGRAPHS OF THE DOG
In discussing patient positioning, the “angle” will be understood to mean the angle made between the line of the longitudinal axis of the tooth root and the plane of the film. A very handy film-positioning device is a wadded paper towel or part of a paper towel (the paper towel film positioning device [PTFPD]). It is soft enough to prevent bending of the film, adaptable to all sizes of patients, inexpensive, readily available, and disposable.
Maxillary Incisor Teeth (Figure 12-10)
One radiograph can include all the maxillary incisor teeth of small-to-medium breeds. The film is placed with the incisor cusp tips along the short side of the film that has the dimple. The tube is positioned perpendicular to the film when viewed from the front and to bisect the angle when viewed from the side. Large-breed dogs may require a separate radiograph for the third incisor teeth, with the tube-head angled from slightly more lateral when viewed from the front.