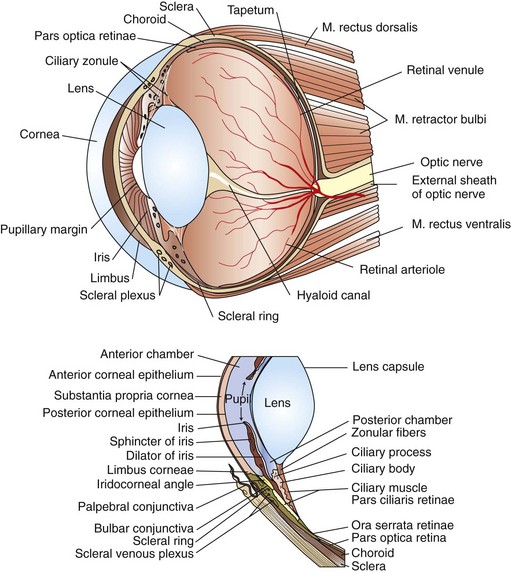
Chapter 17 General Principles and Techniques Successful ophthalmic surgery requires a correct diagnosis, appropriate choice of surgical procedure and materials, attention to detail, and proper instrumentation and equipment. Each animal should be thoroughly evaluated for concurrent and contributing abnormalities. This evaluation should include a complete physical examination and appropriate diagnostics. Complete blood count (CBC) and serum chemistry panel are typical preanesthetic tests in older patients (see Chapter 4). If a heart murmur is present in an older patient, thoracic radiographs, echocardiography, and/or electrocardiography (ECG) may be appropriate, depending on the patient. Ultrasonography, computed tomography (CT), and magnetic resonance imaging (MRI) are helpful in defining orbital and retrobulbar disease. The normal flora of the conjunctival sac, cornea, eyelids, lacrimal ducts, and tarsal glands includes potential pathogens, so perioperative antibiotics are reasonable. Periocular tissues rapidly become inflamed and swollen when manipulated. This swelling can be minimized by preoperative systemic administration of non-steroidal antiinflammatory drugs (NSAIDs). In many patients, induction needs to be performed in a manner that minimizes increases in intraocular pressure (IOP). Preoperative sedatives such as a benzodiazepine with an opioid can be helpful in achieving quiet, struggle-free induction (Table 17-1). Induction with a face mask may place pressure on or near the eyes and should be avoided. Propofol causes a decrease in IOP and is often the drug of choice for induction. Although etomidate can cause a decrease in IOP, if myoclonus occurs, IOP may sometimes increase. This is less likely to occur (but is still possible) when a benzodiazepine is administered beforehand. Use of ketamine in ophthalmic patients is controversial, and debate continues as to whether it increases IOP. Regardless, ketamine causes eye movements that are undesirable; thus its use as an induction agent is not recommended in surgeries where globe motion is problematic. Anesthetic Considerations in the Ophthalmic Patient *Monitor for hyperthermia in cats. †Buprenorphine is a better analgesic than morphine in cats. ††Black box warning added by the FDA in October 2010 identified cases of renal failure and death in cats with repeated uses of meloxicam. Meloxicam is approved for single use only in cats in the U.S. Nondepolarizing muscle relaxants such as atracurium or vecuronium may be used and are very predictable (Box 17-1). Both drugs have an onset of about 3 to 5 minutes and last 20 to 35 minutes. The difference between the two is mainly in how they are metabolized. Atracurium is metabolized in the blood by plasma esterases, but it also undergoes nonenzymatic degradation called Hofmann elimination. Vecuronium is metabolized by the liver and is excreted in bile and urine. Reduced doses are required when used in patients with kidney or severe liver disease. Cis-atracurium is a stereoisomer of atracurium that is completely metabolized by Hofmann elimination. It is safe to use in patients with liver or kidney failure. Pancuronium has a longer duration of action of approximately 30 to 45 minutes. A large fraction is excreted unchanged by the kidneys and the remainder is excreted in bile or metabolized by the liver. Patients with liver or kidney disease can have a prolonged elimination time. Pancuronium is unique in its selective cardiac vagal blockade, causing a temporary increase in heart rate after it is administered. For enucleation, local adjunctive anesthesia may be considered preoperatively or intraoperatively to improve analgesia. Local anesthetics have been given as a retrobulbar injection (Myrna et al, 2010). To facilitate placement, this block may be placed at the end of surgery or after induction of general anesthesia. Retrobulbar injections may be given via an inferotemporal approach through the eyelid skin. To perform, use a 1.5 inch 22 g needle that is straight, or make a 20 degree bend midway in it. Point the needle through the skin just above the lower orbital rim at the junction of the lateral and middle thirds of the eyelid, and advance it through the periorbital fascia. Then, tilt the needle slightly dorsally and medially toward the orbital apex about 1 to 2 cm. Epinephrine may be included in the injection to improve hemostasis, but monitor heart rate as tachycardia may result. Potential pathogens in the normal flora of the conjunctiva, eyelids, cornea, lacrimal glands, and tarsal glands are one reason why perioperative antibiotics are often administered to animals having periocular or ocular surgery. Most often, the bacteria recovered from periocular flora are Staphylococcus and Streptococcus spp., and infected corneal ulcers can involve either Gram-negative or Gram-positive bacteria. Ophthalmic preparations containing bacitracin, polymyxin, and neomycin are often chosen for perioperative prophylaxis. Other frequently used topical antibiotics include erythromycin and oxytetracycline. Generally, systemic antibiotics are given for eyelid, intraocular, and orbital surgeries, whereas topical antibiotics are used for conjunctival and corneal surgeries. Systemic antibiotics should be given so that therapeutic blood levels can be assessed at the time of surgery (see Chapter 9). The eyelids and orbit house and protect the eye (Fig. 17-1). Eyelids are mobile folds of skin that block light and protect the cornea. The upper lid is slightly larger and more mobile than the lower lid. Upper and lower lids join at the medial and lateral canthus and are stabilized by the medial and lateral palpebral ligaments. The width of the opening between the lids is controlled by opposing groups of muscles; the orbicularis oculi muscle closes the palpebral fissure, and the fissure is widened by the levator palpebrae superioris, the pars palpebralis of the sphincter colli profundus, and smooth muscles of the periorbita. The upper and lower lacrimal puncta, which drain excess tears from the ocular surface to the nose and pharynx via the nasolacrimal duct, are located just posterior to the eyelid margin about 2 to 5 mm from the medial canthus. The lacrimal caruncle is located near the medial canthus. It projects fine, small hairs; has sebaceous glands; and may be pigmented. Long hairs known as cilia project from the upper lid skin, but the lower lid is devoid of cilia. A tuft of long tactile hairs is seen at the dorsal medial margin of the orbit; this corresponds to human eyebrows. The contents of the eye are surrounded by an external fibrous coat: the transparent, multilayered cornea; and the yellow-white, opaque sclera (Fig. 17-2). The two meet at the corneoscleral junction or limbus. The cornea is usually less than 1 mm thick and is covered by a precorneal tear film; it has four layers: (1) epithelium with its basement membrane, (2) stroma, (3) Descemet’s membrane (basement membrane of endothelium), and (4) endothelium. The white part of the eye has four layers: conjunctiva, episclera (vascular layer), sclera proper (collagen fibers and fibroblasts), and lamina fusca (collagen bundles that intermingle with choroids and the ciliary body). The sclera is covered anteriorly by the conjunctiva; posteriorly, muscles insert around vessels and nerves, which penetrate its surface. The middle or vascular coat is the uvea, which consists of three continuous parts: choroid, ciliary body, and iris. The iris is seen through the cornea and regulates the size of the centrally located pupil. The ciliary body is a thick circular mound at the level of the limbus, which regulates the shape of the lens. The folds of the internal surface of the ciliary body are the ciliary processes that produce aqueous humor. The choroid lines, and is firmly attached to, the sclera. The retina lines the internal surface of the choroid to the level of the ciliary process. The retina is the nervous coat of the eye. Zonular fibers attach the equator of the lens to the ciliary process. The lens is transparent and elastic. Lacerated eyelids are commonly associated with traumatic injuries such as bite wounds and automobile injuries. They should be repaired as soon as possible to protect the cornea and maintain an effective blink reflex. Healing of lid lacerations by secondary intention may result in considerable fibrosis and distortion of the eyelids and lid margin, and secondary scarring of the corneal surface. Direct reapposition is possible if one-third or less of the lid margin is missing. More extensive injuries require advancement flaps or grafts for repair. Preservation of the eyelid margin and its associated structures is essential for normal eyelid function. No matter how thin a flap of tissue has been created by a laceration running parallel to the eyelid margin, it should not be excised (Fig. 17-3). If these flaps do not survive, the eyelid margin can be reconstructed. Apply topical lubricating ointment to keep the tissue moist before surgical repair. Thoroughly irrigate and gently cleanse the wound with a dilute 10% Betadine solution. Identify the mucocutaneous junction, the meibomian glands in the tarsal plate, and the palpebral conjunctiva. Convert simple lacerations to a V-shaped defect with judicious wound debridement (scarify necrotic margins and smooth jagged edges), taking care to preserve as much tissue as possible (Fig. 17-4, A) if needed for alignment (optional). Place a marginal skin suture, ensuring that the lid margin has perfect alignment (Fig. 17-4, B). Leave the conjunctival tissue to heal on its own. Take care that knots and suture ends do not abrade the cornea by positioning them subcutaneously, or place knots on the outside of the eyelid by passing the suture through the eyelid. Use a simple interrupted or modified figure-8 cruciate suture (e.g., 4-0 to 5-0 Vicryl) with the knot ends directed away from the cornea to close the skin (Fig. 17-4, C, D). Space remaining skin sutures approximately 2 to 3 mm apart. If the nasolacrimal duct has been damaged by trauma near the medial canthus, stent it by first cannulating the nasolacrimal duct with 0 to 2-0 monofilament suture and then passing polyethylene or Silastic tubing over the suture and securing it to the skin near the medial canthus and the lateral canthus of the nostril (see inset, Fig. 17-4). A complete temporary tarsorraphy may be indicated to protect the cornea after repair of extensive eyelid injuries because of impaired eyelid functions and blink reflex (Fig. 17-5). Medicate the wound with a broad-spectrum ophthalmic antibiotic ointment such as neomycin/polymyxin/bacitracin for 14 days, and monitor for blepharospasm, tearing, or holding the eye closed (mucopurulent discharge is common with topical antibiotic ointments); this may indicate that a corneal ulcer has formed. Remove sutures at 10 to 14 days. Leave the cannula in place for 4 to 6 weeks. Place horizontal mattress sutures at the eyelid margins to appose them, using partial-thickness bites oriented parallel or perpendicular to the lid margin (see Fig. 17-5). Prepare a thin, sliding conjunctival flap by grasping the conjunctiva with ophthalmic tying forceps such as a 0.3 mm Colibri forceps approximately 2 mm from the limbus. Apply traction to tent the conjunctiva, and incise a few millimeters from the limbus with a pair of tenotomy scissors (Fig. 17-6, A). Elevate the cut edge, bluntly dissecting perilimbally with tenotomy scissors to separate the conjunctiva from the underlying sclera (Fig. 17-6, B). Using the tips of the tenotomy scissors directed at a 90-degree angle to the tissue, use sharp dissection to separate the episclera from the conjunctiva. Start the dissection at the free edge of the conjunctiva, and move the scissors proximally as the episclera is separated from the conjunctiva. Take care to prevent iatrogenic button-holes in the conjunctiva. After dissection, the conjunctival flap becomes much more mobile, reducing the chance of flap retraction. Position the flap over the defect after it has been debrided to remove any corneal epithelium. Be sure to debride the corneal epithelium off the corneal ulcer bed and edges before placing the tissue flap so the flap can integrate into the cornea. Dissect a hood flap from the bulbar conjunctiva dorsal to the lesion or from the bulbar conjunctiva as close to the lesion as possible (Fig. 17-7, A and B). Dissect half of the bulbar conjunctiva and separate it from the episclera as described previously; position it over the globe. Ensure that the conjunctiva lies flat on the cornea with no traction; this will occur if the episclera has been well dissected from the conjunctiva with tenotomy scissors (see Fig. 17-7, B). Place two absorbable sutures (6-0 to 8-0 Vicryl) at the limbus 180 degrees apart to position the flap over the cornea (Fig. 17-7, C). Provide tension across the free edge of the flap (not on the eye) to keep it in place over the cornea; corneal sutures are not required. Place partial-thickness sutures into the episclera or sclera in a simple interrupted pattern with 6-0 to 8-0 Vicryl (Gilger et al, 2007). If needed, place additional limbal sutures to further anchor the flap. Start a total or 360-degree conjunctival flap by making a 360-degree conjunctival incision 2 to 3 mm from the limbus, (Fig. 17-8, A and B). Carefully dissect the conjunctiva ventromedially from the episclera and the third eyelid tissues. The third eyelid may be displaced centrally with the conjunctival graft over the eye. After the conjunctiva has been dissected from the episclera, it should stretch easily over the corneal surface (Fig. 17-8, C). If the graft has a great deal of retraction, dissect the episclera more proximally from the conjunctiva with tenotomy scissors, taking care not to cause button-holes in the conjunctiva. Suture the free edges of the conjunctiva together in a horizontal mattress pattern (Fig. 17-8, C and D) using absorbable suture (6-0 Vicryl or smaller). Ensure that the sutures are tight, so that no corneal contact is made by sutures and the conjunctival graft is sutured to itself and not to the cornea (Gilger et al, 2007). It is important to get epithelial-to-epithelial apposition without flap overlap. Medicate the eye with broad-spectrum ophthalmic antibiotics (see previous laceration medical management description) at least four times a day and atropine once or twice daily. In the nonadherent areas, trim the flap with tenotomy scissors under topical anesthesia with proparacaine 6 to 8 weeks after surgery, once the corneal lesion has healed, allowing the corneal attachment to atrophy and undergo fibrosis, thus minimizing scar formation. Loose and excess conjunctiva can be trimmed from the cornea to reduce the vascular reaction and subsequent scar, but do not remove the conjunctiva from the former corneal ulcer or defect. Scar remodeling occurs over several months; final results vary from an insignificant opacity to a dense leukoma. Third eyelid flaps serve as physiologic bandages to support and protect the cornea after trauma. They are easier to create than conjunctival flaps but should not be used on deep corneal ulcers, descemetoceles or corneal perforations, which usually are fragile and require visual monitoring to direct aggressive medication management (see p. 294). Exteriorize and extend the third eyelid by grasping it with forceps and elevating it. Pass a cutting needle with swaged-on 3-0 or 4-0 monofilament absorbable suture through the upper eyelid in the dorsolateral conjunctival fornix (Fig. 17-9, A). Direct the needle through the external surface of the third eyelid under the crossbar of the T-shaped cartilage, and exit through the external surface of the third eyelid on the opposite side of the cartilage. Alternatively, to reduce the chance of the suture rubbing on the cornea, direct the suture around the cartilage, but do not penetrate the conjunctiva on the bulbar surface of the third eyelid (Fig. 17-9, B). Direct the suture back through the dorsolateral conjunctival fornix and out the upper eyelid. Apply tension on the suture, pulling the third eyelid over the cornea. Tie the suture over a stent, with the ends long enough to tie a bow, so that the cornea may be inspected periodically (Fig. 17-9, C). As an alternative, use double-armed 3-0 to 2-0 nonabsorbable suture, and begin by placing the suture midway along the length of the third eyelid and then through the fornix. Enucleation is probably the most common orbital surgical procedure performed in small animal practice. Common indications for enucleation include irreparable corneal or intraocular injury, unmanageable endophthalmitis, intraocular neoplasia, severe proptosis, and intractable uveitis. An additional indication might include painful end-stage glaucoma, although this can be treated with globe-sparing procedures (intrascleral prosthesis). All other options should be considered before enucleation is performed, particularly for sighted or potentially sighted eyes. However, under the right circumstances, enucleation can provide rapid resolution to chronic painful eye disease, at the same time eliminating the need for topical medications in the affected eye (Cho, 2008). The transconjunctival enucleation technique is commonly used. Advantages of this approach compared with other methods include reduced orbital tissue loss (reduced postoperative orbital sinking) and reduced intraoperative bleeding. However, this technique may not be preferred for infectious conditions of the anterior segment, such as severely infected corneal ulceration. The sterile surgical site may be exposed to a contaminated ocular surface, allowing for possible spread of infectious agents into the orbit. This situation is worsened by rupture of the cornea because intraoperative pressure on the globe may expel infected material from the eye. In these cases, transpalpebral enucleation may be a better choice, especially in dogs (Cho, 2008). Using heavy scissors, make a wide lateral canthotomy to improve exposure (Fig. 17-10, A). You may wish to clamp the area to be cut with a straight hemostat before incising to reduce hemorrhage. Place a lid speculum (optional). Next, make a 360-degree bulbar conjunctival incision around the limbus using small blunt scissors, such as Stevens tenotomy or small Metzenbaum scissors (Fig. 17-10, B). At the level of the orbital rim, use curved Metzenbaum scissors to bluntly dissect down through the bulbar conjunctiva to the subtenon space to expose the extraocular muscle tendons. Incise the tendons with scissors close to the globe (Fig. 17-10, C). Optionally, use small hemostats to clamp these areas before cutting to reduce hemorrhage. The ability to freely rotate the globe almost 360 degrees indicates that at least the recti and oblique muscles are cut. Using a curved hemostat, clamp the tissues of the posterior pole of the globe, containing the optic nerve, retractor bulbi muscle, and associated vasculature (Fig. 17-10, D). Do not pull the globe or place any traction on the eye because this could avulse the optic nerve at the optic chiasm and blind the other eye. Leave the hemostat in place if space allows, or if necessary remove it before blindly incising the stalk with curved Metzenbaum or enucleation (more strongly curved) scissors about 5 to 10 mm posterior to the globe. Be sure to transect the optic nerve and avoid cutting the posterior sclera. Control hemorrhage from the orbit with direct pressure, hemostatic clamps, electrocautery, and/or calcium alginate. Avoid the optic nerve with cautery unless the equipment is appropriate for use around the brain or spinal cord such as Cameron-Miller cautery. Ligation of vessels and/or the optic nerve, although possible, is technically difficult and may not be necessary. Also remove the orbital lacrimal gland and all conjunctiva (Fig. 17-10, E). Remove the lid speculum and broadly incise the base of the nictitans; clamping before cutting may again reduce hemorrhage. Remove the entire nictitans, including cartilage and gland at the base. Remove the eyelid margins with heavy straight scissors, starting at the lateral canthotomy (Fig. 17-10, F). Fully excise the smooth hairless lid margin so that the skin edges will close without excessive dead space or tension. The medial canthal area must be removed. The medial canthus is closely adhered to its deeper attachments, so sharp dissection is sometimes required. Large vessels are occasionally encountered at the medial canthus. Copiously flush the orbit with sterile saline. Perform a wide lateral canthotomy using straight, heavy scissors such as a Mayo scissor (Fig. 17-11, A). Bluntly dissect the cut surface of each lid into an anterior skin-orbicularis oculi layer and a posterior tarsoconjunctival layer using a curved Metzenbaum scissor (Fig. 17-11, B). Continue blunt dissection medially until the medial canthus is reached. Remove the scissors, replace one blade of the scissor in the subcutaneous pocket just created, and cut the anterior layer parallel to the lid margin as close to the medial canthus as possible (Fig. 17-11, C). Close the lids with Allis tissue forceps or a 3-0 or 4-0 simple continuous suture with ends left long (Fig. 17-11, D). Use the lateral aspect of the forceps or suture to gently retract and rotate the dissected orbital contents medially, using blunt and sharp dissection of tissues around the lateral globe while clamping and then incising extraocular muscles close to their attachments on the globe (Fig. 17-11, E). Do not pull the globe or place any traction on the eye because this could avulse the optic nerve at the optic chiasm and blind the other eye. Clamp the tissues of the posterior pole of the globe with a hemostat; remove the hemostat and transect the tissues 5 to 10 mm posterior to the globe. Roll the globe out of the orbit from lateral to medial, and transect the remaining extraocular muscles, the medial canthal tendon, and the attachments of the medial canthus to the orbit from posterior to anterior (Fig. 17-11, F). Next, remove the nictitans, and excise any remaining conjunctiva (Fig. 17-11, G).
Surgery of the Eye
Preoperative Concerns
Anesthetic Considerations
 TABLE 17-1
 Box 17-1 Neuromuscular Blockers and Reversal Agents in Dogs and Cats
Antibiotics
Surgical Anatomy
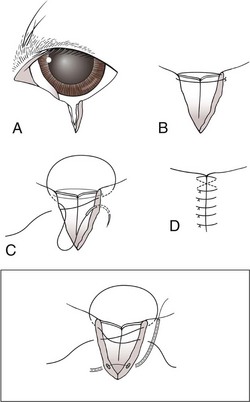
Surgical Techniques
Temporary Tarsorrhaphy
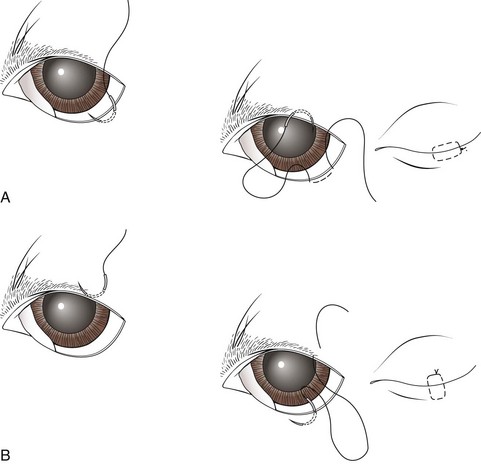
 Conjunctival Flap
 Hood Flap
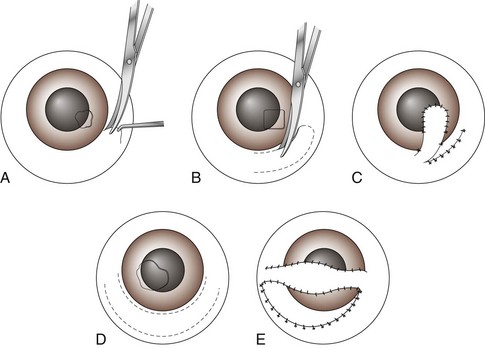
 360-Degree Conjunctival Flap
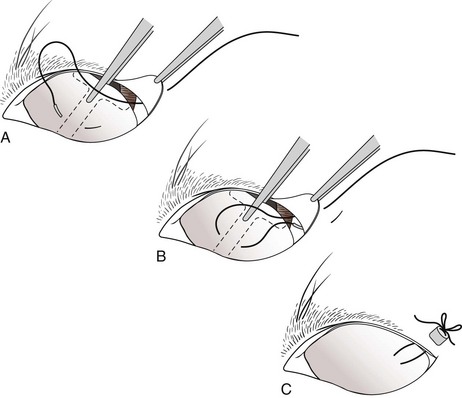
Third Eyelid Flap
Enucleation or Exenteration
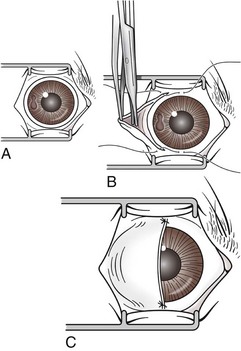
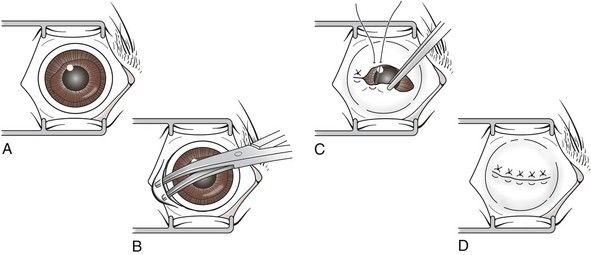
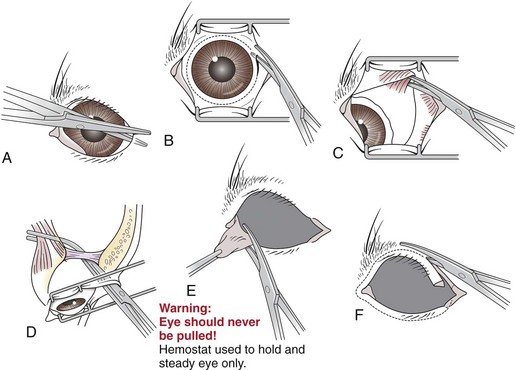
Transconjunctival Enucleation
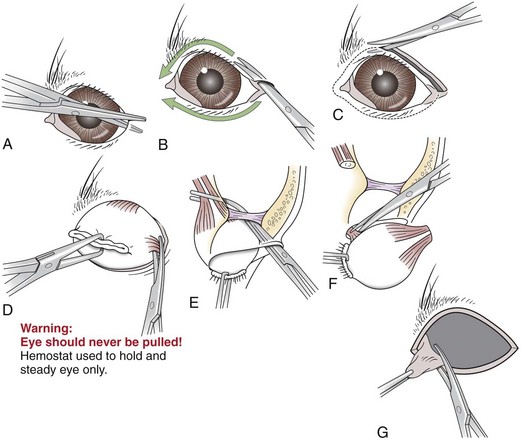
Lateral Enucleation
![]()
Stay updated, free articles. Join our Telegram channel

Full access? Get Clinical Tree