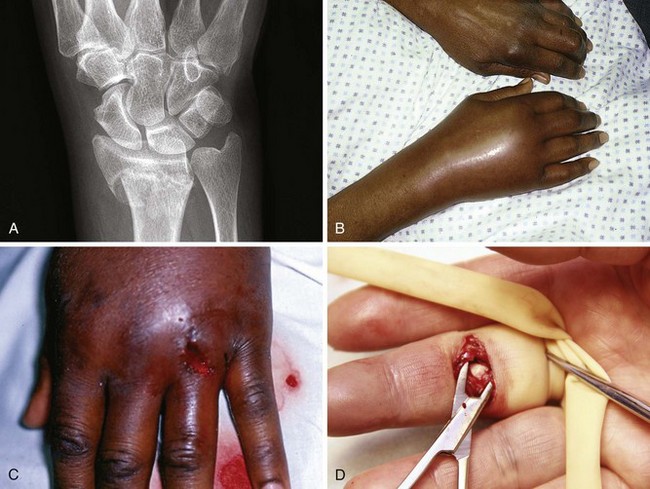
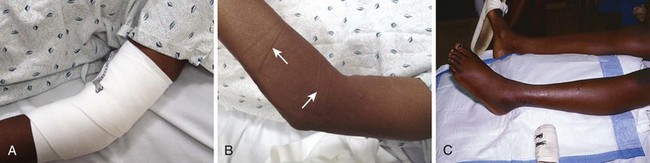
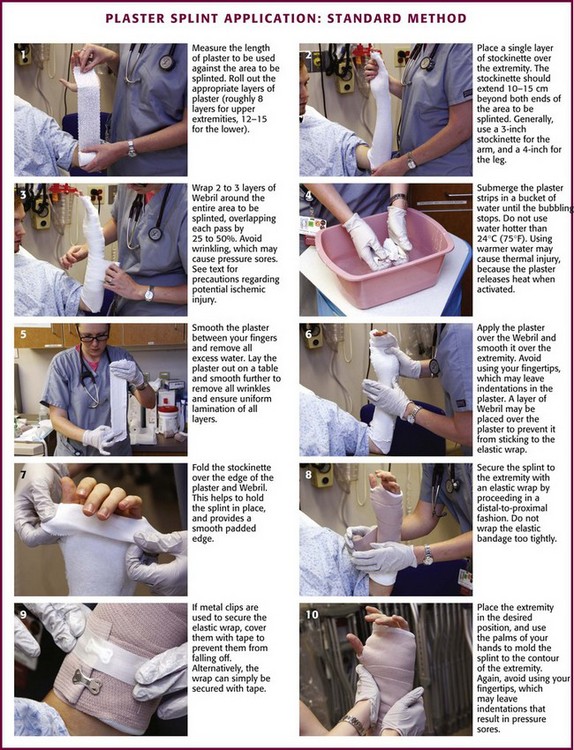
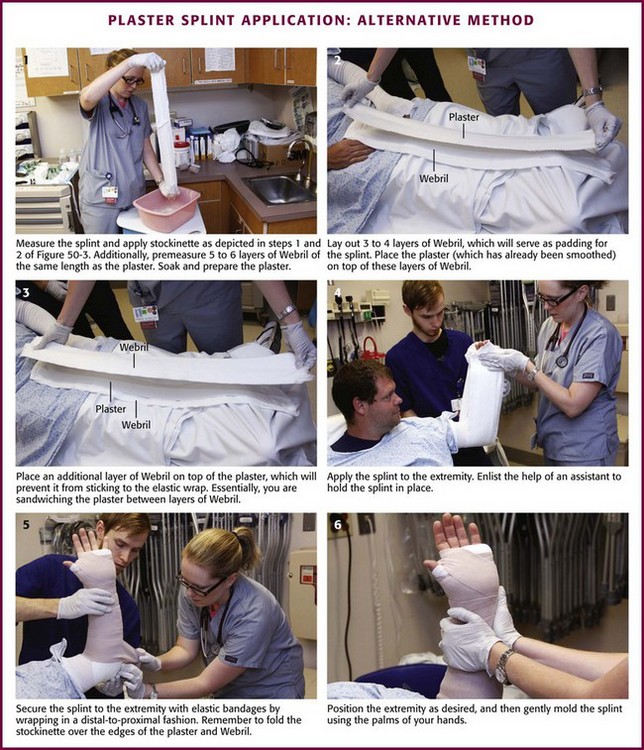
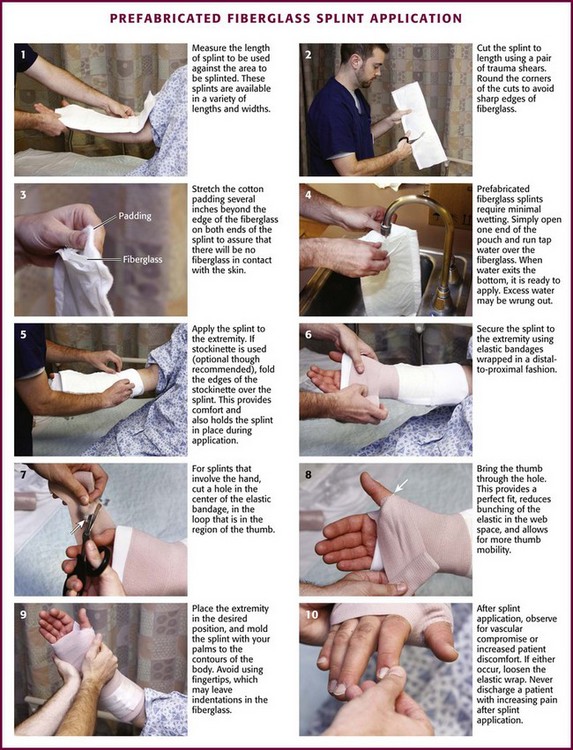
Chapter 50 Splints are used frequently in the emergency department (ED) for temporary immobilization of fractures and dislocations and for definitive treatment of soft tissue injuries.1,2 Patients with a variety of nontraumatic musculoskeletal disorders (e.g., gout, inflammatory joint diseases, infections, burns) also benefit from short-term immobilization. Immobilization is the mainstay of fracture therapy, but though intuitively beneficial, it is difficult to find firm scientific data that support the use of splinting for soft tissue injuries.3,4 Although the general principle of immobilizing sprains and contusions is strongly supported by custom and personal preference, its exact influence on healing, number of complications, and ultimate return to normal activity is not known. In most studies of ankle sprains, for example, the function and pain of the injured joint are similar at 6 weeks’ follow-up, regardless of whether treatment consisted of ad lib walking, a simple elastic bandage, a posterior splint, or a formal cast.5,6 A systematic review of 22 clinical trials comparing various treatments of acute lateral ankle sprains (cast, splint, or early mobilization with support) found no favorable effect of immobilization.7 The current data support functional management for most acute ankle sprains.7 Patients are routinely seen in the ED with injuries that are amenable to splinting to relieve pain and augment healing (see Review Box 50-1). Although a strict standard of care cannot be promulgated, the use of short-term splinting in the ED for acutely painful conditions remains a common practice. Emergency clinicians have virtually abandoned the use of circumferential casts in favor of premade commercial immobilizing devices or splints constructed of plaster of paris or fiberglass. The impetus for this change is primarily related to the complications occasionally associated with circumferential casts, liability issues, and ease of application brought about by new technology. In most instances, properly applied splints provide short-term immobilization equal to that of casts while allowing continued swelling and thus reducing the risk for ischemic injury. Other obvious advantages of splints are that patients can take them off when immobilization is no longer needed or can remove them temporarily to bathe, exercise the injured part, or perform wound care. Most splinting techniques are handed down from house staff or experienced clinicians, but the procedure is often suboptimal and haphazard.8 This chapter presents guidelines for adequate immobilization of injuries commonly encountered by emergency clinicians. Details of the construction and application of commonly used custom-made plaster splints are provided. Theoretically, immobilization facilitates the healing process by decreasing pain and protecting the extremity from further injury. Other benefits of splinting are specific to the particular injury or problem being treated (Fig. 50-1). For example, in the treatment of fractures, splinting helps maintain bony alignment. Splinting deep lacerations that cross joints reduces tension on the wound and helps prevent wound dehiscence. Immobilizing tendon lacerations may facilitate the healing process by relieving stress on the repaired tendon. The discomfort of inflammatory disorders such as tenosynovitis or acute gout is greatly reduced by immobilization. Deep space infections of the hands or feet, as well as cellulitis over any joint, should similarly be immobilized for comfort. Limiting early motion may also reduce edema and theoretically improve the immune system’s ability to combat infection. Hence, selected puncture wounds and mammalian or human bites of the hands and feet may be immobilized until the risk for infection has passed. Splinting large abrasions that cross joint surfaces prevents movement of the injured extremity and reduces the pain produced when the injured skin is stretched. Finally, victims of multiple trauma should have fractures and reduced dislocations adequately splinted while other diagnostic and therapeutic procedures (e.g., fluid resuscitation, airway control, computed tomography scans, tube thoracostomy) are completed. Immobilization decreases blood loss, minimizes the potential for further neurovascular injury, reduces the need for opioid analgesia, and may decrease the risk for fat emboli from long-bone fractures. Plaster of paris is the most widely used material for ED splinting.9 Its name originated from the fact that it was first prepared from the gypsum of Paris, France. When gypsum is heated to approximately 128°C, most of the water of crystallization is driven off and a fine white powder is left behind—plaster of paris. When water is added to the plaster, the reaction is reversed, and the plaster recrystallizes or “sets” by incorporating water molecules into the crystalline lattice of the calcium sulfate dehydrate molecules. Prefabricated splint rolls composed of layers of fiberglass between polypropylene padding (e.g., Ortho-Glass, 3M Scotchcast One-Step) are now commonplace in many EDs. Fiberglass splint rolls offer the same time-saving aspect as prefabricated plaster splint rolls but require only 3 minutes to set, thus making application faster. In addition, splints made of prefabricated fiberglass rolls cure more rapidly (20 minutes), have no messy residue (i.e., they can be hydrated in a conventional sink without a special trap), can be washed and reapplied, and are stronger and lighter than splints constructed of prefabricated plaster rolls. Another advantage is the polypropylene padding, which wicks moisture away from the skin better than polyester, nylon, or cotton padding does.10 Prefabricated fiberglass splint rolls are more expensive than both simple plaster rolls and prefabricated plaster splint rolls and, like prefabricated plaster splints, lack some of the versatility and custom-fit qualities of self-made plaster splints. Patients often use or request an elastic bandage for many soft tissue injuries. Although applying an elastic bandage to an injured part is popular, it is of minimal benefit alone. The downside is that the bandage may be wrapped too tightly and cause additional injury or distal swelling (Fig. 50-2). This following text refers to the application of custom-made plaster splints unless otherwise stated (Figs. 50-3 and 50-4). If periodic wound care is required, apply a more easily removable splint (e.g., OCL, Ortho-Glass, Velcro-type splint described below) in lieu of the standard splint (Fig. 50-5). Address the issue of removability before the splint is applied. In addition, use of Webril (Curity) cast padding is described, but other suitable cast padding may be substituted. Caveats for proper ED splinting are listed in Box 50-1. Following placement of padding between the fingers and toes in self-made splints, use a stockinette over the skin as the first protective layer (see Fig. 50-3, step 2). Extend the stockinette at least 10 to 15 cm beyond the area to be splinted at both ends of the extremity. Later, after the plaster has been applied, fold the stockinette back over the ends of the splint to create smooth, padded rims and to help hold the splint in place when applying elastic bandages (see Fig. 50-3, step 7). To avoid pressure damage, do not pull the stockinette too tightly over bony prominences such as the heel. In addition, prevent wrinkling over flexion creases by slitting and overlapping the stockinette at bony prominences. One may also use two separate pieces of stockinette (one at each end of the splint) to produce the smooth padded rims. As a general rule, use 3-inch-wide stockinette for the upper extremity and 4-inch-wide stockinette for the lower extremity. After the stockinette has been properly positioned, wrap Webril around the entire area that will be exposed to plaster. Apply at least two or three layers of Webril, with each turn overlapping the previous turn by 25% to 50% of its width (see Fig. 50-3, step 3). Make sure that the Webril extends 2.5 to 5.0 cm beyond the ends of the splint so that it, too, can be folded back over the splint to help create smooth, well-padded edges. Place extra padding over areas of bony prominence, such as the radial condyle or the malleoli (Box 50-2). Although this can be done with Webril, Mother’s Cotton adds an additional measure of protection without the worry of wrinkling or ischemic injury. If significant swelling is anticipated, use three or four layers of Webril. Be careful to avoid wrinkling because this can result in significant skin pressure when a tight splint is worn for a long period. Prevent wrinkles by proportionately stretching or even tearing the side of the Webril that must wrap around the larger portion of an extremity. Joints that must be immobilized in a 90-degree position, such as the ankle, make continuous Webril wrapping difficult. To avoid wrinkles around the ankle, place the joint in the proper position before padding. Wrap the Webril around the malleolar and midtarsal regions first, and then cover the bare calcaneal region with overlapping vertical and horizontal Webril strips until the entire heel region is evenly padded. Use the same approach in similar areas such as the elbow. Choose a width of Webril appropriate for the extremity to be splinted. In general, use the 2-inch width for the hands and feet, the 3- or 4-inch width for the upper extremity, and the 4- or 6-inch width for the lower extremity. A final caveat when using Webril is to be aware of the potential for ischemic injury. This rare complication is most likely to occur in an extremity that continues to have significant swelling after the patient is released from the ED. Ischemia may result because the concentrically placed Webril can become a constricting band. If this situation is anticipated, it can easily be prevented. Cut through the Webril along the side of the extremity that is opposite the plaster splint. Then, secure the splint to the extremity in the usual manner. Alternatively, place two or three layers of Webril (the same diameter as the plaster) directly over the wet plaster (see Fig. 50-4). Position the Webril-lined splint over the area to be immobilized and secure it in place with an elastic bandage. The choice of plaster setting time depends on the nature of the injury and the expertise of the clinician. Use extra-fast–setting plaster when rapid hardening is desired to help maintain alignment of an acutely reduced fracture. However, for the majority of ED splints, plaster with slower setting times (e.g., Specialist Plaster Bandage Fast Setting) is recommended.11 Plaster that sets more slowly is easier for some clinicians to use because it affords more leeway in applying and molding the splint. Furthermore, plaster with a longer setting time produces less heat, thus reducing both patient discomfort and the risk for serious burns.12 Table 50-1 lists the setting times for commonly used plaster. These setting times can be adjusted by adding different substances to the plaster during the production process (Box 50-3). Given plaster with equal setting times, the most important variable affecting the rate of crystallization is water temperature. Warm water hardens a splint faster than cold water does and should not be used when extra time is needed for splint application. TABLE 50-1 Setting Times of Fast- and Extra-Fast–Drying Plaster The thickness of a splint depends on the size of the patient, the extremity that is injured, and the desired strength of the final product. An ankle splint may crack quickly and become useless if only eight layers are used, but this thickness may be ideal for a wrist splint. In general, it is best to use the minimum number of layers necessary to achieve adequate strength. Thicker splints are heavier and more uncomfortable. It is also important to note that plaster thickness is a major determinant of the amount of heat given off during the setting process. More than 12 sheets of plaster create an increased risk for significant burns, especially when using extra-fast–drying plaster, when using dipping water with a temperature higher than 24°C, or when a pillow is placed under or around the extremity for support during the setting process (Box 50-4). For an average-sized adult, splint the upper extremities with 8 sheets of plaster and the lower extremities with 12 to 15 sheets. Such layering usually provides the strength necessary for adequate immobilization while reducing the patient’s discomfort and the risk for significant burns. In a 136-kg (300-lb) patient, however, up to 20 layers may be required to make a durable ankle splint. Keep the dipping water clean and fresh. Reusing water that has been used previously for wetting plaster increases the amount of heat given off during crystallization and causes the plaster to set more quickly. As a rule of thumb, keep the temperature of the water around 24°C. This temperature allows a workable setting time and has not been associated with increased risk for significant burns. As the temperature of the dipping water approaches 40°C, the potential for serious burns increases, even with splint thicknesses consisting of fewer than 12 plies. It is interesting to note that water temperature has been shown to be only a minor consideration in heat production in some studies (see Box 50-4). Molding the wet splint to conform to the body’s anatomy is probably the most important, yet the most frequently overlooked step to ensure adequate immobilization. The act of molding may cause some pain, so be sure to forewarn the patient. Mold with the palm or flat side of the fingers to avoid putting ridges or indentations in the underlying plaster. Complete all manipulation of the wet plaster before it reaches a thick, creamy consistency. Any movement after this time, which is known as the critical period, results in an imperfect crystalline network of calcium sulfate molecules and greatly weakens the ultimate strength of the splint. While the plaster is setting, do not wrap a pillow or blanket around the extremity for support. This leads to inadequate ventilation around the splint and greatly increases the amount of heat produced (see Box 50-4).
Splinting Techniques
Indications and Contraindications
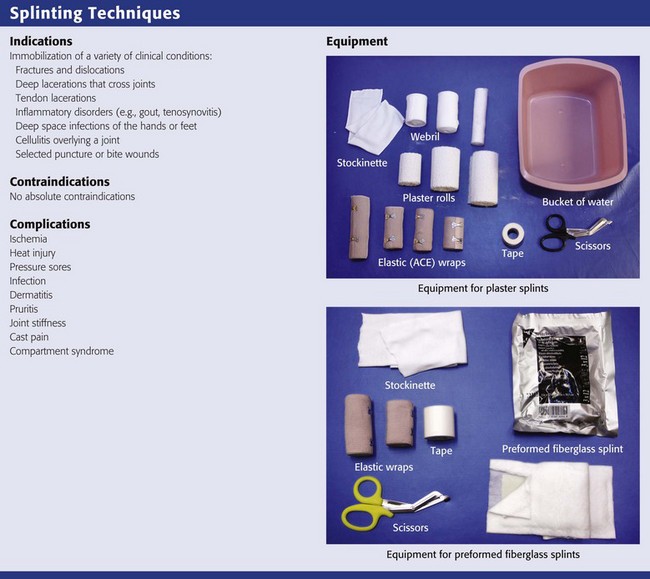
Equipment (see Review Box 50-1)
Plaster of Paris
Prefabricated Splint Rolls
Protective and Miscellaneous Equipment
Elastic Bandages
General Procedure of Custom Splint Application
Padding
Plaster Preparation
PLASTER
SETTING TIME (min)
Fast drying
5-8
Extra-fast drying
2-4
Splint Application (see Fig. 50-3)
![]()
Stay updated, free articles. Join our Telegram channel

Full access? Get Clinical Tree


Veterian Key
Fastest Veterinary Medicine Insight Engine