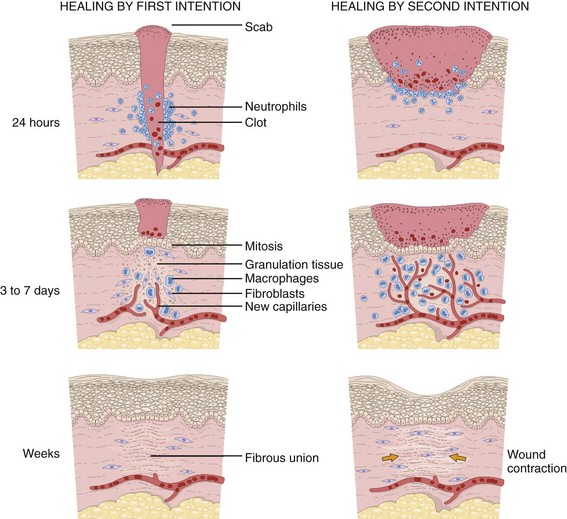
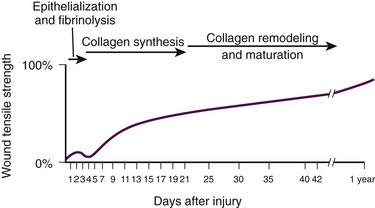
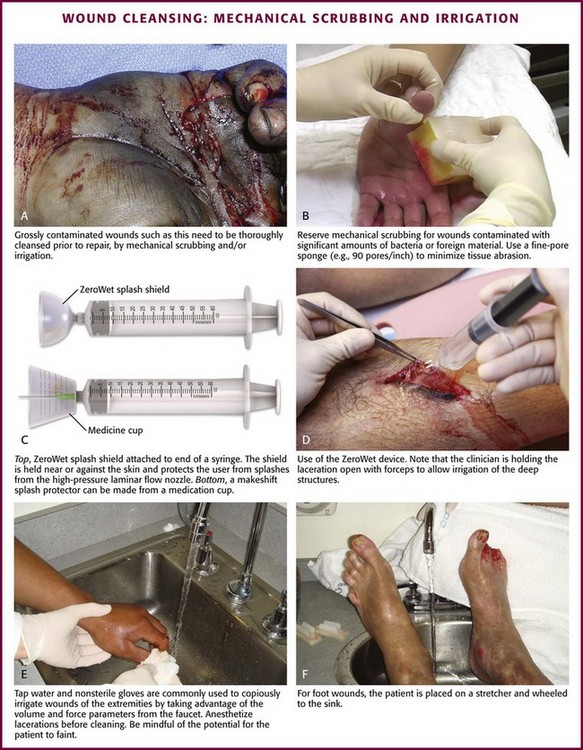
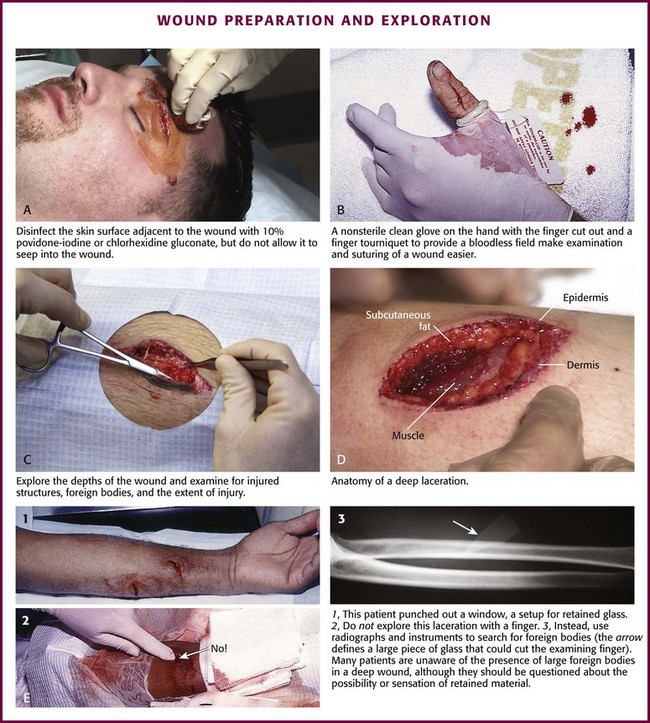
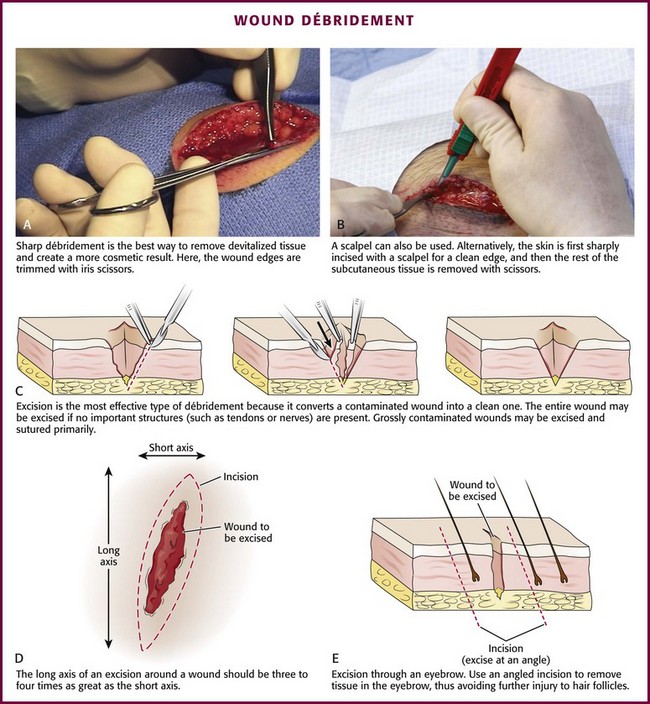
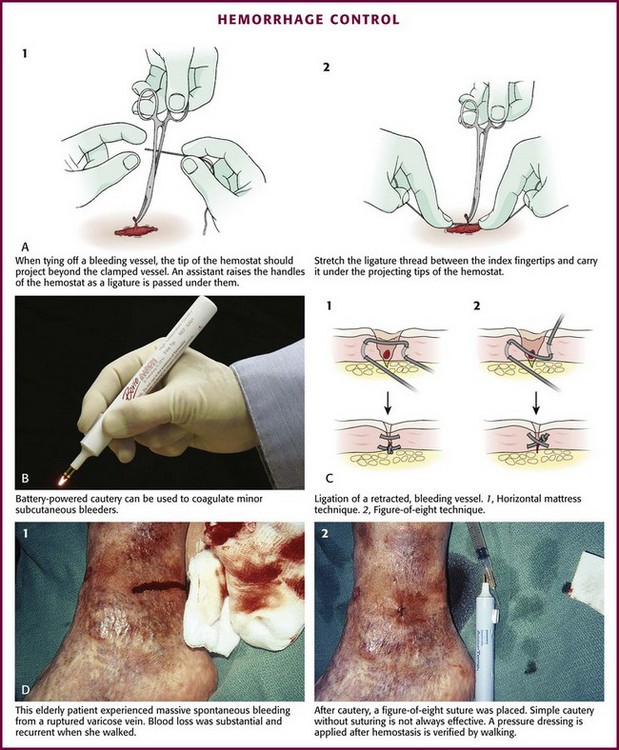
Chapter 34 1. Preserve viable tissue and remove nonviable tissue 2. Restore tissue continuity and function 3. Optimize conditions for the development of wound strength 4. Prevent excessive or prolonged inflammation 5. Avoid infection and other impediments to healing Patients who seek care in the emergency department (ED) because of acute wounds report that their top priorities include prevention of infection, return to normal function, a good cosmetic outcome, and minimal pain during repair.1,2 This chapter reviews the current strategies for attaining these goals. For centuries, victims of wounds commonly experienced inflammation, infection, and extreme scarring; in fact, these processes were considered part of normal wound repair. Only in the late 19th century did surgeons first realize that sepsis could be separated from healing.3 Emergency clinicians should have a basic understanding of the process of wound healing. Highlights of this complex phenomenon as they relate to clinical decision making are presented here (Fig. 34-1). Wounds extending beneath the epithelium heal by forming scar tissue. Inflammation, epithelialization, fibroplasia, contraction, and scar maturation constitute the five stages of this natural repair process.3–5 Inflammation is a beneficial response that removes bacteria, foreign debris, and devitalized tissue, essentially a biologic débridement. Polymorphonuclear and mononuclear leukocytes concentrate at the site of injury and phagocytose dead and dying tissue, foreign material, and bacteria in the wound.6 As white blood cells die, their intracellular contents are released into the wound. When in excessive amount, the contents form the purulence characteristic of infected wounds. Some exudate is expected even in the absence of bacterial invasion, but infection with accumulation of pus interferes with epithelialization and fibroplasia and impairs wound healing. Wounds contaminated with significant numbers of bacteria or foreign material may undergo a prolonged or persistent inflammatory response and not heal. Granuloma formation surrounding retained sutures is an example of chronic inflammation.7 Significant gains in tensile strength do not begin until approximately the fifth day after the injury. Strength increases rapidly for 6 to 17 days, more slowly for an additional 10 to 14 days, and almost imperceptibly for as long as 2 years (Fig. 34-2). The strength of scar tissue never quite reaches that of unwounded skin. Although the process of collagen formation is essentially completed within 21 to 28 days, the scar widens for another month, and collagen continues to remodel and strengthen the wound for up to 1 year.3,7 Decisions regarding the optimal time for suture removal and the need for continued support of the wound with tape are influenced by (1) the tensile strength of the wound, (2) the period of scar widening, and (3) the cosmetically unacceptable effect of epithelialization along the suture track. Scars are quite red and noticeable at 3 to 8 weeks after closure. The appearance of a scar should not be judged before the scar is well into its remodeling phase. The cosmetic appearance of wounds 6 to 9 months after injury cannot be predicted at the time of suture removal.8 Therefore, scar revision, if necessary, should be postponed until 6 to 12 months after injury. One of the most important factors in predicting the cosmetic result of a wound is its location.9 In general, wounds on concave surfaces heal with better cosmetic results than do wounds on convex surfaces. Other factors that affect cosmesis include wound size, wound depth, and skin color.10 Small, superficial wounds in lax, light-colored skin, especially areas where the skin is thin, result in less noticeable scars. Wounds on convex surfaces look better after primary closure than after secondary healing. Static and dynamic forces, along with the propensity toward keloid formation, may influence the long-term cosmetic appearance of wounds more than the surgical skills of the clinician who repaired the wound.8 Repigmentation occurs over a period of 3 to 5 years, even in large wounds that heal by secondary intention.10 In the patient care instructions it is important to emphasize the need for wearing sunscreen over the scar, especially during the early years, because unprotected exposure to the sun can alter the pigmentation as the wound heals and result in noticeably darker pigmentation than the surrounding skin. The approach to management of a particular wound and the decision to close a wound immediately or after a period of observation are based primarily on factors that affect the risk for infection and secondarily on cosmesis and long-term functionality. The history and physical examination should be directed toward identifying these factors. Some wounds may appear benign but conceal extensive and devastating underlying tissue damage. The discovery that an extremity wound was produced by a roller or wringer device, a high-pressure injection gun, high-voltage electricity, heavy and prolonged compressive force, or the bite of a human or a potentially rabid animal radically alters the overall management of the patient. The American College of Emergency Physicians’ “Clinical Policy for the Initial Approach to Patients Presenting with Penetrating Extremity Trauma” provides a useful approach to the evaluation of all wounds.11 In general, the likelihood of a wound infection increases with time from the injury to definitive wound care.12 Definitive wound care does not necessarily mean suturing. Some wounds should never be sutured, such as small contaminated lacerations on the bottom of the foot, whereas others can be sutured many hours after the injury without increasing infection rates. A delay in wound cleaning is the most important factor and may allow bacteria contaminating the wound to proliferate. A delay of only a few hours in the treatment of a heavily contaminated wound can increase the risk for infection. Although no scientific data exist to fully answer the question and there is no definitively accepted standard, it appears reasonable that most wounds that are not grossly contaminated can probably be closed safely 6 to 8 hours after injury if the wound can be adequately cleaned. In contrast, some evidence suggests that wounds in highly vascular regions such as the face and scalp can be closed without increased risk for as long as 24 hours after injury.13 Contrary to popular belief, the “golden period”—the maximum time after injury that a wound may be closed safely without significant risk for infection—is not a fixed number of hours.14 Many factors affect risk for infection, and closure decisions should not be based solely on time considerations. Delayed primary closure is a reasonable alternative when there is clinical concern regarding closure at initial assessment. All data accumulated in the initial evaluation, both historical and physical, must be considered when making the decision to close a wound in a particular patient.12 In addition, the techniques of wound care may extend the period; with skillful cleaning and débridement, a clinician may be able to convert a contaminated wound to a clean wound that can be safely closed in the ED.5 In summary, any time frames offered are suggestions, and clinical judgment and the potential for wound infection should be incorporated into the final decision making. Other factors that affect wound healing or the risk for infection include the patient’s age and state of health. Patient age appears to be an important factor in host resistance to infection, and individuals who are at the extremes of age, such as young children and the elderly, have the greatest risk for infection.12,15 Infection rates are reported to be higher in patients with concurrent medical conditions, such as diabetes mellitus, immunologic deficiencies, malnutrition, anemia, uremia, congestive heart failure, cirrhosis, malignancy, alcoholism, arteriosclerosis, arteritis, collagen vascular disease, chronic granulomatous disease, smoking, chronic hypoxia, renal failure, liver failure, and morbid obesity, as well as in patients who are taking steroids or immunosuppressive drugs or undergoing radiation therapy. Shock, remote trauma, distant infection, bacteremia, retained foreign bodies, denervation, and peripheral vascular disease also increase wound infection rates and slow the healing process.6,12,15–17 Additional information pertinent to decision making in wound management includes the following: • Current medications (specifically, anticoagulants and immunosuppressive drugs) • Allergies (especially to local anesthetics, antiseptics, analgesics, antibiotics, and tape) • Potential exposure to rabies (in bite wounds and mucosal exposures) • Potential foreign bodies embedded in the wound, especially when the mechanism of injury is unknown or the injury was associated with breaking glass or vegetative matter18 • Previous injuries and deformities (especially with extremity and facial injuries) • Associated injuries (underlying fracture, joint penetration) • Other factors (availability for follow-up, patient understanding of wound care, compliance) 1. Abrasions. Wounds caused by forces applied in opposite directions result in the loss of epidermis and possibly dermis (e.g., grinding of skin against a road surface). 2. Lacerations. Wounds caused by shear forces produce a tear in tissues. Little energy is required to produce a wound by shear forces (e.g., a knife cut). Consequently, little tissue damage occurs at the wound edge, the margins are sharp, and the wound appears “tidy.” Tensile and compressive forces also cause separation of the tissues. The energy required to disrupt tissue by tensile or compressive forces (e.g., forehead hitting a dashboard) is considerably greater than that required for tissue disruption by shear forces because the energy is distributed over a larger volume. These lacerations often have jagged, contused, “untidy” edges, which have a higher risk for infection.15 3. Crush wounds. Wounds caused by the impact of an object against tissue, particularly over a bony surface, compress the tissue. These wounds may contain contused or partially devitalized tissue. 4. Puncture wounds. Wounds with a small opening whose depth cannot be entirely visualized are caused by a combination of forces. They are particularly prone to infection. 5. Avulsions. Avulsions are wounds in which a portion of tissue is completely separated from its base, which is lost, or left with a narrow base of attachment (a flap). Shear and tensile forces cause avulsions.19 Skin tear avulsions often result from low-force friction or shearing forces that separate the layers of the skin (epidermis and dermis) from the underlying tissue. These wounds often occur in older adults as a result of minimal impact and vulnerable skin. 6. Combination wounds. Wounds can also have a combination of configurations. For example, a stellate laceration caused by compression of soft tissue against underlying bone can create wounds with elements of both crush injury and tissue separation. Missile wounds involve a combination of shear, tensile, and compressive forces that puncture, crush, and sometimes avulse tissue.20 Contaminants (Bacteria and Foreign Material): Infection rates in studies of traumatic wounds range from 1% to 38%. Numerous factors affect the risk for wound infection, but the primary determinants of infection are the amount of bacteria and dead tissue remaining in the wound,21 the patient’s immune response, and local tissue perfusion. Essentially all traumatic wounds are contaminated with bacteria to some extent. The number of bacteria remaining in the wound at the time of closure is directly related to the risk for infection. A critical number of bacteria must be present in a wound before a soft tissue infection develops. In experimental wounds, fewer bacteria are required to infect wounds caused by a compressive force (≥104 bacteria/g of tissue) than by a shear force (≥106).22 The nature and amount of foreign material contaminating the wound often determine the type and quantity of bacteria implanted. In general, visible contamination of a wound increases the risk for infection.15 The presence of undetected, reactive foreign bodies in sutured wounds almost guarantees an infection. Although bullet or glass fragments by themselves rarely produce wound infection, these foreign bodies may carry particles of clothing, gun wadding, or soil into the wound. Minute amounts of organic or vegetative matter, feces, or saliva carry highly infective doses of bacteria. The bacterial inoculum from human bites often contains 100 million or more organisms per milliliter of saliva.23 Inorganic particulate matter, such as sand or road surface grease, usually introduces few bacteria into a wound and has little chemical reactivity. These contaminants are relatively innocuous. Soil that contains a large proportion of clay particles or a high organic content (such as that found in swamps, bogs, and marshes), however, has a high risk for infection.24 In industrialized countries, most wounds encountered in the practice of emergency medicine have low initial bacterial counts. If wound cleaning and removal of devitalized tissue are instituted before bacteria within the wound enter their accelerated growth phase (3 to 12 hours after the injury), bacterial counts will generally remain below the threshold needed to initiate infection.11,25 The anatomic location of the wound has considerable importance in the risk for infection. Bacterial densities on the surface of the skin range from a few thousand to millions per square centimeter.24 Distal extremity wounds are more at risk for the development of wound infections than are injuries on most other parts of the body.12,26 The high vascularity in areas such as the scalp or perineum appears to offset the risk posed by the large numbers of endogenous microflora, whereas wounds in ischemic tissue are notoriously susceptible to infection.27 If injury to underlying structures such as nerves, vessels, tendons, joints, bones, or ducts is found, the clinician may choose to forego wound closure and consult a surgical specialist (Fig. 34-3). Procedures such as joint space irrigation, reduction and débridement of compound fractures, neurorrhaphy, vascular anastomosis, and flexor tendon repair are best accomplished in the controlled setting of the operating room, where optimal lighting, proper instruments, and assistance are available.20 Clean the wound as soon as possible after evaluation. Although most wounds are initially contaminated with less than an infective dose of bacteria, given time and the appropriate wound environment, bacterial counts may quickly rise to infective levels. The goals of wound cleaning and débridement are (1) to remove bacteria and reduce their numbers below the level associated with infection and (2) to remove particulate matter and tissue debris that would lengthen the inflammatory stage of healing or allow the growth of bacteria beyond the critical threshold.17 There are two general wound-cleansing techniques—compression and irrigation. Compression involves gently pressing premoistened gauze to the wound to remove surface debris. If necessary, this can be followed by gentle and judicious scrubbing. Irrigation is recommended for most wounds and involves a steady flow of solution across the surface of the wound. This important step in wound management provides hydration to the wound, removes deeper debris, and aids in visual examination while reducing the risk for infection. Normal saline or tap water is often used as the irrigation fluid. Soaking a wound in a saline or antiseptic solution before the clinician arrives is of little value and may actually increase bacterial counts, so it is not recommended as a routine practice.28 Before examining, cleaning, exploring, or repairing a wound, explain the procedure to the patient to allay fears and encourage cooperation. In general, all wound care should be performed with the patient in a supine position because fainting is a common occurrence during wound preparation and repair (Fig. 34-4). Relatives and friends can be allowed to stay with the patient, but they should be cautioned to report any dizziness or nausea, and they should remain seated throughout the procedure. Initially, scrub a wide area of skin surface surrounding the wound with an antiseptic solution to remove contaminants that might be transferred into the wound by instruments, suture material, dressings, or the clinician’s gloved hand during wound management. Minimal aseptic technique requires the use of gloves during the cleaning procedure. It is important to remove all nonabsorbable particulate matter; any such material left in the dermis may be retained in the healed tissue and result in a disfiguring “tattoo” effect.7 Scrubbing the internal surface of a wound is controversial. Although scrubbing a wound with an antiseptic-soaked sponge does remove foreign particulates, bacteria, and tissue debris, an abrasive sponge may inflict more damage on the tissue and become a portal for inflammation and infection.29,30 Mechanical scrubbing should be reserved for wounds contaminated with significant amounts of bacteria or foreign material (Fig. 34-5A and B). If irrigation alone is ineffective in removing visible contaminants from a wound, scrub the wound. Because the amount of damage inflicted on tissues by scrubbing correlates with the porosity of the sponge, a fine-pore sponge (e.g., 90 pores/inch) should be used to minimize tissue abrasion.29,31 Detergents have an advantage over saline in that they minimize friction between the sponge and tissue, thereby limiting damage to tissue during scrubbing. Detergents also dissolve particles and thus help dislodge them from the surface of the wound. Unfortunately, many of the detergents available are toxic to tissues.29,32 Use caution when considering detergents. For many years, antiseptic solutions have been used for their antimicrobial properties in and around wounds (Table 34-1). Studies of the use of antiseptics in wounds demonstrate that there is a delicate balance between killing bacteria and injuring tissue.33 Intact skin can withstand strong microbicidal agents, whereas leukocytes and the exposed cells of skin and soft tissue can be damaged by these agents.32 Many antiseptic solutions have been used for cleaning wounds, but the true final benefit or harm from the multiple products introduced during ED wound preparation is difficult to assess or quantify. TABLE 34-1 Summary of Agents Used for Wound Care *Based largely on in vitro studies and animal data. The true harm (or benefit) of these products for routine use in the emergency department is theoretical and probably of minimal clinical consequence for most wounds. Povidone-iodine (Betadine) is widely available as a 10% stock solution. Although the undiluted solution may be used to prepare the skin surrounding a wound, it may be harmful to some tissue; therefore, it should not be placed within the interior of the wound. Diluted povidone-iodine solution in concentrations of less than 1% appears to be safe and effective for cleaning contaminated traumatic wounds, but the precise concentration that provides the most benefit is unclear. In contrast, povidone-iodine surgical scrub (Betadine scrub) and hexachlorophene (pHisoHex) both contain anionic detergents that are harmful to tissues. In vitro studies have demonstrated that chlorhexidine gluconate–alcohol (Hibiclens) is toxic to the cellular components of blood,34 but its effect on wound infection rates is unknown. Many potentially harmful solutions (such as peroxide, alcohol, or commercial cleaning products) are commonly used by patients at home on their own wounds, usually without serious consequence. Hydrogen peroxide is hemolytic, and there is little reason to use it except to clean surrounding skin encrusted with blood and coagulum or to soak off adherent blood-saturated dressings. Peroxide should not be used on granulation tissue because oxygen bubbles lift newly formed epithelium off the wound surface.35 Ethyl alcohol gel solutions are now used commonly as hand sanitizer agents, but their use as a wound antiseptic requires further study. Nonantiseptic, nonionic surfactants are attractive alternatives to these toxic cleansing agents. In contrast to antiseptic solutions, these preparations cause no tissue or cellular damage, leukocyte inhibition, or impairment of wound healing. The solutions cause no corneal injury, conjunctival irritation, or pain on contact with the wound.34,36 Poloxamer 188 (Pluronic F-68, Shur-Clens, and Pharma Clens) is nontoxic and nonallergenic.29,32 This Pluronic polyol has no antibacterial activity, but scrubbing experimental wounds with poloxamer reduced infection rates, thus proving its ability to cleanse a wound effectively and atraumatically.29 Pluronic polyols may be considered, especially if the wound is near mucous membranes. Even dilute povidone-iodine may be particularly irritating when used for scrubbing contaminated wounds. The use of antiseptic preparations in wounds remains controversial. Properly performed irrigation is effective in removing particulate matter, bacteria, and devitalized tissue that is loosely adherent to the edges of the wound and trapped within its depths. The effectiveness of irrigation is determined primarily by the hydraulic pressure at which the irrigation fluid is delivered.37–39 Although some investigators have used port devices spiked into plastic intravenous bags and squeezed by hand to deliver a stream of fluid,40,41 other studies have shown that such activities and bulb syringes or gravity flow irrigation devices deliver fluid at low pressure and are ineffective in ridding wounds of small particulate matter or lowering wound bacterial counts.38 In an uncontrolled study, Hollander and coworkers42 found comparable infection rates and cosmetic outcomes in facial and scalp wounds repaired with and without irrigation. Although irrigation may not be required for low-risk, highly vascular uncontaminated facial and scalp wounds, randomized, prospective trials are needed to answer this question. The pressure that can be delivered with a syringe varies with the force exerted on the plunger and the internal diameter of the attached needle. A simple irrigation assembly consisting of a 19-gauge plastic catheter or needle attached to a 35-mL syringe produces 25 to 40 psi when the barrel of the syringe is pushed with both hands.39 This high-pressure irrigation system removes significant numbers of bacteria and a substantial amount of particulate matter from the wound surface. Wound irrigation is best achieved with a large-volume syringe and a 18- or 19-gauge catheter or needle to deliver irrigation volumes of at least 250 mL. Irrigation should continue until all visible, loose particulate matter has been removed. Warmed irrigant solutions are comfortable for patients, even after the wound is anesthetized.43 A potential complication of wound irrigation is that infectious material can be splashed into the face of the clinician, even when the tip of the irrigation device is held below the surface of the wound. Several commercial devices are available to contain the splatter, including devices that fit on the end of a syringe (see Fig. 34-5C and D) and devices that fit on the screw top of saline bottles (for this particular device the company reported variable pressure from 4 to 15 psi). An alternative strategy is to pierce the base of a small medicine cup with a large-bore needle. The cup can be placed upside down to cover the area to be irrigated and the syringe with the 19-gauge needle can be inserted through the base of the cup (see Fig. 34-5C). The wound should be positioned to allow continuous drainage of fluid during irrigation by any method. A variety of antibiotic solutions have been instilled directly into wounds or used as irrigation solutions, including ampicillin, a neomycin-bacitracin-polymyxin combination, tetracycline, penicillin, kanamycin, and cephalothin. Although there have been no reports of topical sensitization or toxic tissue levels of the antibiotic, studies have found inconsistent effectiveness in reducing infection rates.44–47 The indications for using antibiotic solutions to clean wounds have not been defined, and this practice is not considered standard. A sterile bottle of saline solution can be used to irrigate the wounds of multiple patients until the bottle is empty, but once the bottle is opened, bacterial contamination occurs quite rapidly.48 Use bottles opened only within the past 24 hours to irrigate wounds.48,49 Patients frequently irrigate their wounds with tap water before going to the ED. Many clinicians routinely irrigate wounds, especially extremity wounds, with tap water instead of sterile saline, and infection rates have been found to be comparable to that of saline irrigation50–53 (see Fig. 34-5E and F). The advantage of using tap water is that large volumes of irrigant can be quickly applied to an open wound. The disadvantages of this technique are that irrigation pressures are difficult to control and the patient may faint if allowed to stand at a sink. If tap water is used to irrigate wounds, deliver it through a syringe at the bedside. Before débridement or wound closure, prepare and drape the wound. Avoid shaving body hair because preoperative wounds that were shaved demonstrated higher infection rates.16,54–56 For wounds in hair-bearing areas, hair can be removed by clipping if it interferes with the procedure.55 Stubborn hairs that repeatedly invade the wound during suturing can be coated with petrolatum jelly or a water-soluble ointment to keep them out of the field. Do not shave eyebrows because critical landmarks for exact approximation of the wound edges would be lost. Although shaved eyebrows will grow back eventually, shaving produces an undesirable cosmetic effect as well. Clip hair rather than shaving it. Use a petrolatum- or water-based ointment to keep the hair out of the wound field. Disinfect the skin surface adjacent to the wound (not the wound itself) with a standard 10% povidone-iodine or chlorhexidine gluconate (Hibiclens) solution. Paint the solution widely on the skin surrounding the wound, but do not allow it to seep into the interior of the wound itself (Fig. 34-6A). After hand washing, the clinician and any assistants involved in the procedure must wear sterile or nonsterile but clean gloves.57 Sterile gloves are not required, and their use does not decrease infection rates. Wear face masks, especially if you have a upper respiratory bacterial infection. Because droplets of saliva may leak even from around the edges of a face mask, avoid talking in proximity to the wound.58 Use a single fenestrated drape or multiple folded drapes around the wound site. Place a sterile glove on a patient who has a hand wound to provide a sterile field in lieu of a fenestrated drape (see Fig. 34-6B). The area to be sutured can then be exposed by cutting the glove, and the extremity can be placed on a sterile towel. This technique provides a clean field without the need to continually adjust the drape or to operate through a small opening. Explore the entire depth and the full extent of every wound to locate hidden foreign bodies, particulate matter, bone fragments, or any injuries to underlying structures that may require repair (see Fig. 34-6C). Avoid the temptation to initially explore wounds and assess their characteristics with a finger in search of a foreign body because (see Fig. 34-6E) embedded glass, metal fragments, or sharp pieces of bone may cut the clinician and cause exposure to blood-borne infections. Visualize directly with good lighting in a bloodless field, explore the wound with a metal probe, and use radiographs as safer approaches to wound exploration. Despite these measures, lacerations through thick subcutaneous adipose tissue are treacherous because large amounts of particulate matter can be completely obscured in deep folds of tissue. Unless a careful search is undertaken, these contaminants may be left in the depths of a sutured wound, and infection usually follows. Some clinicians are reluctant to extend lacerations to properly clean or explore them; however, opening the wound to permit adequate visualization may be necessary for successful wound exploration. If the wound is already clean and the edges are viable, sharp débridement may not improve the outcome. Irregular wounds have greater surface areas than do linear lacerations. Because skin tension is distributed over a greater length, the width of the scar is usually less with jagged wounds than if the wound is converted to an elliptical defect with tidy edges. If the edges are devitalized or contaminated, though, the wound edges must be débrided (Fig. 34-7A and B). To avoid a wide scar in this situation, undermine the wound. Excision: Excision is the most effective type of débridement because it converts a contaminated traumatic wound into a clean wound. If significant contamination occurs in areas in which there is laxity of tissues and if no important structures, such as tendons or nerves, lie within the wound, the entire wound may be excised5 (see Fig. 34-7C). Complete excision of grossly contaminated wounds such as animal bites allows primary closure of such wounds with no greater risk for infection than occurs with relatively uncontaminated lacerations.31 When a puncture wound is excised, make the axis of the excision parallel to a wrinkle, a skin line, or a line of dependency or facial expression. Make the long axis of this lenticular excision three to four times as great as the short axis (see Fig. 34-7D). Premark the skin with a surgical marking pen or by making a superficial “scoring” mark (cutting only down to the epidermis) around the wound with a No. 15 scalpel blade. Place tension on the surrounding skin with a finger or a skin hook. While steadying your hand on the table or on the patient, use the No. 15 blade and cut through the skin at right angles or at slightly oblique angles to the surface of the skin. If complete excision of the entire depth of the wound is not necessary, use tissue scissors to cut the edge of the wound by following the path premarked in the epidermis with the scalpel blade. If complete excision is desired, incise each wound edge past the deepest part of the wound. Excise and remove the wedge of tissue carefully without contaminating the fresh wound surface. Plan the excision carefully because excessive removal of tissue can create a defect that is too large to close. Wounds on the trunk, the gluteal region, or the thigh are amenable to excision. In contrast, simple excision of a wound on the palm or the dorsum of the nose will make approximation of the resulting surgical wound edges difficult. In hair-bearing areas of the face, particularly through the eyebrows, angle the incision parallel to the angle of the hair follicles to avoid linear alopecia (see Fig. 34-7E). Selective Débridement: Complete excision is impossible for most wounds because of insufficient skin elasticity, so selective débridement must be used.5,21 Stellate wounds and wounds with an irregular, meandering course have greater surface area and less skin tension per unit length than do linear lacerations. In some cases, excision of an entire wound would result in the loss of too much tissue (i.e., produce a gaping defect and excessive tension on the edges of the wound when closed). Avoid this problem by selective débridement and approximation of the irregular wound edges. This technique involves sharp débridement of devitalized or heavily contaminated tissue in the wound piece by piece and eventual matching of one edge of the wound to the other. Selective débridement is time-consuming but preserves more surrounding tissue. In heavily contaminated wounds, especially those with abundant adipose tissue, remove all exposed fat and all fat impregnated with particulate matter. The subcutaneous adipose tissue attached to large flaps or to avulsed viable skin should be débrided before reapproximation of the wound; removal of this fatty layer allows better perfusion of the flap or the graft. Contaminated bone fragments, nerves, and tendons are almost never removed. Every effort should be made to clean these structures and return them to their place of origin because they may be functional later.59 Fascia and tendons perform important functions despite potential loss of viability. If they can be cleaned adequately, these tissues should not be débrided. They may be left in wounds as free grafts and be covered by viable flaps of tissue.60 Although simply crushing and twisting the end of a small vessel with a hemostat avoids the introduction of suture material into the wound, this method provides unreliable hemostasis. Ligation of the vessel with fine absorbable suture material is preferred. Clamp the bleeding ends of vessels with fine-point hemostats to provide immediate hemostasis. Because nerves often course with these vessels, clamp them only under direct visualization. The tip of the hemostat should project beyond the vessel to hold a loop of a ligature in place (Fig. 34-8A). With an assistant lifting the handle of the hemostat, pass a synthetic 5-0 or 6-0 absorbable suture around the hemostat from one hand to the other. Tie the first knot beyond the tip of the hemostat. Once the suture is securely anchored on the vessel, release the hemostat.61,62 Three knots are sufficient to hold the ligature in place. Cut the ends of the suture close to the knot to minimize the amount of suture material left in the wound. Ligate vessels with diameters greater than 2 mm. Vessels smaller than 2 mm that bleed despite direct pressure can be controlled by pinpoint, bipolar electrocautery. A dry field is required for an effective electrical current to pass through the tissues. If sponging does not dry the field, use a suction-tipped catheter. Minimize trauma by using fine-tipped electrodes to touch the vessel or touch the active electrode of the electrocautery unit to a small hemostat or fine-tipped forceps while gripping the vessel.3 Keep the power of the unit to the minimum level required for thrombosis of the vessel. Self-contained, sterilizable, battery-powered coagulation units are alternatives to electrocautery. These devices cauterize vessels by the direct application of a heated wire filament. Although these units may damage more surrounding tissue than electrocautery units do, they are compact, simple, and well suited for use in the ED (see Fig. 34-8B). A cut vessel that retracts into the wall of the wound may frustrate attempts at clamping, ligation, or cauterization. First, control bleeding by downward compression on the tissue. Pass a suture through the tissue twice via a figure-of-eight or horizontal mattress stitch, and then tie it. This stitch will constrict the tissue containing the cut vessel (see Fig. 34-8C). Large superficial varicosities may bleed spontaneously or from minor trauma. They may bleed profusely, especially when the patient stands up and increases venous pressure. Use a simple figure-of-eight suture to halt the bleeding (see Fig. 34-8D). Fibrin foam, gelatin foam, and microcrystalline collagen may be used as hemostatic agents. Their utility is limited in that vigorous bleeding will wash the agent away from the bleeding site. Their greatest value may be in packing small cavities from which there is constant oozing of blood.61 Do not spend excessive time attempting to tie off several small bleeding vessels while the patient slowly exsanguinates (Fig. 34-9). In highly vascular areas such as the scalp, it is sometimes best to suture the laceration after exploration and irrigation of the wound despite active bleeding; the pressure exerted by the closure will usually stop the bleeding (Fig. 34-10). If bleeding is too brisk to permit adequate wound evaluation and irrigation, control hemorrhage by clamping and everting the galea or dermis of each wound edge with hemostats. Raney clamps or a large hemostat is an excellent way to stop scalp bleeding; they are used during neurosurgical procedures. If the edge of the entire scalp is compressed, the bleeding will generally stop (see Fig. 34-10C). In the majority of simple wounds with persistent but minor capillary bleeding, apposition of the wound edges with sutures, followed by a compression dressing, provides adequate hemostasis.
Principles of Wound Management
Background: Wound Healing
Initial Evaluation
History
Wound Age
Other Historical Factors
Physical Examination
Mechanism of Injury and Classification of Wounds
Wound Location
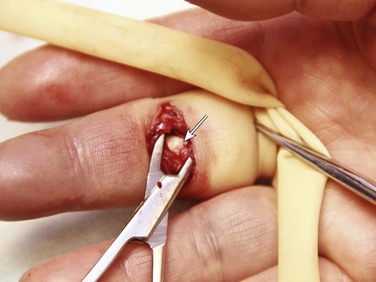
Underlying Structures
Cleaning
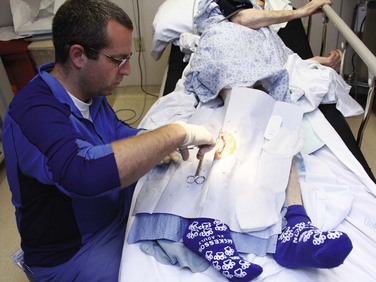
Patient Preparation
Mechanical Scrubbing
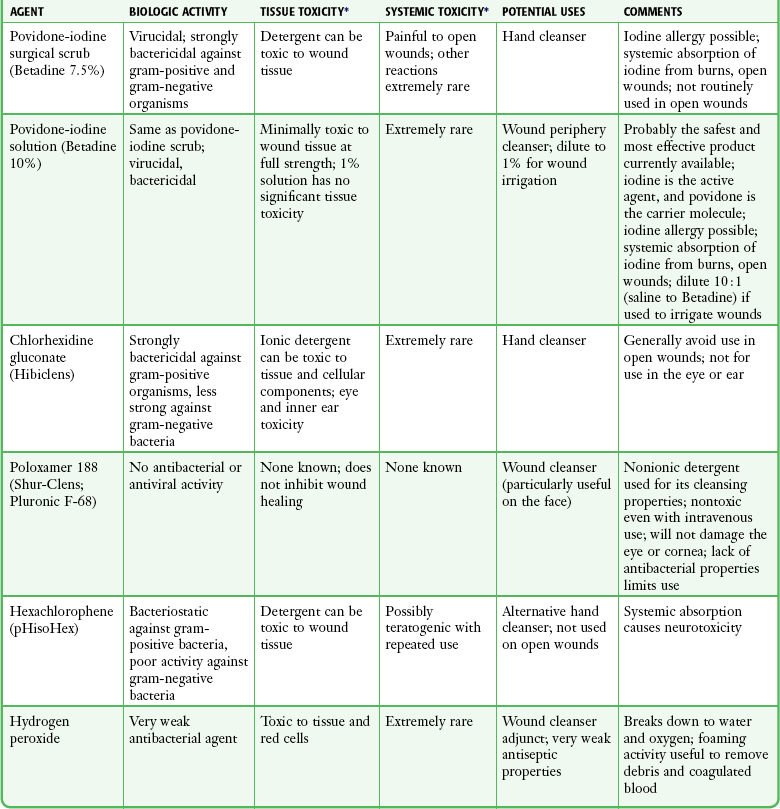
Antiseptics during Cleaning
Irrigation
Antibiotic Solutions for Irrigation
Recommendations for Cleaning the Wound
Preparation for Wound Closure
Débridement
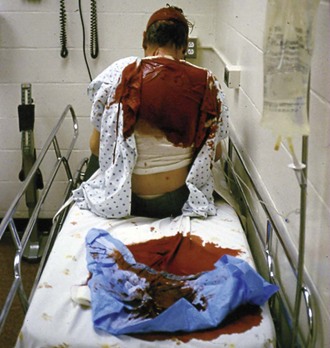
Control of Hemorrhage
![]()
Stay updated, free articles. Join our Telegram channel

Full access? Get Clinical Tree


Principles of Wound Management