CHAPTER 14 Peripheral Blood Smears
Blood smear examination is an integral part of the complete blood cell count (CBC) and is probably the most important aspect of a routine hematologic examination. A peripheral blood smear is examined (1) to determine the leukocyte differential count, (2) to detect alterations in erythrocyte and leukocyte morphology, and (3) to detect parasites (eg, Babesia sp.) and rickettsial inclusions (eg, Ehrlichia equi). Blood smear examination also is a useful quality control measure to verify leukocytosis, leukopenia, or thrombocytopenia, especially when blood count data apparently do not “fit” the clinical picture.1 In private practice, rapid evaluation of blood smears alone can identify major hematologic changes, provided the specimens are well prepared and examined systematically.
This chapter presents basic information and illustrations to allow practitioners to prepare and examine stained blood smears, identify normal blood cells and platelets, perform accurate leukocyte differential counts on sick animals, and recognize clinically important morphologic changes and inclusions within blood cells. Other excellent texts provide more detailed information on blood sample collection and analysis, including blood cell and platelet counts, hemoglobin determination, calculation of red cell indices, and determination of plasma protein and fibrinogen concentrations.2–6
Clinical Signs of Hematopoietic Abnormalities
Platelets maintain vascular integrity. With severe thrombocytopenia (<20,000 platelets/μl), petechial hemorrhages may be observed in the mucous membranes and skin.
Hematologic Reference Intervals
Reference intervals, previously known as “normal ranges,” are used for comparative purposes to identify patient abnormalities in the CBC.6 Reference intervals are determined by performing CBCs on a defined (age, breed, gender, reproductive status, physical activity, geographic location) population of clinically healthy horses. Statistical analysis of these data determines a smaller interval within which most test values occur in health, the reference interval. These narrower reference intervals allow more rapid detection of sick animals based on examination of laboratory test results.
Table 14-1 presents the reference intervals used to interpret equine hematologic data at the University of Georgia Veterinary Medical Teaching Hospital. These reference intervals reflect general equine practice in Georgia and may not be entirely applicable for specialized practices (exclusively light or draft breeds, racetrack animals, foals) or other areas of the United States, where normal hematologic data may differ slightly.
TABLE 14-1 Blood Reference Intervals for Horses*
| Erythrocytes | |
|---|---|
| Hematocrit (%) | 32–48 |
| Hemoglobin (g/dl) | 10–18 |
| Erythrocyte count (×106/μl) | 6–12 |
| Reticulocytes (%) | 0 |
| MCV (fl) | 34–58 |
| MCH (pg) | 13–19 |
| MCHC (g/dl) | 31–37 |
| Cell Type | Leukocytes Distribution range (%) | Absolute Range (cells/μl) |
|---|---|---|
| Leukocytes | — | 6000–12,000 |
| Neutrophils | ||
| Segmented | 30–75 | 3000–6000 |
| Band | 0–1 | 0–100 |
| Lymphocytes | 25–60 | 1500–5000 |
| Monocytes | 1–8 | 0–100 |
| Eosinophils | 1–10 | 0–800 |
| Basophils | 0–3 | 0–300 |
| Platelets | |
|---|---|
| Platelet count (×105/μl) | 1–6 |
| Mean platelet volume (fl) | 4.1–6.9 |
| Proteins | |
|---|---|
| Plasma protein (refractometry, g/dl) | 6.0–8.5 |
| Fibrinogen (heat precipitation, mg/dl) | 100–500 |
MCV, mean corpuscular volume; MCH, mean corpuscular hemoglobin; MCHC, MCH concentration.
* Derived from horses examined at University of Georgia Veterinary Medical Teaching Hospital.
Blood Smear Preparation
A well-prepared blood smear separates erythrocytes, leukocytes and platelets so they may be identified and examined after staining. Smears of EDTA-anticoagulated whole blood may be made using 1 × 3–inch frosted-end glass slides (wedge method) or 24 × 24–mm square glass coverslips (coverslip method).1 Before making smears, the blood sample should be mixed thoroughly because equine erythrocytes sediment rapidly.3
Wedge Method
Preparation of acceptable wedge smears requires minimal practice. Wedge smears are made using two clean glass slides (Fig. 14-1).1 A small drop of blood is placed near the frosted end of one slide using a microhematocrit tube. The second slide (spreader slide) is held between the thumb and forefinger. This slide is held at an angle (about 30 degrees) and drawn backward into the drop of blood. As the blood spreads along the trailing edge of the spreader slide, this slide is advanced in a rapid and smooth motion, carrying the blood with it. The smear is rapidly air dried, labeled in pencil on the frosted end, and stained.
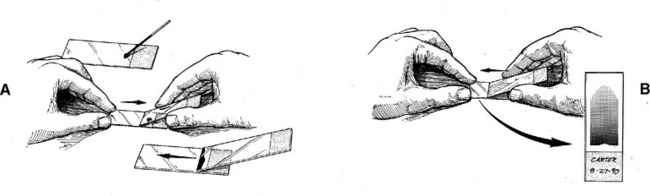
Fig. 14-1 Steps in producing wedge blood smear.
A, Drop of blood is placed near frosted end of slide. Spreader slide is drawn into drop of blood and then advanced. B, As spreader slide is rapidly advanced in a smooth motion, the blood smear is completed. A properly prepared blood smear has a distinct feathered edge, a body, and a butt end and is adequately identified.
Coverslip Method
Preparation of good coverslip slides requires more manual dexterity and practice than for wedge smears.1 Coverslip smears are thinner, making blood cell identification easier. Blood cells, especially leukocytes, are more evenly dispersed, resulting in a slightly higher percentage of monocytes on the leukocyte differential count. In contrast, maldistribution of leukocytes may occur in poorly prepared wedge smears, especially along the feathered edge.
Smears are made using two clean square glass coverslips (24 × 24 mm, #1½) (Fig. 14-2). One coverslip is held between the thumb and index finger. Using a microhematocrit tube, a small drop of blood is placed in the center of the coverslip. A second coverslip is quickly dropped onto the blood in a crosswise fashion. The blood spreads rapidly and evenly between the two surfaces. Just before spreading is complete, rays appear along the edges of the rapidly spreading blood, and the coverslips are pulled apart laterally in a single smooth motion. Smears are rapidly air-dried, labeled in pencil along the base of the blood smear, and stained in a routine manner.
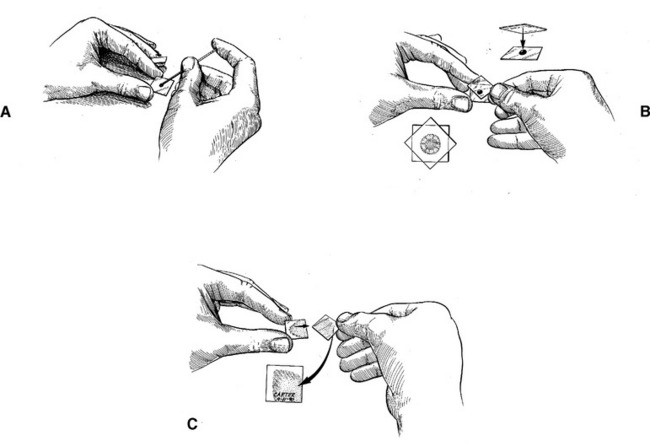
Fig. 14-2 Steps in producing coverslip blood smear.
A, Drop of blood is placed in center of coverslip, using microhematocrit tube. B, Second coverslip is placed crosswise over drop of blood, and blood begins to spread. Appearance of radial striations indicates spreading is almost complete. C, Coverslips are pulled apart laterally in a smooth, rapid motion when the radial striations appear. The butt of the completed smear is labeled for patient identification.
Blood Smear Staining
Practitioners should have a basic understanding of hematologic stains and how to troubleshoot common staining problems.1 With careful attention to detail, high-quality stained blood smears can be produced consistently.
Blood smears are most often stained with Romanowsky stains (Wright’s, Giemsa, Leishman’s). These stains also are called polychromic stains because three colors (red, blue, purple) are produced. Both classic Wright’s stain and Romanowsky-based “quick” stains (eg, Diff-Quik) are often used in private practice settings. These stains are similar but vary slightly in tinctorial properties and staining technique.
Diff-Quik Stain
Diff-Quik is supplied in three solutions: light blue, red-orange, and blue-purple. Each solution is placed in a separate container or Coplin jar. The staining process begins by dipping the smear in the light blue solution about 5 times to allow adequate fixation of cellular components. The smear is immediately dipped in the red-orange solution about five times to give a red color to certain cellular structures. The smear then is dipped in the blue-purple solution about five times to provide both blue and purple colors. The smear is rinsed in tap water, stain residue is wiped from the underside of the slide, and the preparation is air-dried on end. Total staining time is approximately 15 seconds.
Troubleshooting Common Problems
Inadequate Staining: Inadequate staining is characterized by blood smears in which erythrocytes and eosinophil granules stain bright red and leukocyte nuclei are blue instead of purple (Fig. 14-3). With Wright’s stain, this observation usually indicates inadequate staining time or overzealous application of buffer, with subsequent loss of dye solution. Preparations may be salvaged by restaining the smear. To prevent this problem, staining time should be increased, or care should be taken not to apply too much buffer.
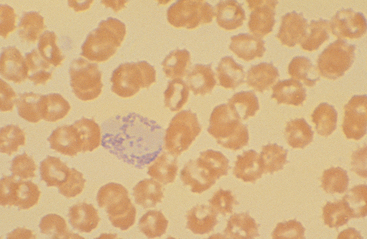
Fig. 14-3 Inadequately stained blood smear.
Basophil lacks purple coloration of its nucleus and granules. This smear was salvaged by restaining.
Precipitate Formation: Precipitate formation is a problem because it can obscure cellular detail, preventing adequate examination of the blood smear (Figs. 14-4 and 14-5). Smears cannot always be salvaged, but causes of precipitate formation can be corrected rapidly. Problems are more common with Wright’s stain than with Diff-Quik stain.
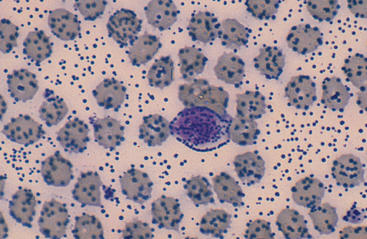
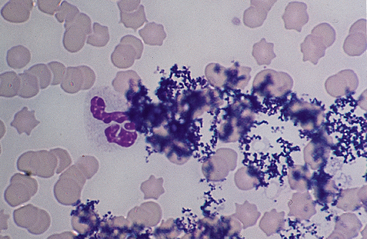
A coarse globular precipitate forms with Wright’s stain if excessive incubation time is allowed after application of the dye solution (Fig. 14-4). The dyes are dissolved in absolute methanol, which eventually evaporates and results in the deposition of a coarse stain precipitate. Therefore the incubation period should be timed carefully to prevent globular precipitate formation.
A reticular staining precipitate occurs when the iridescent surface metallic film that develops during Wright’s staining is deposited on the slide due to inadequate washing after buffer application (Fig. 14-5). This metallic film obscures cellular detail. Therefore the slides must be rinsed carefully at the end of the staining procedure to prevent precipitate from settling on the surface of the blood smear.
Precipitate may also be present in the stock or working dye solutions. With Wright’s stain, the stock and working dye solutions should be filtered through Whatman #1 or #2 filter paper into clean storage bottles. With Diff-Quik, the blue-purple solution should be filtered as described earlier into a clean Coplin jar.
Normal Blood Cell Components
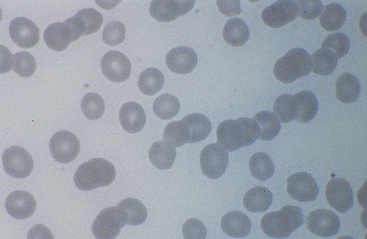
Erythrocytes from healthy horses are about 5.7 μm in diameter. These cells stain red and have slight central pallor. Equine erythrocytes sediment rapidly in health, and rouleau formation is observed frequently (Fig. 14-6). Howell-Jolly bodies (purple punctate DNA remnants) are observed infrequently in healthy animals and more often in severe anemia (Fig. 14-7). Reticulocytes or polychromatophilic erythrocytes may be observed in bone marrow aspirates but generally are not released into the circulation, even in the presence of severe anemia.
Stay updated, free articles. Join our Telegram channel

Full access? Get Clinical Tree


