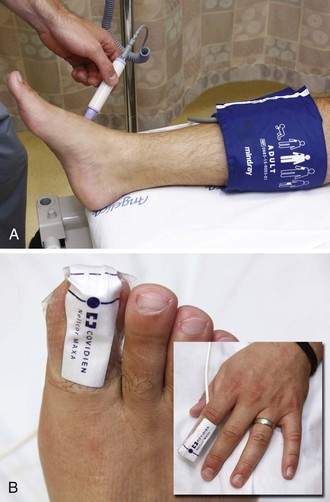
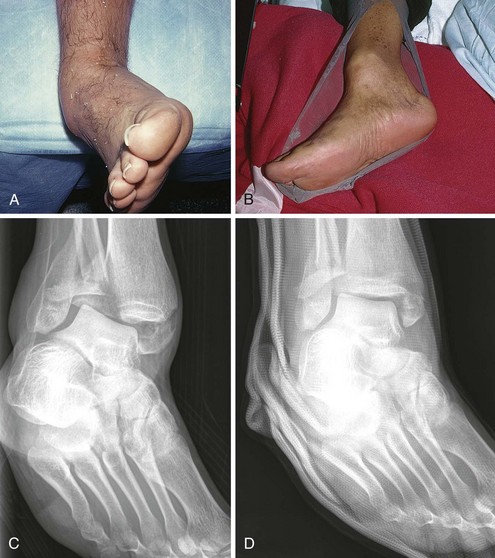
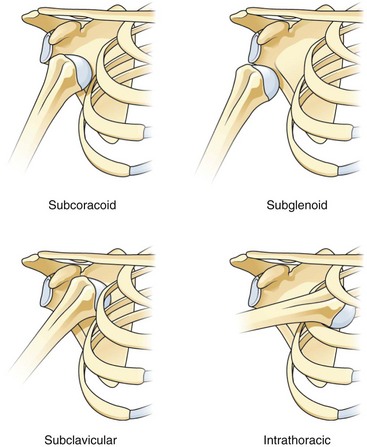
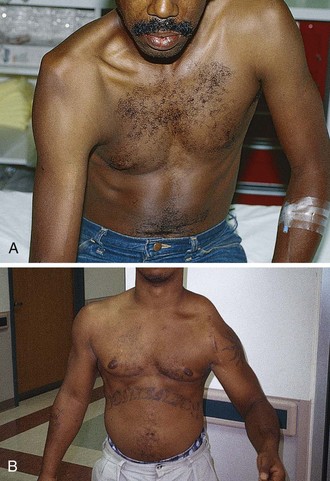
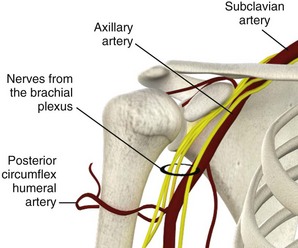
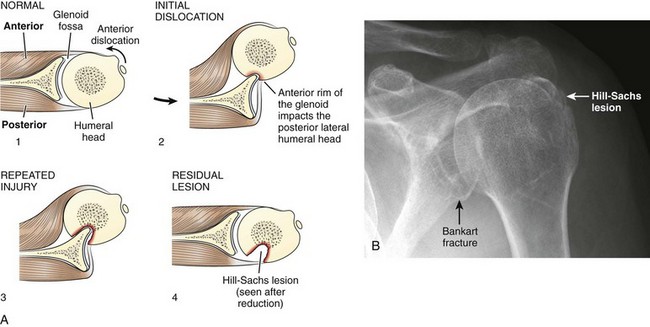
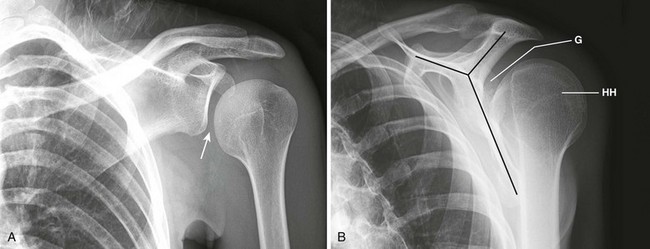
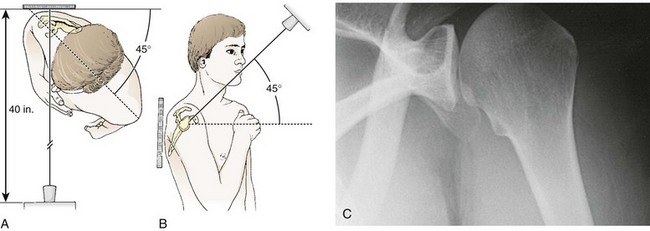
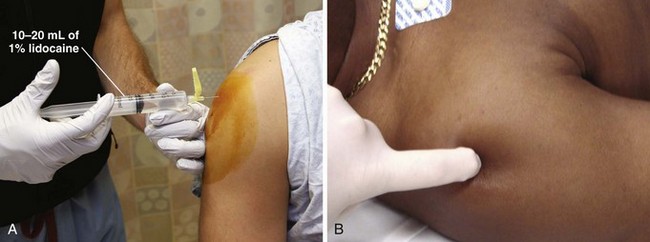
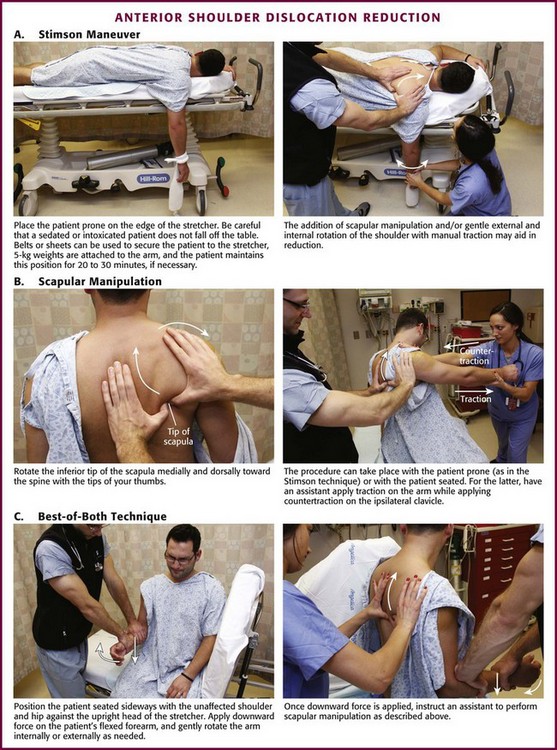
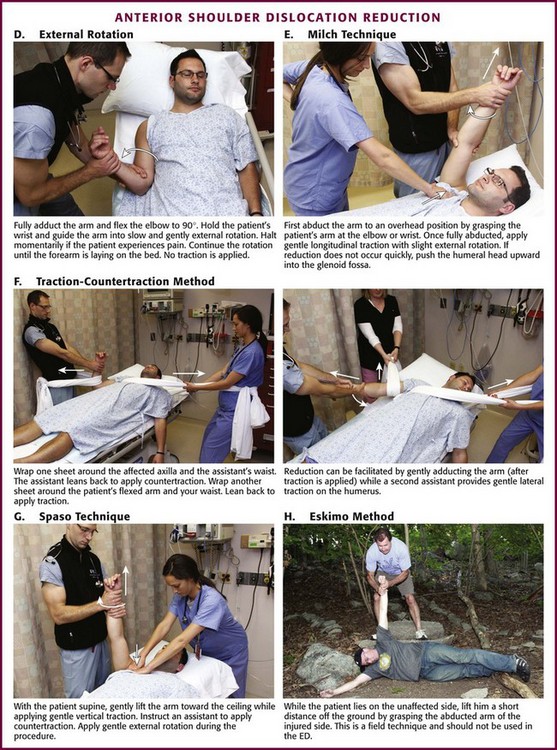
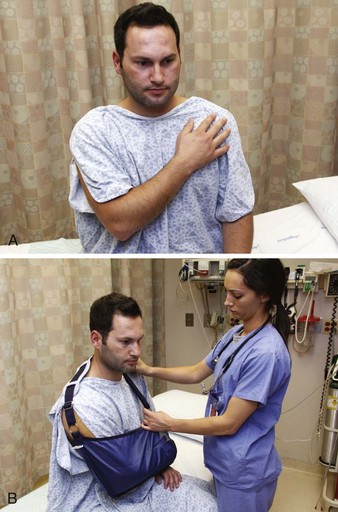
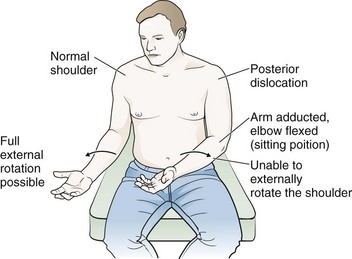
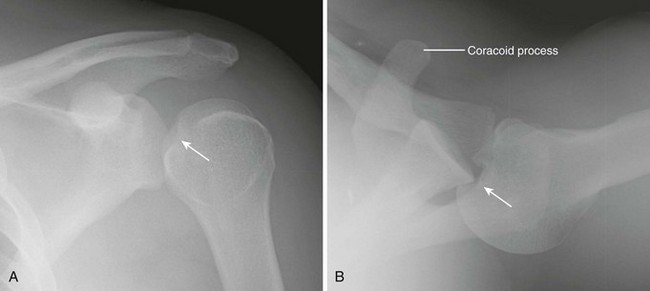
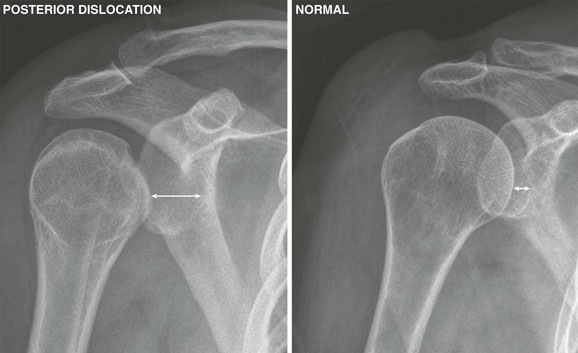
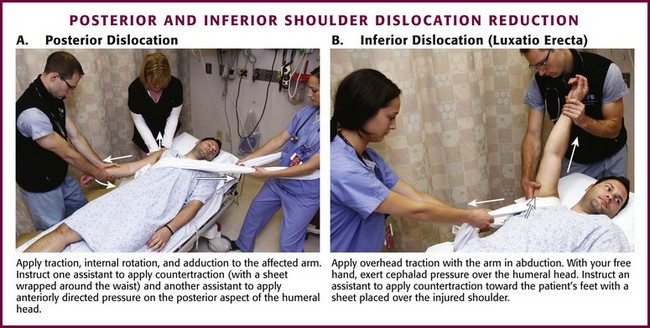
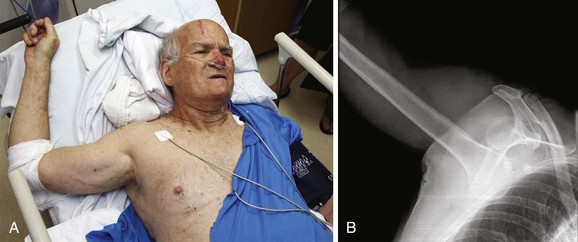
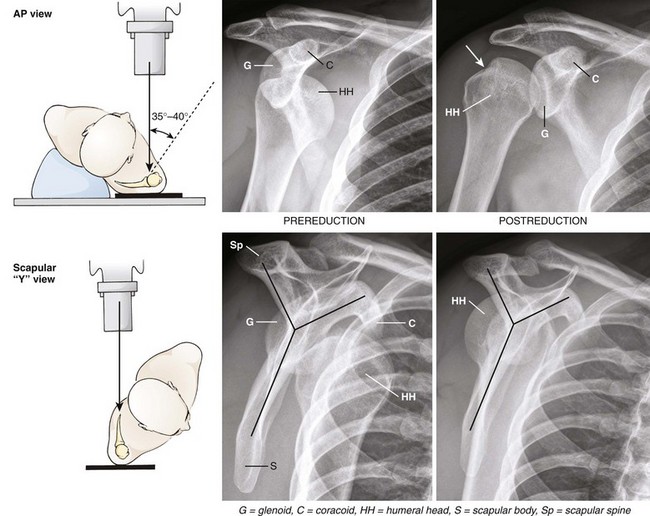
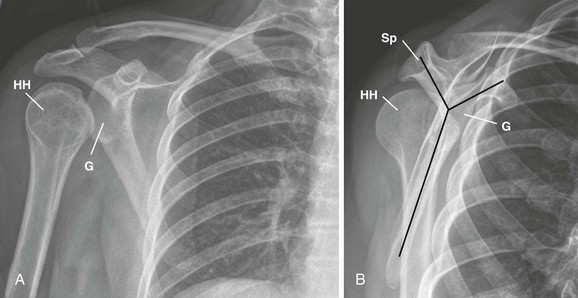
Chapter 49 Although many authors claim that their reduction method is well tolerated without premedication, they have not usually measured the discomfort of their patients quantitatively.1–5 There are no rigid, generally accepted guidelines for the use of pharmacologic adjuncts in the management of dislocations. Each patient and each dislocation is unique, and the treating clinician must use judgment regarding whether premedication is required, which agent or agents to use, and what dose to give. In general, the authors suggest the judicious use of analgesia with or without sedation for the majority of reductions performed in the ED. A calm, cooperative patient may tolerate attempts at gentle reduction of a major joint such as the shoulder, but even the most stoic of patients may be quite uncomfortable with the manipulations necessary for reduction of a dislocated finger. A radial head dislocation in a child is usually easily treated without analgesia; however, reduction of a hip dislocation is unlikely to be successful without a significant amount of sedation and analgesia. Attempting any reduction technique in an extremely anxious patient without premedication will generally frustrate the operator and further upset the patient and may hinder a successful outcome. When multiple attempts are required and significant force must be exerted because of muscle spasm or an uncooperative patient, there is an additional chance of producing complications during the reduction. Verbal techniques for alleviating anxiety and discomfort are not to be discounted because they can be of great assistance during joint reduction. In field settings, simple hypnosis techniques have been used successfully for major joint dislocations.6 In the ED, verbal reassurance and distracting conversation are useful adjuncts. In most circumstances, analgesia or sedation of some sort, or both, will be required; the intravenous (IV) route of drug administration is usually the method of choice because it allows rapid relief of patient discomfort and facilitates repetitive dosing for titration to the desired effect (see Chapter 33). Alternatives to procedural sedation and analgesia include intraarticular injection of local anesthetics, hematoma blocks, peripheral nerve blocks, and regional anesthesia (see Chapters 29, 31, and 32). Although the chance that a gentle attempt at reduction will cause a fracture or neurovascular injury is extremely low, careful evaluation before and after reduction, as well as documentation of the patient’s neurovascular status, is important. Frequently, the initial pain of the dislocation is distracting, and paresthesias or a weak pulse may not be readily apparent until the joint has been reduced. When the integrity of the pulse is in question, blood pressure at the wrist or foot may be compared with that in the uninjured extremity, or a pulse oximeter may be applied to the distal end of the fingers (Fig. 49-1). Some authors question the need for prereduction films in certain patients with obvious or recurrent anterior shoulder dislocation.7,8 Although postreduction radiographs are traditionally obtained, the need for this in a clinically obvious successful shoulder joint relocation has been questioned.8,9 The authors suggest that postreduction films be taken in virtually all patients who have had a dislocation reduced in the ED. Patients who have received sedatives and opioids may not remember the actual successful reduction or the immediate postreduction period. Reinjury after release from the ED without radiographic corroboration of a successful reduction can raise questions about the adequacy of the initial procedure. Occasionally, a fracture is detected on postreduction radiographs that was not obvious on the initial films, or a previously noted minor fracture may be found to reside in an intraarticular location.8 It is generally accepted that the sooner a dislocation is reduced, the better. This alleviates the patient’s discomfort and corrects distortion of the surrounding soft tissues. In some studies the success rate of reduction is higher when attempted closer to the time of injury.2 However, there is no reason to forego an attempt at closed reduction of an “old injury” in the vast majority of dislocations. Chronic dislocations persisting several days, weeks, or longer are often difficult to reduce in a closed manner, but such cases are infrequent. Questions often arise concerning the necessity of immediate reduction versus delayed reduction, with the clinician fearing disastrous neurovascular consequences if a dislocation is not manipulated immediately on arrival at the ED. In reality, there is rarely an instance in which prereduction radiographs, even portable films, cannot be obtained before treatment. Even if the pulse is weak or the fingers are numb, a few minutes’ delay is usually acceptable to gain important radiographic information on the type of dislocation and the presence of an associated fracture and to provide documentation for follow-up clinicians. Important clinical information may be difficult to obtain, or the specific initial injury may be impossible to reconstruct once the joint has been reduced (Fig. 49-2). Of equal importance, a dislocation with concomitant neurovascular injury should be reduced with the least amount of trauma possible, which often requires a few minutes for induction of analgesia and sedation, a time during which radiographs can be obtained. If a vascular or neurologic abnormality is documented before reduction, the joint should be reduced by the most timely and least traumatic procedure available. Each case should be handled individually by taking the specific injury, available resources, and the clinician’s experience into account. Although multiple unsuccessful or forceful attempts at reduction in the ED should be avoided with all dislocations, this is especially important in patients with vascular or neurologic compromise. Occasionally, the more prudent course is reduction under general anesthesia, but this decision must take into consideration the availability of consultation and other resources. This chapter covers dislocations of the various joints with the exception of wrist dislocations, which are complex and require orthopedic consultation, and temporomandibular joint dislocations, which are discussed in Chapter 63. The human shoulder joint is remarkable for its degrees of motion, but the anatomic features that allow this mobility, contribute to its instability. The glenohumeral joint has the greatest range of motion of any joint in the body, largely because of the loose joint capsule and the shallow nature of the glenoid fossa.10 Posterior dislocation is uncommon, mainly because of the anatomic support of the scapula and the thick muscular support in this area. Anterior support is less pronounced, with the inferior glenohumeral ligament serving as the primary restraint to anterior dislocation.11 The depth of the glenoid fossa is somewhat increased by the fibrocartilaginous glenoid labrum, which forms the rim of this structure. Most shoulder dislocations are anterior (i.e., the humeral head becomes situated in front of the glenoid fossa). Posterior dislocations are the next most common, but they generally account for less than 4% of shoulder dislocations.12 Uncommon variations include inferior (luxatio erecta), superior, and intrathoracic dislocations. Anterior dislocations of the shoulder are the most common major joint dislocation encountered and reduced in the ED. The usual mechanism of injury is indirect and consists of a combination of abduction, extension, and external rotation.10,11 Only rarely is the mechanism a direct blow to the posterior aspect of the shoulder. Occasionally, especially with recurrent dislocations, the mechanism is surprisingly minor and can be puzzling to the clinician. An anterior dislocation can be induced by mere external rotation of the shoulder while rolling over in bed or raising the arm overhead. When the first dislocation occurs at a younger age, the recurrence rate is higher. If the first dislocation occurs before 20 years of age, there is an 80% to 92% rate of recurrence. If the first dislocation takes place after 40 years of age, the rate of recurrence is 10% to 15%.10 Rotator cuff injuries, however, occur more frequently in older patients with anterior shoulder dislocations.13 The four types of anterior dislocations are classified according to where the humeral head comes to rest. Subcoracoid dislocations account for more than 75% of anterior dislocations. Other shoulder dislocations include subglenoid dislocation and the uncommon subclavicular and intrathoracic dislocations (Fig. 49-3).10 The presence of an anterior shoulder dislocation is usually obvious (Fig. 49-4). A posterior dislocation is more subtle in terms of both clinical and radiographic findings. It can be misdiagnosed as a severe contusion (Table 49-1). A patient with an anterior shoulder dislocation supports the injured extremity and leans toward the injured side while holding the arm in abduction and slight external rotation. The patient cannot adduct or internally rotate the shoulder. Visual inspection reveals loss of the rounded appearance of the shoulder because of absence of the humeral head beneath the deltoid region. The acromion is prominent and an abrupt drop-off below the acromion can be seen or palpated. An anterior fullness in the subclavicular region is visible in thinner individuals and is easily palpable in most others. Comparison with the uninjured side is a useful aid for both visual examination and palpation. Any attempt at internal rotation is quite painful and resisted by the patient. An inability to place the palm from the injured extremity on the uninjured shoulder is consistent with an anterior shoulder dislocation; after reduction, this maneuver should be possible. TABLE 49-1 Careful assessment of the neurovascular status of the affected extremity is essential (Figs. 49-5 and 49-6). Injury to the axillary artery is rare. It usually occurs in the elderly13 and can be quickly assessed by a decreased or absent radial pulse or by the appearance of an expanding hematoma. It is important to evaluate the status of the axillary nerve because this is the most common nerve injury resulting from anterior dislocations.14 Assess the sensory component of the axillary nerve by testing for sensation over the lateral aspect of the upper part of the arm in the “regimental badge” area over the deltoid muscle. Test the motor component of the axillary nerve by assessing the strength of the deltoid muscle; however, this is a difficult undertaking in a patient with a dislocated shoulder. Less commonly, the brachial plexus may be injured by a stretch injury and produce variable nerve deficits. Perform a complete assessment of all the major nerves to the arm because other nerve injuries may occur, such as injuries to the ulnar and radial nerves.14 A neurologic deficit does not preclude closed reduction, but in patients with a nerve injury, avoid multiple forceful attempts at reduction. Vascular injuries, such as axillary artery disruption, are rare but usually quite obvious because of dysesthesias and coolness of the involved arm. An expanding axillary hematoma, pulse deficit, peripheral cyanosis, and pallor can be seen. Collateral circulation may produce a faint pulse in the extremity, so comparison with blood pressure on the uninjured side may be helpful. Specific lesions include complete disruption, linear tears, and thrombosis. Axillary artery injuries can occur at all ages, but they are more prominent in the elderly. The artery is particularly at risk with anterior dislocations, and dislocation with spontaneous reduction can produce the injury. Arteriography with surgical repair of the artery is required, occasionally with fasciotomy of the forearm if the ischemia is long-standing.15 Associated fractures are detected in 15% to 35% of anterior shoulder dislocations, with fractures of the greater tuberosity being the most common.10 The presence of a fracture of the greater tuberosity does not change the initial management of anterior shoulder dislocations, and these fractures usually heal well after closed reduction in routine fashion.10 The Hill-Sachs deformity, a sign of repeated dislocations, produces a groove in the posterolateral aspect of the humeral head and may be seen on prereduction or postreduction films (Fig. 49-7). The Hill-Sachs deformity is caused by impaction of the humeral head against the glenoid rim after dislocation. It rarely has any clinical significance but may result in a loose body within the joint.13 Impaction of the humeral head against the glenoid during dislocation may also cause disruption of the anteroinferior portion of the cartilaginous labrum of the glenoid or the inferior aspect of the bony glenoid, an injury known as a Bankart lesion. It has been implicated as one source of recurrent dislocations but does not affect immediate ED management.13 Fractures of the humeral neck are frequently displaced with attempts at closed reduction, which can lead to avascular necrosis of the humeral head.16 The fact that humeral neck fractures are a known complication of shoulder relocation10 suggests the value of prereduction radiographs of anterior shoulder dislocations. However, some argue that clinically obvious recurrent dislocations and first-time anterior dislocations without a blunt traumatic mechanism (information usually offered by the patient) can be reduced without prior radiographs because fracture is quite unlikely in these situations.7,8 Hendey and coworkers17 performed a prospective validation study of an algorithm for selective radiography that incorporated the mechanism of injury, previous dislocations, and the clinician’s certainty of joint position. In this study, 24 patients with recurrent atraumatic anterior shoulder dislocations who received neither prereduction nor postreduction radiographs had no clinically significant fractures found on follow-up. These patients had much shorter ED lengths of stay than did patients who received only prereduction or postreduction films, or both.17 One retrospective case-control study found that the presence of any of three risk factors (age >40 years, first episode of dislocation, traumatic mechanism of injury defined as a fall greater than one flight of stairs, a fight or assault, or a motor vehicle collision) predicted clinically important fractures with a sensitivity of 97.7%.18 This study has not yet been prospectively validated. Anterior dislocations are not subtle on routine anteroposterior (AP) radiographs, and this view detects the most important fracture to identify, that of the humeral neck (Fig. 49-8). An adequate AP view, when combined with the typical clinical examination, allows successful management of most anterior shoulder dislocations. A true AP view of the shoulder is taken at a right angle to the scapula and requires rotation of the patient to 30 to 45 degrees. Figure 49-8 Anteroposterior (AP) and scapular “Y” views of an anterior subcoracoid dislocation. The AP views (top row) are fairly easy to interpret. On the prereduction film, the humeral head is clearly dislocated from the glenoid fossa and is seen underneath the coracoid process. The correct anatomic relationship of the humeral head and glenoid is demonstrated on the postreduction film. Note the presence of a Hill-Sachs lesion (arrow) on the superior aspect of the humeral head. The scapular “Y” view (bottom row) is more difficult to understand. The limbs of the “Y” are composed of the scapular spine, the coracoid process, and the scapular body (gray lines). The glenoid fossa is found at the convergence of these limbs in the center of the scapula. On the prereduction view, the humeral head is found anterior, or medial, to the glenoid and under the coracoid, thus confirming the presence of an anterior dislocation. In a posterior dislocation, the humeral head is posterior, or lateral, to the glenoid (see Fig. 49-9). On the postreduction view, the humeral head is correctly positioned in the middle of the “Y,” over the glenoid. (Diagrams from Heppenstall RB. Fracture Treatment and Healing. Philadelphia: Saunders; 1980:374.) The typical lateral views obtained include a scapular Y view (see Fig. 49-8), a transthoracic view, and an axillary view. These views rarely add to the AP film in patients with an obvious anterior dislocation, but they are of value in posterior dislocations (Fig. 49-9). The usefulness of additional views for anterior shoulder dislocations is primarily to detect fractures, and the previously mentioned lateral views (especially the transthoracic view) are quite limited in this respect.19 The apical oblique view has been found to be more valuable than the oblique scapular projection for acute shoulder trauma.19 This view is obtained by angling the beam 45 degrees caudad with the patient in a 45-degree oblique position (Fig. 49-10). Postreduction radiographs are obtained to document the success of the reduction. Occasionally, they will reveal a fracture not detected on prereduction radiographs. In one series, 8% of patients with anterior shoulder dislocations had Hill-Sachs deformities noted only on postreduction films.8 More recent reports have highlighted the role of ultrasound in shoulder dislocation, both for diagnosis19,20 and for confirmation of reduction.21 Hippocrates (450 bc) is generally credited with the first detailed description of reduction techniques, and it is believed that a drawing in the tomb of Upuy (1200 bc) is the earliest depiction of such a method.10 The Hippocratic technique involves placement of the operator’s foot in the axilla to allow countertraction. This technique is problematic and not recommended by some authors.3,11 Likewise, the Kocher method, which involves forceful leverage of the humerus, is associated with an increased rate of complications and is generally discouraged in favor of other techniques.10,11 This section discusses several methods of reduction that are well studied, proven to be safe, and easy to master. Regardless of the reduction technique used, gradual, gentle application of the technique is essential. Although all the techniques discussed are generally acceptable and many authors state that their techniques are quite painless,1–5 few studies have quantified the actual pain reported by patients.22 As noted previously, intraarticular lidocaine may also be used to reduce the pain accompanying reduction (Fig. 49-11). In studies by Matthews and Roberts23 and Kosnick and colleagues,24 intraarticular injection of lidocaine was found to offer significant relief of pain during reduction of anterior shoulder dislocations. In addition, a recent metaanalysis showed that intraarticular lidocaine had similar success rates as procedural sedation and led to decreased ED length of stay, decreased personnel times, and reduced overall health care cost, thus making it a useful alternative to procedural sedation and analgesia.25 A Cochrane review reported similar results.26 When using intraarticular lidocaine, any blood present should be aspirated from the glenohumeral joint before injecting the anesthetic. Note that 10 to 20 mL of 1% lidocaine has been used with the intraarticular technique and that it may take as long as 15 to 20 minutes for adequate analgesia. Recently, Blaivas and Lyon27 reported the ED use of ultrasound-guided interscalene blocks for analgesia before reduction of shoulder dislocations (see Chapter 31). It is important to note that neither local nor regional anesthesia produces muscle relaxation, but they may obviate the need for IV access and prolonged observation. Operator judgment is an important part of the decision whether reduction should be attempted without premedication. Advantages of such an approach include avoidance of potential complications from drug therapy, reduced staff requirements, and theoretically, more rapid patient disposition. Certainly, a patient who is markedly intoxicated may require little, if any supplemental sedative therapy. However, all patients who are reluctant or too anxious to cooperate with an attempt at reduction without medication and those with a high degree of muscle spasm should receive premedication. Generally, only one attempt is made; if unsuccessful, further attempts at reduction are made after the IV administration of sedatives. When in doubt, it is best to use pharmacologic adjuncts (see Chapter 33). Stimson Maneuver (Fig. 49-12A): The Stimson maneuver is a classic technique that offers the advantage of not requiring an assistant. Place the patient prone on an elevated stretcher and suspend about 2.5 to 5.0 kg (5 to 10 lb) of weight from the wrist.10,11 The weights can be strapped to the wrist, or a commercially available Velcro wrist splint can be placed and the weights hung from the strap with a hook.28 The slow, steady traction produced with this method often permits reduction, but 20 to 30 minutes may be required. If needed, facilitate reduction by externally rotating the extended arm. Variations of this method include the recommendation for flexion of the elbow to further relax the biceps tendon and the application of manual traction instead of weights.29,30 Rollinson31 allowed the arm to hang under its own weight after a supraclavicular block and reported a 91% success rate with usually no more than a gentle pull on the arm after 20 minutes in this position. Each variation of the Stimson method can be used in combination with the scapular manipulation technique described later. Indeed, a success rate of 96% has been reported with the combined prone position, hanging weights, IV analgesia and sedation, and scapular manipulation.28 Scapular Manipulation Technique (see Fig 49-12B): This method is popular because of its ease of performance, reported safety, and acceptability to patients. To date, no complications from the scapular manipulation technique have been reported in the literature.22,28,32 Shoulder reduction via this method focuses on repositioning the glenoid fossa rather than the humeral head, and less force is required than with many other methods.23 Its success rate is high, generally greater than 90% in experienced hands.28,32,33 Some studies report higher success rates in patients who have had repeated dislocations and lower rates in patients with an associated greater tuberosity fracture.33 The initial maneuver for scapular manipulation is traction on the arm as it is held in 90 degrees of forward flexion. This may be performed with the patient prone and the arm hanging down, as described for the Stimson method, with or without flexion of the elbow to 90 degrees. Alternatively, this traction may be applied by placing an outstretched arm over the seated patient’s midclavicular region while pulling the injured extremity with the other arm. Regardless of the means of arm traction, slight external rotation of the humerus may facilitate reduction by releasing the superior glenohumeral ligament and presenting a favorable profile of the humeral head to the glenoid fossa.34 The prone patient position is recommended for those not familiar with the technique because it facilitates identification of the scapula for manipulation (medial rotation of the tip). Nonetheless, the technique can be performed with the patient supine given that the patient’s shoulder is flexed to 90 degrees and the scapula is exposed during gentle upward traction on the humerus.35 Although seated scapular manipulation offers the advantage of not requiring the patient to go through the awkward and potentially uncomfortable assumption of the prone position, it is a technically more difficult variation of scapular manipulation, especially if sedation is going to be necessary. When using the prone position, place the injured shoulder over the edge of the bed to allow the arm to hang perpendicular for the application of traction (see Fig. 49-12A).32 After the application of traction, manipulate the scapula to complete the reduction. Anderson and associates32 recommended manipulation of the scapula after the patient’s arm is relaxed; however, success is possible with no delay in performing this second step.22 Manipulate the scapula by stabilizing the superior aspect of the scapula with one hand and pushing the inferior tip of the scapula medially toward the spine. Place the thumb of the hand stabilizing the superior aspect of the scapula along the lateral border of the scapula to assist the pressure applied by the thumb of the other hand. A small degree of dorsal displacement of the scapular tip is recommended as it is being pushed as far as possible in the medial direction.32 BOB Technique (see Fig. 49-12C): A recently described variation of the seated scapular manipulation technique is the “best of both” (BOB) maneuver.36 To perform the BOB maneuver, position the patient seated sideways on the stretcher with the unaffected shoulder and hip against the fully elevated head of the stretcher. Stand on the foot end of the gurney at the patient’s affected side and use one hand to apply downward force on the proximal end of the patient’s bent forearm. Use the other hand to grasp the patient’s hand and gently rotate the arm internally or externally as needed. Once downward force is being applied, ask an assistant to perform the scapular manipulation maneuver described earlier.36 External Rotation Method (see Fig. 49-12D): This method offers the advantage of requiring only one person and no special equipment. The technique needs no strength or endurance on the part of the operator and is well tolerated by patients.3 The actual pain experienced by patients with this technique has not been quantified, but Plummer and Clinton3 stated that it can be performed with “little, if any sedation.” In this technique, the basic maneuver is slow, gentle external rotation of the fully adducted arm. In 1957, Parvin37 described a self-reduction external rotation technique in which the patient sits on a swivel-type chair and grasps a fixed post positioned waist high and slowly turns the body to enact external rotation. Parvin37 reported that the reduction usually takes place at 70 to 110 degrees of external rotation. Since Parvin’s initial study, this method has been described with the patient supine and the affected arm adducted tightly to the side of the patient.1,38 Flex the elbow to 90 degrees and hold it in the adducted position with the operator’s hand closest to the patient. Use the other hand to hold the patient’s wrist and guide the arm into slow and gentle external rotation. The procedure may require several minutes because each time that the patient experiences pain, the procedure is halted momentarily. Although the report of Mirick and coworkers1 mentioned using the forearm as “a lever,” a later description clearly recommends allowing the forearm to “fall” under its own weight.3 No additional force should be applied to the forearm, and no traction is exerted on the arm. The end point of the reduction may be difficult to identify because reduction is frequently very subtle. It is therefore recommended that external rotation be continued until the forearm is near the coronal plane (lying on the bed, perpendicular to the body), a process that usually takes 5 to 10 minutes.3 If the patient’s dislocation persists after full external rotation, apply steady gentle traction at the elbow. Reduction may occasionally be noted when the arm is rotated back internally.38 The success rate of this technique in three series performed by emergency clinicians was around 80%.1,38,39 Milch Technique (see Fig. 49-12E): Proponents of this method praise its gentle nature, high success rate, lack of complications, and tolerance by patients.2,5 It can be described as “reaching up to pull an apple from a tree.” The basic steps of this technique are abduction, external rotation, and gentle traction of the affected arm. Finally, if needed, the humeral head can be pushed into the glenoid fossa with the thumb or fingers. In describing this technique, Milch40 wrote that the fully abducted arm was in a natural position in which there was little tension on the muscles of the shoulder girdle. He postulated that this was related to our ancestral “arboreal brachiation” (swinging from trees). The primary step in this technique is to abduct the affected arm to an overhead position. Russell and colleagues34 had their patients raise their arm and put their hand behind their head as a first step. Although this seems odd, patients can usually do this quite readily with little assistance and be quite comfortable in this position. Alternatively, abduct the arm by grasping the patient’s arm at the elbow or the wrist. Lacey and Crawford41 found that the prone position, with the patient’s shoulder close to the end of the bed, facilitated this step. Once the arm is fully abducted, apply gentle longitudinal traction with slight external rotation. If reduction does not occur quickly, push the humeral head upward into the glenoid fossa with the thumb or fingers of the other hand. Beattie and associates2 reported a success rate of 70% with the Milch technique, but others have achieved success rates of 90% or greater.5,34 Traction-Countertraction (see Fig. 49-12F): This method is commonly used in the ED, largely because of tradition, clinician comfort, and a high success rate. Clinician familiarity is an advantage of this technique, but it requires more than one operator, some degree of force, and occasionally, endurance. This technique is usually quite uncomfortable for the patient, and premedication is recommended before any attempt. Once traction has been applied, the operator must be patient because the procedure may take a number of minutes to be successful. The premedication is probably inadequate if the patient resists the procedure or is notably uncomfortable during attempts at reduction. Do not hesitate to order supplementary medications. Gentle, limited external rotation is sometimes useful to speed reduction.10 Applying traction to an arm that is slightly abducted from the patient’s body is often successful, but some operators prefer to slowly bring the arm medial to the patient’s midline while maintaining traction or to have an assistant apply a gentle lateral force to the midhumerus to direct the humeral head laterally. Successful reduction is usually presaged by slight lengthening of the arm as relaxation occurs, and a noticeable “clunk” may occur at the point of reduction. A brief wave of fasciculations in the deltoid may also be seen at the time of reduction. Spaso Technique (see Fig. 49-12G): This technique was first reported by Spaso Miljesic as a simple, single-operator technique requiring minimal force.42 One published series reported an 87.5% success rate in premedicated patients when performed by junior house officers.43 Place the patient in the supine position and grasp the affected arm around the wrist or distal end of the forearm. Gently lift the affected arm vertically toward the ceiling and apply gentle vertical traction. While maintaining traction continuously, externally rotate the arm. Reduction may be subtle but is generally signaled by hearing or feeling a “clunk.” Completion of this technique may require several minutes of gentle traction to allow the muscles of the patient’s shoulder to relax.43 Other Methods: Poulsen44 reported a method termed the Eskimo technique that may be performed in field settings (see Fig. 49-12H). In this technique the patient lies on the unaffected side and is lifted a short distance off the ground by grasping the abducted arm on the injured side. The patient’s body weight acts to effect the reduction. Poulsen’s success rate was 74% in a series of 23 patients, all of whom were premedicated. However, the author44 also postulated that this technique could place undue stress on the brachial plexus or axillary vessels. Use of this technique, when other options are available, should probably be reserved until more data are obtained. Noordeen and coworkers45 reported a simple method in which the patient sits sideways in a chair with the affected arm draped over the backrest. The operator holds the arm with the wrist supinated, and the patient is instructed to stand up. The success rate was 72% in 32 patients treated in this manner. A variation of the chair technique, which was successful in 97% of 188 anterior shoulder dislocations, involves operator-applied traction on the patient’s flexed elbow by means of a cloth loop or stockinette.46 Standing beside the patient, the operator holds the involved elbow in 90 degrees of flexion while stepping down on the cloth loop. The patient sits in the chair, and an assistant may help support the patient by applying countertraction under the involved arm. After an attempt at reduction, the neurovascular status of the affected extremity should be rechecked and the results documented on the patient’s record. Indirect evidence that the reduction has been successful includes an immediate decrease in pain, restoration of the round shoulder contour, and increased passive mobility of the shoulder. No harm is done by putting the joint through a limited range of motion. If the patient can tolerate placement of the palm from the injured arm on the opposite shoulder, it is quite likely that the shoulder reduction was successful (see Fig. 49-13A). For patients with possible axillary nerve injury, close to 90% will recover with expectant management. Nevertheless, it is prudent to refer these patients for early orthopedic follow-up.47 Postreduction radiographs are often recommended to make a careful search for new fractures. Although most greater tuberosity fractures do not alter patient management, patients with greater tuberosity fractures displaced more than 1 cm after closed reduction almost always have an associated rotator cuff tear48 and should receive prompt orthopedic consultation because they may require operative repair. Traditional postreduction treatment focuses on the importance of preventing the shoulder from dislocating again after the patient is discharged. This is best accomplished by immobilizing the joint with a commercially available shoulder immobilizer or a sling and swath to limit external rotation and abduction (see Chapter 50). Orthopedic follow-up is recommended for all anterior shoulder dislocations because the incidence of rotator cuff injury is as high as 38% and it might complicate restoration of normal function.49 Younger patients are usually immobilized for approximately 3 weeks and can be instructed to follow up within 1 or 2 weeks of the event. As a general rule, the older the patient, the shorter the recommended time of immobilization10 because it is important to maintain mobility in joints of the elderly. Those older than 60 years should have early follow-up (e.g., 5 to 7 days) to allow early mobilization and avoid persistent shoulder joint stiffness or adhesive capsulitis. Since the early 2000s, the wisdom of immobilization in internal rotation has been questioned. Several studies have shown that placing the arm in internal rotation actually increases labral detachment from the glenoid rim whereas some degree of external rotation maximizes contact between the detached labrum and the glenoid rim.50–52 In one study, cadavers were used to measure the force of contact between the labrum and the glenoid rim in different arm positions. The authors of this study found that maximum contact force was actually generated in 45 degrees of external rotation whereas no contact force was generated with the arm in internal rotation.52 One prospective study showed that of 20 patients immobilized in external rotation, none had recurrent dislocation after more than 1 year, whereas of 20 patients immobilized in internal rotation, 6 had recurrent dislocation.51 Despite this growing body of evidence, very few scientific data are available to guide the clinician on the most appropriate position for postreduction immobilization of anterior shoulder dislocations. A recent literature review was designed to assess (1) whether traumatic anterior shoulder dislocations should be immobilized, (2) how long they should be immobilized, and (3) whether the position of immobilization affects outcome. Unfortunately, the study was unable to provide any definitive answers.53 According to the author of this study, “much of this uncertainty is due to the limited size of the evidence base [and] numerous methodologic weaknesses (e.g., small sample sizes, no control groups, and not evaluating findings against statistical tests).”53 More recent studies and reviews have shown conflicting results on whether immobilization in external rotation is preferable to immobilization in internal rotation.54–57 As a result, it is not unreasonable to immobilize the extremity in a manner consistent with the recommendations of the orthopedic surgeons at one’s institution until further evidence is presented. When in doubt, a simple sling or the traditional shoulder immobilizer will certainly suffice pending 5- to 7-day follow-up (see Fig. 49-13B). It is appropriate to prescribe oral analgesics (either nonsteroidal antiinflammatory drugs or narcotics) to minimize patient discomfort. Instruct the patient to return if the clinical condition worsens. Periodically, one may encounter a return visit from a successfully treated patient who is in severe pain from hemarthrosis. In a series of patients older than 60 years, Trimmings58 reported that excellent pain relief was achieved by aspirating the hemarthrosis 24 to 48 hours after shoulder reduction. This can be accomplished by using the technique of arthrocentesis described in Chapter 53. In addition, intraarticular instillation of 10 to 20 mL of 1% lidocaine (or a longer-acting local anesthetic) may be helpful for further pain relief. Posterior shoulder dislocations account for less than 4% of all shoulder dislocations.12 Because they are so uncommon, posterior dislocations have the potential to be missed. The emergency clinician must be knowledgeable about these injuries to avoid a misdiagnosis. Delays in diagnosis for weeks to months have been reported with posterior dislocations.59,60 This may lead to increased rates of dislocation arthropathy and chronic pain.13 The mechanism of injury is almost always indirect and consists of a combination of internal rotation, adduction, and flexion.10 Classic precipitating events include seizure, electrical shock, and falls. The patient may also be initially seen at a point long past the original event.60 In addition, patients with seizures may not experience obvious problems in the immediate postictal period because of their altered mental status. Though clinically less obvious than anterior dislocations, posterior shoulder dislocations do occur in a typical, recognizable manner. Mistakes may be made if the clinician is overly reliant on AP radiographs, which are potentially misleading60 and may result in misdiagnosing the injury as a soft tissue contusion or acromioclavicular (AC) strain. The principal sign of a posterior dislocation is an arm that is somewhat fixed in adduction and internal rotation (Fig. 49-14). Abduction and external rotation are limited, and attempts to perform these movements generally elicit pain.10,12 Inspection and palpation reveal loss of the normal anterior contour of the shoulder, as well as a prominent coracoid and acromion. The shoulder is flattened anteriorly and rounded posteriorly, and the humeral head may be palpable.10,12 The key point regarding radiographs for posterior shoulder dislocations is the subtle nature of this dislocation on a single AP film (Figs. 49-15A and 49-16A) and the diagnostic importance of the scapular Y view (see Fig. 49-15B) or the axillary view (see Fig. 49-16B). Diagnosis of posterior shoulder dislocation is quite easy with the axillary view, whereas the routine AP and lateral views are difficult to interpret in around half the cases.60 The axillary view is generally available in the radiology department and can be obtained with as little as 20 to 30 degrees of abduction and the plate placed on the shoulder.60 In addition to easy visualization of the posteriorly situated humeral head, the axillary view often reveals an impression fracture of the humeral head (see Fig. 49-16B). The scapular Y view is produced by superimposing the head of the humerus over the coracoid, acromion, and body of the scapula, which form a Y shape. In the event of a posterior shoulder dislocation, the head of the humerus will lie posterior to the glenoid (away from the chest wall) (see Figs. 49-9B and 49-15B). Figure 49-15 Posterior shoulder dislocation seen on a scapular Y view (see also Figs. 49-8 and 49-9). A, The anteroposterior view does not definitively show the dislocation. Because the dislocation is directly posterior, there is no superior or inferior displacement of the humeral head. On superficial observation, the head of the humerus appears to maintain a normal relationship with the glenoid fossa and the acromion process. However, definite abnormalities exist on this film. The space between the humeral head and the glenoid fossa is abnormal, and because of the extreme internal rotation of the humerus, the head and neck are seen end on and resemble a light bulb. B, On the scapular Y view it becomes obvious that the humeral head is posteriorly dislocated. It projects posteriorly under the scapular spine rather than in its normal location, centered over the glenoid fossa. G, glenoid fossa; HH, humeral head; Sp, scapular spine. Even though axillary and scapular Y views are diagnostic, clues to posterior dislocation do exist on AP films. The internally rotated humeral head appears symmetric on an AP film and is in the shape of a light bulb, as opposed to the normal club-shaped appearance created by the greater tuberosity (Fig. 49-17).61 With posterior dislocation, the space between the articular surface of the humeral head and the anterior glenoid rim is widened, and there is a decrease in the half-moon–shaped overlap of the head and the fossa.59,61 There may also be a compression fracture on the medial aspect of the humeral head, as indicated by a dense line. This is known as the trough sign.61 A fracture of the lesser tuberosity should always prompt a search for the presence of a posterior shoulder dislocation. Reduce an acute posterior dislocation by applying traction on the internally rotated and adducted arm combined with anteriorly directed pressure on the posterior aspect of the humeral head.10,60 Generous premedication is usually indicated, and countertraction may be applied with a sheet looped in the affected axilla, very much similar to the procedure described for anterior dislocations. Kwon and Zuckerman10 recommended applying lateral traction on the upper part of the humerus if the humeral head is locked on the posterior glenoid. Hawkins and colleagues60 suggested that posterior dislocations with an impression defect of the humeral head greater than 20% of the articular surface require open reduction. Posterior dislocations that have been diagnosed late are difficult to reduce in a closed manner, but an attempt with adequate premedication is generally indicated.60 Inferior dislocations of the shoulder, known as luxatio erecta, are quite rare but also quite obvious. The patient has the arm locked in marked abduction with the flexed forearm lying on or behind the head62 (Fig. 49-19). Occasionally, the humerus may have less abduction, thus potentially obscuring the diagnosis.63 The humeral head can be palpated along the lateral chest wall. With this injury, the inferior capsule is almost always torn. Associated injuries include fractures of the greater tuberosity, acromion, clavicle, coracoid process, and glenoid rim. Neurovascular compression may be present, but this is usually reversed once reduction is accomplished.10 Long-term complications include adhesive capsulitis and recurrent dislocations. Apply overhead traction (generally with the arm in full abduction) in the longitudinal direction of the arm, and exert cephalad pressure over the humeral head much as with the Milch technique (see Fig. 49-18B).10,63 If needed, apply countertraction toward the patient’s feet by using a sheet placed over the injured shoulder. After reduction, bring the abducted arm into adduction against the body and supinate the forearm.64 Alternatively, use the “two-step” maneuver described by Nho and associates65 to reduce inferior dislocations. In this technique, convert the luxatio erecta to an anterior dislocation. To perform this maneuver, place one hand on the medial condyle of the elbow and the other hand around the shaft of the humerus. Push anteriorly on the shaft of the humerus while stabilizing the medial condyle of the elbow, and rotate the humeral head from an inferior to an anterior position. The authors then describe using the external rotation method to reduce what is now a typical anterior dislocation.65 Scapular dislocation or “locked scapula” is a rare condition characterized by obvious protrusion of the lateral border of the scapula and significant swelling of the medial border because of tearing of the musculature.66 To reduce the scapula, apply traction on the abducted arm and apply medial pressure on the scapula.66
Management of Common Dislocations
Preparation of the Patient
General Principles
Timing of Reduction
Shoulder Dislocations
Anterior Shoulder Dislocations
Clinical Assessment

Radiologic Examination
Reduction Techniques
Postreduction Care
Posterior Shoulder Dislocations
Clinical Assessment
Radiologic Examination
Reduction Technique (Fig. 49-18A)
Unusual Shoulder Dislocations
![]()
Stay updated, free articles. Join our Telegram channel

Full access? Get Clinical Tree


Management of Common Dislocations

