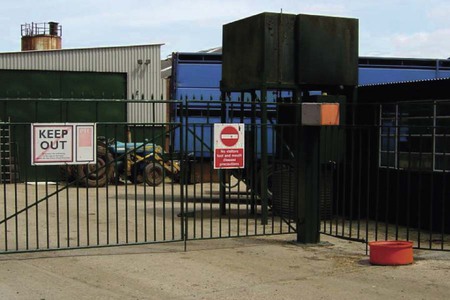
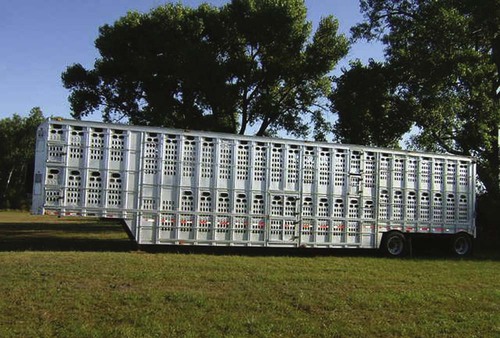
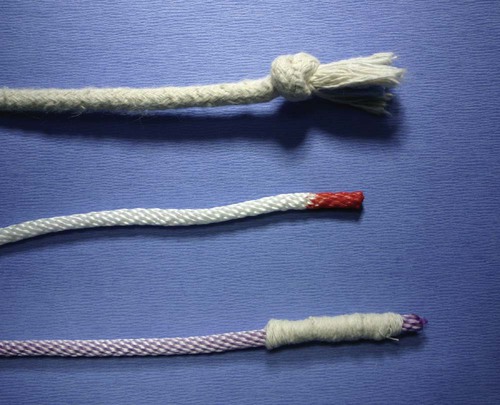
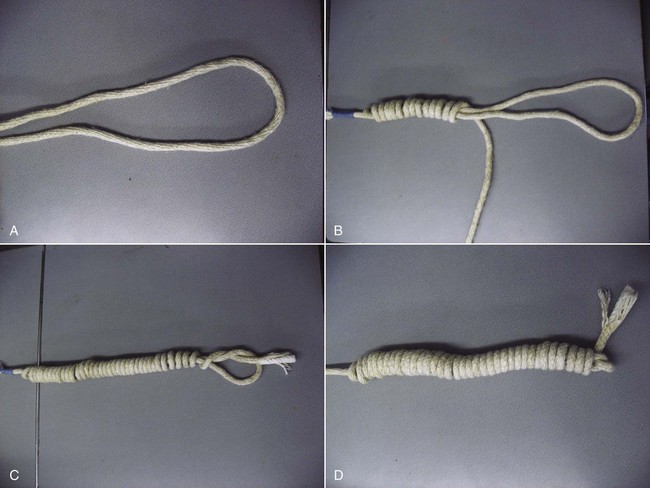
After reading this chapter, you will be able to • Understand potential risks that exist with the practice of large animal veterinary medicine • Tie multiple types of knots to ensure an effective set of tools for large animal restraint • Understand the basic natural instincts of each large animal species • Understand the importance of protecting yourself, veterinary personnel, and clients while handling patients • Apply common methods of large animal restraint safely, efficiently, and effectively Animal disease is another area of concern for technicians. Several diseases and parasites of the livestock industry have zoonotic potential. Precautions should be taken when there is a risk for exposure to these types of diseases. Disease prevention is important not only for zoonotic disease but also for biosecurity (Fig. 2-1). Technicians should wear masks, disposable gowns, disposable shoe covers, and disposable gloves and use disinfectant footbaths to help prevent disease transmission. Grain handling can be dangerous for the technician or producer. Avoid wearing loose clothing around augers and power takeoffs (PTOs). People who drive grain/livestock trucks cannot see all areas around the semitruck and trailer and may not be able to see you (Fig. 2-2). The grain itself can be dangerous; when piled, it can develop air pockets that are almost impossible to get out if a person falls into them. Ropes are a valuable piece of equipment in the large animal industry. Ropes can be used for casting, halters, and leg restraint. Ropes should be inspected before use. If manufactured lead ropes are being used, metal clasps should be inspected for rust and free moving pieces. Ropes that are dirty or have kinks, stress points, tears, or frayed ends should be repaired or removed from use in the veterinary clinic. The four main ways to fix fraying at the end of a rope are (1) melting the end of the rope with fire (nylon ropes), (2) tying an overhand knot in the end of the rope, (3) coating the end of the rope with a stop fray product, and (4) whipping (Fig. 2-3). Faulty ropes can cause serious injuries to veterinary personnel, clients, and the animals. Ropes should be cleaned with warm water. Detergent should not be used on a rope because it deteriorates the fibers and results in a weaker rope, thus shortening the lifespan of the rope. Whipping can be used to stop fraying at the end of a rope. You will need a smaller cord to wrap around the rope (Fig. 2-4A). It is better to have more cord than not enough. Fold the cord in half. Lay the cord on the rope, with the connected end of the cord, on the end of the rope (Fig. 2-4B). Then, pick up one strand of the cord and pull it toward the top of the rope so that the shorter end of the cord is about When ropes are stored, they should be stored using “hanking.” Hanking works well for long lengths of ropes and electrical cords. Make a loop in one end of the rope (Fig. 2-6A). While holding the loop with one hand, reach through the loop and pull the long end of the rope (Fig. 2-6B). Pull the long end through the original loop just enough to create another loop (Fig. 2-6C). Repeat the process until the entire rope is chained together. Once the last of the rope has been chained, place the end of the rope through the last loop and tighten (Fig. 2-6D). To unravel, remove the end from the last loop and pull. It should unravel easily. If it does not, try pulling on the other end of the rope. Fold over a few inches of one rope and create a loop with it (Fig. 2-8A). Pass the second rope behind the first just above your fingers, which should be holding the loop in place. Then feed the ends of the second rope back through the loop and pull both ropes in opposite directions (Fig. 2-8B to E). Begin by making one throw (Fig. 2-10A). Then make a bight in one end of the rope. Fold the bight back over the other end of the rope (Fig. 2-10B). Take the unbighted end and wrap over the bight and through the hole between the first throw and the bighted end (Fig. 2-10C). Pass the rope through the hole (Fig. 2-10D). Then pull the two ropes in opposite directions (Fig. 2-10E). To untie, pull the loose end of the bight. It should unravel easily. The tom fool’s knot can be used to tie two legs of an animal together. Both sides of the tom fool’s knot are adjustable, making it easy to accommodate any size leg. Begin by finding the middle of the rope. Hold your hands about 12 inches apart. First create a small loop in the rope. Hold this loop with your left hand. Then create a second loop in your right hand (Fig. 2-11A). Look down at the top of the rope; one of the loops should be toward you, the other loop should be away from you in reference to the piece of rope connecting the two loops (Fig. 2-11B). Now pass the two loops over each other (Fig. 2-11C). Then take your left index finger and reach underneath the loops and pull the opposite loop to the left. At the same time, take your right index finger over the loops and pull the opposite loop to the right (Fig. 2-11D to F). To test the loop, pull both loose ends (Fig. 2-11G). To adjust the size of each loop, just pull on the loops. You can secure the loops to a specific size by tying a square knot over the top of the tom thumb’s knot. First start by passing the rope around the post or object you would like to tie to. Some people prefer to pass the rope around the post twice. Make a loop in the end of the rope that is not attached to the animal. Hold the loop in your left hand. Hold the loose end of the rope in your right hand (Fig. 2-12A). Lay the loop over the loose end of the rope in your right hand (Fig. 2-12B). Work close to the post to ensure the least amount of slack. Reach though the loop with your thumb and finger on the right hand grasping the loop from under the rope attached to the animal (Fig. 2-12C and D). Pull the loop in your thumb and finger to the right and the end attached to the animal to your left (Fig. 2-12E). Some horses are very intelligent and have figured out how to untie themselves by grasping the end not attached to the horse. Some people slip the end of the rope through the loop to ensure the horse does not escape. However, remember you must remove the end before pulling or it will not release. To ensure you have tied the knot correctly, pull on the loose end of the rope—it should untie easily. If excess amounts of lead rope are hanging from the knot, you can hank the end of the rope to keep it off the ground. You should practice tying this knot from the other side of the horse to ensure you can do it both ways. It can become confusing. Also practice tying to horizontal and vertical bars. A sheet bend is used to tie two ropes together. First begin by making a bight in one of your ropes (Fig. 2-13A). Then slide the end of the other rope underneath the bight (Fig. 2-13B). Pick up the end of the rope and pass it over one side of the bight. Then bring the rope under the bight and back over through the bight (Fig. 2-13C). Place the end under the first strand that is still inside the bight and bring it up over the side of the bight (Fig. 2-13D). Pull both ends in opposite directions (Fig. 2-13E). Bowlines are used to create a loop that can easily be placed around the animal’s neck. They are nonslip and are safe for this use. First, begin by making a circle in the rope (Fig. 2-14A). The circle should be the size of loop you want when finished. Hold your fingers on the long end of the rope and drop the shorter end that will make up your loop. At the level of your fingers make a small loop (Fig. 2-14B and C). Grab the end you just dropped and pull it through your loop (Fig. 2-14D). Place the end behind the cross made by your loop and bring the end back through your loop (Fig. 2-14E). Now tighten the knot (Fig. 2-14F and G). A bowline on the bight can be used to restrain an animal’s legs and neck. First begin by folding your rope completely in half. From here on out, pretend that it is just one rope. You will never separate the two strands. Make a loop of the desired size (Fig. 2-15A). Then hold your thumb over the crossed portion of the ropes in the loop. Take the loose strands and wrap them around your thumb (Fig. 2-15B). Once around both sides of the ropes, stick the ropes back through the hole made by the placement of your thumb. Then place the strands through the loop (Fig. 2-15C). Pull on the large loops to tighten the rope (Fig. 2-15D). Start by placing your rope around a post or leg. Bring the strand around and under. Pull up on this end of the rope. Drop down to the next hitch. Bring the strand around, but this time lay the loose end over the rope. This type of hitch is often used to tie in a surgery patient (Fig. 2-16). Start as if you were making a tom fool’s knot. Hold one loop in each hand. Overlap the loops, although you must place the two strands of rope that are on opposite sides together. The main rope will look like it is crossing both strands. Place both loops in this position over the post you would like to tie to, and pull the loose ends (Fig. 2-17). The tail tie can be used to hold the tail out of the way during veterinary procedures. A tail rope should never be tied to an immovable object. The tail rope is not a substitute for the hindquarters; if an animal demonstrates that it cannot provide any support of its own rear body weight, the animal should not be left dangling by a tail rope. The tail tie is performed just beyond the end of the last coccygeal vertebrae (Fig. 2-18). Begin by tying a bowline in a long rope and passing it over the horse’s head. The rope can also be placed around the neck and then a bowline tied. Be careful to ensure the knot is not a slip knot (Fig. 2-19A). Then create a bight in the rope and pass it through the rope already encircling the horse’s neck (Fig. 2-19B). Pass the bight over the nose (Fig. 2-19C and D). This is a time-honored method that can be applied to one or both of the animal’s eyes. Sometimes, the animal will be submissive if it cannot see the area being worked on. Covering the eye on the same side as the procedure is the most common method but often is applied incorrectly. Placing the hand completely over the eye to force it shut usually is unnecessary and often is met with resistance (Fig. 2-20A). All that is necessary is to block the animal’s view of the procedure by using an open hand like a curtain but allowing the animal to keep its eye open (Fig. 2-20B). Some animals respond favorably to blindfolding (Fig. 2-21). These individuals and situations must be carefully selected because not all animals accept a blindfold. Blindfolding is usually done by placing a towel over both eyes and tucking it underneath the halter. The blindfold should be easily removable and quickly accessible by the handler in case the animal panics. The horse should he approached from its left side; avoid standing directly in front of the horse (Fig. 2-22). Usually the halter is placed first, then the lead rope is attached to the halter. However, in some horses the lead rope must be placed around the neck first for initial control while the halter is being placed (Fig. 2-22 and Fig. 2-23A). The halter has a small loop (the nose band), which is placed around the nose, and a larger loop (the crown strap), which is placed over and behind the ears (Fig. 2-23B). Buckles or snaps are used to open and close the loops (Fig. 2-23C). As a courtesy to the horse, try not to drag the halter over the eyes and ears. Rather, spread the halter apart to avoid the eyes and lift or unbuckle the halter to avoid the ears. Once the halter is positioned and the buckles/snaps secured, the lead rope is attached (Fig. 2-23D and E). Once placed, the halter and lead rope can be used to lead the horse. The horse should not be led by grasping the halter. If the horse moves its head up or away, the operator may lose his or her grip, and if the horse bolts or runs, the operator is at for risk of being dragged and seriously hurt. Use the lead rope to lead the horse. Hold the lead away from any buckles or chains, and never coil the lead around the fingers, hand, or arm. If the horse bolts or runs, coiled rope may tighten around body parts, resulting in serious injury and death. Do not let the lead rope drag on the ground because the horse may step on the rope or the handler may become tangled in the rope, resulting in injury (Fig. 2-24). Chain shanks or lead shanks can be purchased with varying lengths of chain and thickness of the chain links. When a simple lead rope does not provide enough control, the chain portion of a chain shank can be placed over the nose or in the mouth for increasing restraint. In order to use the chain in this fashion, the halter must have side rings to slide the chain through and fasten the chain snap. Placing the chain over the nose is a mild form of restraint. The chain is passed (1) through the left ring of the nosepiece and over the nose to attach to the right nosepiece ring (Fig. 2-25A), (2) through the right nosepiece ring and continuing to the right upper ring (Fig. 2-25B), or (3) through the right nosepiece ring and continuing under the halter to attach to the large nosepiece ring between the mandibles (Fig. 2-25C). Care should be taken to cross the chain over the halter nose band so that the nose band can act as a protective interface between the chain and the horse’s skin (Fig. 2-25D). A 1ight quick snap of the lead usually gets the horse’s attention.
Livestock Safety and Handling
Safety in the Large Animal Veterinary Practice
Ropes
Rope Care
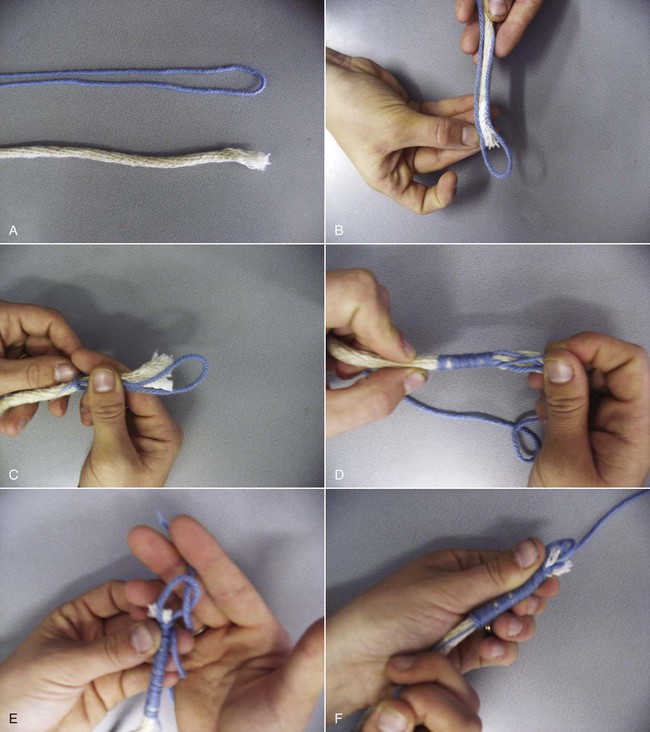
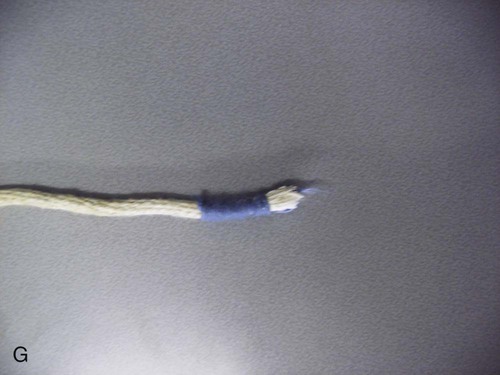
Whipping
 inch longer than the area of fraying you would like to cover. While holding the cord in place, take the long end of the cord and wrap it around the short end of the cord and rope, working toward the end of the rope (Fig. 2-4C and D). Once the cord is wrapped completely around the end of the rope up to the bighted end, pass the cord through the loop and pull tight (Fig. 2-4E). Then take the
  inch of cord on the other end and pull it. This will secure the whipping and hide the loop (Fig. 2-4F and G). Clip the extra strands of cord from each end of the whipping, and you are finished. Whipping can also be used to store or hang ropes. The only difference is that you are just whipping around the single strand of cord instead of two ropes. The rope will be finished in the same way except you do not pull your loop all the way under, just enough to keep it from untying (Fig. 2-5).
Hanking
Knots and Hitches
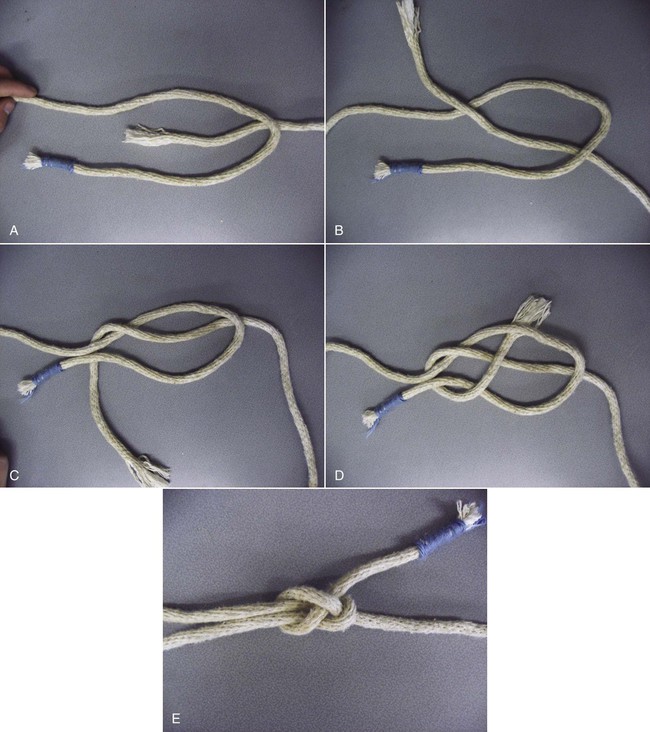
Square Knot
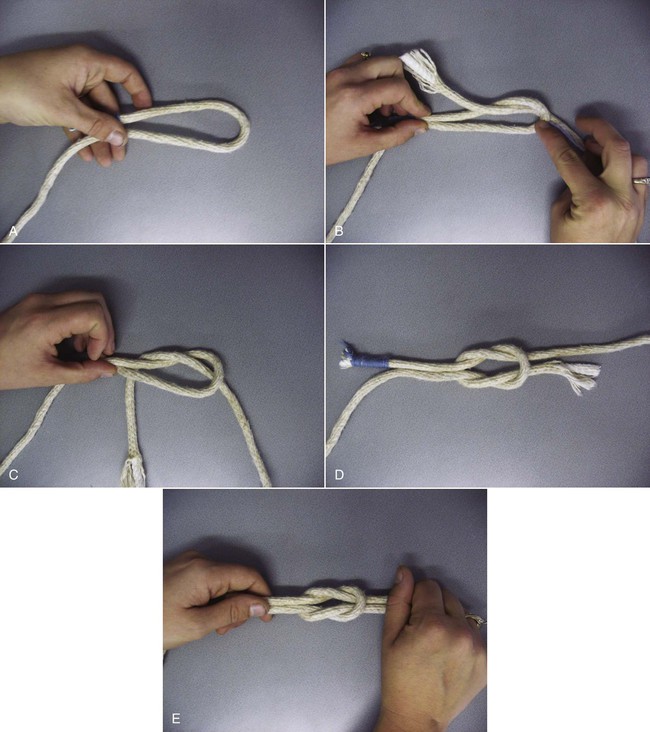
Reefer’s Knot
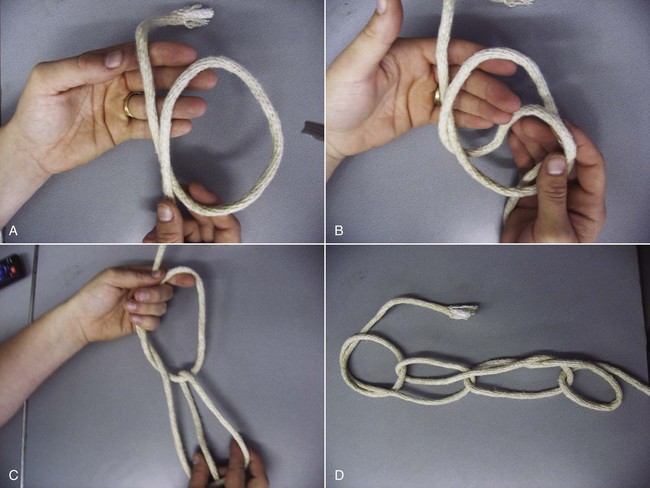
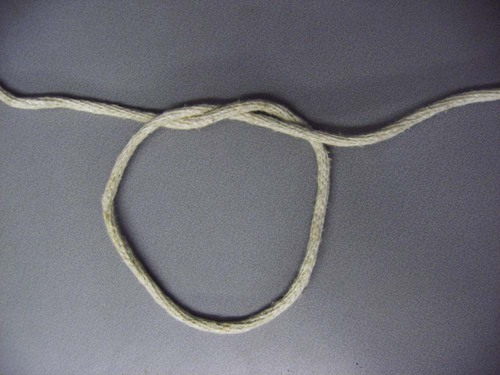
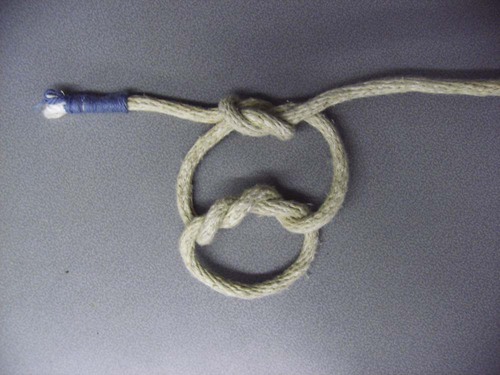
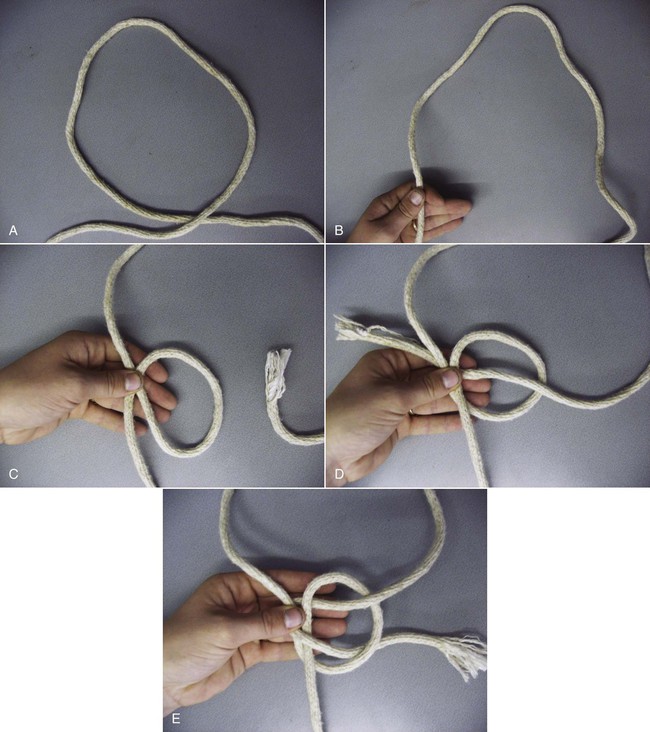
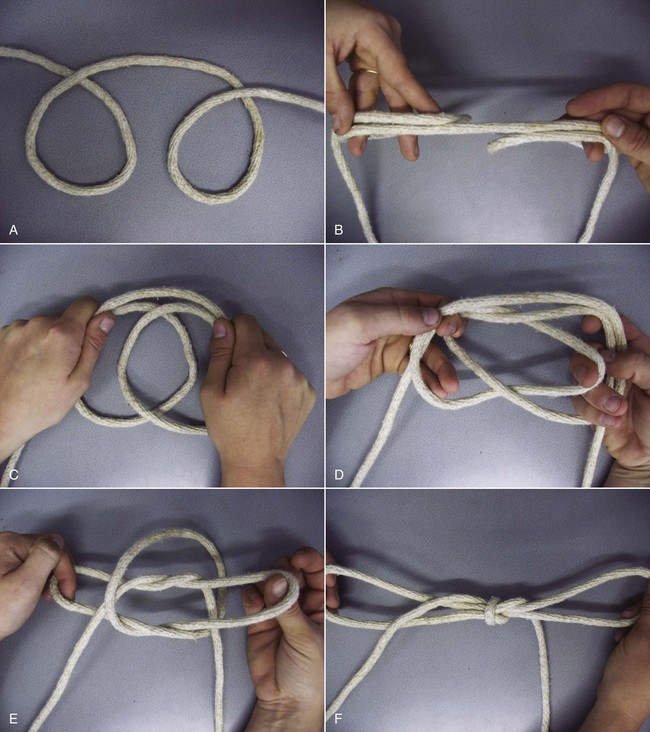
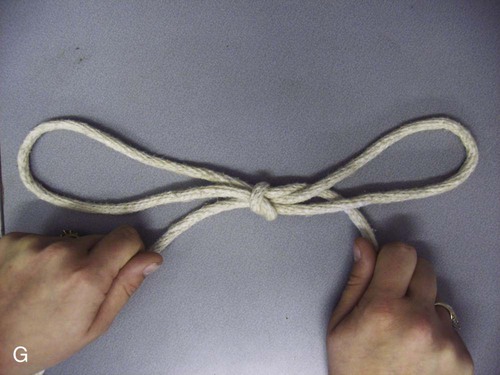
Tom Fool’s Knot (Double Bowline Knot)
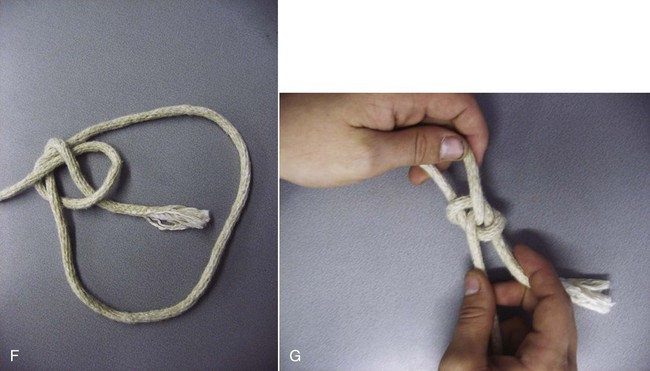
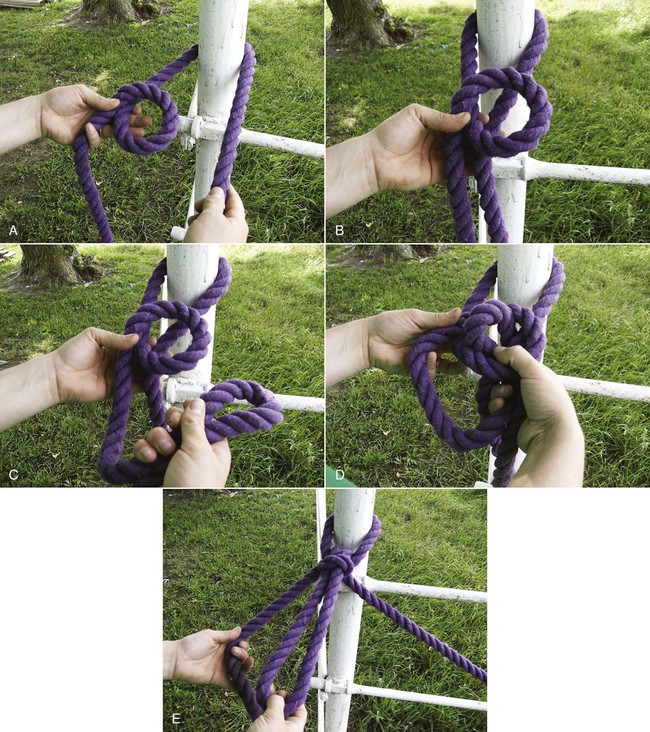
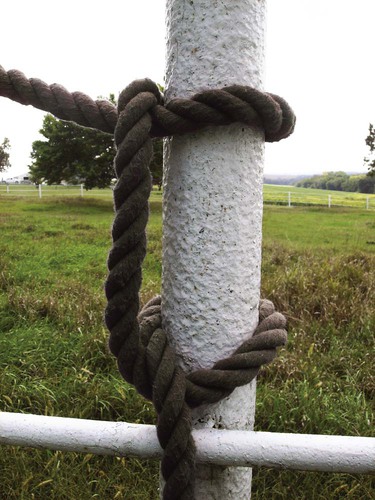
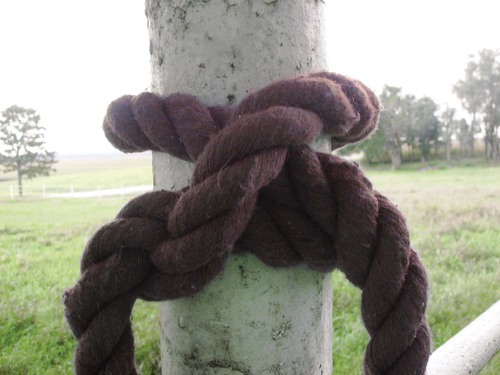
Quick-Release Knot
Sheet Bend
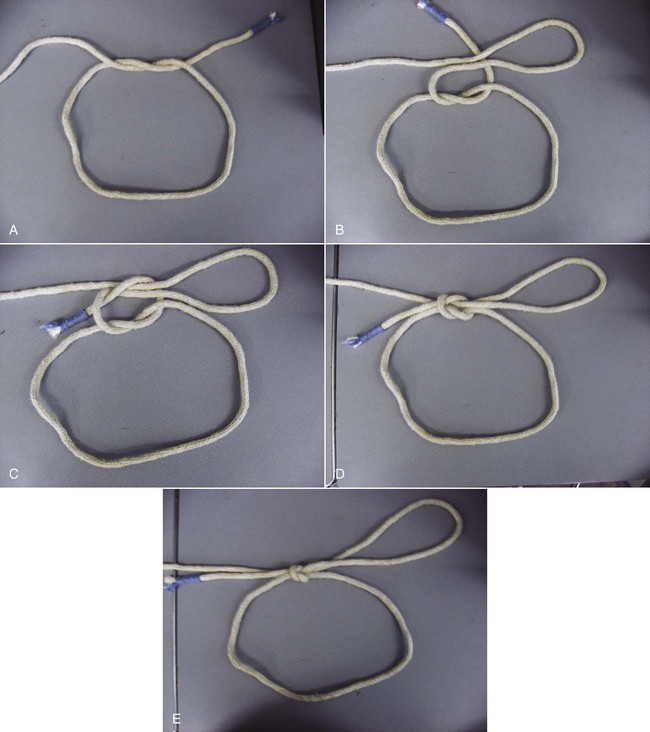
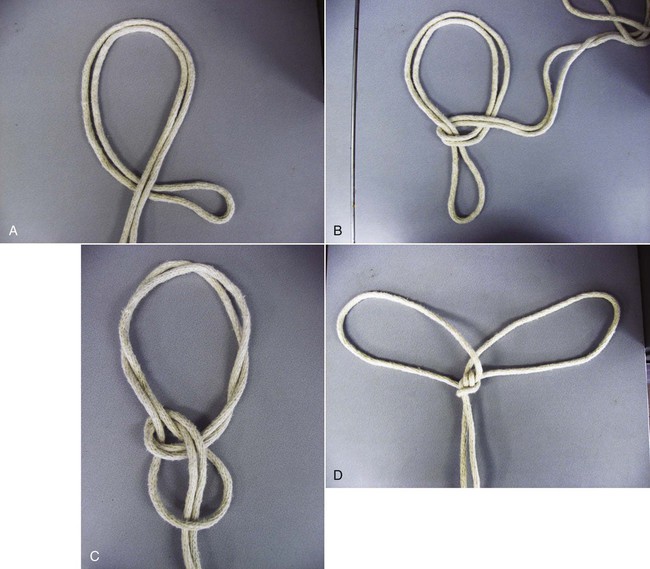
Bowline
Bowline on the Bight
Half Hitch
Clove Hitch
Tail Tie
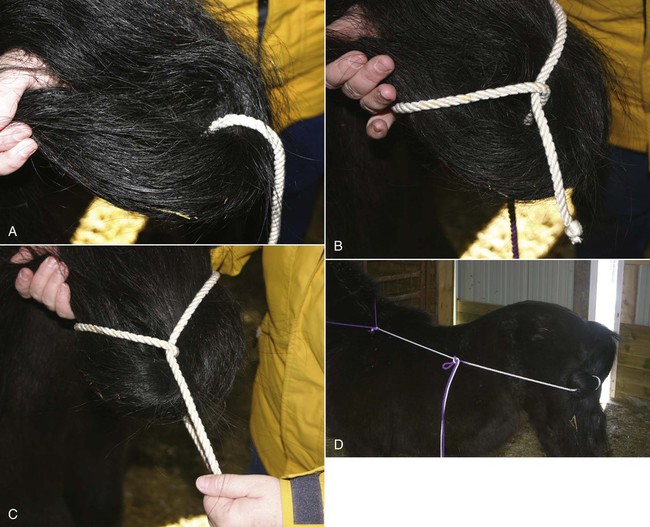
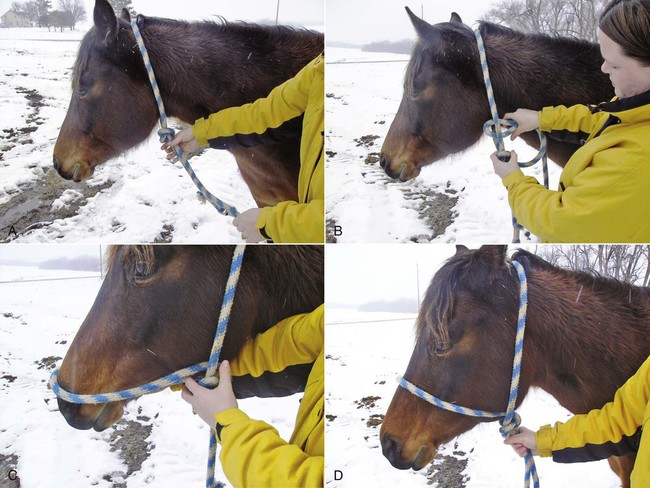
Temporary Rope Halter
Restraint
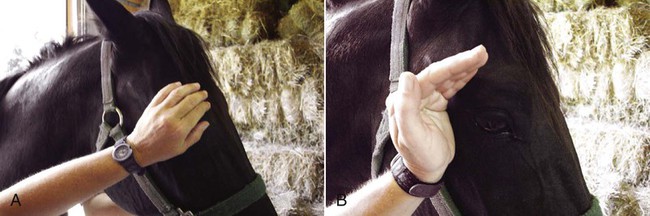
Covering the Eyes
Physical Restraint of Horses
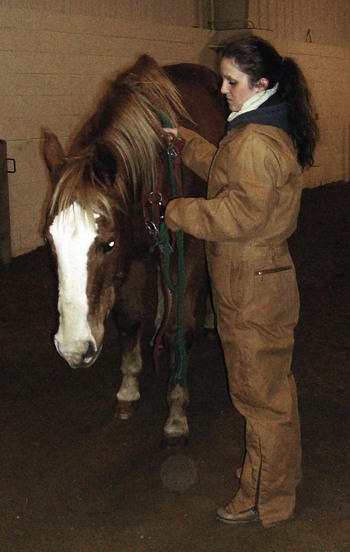
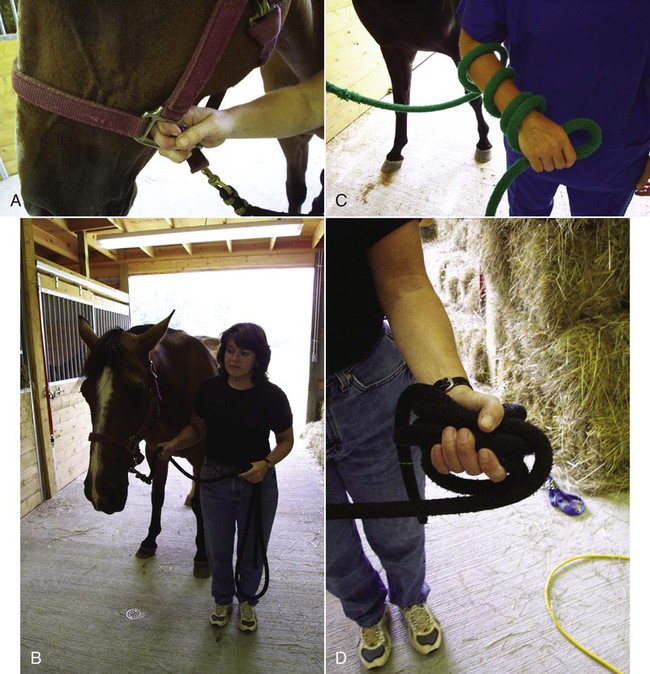
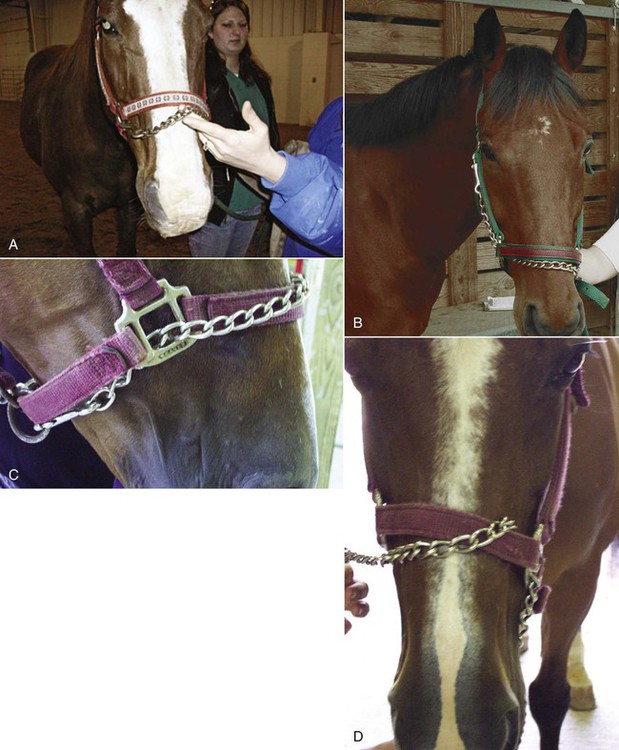
Halter and Lead Rope
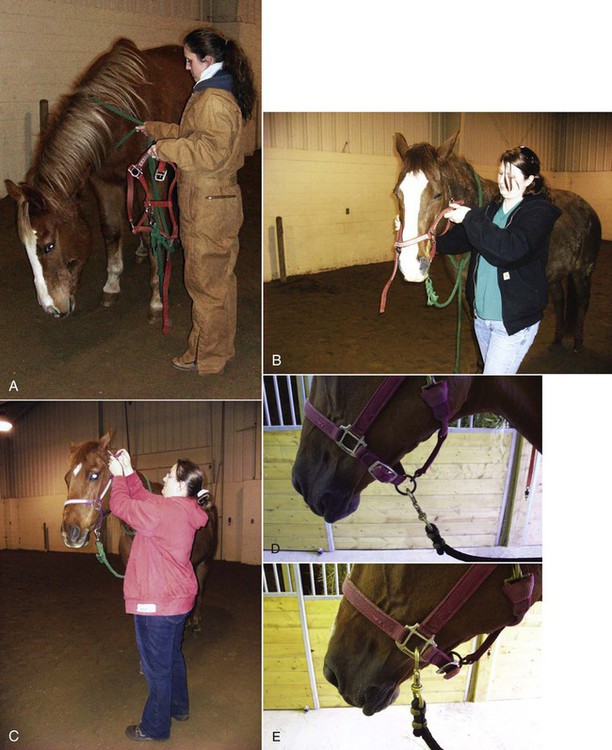
![]()
Stay updated, free articles. Join our Telegram channel

Full access? Get Clinical Tree


Livestock Safety and Handling