chapter 7 Film Processing
Upon completion of this chapter, the reader should be able to do the following:
Accelerators: Chemicals that increase the pH of the developer and subsequently increase the rate of developing.
Acidifiers: Compounds that accelerate the fixing process and neutralize the alkaline developer.
Buffers: Compounds in the fixer that maintain proper solution pH.
Clearing agents: Also called fixing agents; a portion of the fixer that dissolves and removes the unexposed silver halide crystals from the film emulsion.
Developer: A chemical solution that converts the latent image on a film to a visible image by converting the exposed silver halide crystals to black metallic silver.
Developing agents: Chemical solutions used to convert a latent image on x-ray film to a visible image.
Fixation: The process by which the unexposed silver halide crystals are removed from the film and the gelatin is hardened.
Fixer: The chemical solution used during fixation.
Hardeners: Chemicals added to the fixing solution or to developers in automatic processors to prevent excessive emulsion swelling.
Latent image: An invisible image on unprocessed x-ray film after it has been exposed to ionizing radiation or light.
Preservatives: Chemicals that prevent rapid decomposition of the developer or fixer.
Restrainers: Often potassium bromide and potassium iodide are used as restrainers or antifoggants. Restrainers limit the action of the developing agent to the exposed silver bromide crystals in the film.
Reticulation: A darkroom artifact produced by variable chemical temperatures that cause irregular expansion and contraction of the film emulsion, resulting in a mottled density appearance.
Rinse bath: A solution (usually water) used to remove excess developer solution before the film is placed in the fix tank.
Solvent: Water; dissolves the ingredients of the developer or fixer and diffuses the chemical into the emulsion of the film.
Stop bath: A solution of acetic acid and water used to “stop” the development of the x-ray film by rapidly neutralizing the alkaline developer solution.
THE DARKROOM
Another factor that is often overlooked in the darkroom is climate control. Because the film emulsion is extremely sensitive to heat and humidity, good ventilation and temperature control are mandatory. A darkroom should be relatively cool and should have low humidity. The specific temperatures and humidity for proper film care are described in Chapter 6.
Organization
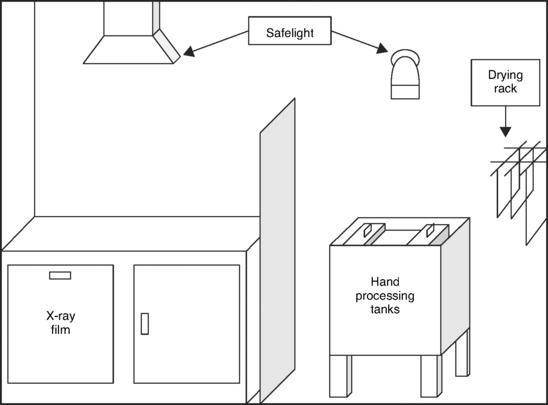
There should be essentially two sides to the darkroom: a dry side and a wet side (Fig. 7-1).
Dry side.
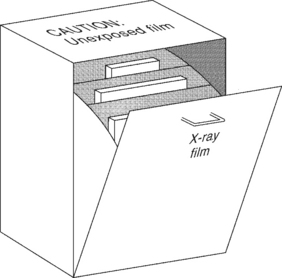
The dry side of the darkroom is where the cassettes are unloaded and reloaded. A countertop or tabletop large enough to accommodate the largest cassette in the open position should be available. The tabletop should be constructed of a material that allows frequent cleaning, which is necessary to reduce the source of darkroom artifacts that can potentially get on the film. It must be impossible for chemicals to splash into the dry side. At no time should anything “wet” be brought to the dry side. It is customary to store film under the dry table, either in a cupboard or in a film bin, to allow easy access for reloading cassettes (Fig. 7-2). Film hangers for each size of film should be hung above the table on the dry side on an appropriate bracket. Brackets can be purchased commerially or constructed inexpensively using large hooks found at any hardware store.
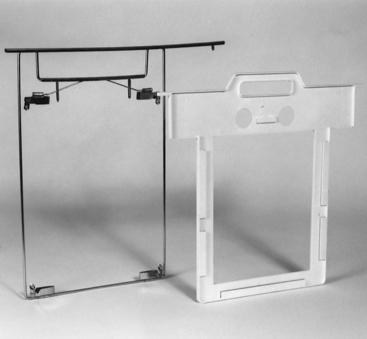
Film hangers are available in two designs: channel hangers and clip hangers (Fig. 7-3). Channel hangers tend to retain water and chemicals and need special cleaning and drying to prevent contamination of the dry side. Films must also be removed from the channel hangers to be dried. However, clip hangers are more fragile than the channel type. When the clips are used frequently over a period of time, they become weak and lose the ability to “stretch” the film. The clips also puncture the four corners of the film, which, when filed, can scratch other films in the same envelope. It is important to cut off the corners of films processed with clip hangers before filing to prevent this. When more than one film is processed at the same time in the tanks, the clips on the hangers can scratch neighboring films.
Wet side.
The wet side of the darkroom is where the actual chemical processing is performed. A darkroom that hand processes films usually consists of three tanks containing developer, water, and fix solutions. Various tank designs are available. The three tanks can be individually freestanding and warmed as required by an immersion heater (placed in the developer). Alternatively, the developer and fix tanks can be placed in one large tank filled with thermostatically controlled water. The latter system is preferred and can be purchased as a complete package constructed with 3- or 5-gallon (9- or 22-L) individual tanks. The water tank is usually four times the size of the smaller developer and fix tanks. The central water tank should have a circulating water system to provide a way to regulate temperature and rinse chemicals off the films during the processing procedure. A thermometer is an essential piece of equipment for the processing tanks because radiographic film is developed for a specified time on the basis of the temperature of the chemicals.
Darkroom Lightproofing
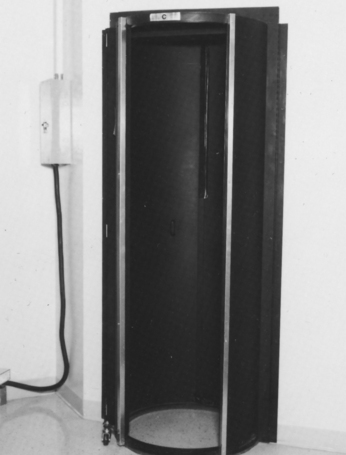
The entrance to the darkroom is a common site for light leaks. A double-door system or revolving door is preferred but not always practical in a veterinary practice (Fig. 7-4). The first step in lightproofing a standard door is to fit it tightly into its frame against strips of felt or rubber molding. Weather stripping is also useful around doors to prevent the entrance of light. Light entering from underneath the door can be prevented by a vapor seal designed specifically for the bottom of a door. A sliding bolt lock or doorknob lock prevents someone from accidentally entering the darkroom at an inopportune time. A suspended ceiling can be a radiographer’s nightmare. It may be necessary to place a large black sheet of plastic above the ceiling tiles to prevent light in adjacent rooms from entering through the seams.
Darkroom safelight.
Correct safe lighting in the darkroom is crucial. A “safe” light means that the light produced will not affect the film. Radiographic film is sensitive to ultraviolet light. Safelights use a small-wattage bulb and a special filter to eliminate the light from the blue and green spectrum. The light bulb should be 15 watts or less. The filter varies by manufacturer. The most common types are a brown filter (Wratten 6B, Kodak) for blue-light-sensitive film and a dark-red filter (Wratten 6BR or GS-1) for green-light-sensitive film. The dark-red filter is recommended because of its versatility: both green-light- and blue-light-sensitive film can be used in this lighting.
Safelights should be positioned so that darkroom work can be performed without fumbling. There are two types of safe lighting: direct and indirect (Fig. 7-5). Direct lighting is a diffused light that shines directly over a work area such as the dry or wet side of the darkroom. Indirect lighting is a filtered light directed toward the ceiling and reflected over the entire room. Indirect lighting is often combined with direct lighting. At no time should the safelight be closer than 4 feet from a work area. A safelight that is too close, has a too-high wattage bulb, or has incorrect filtration may cause film fog.
The efficiency of a safelight can be tested; this is discussed in Chapter 10. Remember, no light is “safe” if the film is exposed to it for a prolonged period. Therefore the film bin should be open only when removing or replacing film. Fogging will result even with a safelight if the bin is left open or if film is left on the counter.
FILM-PROCESSING SOLUTIONS
A quality assurance program should be established and maintained in the veterinary practice. This program allows reproducibility, and it gives the radiographer confidence in the exposures used on each radiograph (see Chapter 10).
