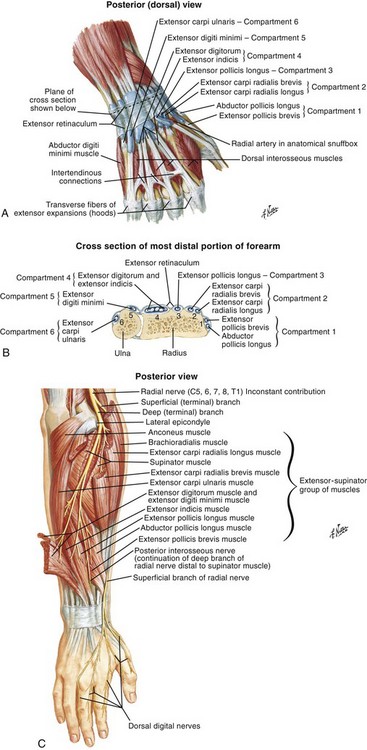
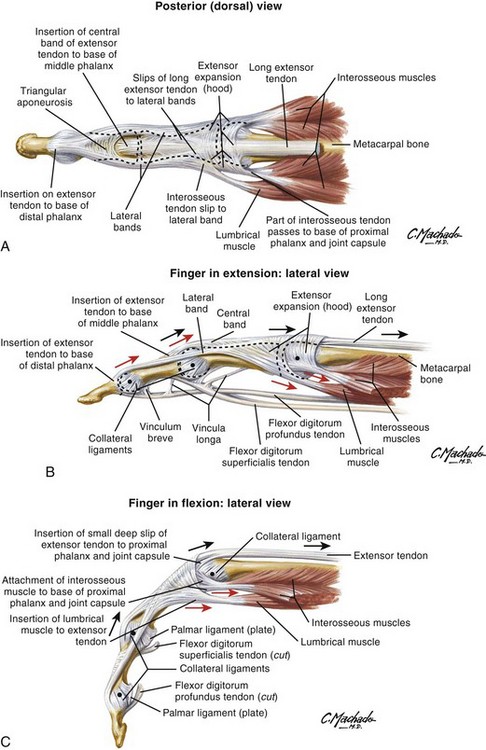
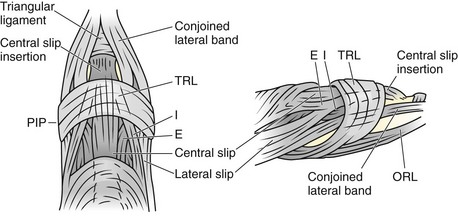
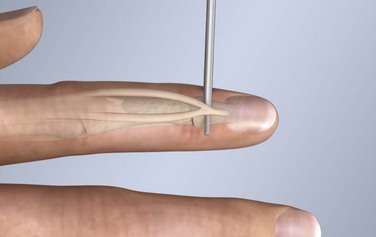
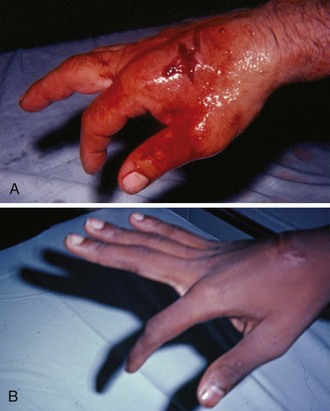
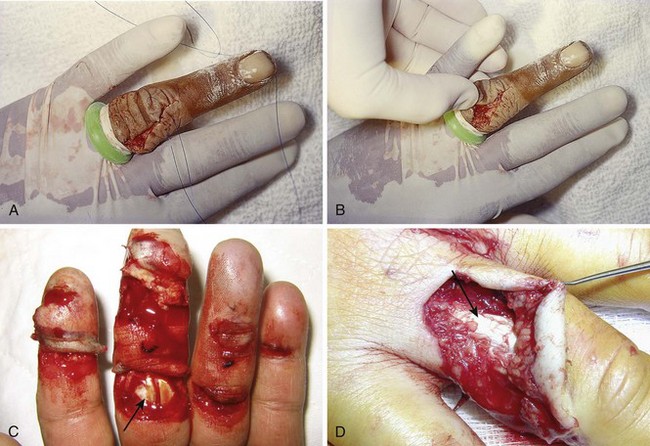
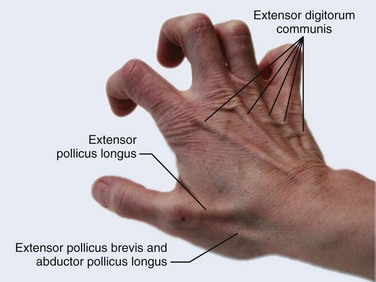
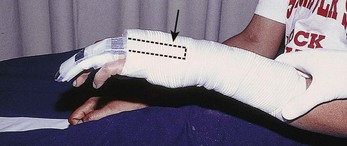
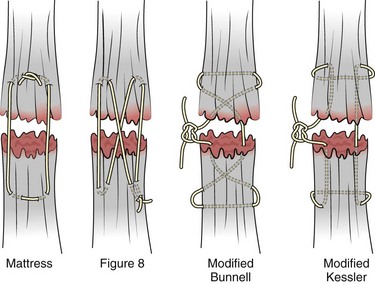
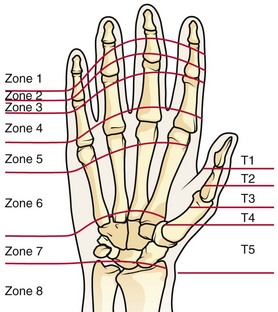
Chapter 48 There are 12 extrinsic extensors of the wrist and digits, all of which are innervated by the radial nerve. The muscles that give rise to these tendons originate in the forearm and elbow (Fig. 48-1). The extrinsic extensor tendons reach the hand and digits by passing through a fibroosseous tendon sheath (retinaculum) located at the dorsal surface of the wrist. This synovium-lined sheath provides smooth gliding of the tendons and prevents bowstringing when the wrist is extended.1 The dorsal retinaculum contains six compartments or subdivisions (Fig. 48-2). These compartments are numbered from the radial to the ulnar side of the wrist. The course of the extensor tendons along the fingers is more complex, but a basic understanding of this anatomy is essential for the emergency clinician to evaluate and treat extensor tendon injuries (Fig. 48-3). The EIP tendon joins the EDC tendon at the level of the metacarpophalangeal (MCP) joint in the index finger. The EDM tendon parallels the course of the EDC tendon; the four EDC tendons eventually insert at the base of the proximal, middle, and distal phalanges. The most proximal insertion of the EDC tendon is at the level of the base of the proximal phalanx. The tendon actually inserts in two ways. First, there is a loose dorsal insertion just distal to the MCP joint. In addition, the EDC tendon inserts into the volar plate via the sagittal bands. The sagittal bands are circumferential structures at the level of the metacarpal head that serve to keep the EDC tendon centered over the metacarpal head, as well as to provide a stable connection with the volar plate located on the palmar side of the hand. After its primary insertion at the level of the MCP joint, the EDC tendon then extends dorsally along the digit. The EDC trifurcates over the proximal phalanx (Fig. 48-4). Its major central slip inserts on the base of the middle phalanx (Fig. 48-5). The lateral branches of the EDC tendon join with the lateral bands from the interossei and lumbricals to form the conjoined lateral bands. The two conjoined lateral bands then fuse together over the middle phalanx to form the terminal extensor mechanism (TEM), which inserts into the base of the distal phalanx (Fig. 48-6). The triangular ligament is a connection between the two conjoined lateral bands that assists in keeping these structures on the dorsal aspect of the digit. The key to detecting extensor tendon injuries in the ED is to perform a careful and thorough history and physical examination. Closed injuries may appear innocuous at first but can result in tendon injuries that may lead to severe deformities or dysfunction if undetected (Figs. 48-7 to 48-9). Closed injuries are also commonly associated with fractures. A hand radiograph is recommended for closed-hand injuries when a fracture is suspected or for open-hand injuries in which a fracture or foreign body is suspected. It is generally accepted that all open injuries that result from glass should be radiographed. Plain radiographs have a sensitivity of approximately 98% for detecting radiopaque foreign bodies (e.g., gravel, glass, metal).2 After assessing the strength and neurovascular status of the injured hand it is imperative that the emergency clinician visually inspect the wound thoroughly. Inspection should include an assessment of the degree of wound contamination, as well as a search for foreign bodies and occult tendon lacerations. It is often necessary to extend the skin laceration to aid in the visualization of a possible tendon injury. Some investigators have advocated for the use of ultrasound in the diagnosis of suspected extensor (and flexor) tendon lacerations in the hand.3 This is a potentially attractive tool since it is easy to use and noninvasive and provides point-of-care analysis, but the use of sonography for detection of hand and digit tendon injuries cannot yet be advocated for routine use by emergency physicians. Because an extensor tendon is a mobile structure, it is imperative that if it is exposed, it be visualized in its entirety through a full range of motion. It is especially important to examine the tendon in the position that it occupied at the time of injury because the tendon injury frequently does not lie directly under the external skin wound (see Fig. 48-8). The choice of suture material depends on the location of the tendon injury. For repair of complete tendon injuries on the dorsum of the hand, nonabsorbable, synthetic braided sutures are preferred.4 Polyester sutures, such as Ethibond or Mersilene, are recommended. Nylon sutures are acceptable but are less ideal because colored nylon may be visible under the skin. Chromic and plain gut should be avoided because they will dissolve before adequate tendon healing has occurred. Silk is not desirable because of its reactivity. Most extensor tendons on the dorsum of the hand will accommodate 4-0 sutures, but 5-0 suture material may be needed for smaller tendons. Small, “plastic repair” tapered needles should be used to avoid tearing the tendon. Partial tendon injuries in the digits are best repaired with fine, synthetic absorbable sutures such as polyglactin (Vicryl). Complex lacerations that involve tissue loss and fraying of the tendon margins (e.g., table saw injuries) represent a particularly challenging clinical scenario that may make an otherwise straightforward tendon repair very difficult. In these cases, Lalonde and Kozin recommend closing the lacerated skin and tendon together (i.e., dermatotenodesis). Take large, composite bites of skin and tendon together, 5 to 10 mm on either side of the wound, with 3-0 or 4-0 nylon sutures tied outside the skin. Tighten the sutures until the digit is in full extension.5 Before repairing a tendon injury, it is imperative that the clinician use adequate anesthesia so that thorough wound exploration can occur. A field block or regional nerve block can be used on the dorsum of the hand, whereas local anesthesia or a digital nerve block can be used on the fingers. The choice of anesthetic composition has been the subject of long-standing controversy. Traditional teaching admonishes the use of epinephrine in anesthetics for fear of digital ischemia; however, many clinicians readily use lidocaine with epinephrine in the hand and fingers without complications. There is ample anecdotal and clinical evidence supporting the safety profile of epinephrine in digital anesthesia. Epinephrine has the benefit of prolonging the anesthetic effect and promoting a bloodless field during wound exploration and repair.6 It is important that the digits be fully anesthetized or, in the case of more proximal wounds on the hand, that the area around the wound be liberally anesthetized because many lacerations must be extended to afford access to the surgical field. It is a common error to avoid extending a laceration and to attempt examination, cleaning, or repair through a small initial skin laceration. Atraumatic technique is essential for minimizing adhesions and scar tissue formation. Tendons should be handled delicately, with crushing force or excessive punctures with forceps and needles avoided. Forceps should be used only on the exposed, cut end of the tendon whenever possible.7 Treatment of extensor tendon injury depends primarily on whether the injury is open or closed, as well as the anatomic location of the injury. The most widely accepted classification system is that developed by Verdan,8 which divides the hand and wrist into eight anatomically based zones (Fig. 48-10). It is quite useful for emergency clinicians to become familiar with this classification because in many instances the zone of injury can help determine whether tendon repair should be attempted in the ED. One must keep in mind that repair of lacerated extensor tendons within 72 hours of injury is still considered primary closure. Therefore, although emergency clinicians may repair many extensor tendon injuries immediately, some injuries are best managed with delayed repair. In these cases, initial care in the ED should consist of sterile skin preparation, copious wound irrigation and inspection for foreign bodies, skin closure, splint application, and referral to a hand specialist for further care in 1 to 5 days. A dorsal plaster or fiberglass splint in which a metal foam finger splint is incorporated is an ideal way to totally immobilize a finger (Fig. 48-11) (see Chapter 50). Figure 48-10 Dorsum of the left hand. The injury classification system recommended by Verdan8 includes eight anatomically based zones. (Adapted from Blair WF, Steyers CM. Extensor tendon injuries. Orthop Clin North Am. 1992;23:142.) Once both ends of the injured tendon have been located, the technique used for repair depends on the size and shape of the tendon. Whereas larger, round tendons can accommodate sutures that pass through the core of the tendon, smaller or flat tendons are difficult to repair with this technique. Most of the tendons in zone 6 can be repaired with either a modified Kessler or a modified Bunnell core suture technique using 3-0 or 4-0 nonabsorbable suture (Fig. 48-12). Both these techniques involve first placing a single suture in half of the cut tendon. Place the suture in the tendon core by inserting the suture needle into the exposed, cut end and then weaving the suture through the lateral tendon margins. Next, place the same suture through the core of the opposite half of the cut tendon. Tie the suture ends in a square knot in between the cut ends of the tendon to bring the two halves together. Smaller tendons may be repaired with a figure-of-eight or horizontal mattress suture (see Fig. 48-12). Small, tapered needles should be used to avoid tearing the tendon. In a cadaver study comparing these multiple suture techniques, it was found that the modified Bunnell technique provided the strongest extensor tendon repair.10 In addition, this technique produced no gapping between the repaired tendon ends and minimized the postrepair restriction of flexion at the MCP and proximal interphalangeal (PIP) joints. It is important to passively test the degree of flexion at the MCP joint after a zone 6 tendon repair to be certain that the tendon has not been excessively shortened. To improve the tensile strength of the repair, a number of other suture techniques may be used.4 One option is to increase the number of suture strands that cross the repair site (e.g., four strands rather than two). A cadaver study that compared various four-strand tendon repair techniques concluded that the Massachusetts General Hospital technique was more resistant to gap formation than either the Krackow-Thomas or the four-strand modified Bunnell technique.11 However, this cadaver model could not assess tendon shortening or subsequent range of motion.12 Another way to improve tensile strength is to place a peripheral suture in addition to the core suture. Place a running cross-stitch suture of synthetic, absorbable material (e.g., 5-0 polyglycolic acid, polyglactin, polydioxanone) circumferentially around the repair site or just on the dorsal surface of the tendon across the laceration site. Alternatively, place sutures laterally along both sides of the tendon, starting at about 1 cm on either side of the repair site. The ultimate choice of repair technique will depend largely on the treating clinician’s familiarity with extensor tendon repair, as well as the size of the tendon. The approach to partial extensor tendon lacerations is not well defined, and no definitive standard of care exists. One evidence-based analysis identified 141 papers in its literature search, but none were relevant to the question of repair of partial extensor tendon injuries.13 The authors concluded that there is no direct evidence to assist in answering this question. Given the lack of literature on the subject, a reasonable approach may be to extrapolate from data on flexor tendon injuries. It has been demonstrated that many partial flexor tendon lacerations do well without repair,14 but hand surgeons still disagree on the need for repair of these injuries. In a survey of hand surgeons, 30% of respondents repaired all partial flexor tendon lacerations and 45% repaired only lacerations with greater than 50% involvement of the cross-sectional area.15 Except at the wrist level, extensor tendons are not covered with synovium and are less likely than flexor tendons to form adhesions after repair. This encourages some authors to recommend repair of most partial extensor tendon lacerations. Although the ideal approach to these injuries is not known, it is reasonable to consider repair of partial extensor tendon lacerations to be optional if less than 50% of the cross-sectional area is involved. However, if not repaired, such injuries must be splinted for 3 to 4 weeks to ensure that a partial laceration is not converted into a complete injury. Skin closure, splinting, and referral for follow-up is a standard approach to unsutured partial extensor tendon lacerations. After repair of a lacerated EDC tendon in zone 6, apply a plaster or fiberglass volar splint so that the wrist is in 30 to 45 degrees of extension, the affected MCP joint is in neutral (0 degrees of flexion), and the unaffected MCP joints are in 15 degrees of flexion. The PIP and distal interphalangeal (DIP) joints should be allowed full range of motion. After 10 days, the MCP joints are allowed 20 to 30 degrees of flexion. If there is an isolated EIP or EDM tendon injury, only the index or little finger must be included in this splint. Dynamic extension splinting may be used as early as 2 days after tendon repair, so close follow-up is recommended.16
Extensor and Flexor Tendon Injuries in the Hand, Wrist, and Foot
Extensor Tendons
Functional Anatomy
General Approach to Extensor Tendon Injuries
Preparation for Repair
Patterns of Injury and Management
Zone 6 Injuries1,4,9
![]()
Stay updated, free articles. Join our Telegram channel

Full access? Get Clinical Tree


Extensor and Flexor Tendon Injuries in the Hand, Wrist, and Foot