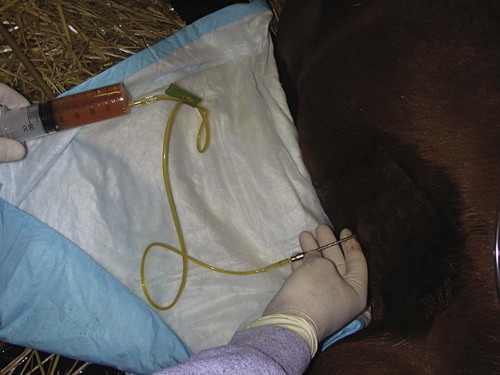
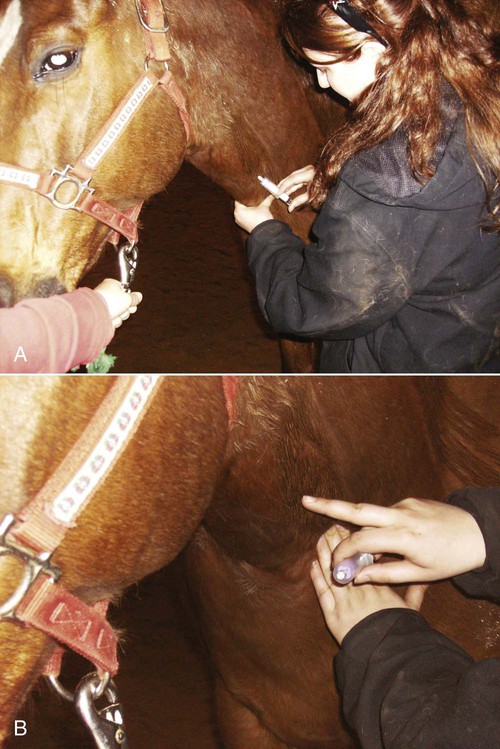
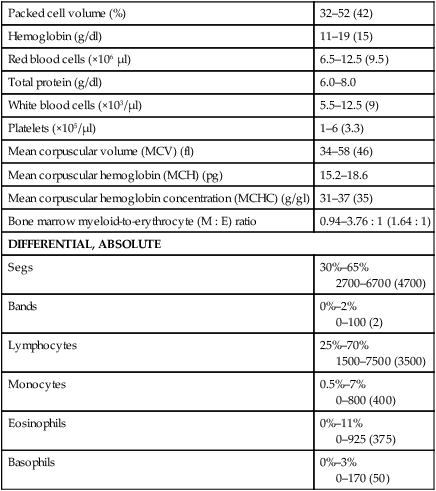
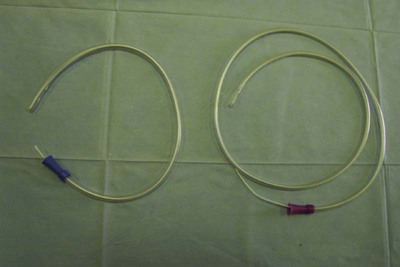
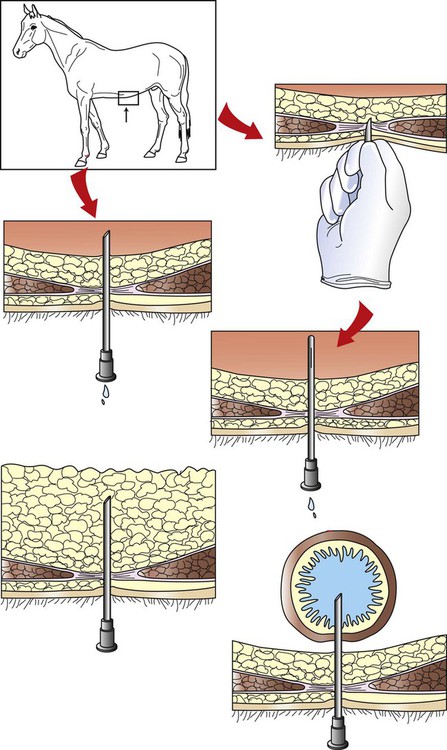
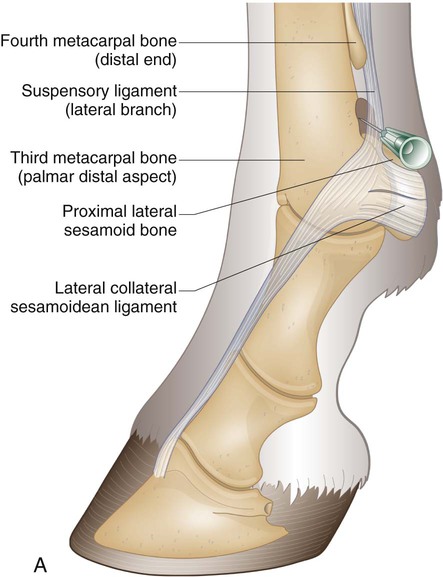
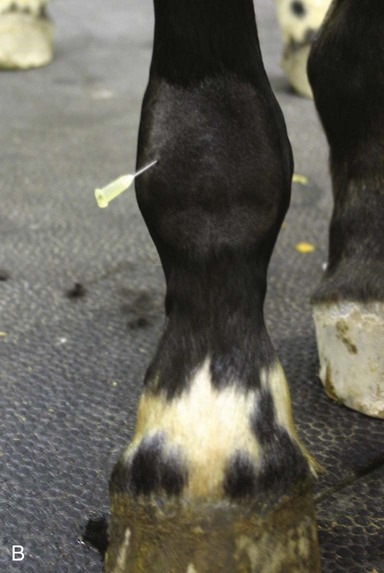
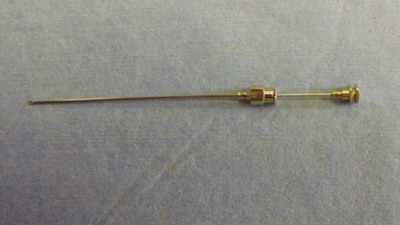
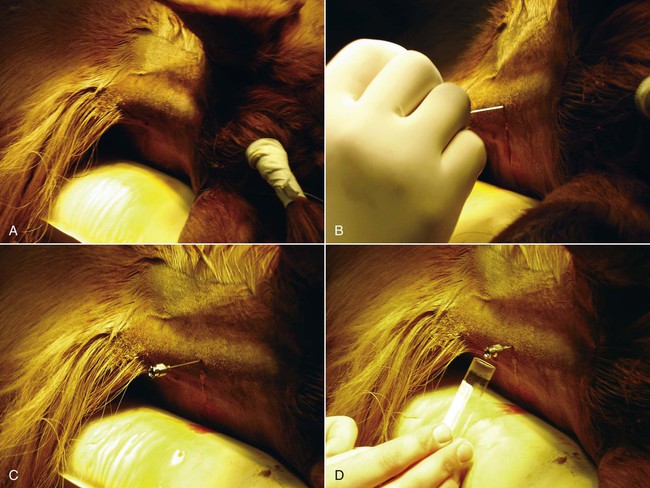
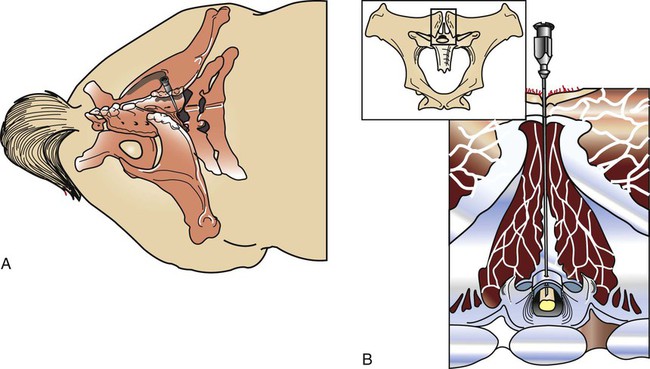
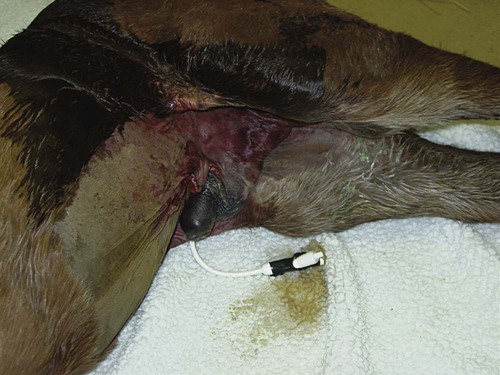
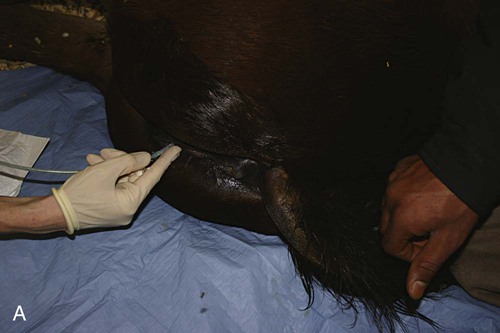
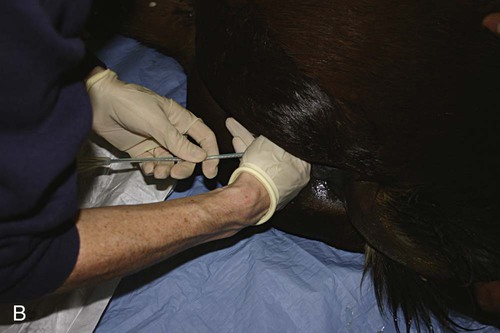
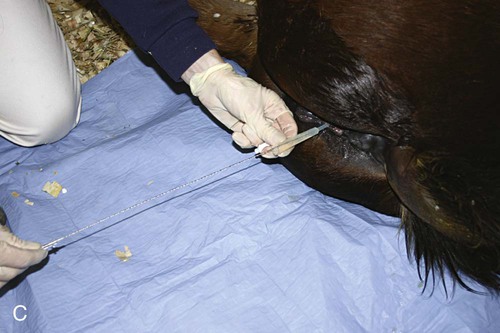
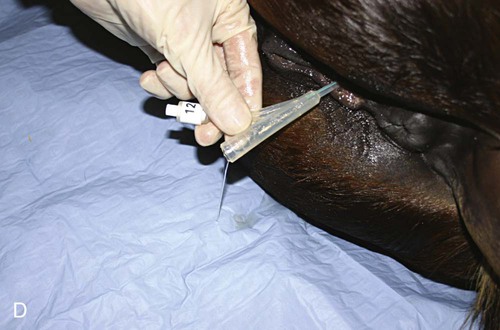
After reviewing this chapter, you will be able to • Set up and prepare the patient for each procedure, perform the procedure (when appropriate), or assist the clinician in performing diagnostic sampling and medication procedures • Properly insert and maintain an intravenous catheter and monitor the catheter for complications • Explain the rationale and indications for each of the clinical procedures described • Set up materials and equipment and prepare the patient as needed for the procedure • Provide assistance to the veterinarian when performing the procedure or perform the procedure when it may be appropriate for a veterinary technician to do so • Perform or assist with necropsy and sample collection procedures and maintain a safe environment during these procedures In general, “normal” body fluids (other than blood) have the following characteristics: • Their clarity is transparent (not cloudy). • They have low white blood cell counts. • They have no or few red blood cells (the procedure itself, i.e., obtaining the sample, can cause some bleeding into the fluid). • They have no bacteria (if obtained from closed body cavities). Sites for venous blood sampling include the jugular vein (Fig. 7-1), cephalic vein, lateral thoracic vein, saphenous vein, and coccygeal vein. Any vein that can be identified, occluded, and accessed safely may be used. The technician should use an approach and preparation similar to that for an intravenous (IV) injection, described under Parental Injection Techniques. Processing and analysis of blood samples are discussed in detail in other texts. Table 7-1 lists normal complete blood count values. Table 7-2 lists normal blood chemistry values for horses. TABLE 7-1 Normal Complete Blood Count Values TABLE 7-2 Samples for blood gas analysis must not clot and must not be contaminated by atmospheric air. Typically, a 25-ga needle and 3-ml syringe are used to obtain the sample. To prevent coagulation of blood, just enough heparin is aspirated to fill the needle and appear in the needle hub. No air or air bubbles should be in the syringe. At least 1 ml of blood is drawn from an artery or vein, and the needle is immediately capped with a rubber stopper to keep air from contacting the sample (rubber stoppers from blood tubes work well). The syringe/needle/cap combination is placed on ice and promptly analyzed. The sample should be run within 10 minutes but may yield accurate results for about Catheterization of the bladder risks contamination of the urine with bacteria that accumulate on the catheter as it passes through the urethra. Therefore, culture results of catheterized samples must be interpreted with caution. Because cystocentesis is not feasible in large animals, catheterized urine samples are the accepted compromise for microbial testing. Urine collection using catheterization is a sterile procedure, so you should prepare the following equipment before the procedure: a urinary catheter (stallion catheter for males; mare catheter or metal Chambers catheter for females [Fig. 7-3]), a 60-ml syringe (catheter or Luer tip depending on the catheter used), sterile gloves, sterile lubricating jelly, and a sterile collection container (plastic or glass). Tranquilization is usually required to cause relaxation and extension of the penis. This procedure induces discomfort; therefore, personnel should position themselves cranially to avoid being kicked with the hindlegs. Additional physical restraint may be necessary. Catheterization of the bladder is performed through the urethra. In males, the urethral entrance is on the end of the glans penis. Following extension of the penis, the tip of the glans penis is prepared with at least three applications of antimicrobial soap/water rinses. The tip of the catheter should be well lubricated with a sterile lubricant. The urethral opening is identified, and the lubricated catheter is passed into the urethra and slowly advanced into the bladder. If the catheter has a stylet, it must be withdrawn to allow urine flow through the catheter. Urine sometimes flows freely from the catheter and may be collected in a sterile container. If urine does not flow freely, a sterile 60-ml syringe is used to aspirate urine from the bladder (Fig. 7-4). The tail is tied or held to the side, and the perineum is prepared with at least three applications of antimicrobial soap/water rinses. The clinician’s gloves should be well lubricated with a sterile lubricant. Physical restraint may be necessary; sedation is occasionally necessary. In females, the urethral entrance is located in the floor of the vestibule–vagina junction (Fig. 7-5). The procedure from this point is carried out similar to that of male catheterization. Common procedures include the following evaluations and measurements: • Gross evaluation: Normal horse urine is clear to cloudy and yellow. The cloudiness is due to a relatively large amount of mucus, which is normal in the horse. • Chemical analysis: Determined using reagent test strips (“dipsticks”) and/or machine analysis. • Urine sediment evaluation: Calcium carbonate crystals are normal and common in horse urine. • Microbial culture and sensitivity: Performed if infectious disease is suspected or confirmed. The following observations should be made when performing a fecal laboratory analysis: • Gross evaluation: Normal equine feces are mostly solid, in formed fecal balls. Color is light to dark green. Mucous coating may indicate that the feces have been retained longer than normal. • Parasitic evaluation: Fecal flotation ± quantitative techniques ± larval culture. • Fecal culture/sensitivity: This is especially important when Salmonella is suspected. Salmonella testing usually requires daily samples for 3 to 5 days; at least 10 g of feces should be submitted for each sample. Adults are restrained in a standing position for the procedure; foals are restrained in lateral recumbency. The procedure is usually performed at the most dependent (lowest) point of the abdomen, on ventral midline or slightly to the right of ventral midline (Fig. 7-6). The hair should be clipped and sterile skin prep performed (Fig. 7-7). Performing the procedure without clipping the hair is possible, but special care must be taken to properly prepare the area, and the client should be warned about the slightly increased risk for introducing infection. Common procedures include the following evaluations and measurements: • Gross visual examination: Normal abdominal fluid is pale yellow, clear, and odorless. Its consistency is similar to water. • Red blood cell (RBC) and white blood cell (WBC) counts • Microbial culture and sensitivity: Performed if infection is suspected or confirmed. • Ancillary tests: May include pH, enzyme, and other chemistries; seldom necessary. Patient restraint depends on many factors, including the anatomical location of the synovial structure, the restraint method, and the clinician’s preference. Restraint is required for most cases and ranges from minimal restraint to more severe physical restraint. In some cases, chemical sedation or even general anesthesia is necessary. Most arthrocentesis is performed with the horse standing and weight bearing, although some structures are accessed with the leg elevated. Some synovial structures are accessible from more than one location (Fig. 7-8). The patient must be motionless while the needle is in the joint because motion can bend or break the needle, and the cartilage and synovial membrane surfaces of the joint can be severely lacerated or punctured. Common procedures include the following evaluations and measurements: • Gross visual examination: Normal synovial fluid is yellow, clear, and odorless. The fluid should have viscosity (i.e., be “stringy”); watery consistency is abnormal. • Microbial culture and sensitivity: Performed if infection is suspected or confirmed. • Ancillary tests: May include pH, enzymes, chemical mediators of inflammation, and other chemistries; cartilage fragment analysis and mucin clot tests are no longer routinely performed. Before beginning the procedure, collect the following equipment: sterile gloves, sterile 12- or 20-ml syringe, EDTA and serum (plain) tubes, a needle (18-ga × 3-inch spinal needle for atlantooccipital tap [Fig. 7-9], 8-inch spinal needle for lumbosacral tap), local anesthetic/12-ml syringe/20-ga × The atlantooccipital space can only be safely accessed with the patient under general anesthesia. Although the procedure carries the risks of general anesthesia, it is a brief procedure, and injectable anesthesia can be used. CSF is technically easy to obtain at this location. If the patient is ataxic, as many neurologic patients are, the risk of self-injury during the anesthetic recovery period is increased and may be unacceptable. Atlantooccipital space is located just caudal to the poll, on the dorsal midline, at the level of the wings of the atlas (Figs. 7-10 and 7-11). This procedure must be performed with the horse under general anesthesia; therefore, proper preparation for anesthesia is required. The patient is placed in lateral recumbency. A rope is usually placed around the nose and pulled caudally to ventroflex the head and neck; this opens up the atlantooccipital space and facilitates needle placement. The patient is clipped and sterilely prepped for the procedure. The needle is advanced by the clinician, paying careful attention to anatomical landmarks, until the bevel is confirmed to be in the subarachnoid space. With atlantooccipital taps, fluid usually flows freely from the needle and can be collected from the needle hub. Fluid may flow freely from the lumbosacral space but usually needs to be collected by gentle aspiration with a sterile syringe because it cannot be easily collected by gravity flow with the needle in its vertical position. Fluid is usually collected into both EDTA and serum tubes; more than 1 ml should be placed in the EDTA tube. The lumbosacral space is usually accessed in the awake, standing patient; this avoids the risk of recovery from general anesthesia. However, the lumbosacral space is technically more difficult to enter, and patients may display violent reactions to pain from the procedure. Lumbosacral space is located on the dorsal midline, at the level of the wings of the ilium (Fig. 7-12). The procedure is performed in the standing patient, usually with sedation. Care must be taken not to oversedate the horse, which may cause excessive body swaying. Because the patient must stand still during the procedure, stocks are highly desirable to restrict movement. The horse must also stand squarely with weight distributed evenly on all legs because leaning makes the procedure difficult to perform. The patient is clipped and sterilely prepped for the procedure, and local anesthesia of the skin, subcutaneous tissues, and deeper tissues is performed. A final prep is performed after the local anesthetic is injected. The procedure is then performed as if you were collecting fluid from the atlantooccipital space. CSF fluid should be analyzed as soon as possible because of rapid deterioration of cells. Common procedures include the following evaluations and measurements: • Gross visual examination: Normal CSF is clear, colorless, and odorless. It has the consistency of water. • RBC/WBC counts: A hemocytometer is often required for accurate counts. • Microbial culture/sensitivity: Performed if infectious etiology is suspected or confirmed. • Serology: Antibody titers for some neurologic diseases are commonly performed on CSF. • Ancillary procedures: Glucose, pH, electrolyte, and enzyme levels are occasionally measured. The patient is restrained in a standing position. The sample is taken from the right or left lateral thoracic wall, through an intercostal space. The specific location is usually determined following ultrasound examination, usually toward the ventral aspect of the lateral thoracic wall (Fig. 7-13).
Equine Clinical Procedures
Diagnostic Sampling
Venous Blood Sampling
Packed cell volume (%)
32–52 (42)
Hemoglobin (g/dl)
11–19 (15)
Red blood cells (×106 µl)
6.5–12.5 (9.5)
Total protein (g/dl)
6.0–8.0
White blood cells (×103/µl)
5.5–12.5 (9)
Platelets (×105/µl)
1–6 (3.3)
Mean corpuscular volume (MCV) (fl)
34–58 (46)
Mean corpuscular hemoglobin (MCH) (pg)
15.2–18.6
Mean corpuscular hemoglobin concentration (MCHC) (g/gl)
31–37 (35)
Bone marrow myeloid-to-erythrocyte (M : E) ratio
0.94–3.76 : 1 (1.64 : 1)
DIFFERENTIAL, ABSOLUTE
Segs
30%–65%
2700–6700 (4700)
Bands
0%–2%
0–100 (2)
Lymphocytes
25%–70%
1500–7500 (3500)
Monocytes
0.5%–7%
0–800 (400)
Eosinophils
0%–11%
0–925 (375)
Basophils
0%–3%
0–170 (50)
Blood urea nitrogen (mg/dl)
10.4–24.7
Creatinine (mg/dl)
0.9–2.0
Glucose (mg/dl)
62.2–114
Albumin (g/dl)
2.5–3.8
Total bilirubin (mg/dl)
0.3–3
Aspartate aminotransferase (AST) (µ/L)
115.7–287
γ-Glutamyltransferase (GGT) (µ/L)
2.7–22.4
Creatine kinase (µ/L)
34–165.6
Alkaline phosphatase (µ/L)
70.1–226.8
Lactate dehydrogenase (DH) (µ/L)
102.3–340.6
Sodium (mEq/L)
133.3–147.3
Potassium (mEq/L)
2.8–4.7
Chloride (mEq/L)
97.2–110.1
Calcium (mg/dl)
10.4–13.4
Phosphorus (mg/dl)
2.3–5.4
Magnesium (mg/dl)
1.8–2.7
Blood Gas Samples
 hours if the sample is maintained on ice and kept airtight. The patient’s temperature should be taken at the time of collection, and the analysis must be corrected for body temperature (Fig. 7-2).
Urine Collection
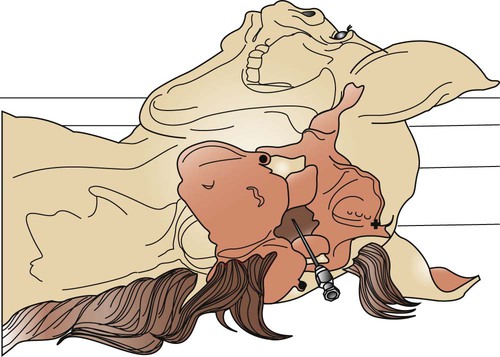
Males
Females
Fecal Collection
Abdominocentesis (Abdominal Tap)
Arthrocentesis (Joint Tap)
Cerebrospinal Fluid Collection
 -inch needle for lumbosacral tap or general anesthesia (injectable or inhalation) for atlantooccipital tap.
Atlantooccipital Space Collection
Lumbosacral Space Collection
Thoracocentesis (Chest Tap)
![]()
Stay updated, free articles. Join our Telegram channel

Full access? Get Clinical Tree


Equine Clinical Procedures
 -inch-long Vacutainer needles are available for large animal use.
 inch for most adults, 18-ga × 3-inch spinal needle for large or obese horses, 20-ga × 1 inch for foals), blunt trocar or cannula for severely bloated patients, no. 15 scalpel blade if using a trocar or cannula, local anesthetic/syringe/25-ga ×
  -inch needle for anesthesia of the skin (for foals or if using a trocar or cannula), sterile 4 × 4 gauze if using a trocar or cannula, and clean ground cloth/towel for foals.
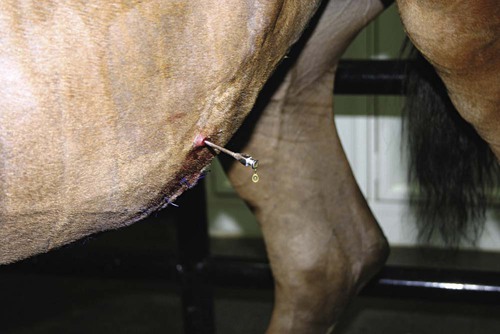
 -inch needle, no. 15 scalpel blade, sterile 35- or 60-ml Luer-tip syringe, and a three-way stopcock.