Chapter 5 Basic Diagnostic Techniques
Early and correct diagnosis of ocular disorders, which is essential to a successful clinical result and a satisfied client, relies almost completely on a thorough, orderly, and complete ocular examination. As with all other body systems, investigation of a patient with ocular disease comprises the taking of a thorough and directed history, a complete examination of the ocular and periocular structures, and then, in many cases, some specialized diagnostic testing as directed by the history and examination findings. The aim of this chapter is to help the reader develop a systematic approach to the ocular examination, including the basic principles of some specialized diagnostic methods. As with other body systems, a problem-oriented approach is encouraged. Most of the examination techniques described in this chapter are applicable to exotic or avian species, sometimes with minor modifications. However, the reader is referred to Chapter 20 for more specific description of examination techniques and diagnostic testing in exotic and avian species. Additionally, this chapter introduces many new terms, and the reader is referred to the Glossary for a full definition of these.
MEDICAL HISTORY
EXAMINATION PROCEDURE
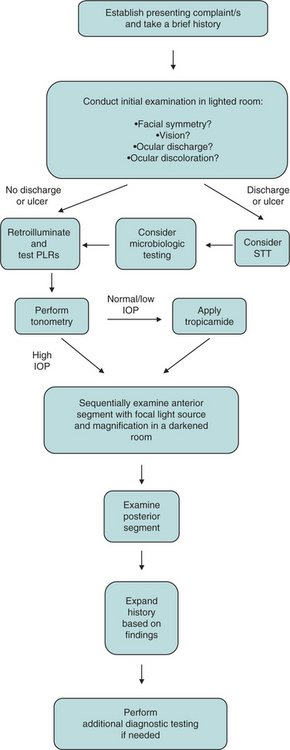
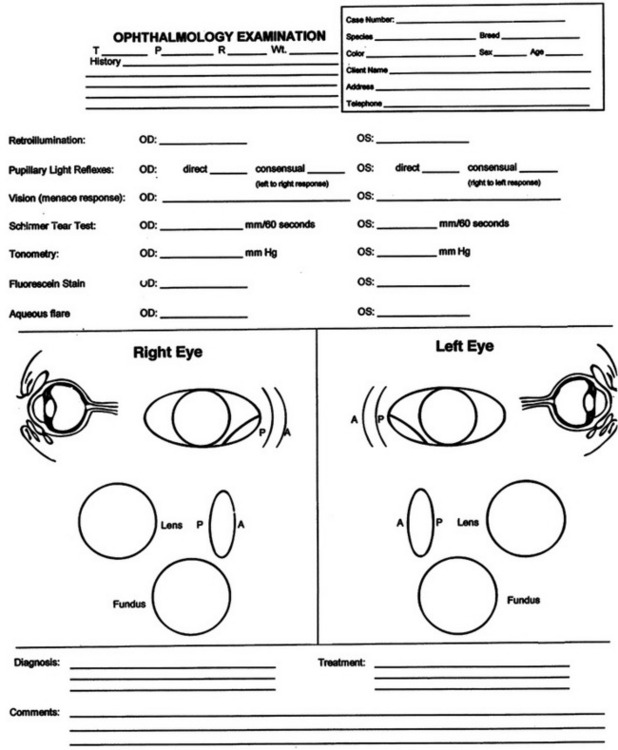
An ophthalmic examination requires a minimum of equipment (Box 5-1). Ideally the examination is conducted in dim ambient light, preferably in a darkened room or stall, to minimize interfering reflections. Once sedated, a horse can be examined with the examiner’s and the horse’s heads under a blanket or dark cloth. Although the order in which the examination is conducted is not critical for all components, certain tests either would compromise later parts of the ocular examination or should not be performed until certain conditions have been ruled out because they could exacerbate or complicate those conditions or render them impossible to further examine. The major components of the ocular examination and the order in which each should be completed are described in Figure 5-1. Sometimes this order can be best recalled and examination findings best recorded on a form designed specifically for the ophthalmic examination (Figure 5-2).
SCHIRMER TEAR TEST
The Schirmer tear test (STT) is a semiquantitative method of measuring production of the aqueous portion of the precorneal tear film. It must be performed before application of any topical solutions, because these would artificially but temporarily raise the STT value. In addition, some topical solutions exert a more protracted inhibitory effect. For example, topically applied anesthetics or parasympatholytic drugs used to induce mydriasis, and local anesthetics, both will reduce STT values. Finally, manipulative procedures such as corneal or conjunctival scrapings, flushing of the lacrimal apparatus, and potentially even application of bright lights to an inflamed eye will result in artificially elevated STT values. For these reasons, if the STT is to be performed, it should be done as the first component of the ophthalmic examination.
The test is performed with sterile, individually packaged strips of absorbent paper with a notch 5 mm from one end. Each strip is folded at the notch and hooked over the middle to lateral third of the lower lid for 60 seconds (Figure 5-3). The distance from the notch to the end of the moist part of the paper is measured immediately on removal of the strip from the eye. This is the STT 1, which measures basal and reflex tearing, including that due to corneal stimulation provided by the test strip itself. That is why the STT strip should be placed in the middle to lateral region of the lower eyelid, where it can gently contact the corneal surface. If it is placed more medially, the third eyelid can protect the cornea and reduce STT 1 results. In normal dogs, the STT 1 result should exceed 15 mm in 1 minute. Readings of less than 10 mm in 1 minute are considered diagnostic for keratoconjunctivitis sicca. Values between 10 and 15 mm in 1 minute are considered highly suggestive of keratoconjunctivitis sicca, particularly if appropriate clinical signs are present.

The reported range for STT results in normal cats is 3 to 32 mm in 1 minute with a mean of 17 mm in 1 minute. However, experience suggests that lower readings than the reported mean can be expected in a clinical setting. This is probably due to autonomic control of secretion and short-term alterations in tear flow due to stress in the examination room. Values should still be recorded in cats but should be interpreted with caution and always in conjunction with clinical signs. Commercial strips are often unsuitable for horses if left in place for 60 seconds because of greater tear production in this species, which quickly saturates the entire strip. Some recommend broader strips, but these must be prepared in a very uniform manner. Rather, it is probably better to leave a standard strip in place for only 30 seconds in this species. STT results are also published for a number of exotic species (see Chapter 20).
MICROBIOLOGIC SAMPLING
Ocular surface samples (typically a swab or scraping) may be assessed for presence of a microbial pathogen by cytologic assessment, culture, polymerase chain reaction, or immunofluorescent antibody labeling. Some of these tests, especially microbial culture, may be affected by many of the drugs applied topically to the eye and by the preservatives that accompany them. Although topical anesthetic agents do contain preservatives, application of a topical anesthetic is essential for the safe and humane collection of samples from the ocular surface. Therefore, if indicated, samples for microbiologic analysis should be collected early in the examination process, immediately after the STT if it is done. The indications for collection of samples for microbiologic assessment include notable purulent inflammation; chronic, unresponsive, or severe corneal or conjunctival lesions; deep corneal ulcers with stromal loss or malacia (“melting”); and severe blepharitis or periocular dermatitis.
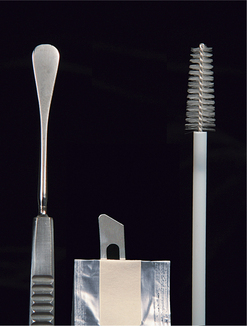
Traditionally, microbiologic specimens have been collected with a moist swab. However, some ophthalmologists prefer to collect more cellular specimens from corneal or conjunctival lesions by scraping or with a cytology brush. These samples can be submitted for culture and sensitivity testing, cytologic assessment, and Gram staining. A sterile instrument such as a Kimura spatula, a cytology brush, or the handle-end of a scalpel blade should be used (Figure 5-4). Samples should be placed into or onto media suitable for the organisms being sought, as advised by the laboratory that will receive and interpret the samples, and shipped appropriately and as soon as possible.
ASSESSMENT OF PUPIL SIZE, SHAPE, SYMMETRY, AND MOBILITY
Retroillumination
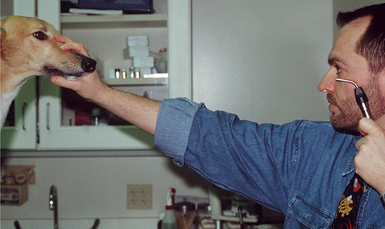
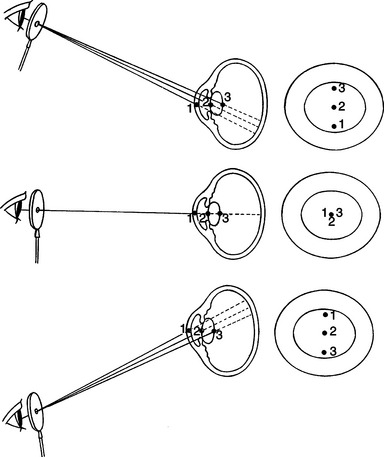
Retroillumination is a simple but extremely useful technique for assessment of pupil size, shape, and symmetry. A focal light source (Finoff transilluminator or direct ophthalmoscope) is held up to the examiner’s eye and directed over the bridge of the patient’s nose from at least arm’s length from the patient so as to equally illuminate the two pupils and elicit the fundic reflection (Figure 5-5). This reflection is usually gold or green in tapetal animals and red in atapetal individuals. With each eye equally illuminated, the fundic reflex is used to assess and compare pupil size, shape, and equality (Figure 5-6). Retroillumination can also be used to judge the clarity of all of the transparent ocular media (tear film, cornea, aqueous humor, lens, and vitreous). Opacities in the ocular media will obstruct the fundic reflection and can be noted for more detailed subsequent examination. Retroillumination is particularly useful for differentiating nuclear sclerosis from cataract (see Chapter 13).
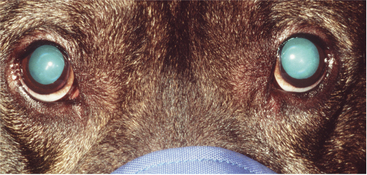
Pupillary Light Reflexes
Following assessment of resting pupil size, shape, and symmetry, pupil reactivity should be assessed (see also Chapter 16). The reflex constriction of the pupil in response to light striking the retina is termed the pupillary light reflex. In most mammals, constriction of the pupil of the illuminated eye (the direct PLR) is slightly greater than that of the pupil of the contralateral or nonilluminated eye (the indirect or consensual PLR). Interpretation of the PLR requires an understanding of the neurologic reflex as well as other potential confounding factors. The neural arc being tested has an afferent arm, which includes the retina, optic nerve, optic chiasm, optic tract, pretectal area, and the parasympathetic nucleus of cranial nerve (CN) III, where there is a synapse with the pupillomotor fibers of CN III (oculomotor nerve), which stimulate the smooth muscles of the iris sphincter muscle to cause pupil contraction. In addition to pathology at any point along this neurologic pathway, the PLR may be decreased or absent if there is iris atrophy (due to age), iris ischemia, (due to acute glaucoma), physical obstruction of the pupil (due to synechia or lens dislocation), prior use of a dilating drug, or high concentrations of circulating epinephrine (i.e., in fearful animals). The effect of these confounding factors is exacerbated if a weak light source is used. Also, it is critical to understand that because the PLR is a subcortical reflex and requires relatively little retinal function, a positive direct PLR is not an indicator of vision. However, because it tests many but not all of the same pathways required for vision, it should be tested in all animals in which vision is impaired as it may help with anatomic localization of the defect.
Both the extent and speed of the PLR should be assessed and compared in the two eyes and against what is considered normal for that species. The PLR tends to be fastest and most complete in carnivores, with the cat’s being the fastest of all common domestic animals. The normal equine pupil constricts slowly in response to a bright light. The PLR of the cow and sheep is somewhat more rapid. Birds and reptiles do have a PLR, but they can override it because their iris musculature is skeletal rather than smooth (see Chapter 20).
EXAMINATION OF THE ANTERIOR SEGMENT
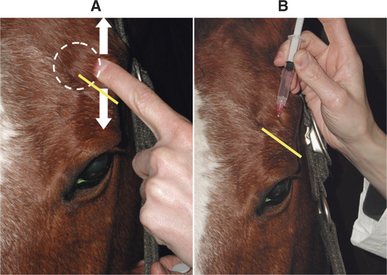
The exception to this rule is in the horse, in which sedation and an auriculopalpebral nerve block are essential for a good eye examination and should be performed after the assessment of pupil size, vision, STT (if necessary), and all reflexes and responses. The auriculopalpebral nerve block provides paresis of the orbicularis oculi muscle and limits eyelid closure, which is very forceful in the horse. Without an auriculopalpebral block, it is generally not possible to examine the whole globe of the horse and peripheral lesions will be missed. The auriculopalpebral nerve is found by running a finger up and down over the zygomatic process of the facial bone. The nerve can be palpated as it runs transversely in the subcutaneous space across the lower third of this process (Figure 5-7, A). Approximately 2 mL of lidocaine is then injected over the nerve (Figure 5-7, B). Sometimes sedation can be avoided in horses if a twitch is used. For food animals, a suitable crush or race/chute and (especially in cows) nose tongs are useful.
In all species and before sedation (if used), the eyes and periocular region should first be examined from a distance and in normal ambient light for gross abnormalities, including asymmetry, palpebral fissure size, ocular or nasal discharge or dryness, periocular alopecia, deviations of the visual axes, redness or other color change, and corneal clarity and moistness (reflectivity). The animal’s response to the new environment of the examination room may also be used to judge visual function. Neuroophthalmic and visual testing may then be conducted. Vision testing could include maze testing, tracking of objects that do not emit sound or odor (thrown cotton balls or a laser pointer are excellent). The menace response, if conducted in such a way that air currents and direct contact with the vibrissae are avoided, can also be used. Normal palpebral reflex (a complete blink in reaction to digital stimulation of the eyelid skin) should then be verified for both eyes as a test of CN V and CN VII function. These tests are more thoroughly described later. Finally, globe movements and position are examined. As the head is elevated, depressed, and moved laterally, the eye should return to or remain in the center of the palpebral fissure, producing a physiologic nystagmus. Both globes should retropulse normally and symmetrically.
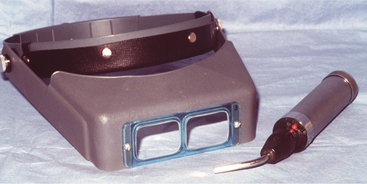
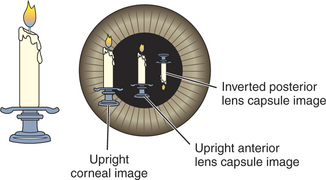
Examination in dim ambient light is then commenced with a magnifying loupe and a focal light source (Figure 5-8). A Finoff transilluminator, which fits to the direct ophthalmoscope or otoscope handset, produces a brighter and more focused beam of light than a penlight and is therefore preferred. A source of magnification is absolutely essential to conduct a complete ocular examination. The most useful instrument for general practice is a simple magnifying loupe with a power of 2 to 4 μ and a focal length of 15 to 25 cm (6 to 10 inches). Using this combination of a focal light source and magnification, the clinician should examine the eye from many angles while the light is directed from many contrasting angles. Particular attention should be paid to the Sanson-Purkinje images, which result from reflections from ocular structures. When a focal light beam is examined from an oblique angle as it passes through the eye, three reflections can usually be seen: the cornea, the anterior lens capsule, and, sometimes, the posterior lens capsule (Figure 5-9). The combination of variable viewing and illumination angles permits the examiner to gain intraocular depth perception by virtue of parallax, shadows, perspective, and reflected light (Figure 5-10).
The slit-lamp biomicroscope (Figure 5-11) is a more sophisticated optical instrument that combines up to 40 μ magnification and illumination and can be used to examine many different microscopic and optical features of the patient’s eye such as individual layers of the cornea that normally are invisible to the naked eye of the examiner. As such, it allows pathologic processes to be described more accurately so as to better guide diagnosis, prognosis, and treatment. Because of the requirement for training and skill in their use, slit-lamp biomicroscopes are usually found only in specialty practices and teaching institutions.

Using a source of focal light and magnification, the clinician examines ocular structures sequentially according to a mental checklist (see Figure 5-2). A logical order appears to be to work simultaneously from peripheral to axial and from anterior to posterior, as follows. More detail can be found in the specific chapters relating to diseases of these individual tissues.
Eyelids
Third Eyelid
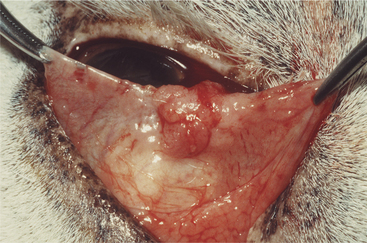
The position of the third eyelid should be examined at rest, and then its anterior face further examined through gentle digital retropulsion of the globe through the upper lid. This later step should be omitted if a deep or penetrating corneal or scleral lesion renders the globe unstable. The posterior or bulbar face of the third eyelid may be examined by means of protrusion and eversion of the third eyelid with a pair of fixation forceps or mosquito hemostats after application of topical anesthetic (Figure 5-12). Look in particular for the following:
Nasolacrimal Apparatus
Cornea
The normal cornea is transparent owing to a number of anatomic and physiologic features. As a result, pathology within the cornea manifests as opacity, often of a color and pattern highly suggestive of the pathologic process (see Chapter 10). Look in particular for the following:
Sclera
Only the anterior portion of the scleral coat may be seen on direct external examination of the eye. Even then, it is seen through the almost transparent bulbar conjunctiva. The posterior sclera also is usually not directly visualized except in dogs with a subalbinotic fundus. In these patients, the inner aspect of the posterior sclera (the lamina fusca) is visible between and through choroidal tissue. This tends to have a more tan appearance than the external anterior sclera and is discussed more fully later as part of the ocular fundus. Pathology of the posterior aspects of the sclera can sometimes create notable changes in the adjacent choroid or retina, which can be seen during the fundic exam or using ultrasound. However, scleral changes can go unnoticed unless special care is taken to include this tissue on the mental checklist for the eye examination. When examining the anterior portion of the sclera, one should in particular look for the following:
Anterior Chamber
When assessing the anterior chamber, one should look in particular for the following:
Iris and Pupil
Lens
Examination of the lens, like that of other clear ocular structures, can be confusing. Here, too, the Sanson-Purkinje images are useful (see earlier). The examiner can use parallax (see Figure 5-10) or the slit beam of the direct ophthalmoscope and a source of manification to determine position of opacities within the lens. Lens pathology is relatively limited, with altered clarity (nuclear sclerosis or cataract) and dislocation (luxation or subluxation) predominating. Look in particular for the following:
Examination of the lens completes examination of the anterior segment, which will identify the vast majority of ocular lesions encountered in general practice. However, a complete examination also necessitates examination of those structures in the posterior segment: the vitreous and various structures of the ocular fundus. This requires some equipment and techniques additional to those used for examination of the anterior segment, which are described in the following sections.
OPHTHALMOSCOPY
The clinician can examine the fundus of larger eyes (notably those of the horse, cow, and many raptors) directly through a widely dilated pupil by aligning the light beam with his/her visual axis and standing a short distance from the patient, as for retroillumination (see Figure 5-5). However, this maneuver is not possible for dogs and cats, and even for horses and cows, accurate assessment requires examination using one of three methods of ophthalmoscopy:
Direct Ophthalmoscopy
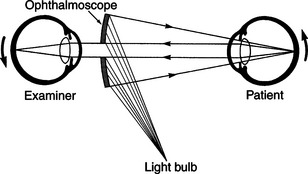
The direct ophthalmoscope directs a beam of light into the patient’s eye and places the observer’s eye in the correct position to view the reflected beam and details of the interior of the eye (Figure 5-14). It is called a direct ophthalmoscope because it provides a direct and upright image of the fundus rather than a virtual and inverted image as provided by the indirect ophthalmoscope. The direct ophthalmoscope (Figure 5-15) has a rheostat to control the light intensity, colored filters, a slit beam for viewing elevations and depressions within the fundus, an illuminated grid to project onto the fundus to measure lesions, and a series of lenses on a rotating wheel that adjusts the depth of focus within the eye. These lenses may be used to examine structures other than the fundus or to measure the height of lesions by changing the focus from the tip of the lesion to the surrounding retina and determining the dioptric difference. However, many of these features are of limited use in noncompliant veterinary patients.
Stay updated, free articles. Join our Telegram channel

Full access? Get Clinical Tree


