Patricia M. Hogan
Bandaging and Casting Techniques
Limb bandages are applied for a variety of reasons and can be constructed differently to address individual needs. The most common indications for a limb bandage are to protect a wound or incision, control edema or secondary swelling, and provide some degree of external support or immobilization. When properly applied, a limb bandage effectively confers the desired goals of protection and support; however, a poorly applied bandage can create some serious problems. In addition to the potential ramifications of failing to achieve the purpose of the bandage (i.e., prevention of contamination of a wound or incision), a poorly applied bandage can create additional soft tissue problems such as bandage sores, skin necrosis and sloughing, and iatrogenic tendon injury (“bandage bow”).
Foot
The foot can be bandaged effectively with a minimal amount of bandage material. The biggest concern is keeping the bandage and underlying dressing free of moisture and environmental contaminants. For a simple bandage on a hoof that does not require concussive protection, a roll of conforming gauze can be applied around the hoof, hooking up around the bulbs of the heel, followed by a roll of cohesive bandaging tape.1 Duct tape should be applied to the bottom of the foot to protect the bandage from the environment. For a bandage that provides more concussive protection, a 12-inch by 12-inch section of roll or sheet cotton can be doubled over to the desired thickness and then placed over the bottom of the foot and secured around the hoof with gauze, followed by application of the cohesive bandage and duct tape. Placement of a layer of adhesive tape2 over the top rim of the bandage is advisable to secure it to the skin and prevent dirt and bedding material from gaining access to the wound area underneath.
To assist in application of duct tape to the foot, making a 10-inch by 10-inch square of overlapping layers of the tape before applying it to the bandage is helpful. The strips are placed in a crisscross overlapping pattern on a wall, counter, or other smooth surface and then peeled off as one large square when ready to use. The square is centered on the bottom of the foot, molded up along the sides of the hoof, and secured with several more wraps of tape around the perimeter of the hoof. In this way, the bottom of the foot has a thick covering to protect the inner bandage from wear and contamination.
Lower Limb
The lower limb bandage is the most common type of bandage used in horses. The degree of immobilization of the lower limb is dictated by the thickness of the bandage. However, extra padding does not necessarily equate to a stiffer bandage; the key is to apply the padding in separate layers to achieve a greater degree of support. The stiffness or degree of support increases with each additional layer applied.
A standard lower limb bandage is applied from just below the level of the fetlock up to just below the carpus or tarsus. A greater degree of immobilization of the lower limb can be achieved if the bandage is extended to incorporate part of the foot, rather than ending at midpastern level. Also, incorporating the foot results in less of a problem with the lower rim of the bandage rubbing the heel region and causing skin irritation in cases of long-term bandaging. Most commonly, a layer of roll cotton or several combined lengths of sheet cotton are rolled onto the limb and then secured with a layer of 4-inch brown gauze, followed finally by application of a roll of cohesive tape. Ideally, the cotton should be  inch thick and 3 to 4 feet long to allow for at least four or five turns around the limb. A standard 1-pound roll of cotton can be separated and rerolled conveniently to make two separate rolls of bandage material.
The bandage is typically applied starting at the bottom of the foot, rolling upward to the level just below the carpus or tarsus. Care should be taken to ensure that the padding is applied evenly and smoothly and that the overlying gauze is secured with the same degree of tension throughout the length of the bandage. Traditionally, the bandage is applied to the limb in a clockwise fashion so that the tension is applied to the cannon bone and not the tendons, but the logic of this theory is questionable when thick layers of padding are used. If more rigid support is required, the bandage can be applied in sequential layers to a desired thickness. Alternatively, a layer of roll cotton can be applied with a brown gauze overlay, followed by an “Army combine” roll and secured with another layer of brown gauze. A layer of adhesive tape material is placed at the top and bottom of the bandage to secure the ends and prevent dirt and bedding material from getting underneath the bandage.
Full Limb
Successfully bandaging the full limb can be challenging, particularly in the hind limb. The high degree of flexion that occurs at the level of the carpus and tarsus causes more slippage of the bandage and bunching of the underlying material. This can result in improper coverage of the wound or incision and development of skin irritation or bandage sores along the bony protuberances of the limb. Because of this, the full-limb bandage requires special attention and should be changed routinely every 2 to 3 days.
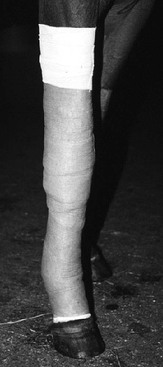
Some clinicians prefer to stack the full-limb bandage and apply it in two stages. The first bandage is applied, centered over the carpus or tarsus, and secured with gauze. Then a separate bandage is applied to the lower limb below the first, and in effect it “holds up” the proximal bandage. An overlying layer of cohesive tape is applied to combine the two into a single unit (Figure 204-1).
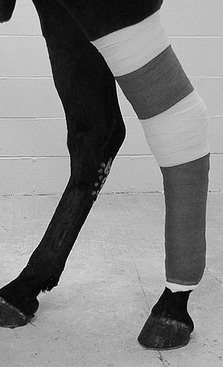
Alternatively, the author prefers to apply the full-limb bandage as one single unit. The roll or sheet cotton is applied, beginning at the level of the fetlock and spiraled up the limb to a point approximately 4 to 6 inches below the level of the elbow or the stifle. The bandage is firmly secured with a roll of brown conforming gauze, followed by two rolls of cohesive bandage material. Several layers of adhesive tape applied around the top of the bandage secure it to the skin and decrease the tendency of the bandage to slip. Additionally, for a hind limb bandage, the adhesive tape also is applied in several layers around the tarsus itself to limit the degree of flexion and prevent the point of the hock from wearing through the bandage (Figure 204-2). For the forelimb, it is helpful to slice a small (2-inch) linear window in the cohesive and gauze layers of the bandage directly over the accessory carpal bone. This releases some of the pressure on this location and decreases the tendency for a pressure sore to develop.
< div class='tao-gold-member'>
Stay updated, free articles. Join our Telegram channel

Full access? Get Clinical Tree


