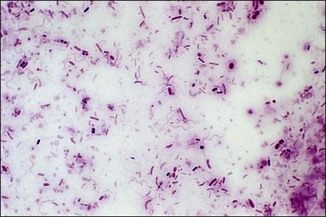
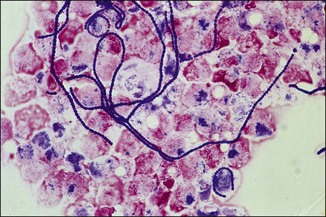
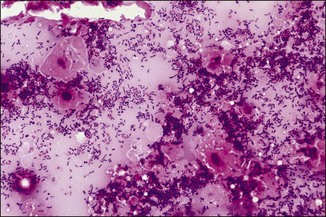
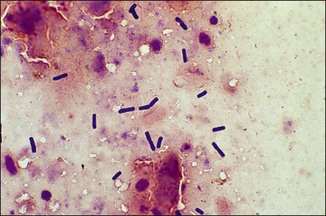
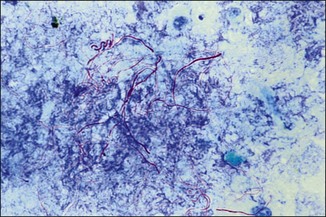
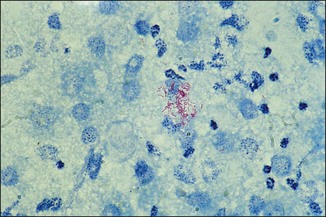
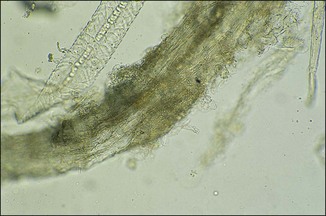
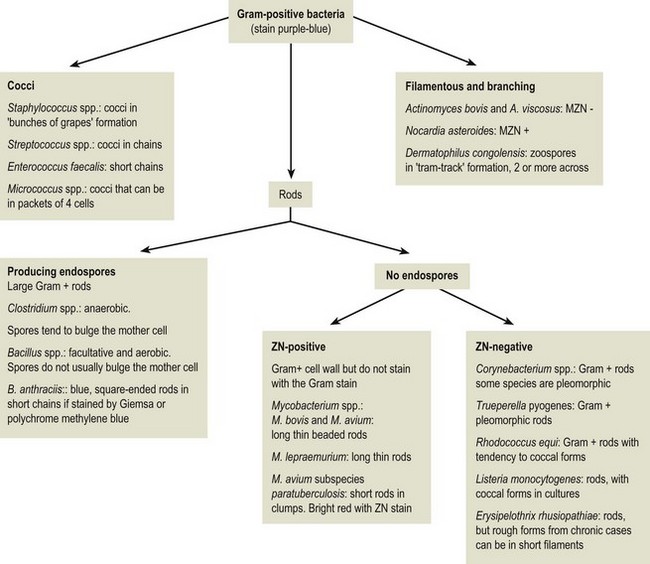
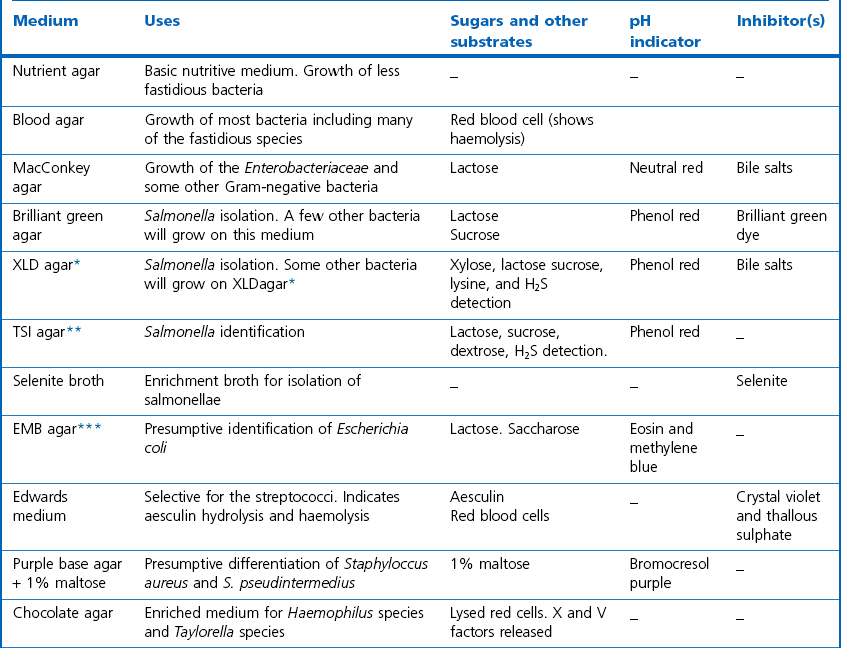
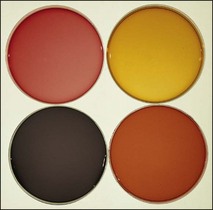
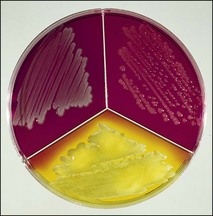
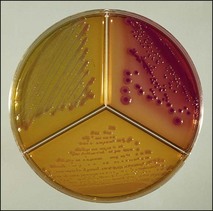
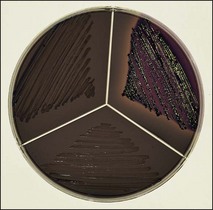
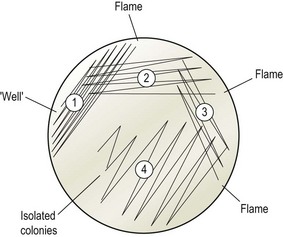
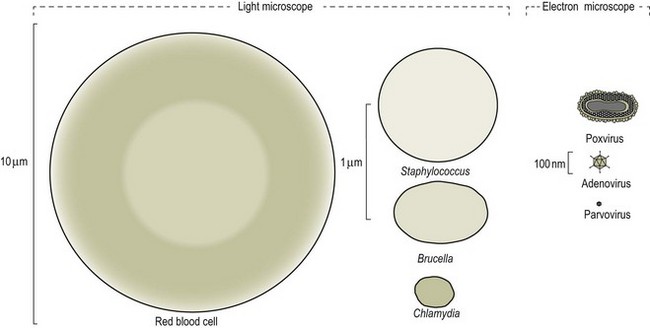
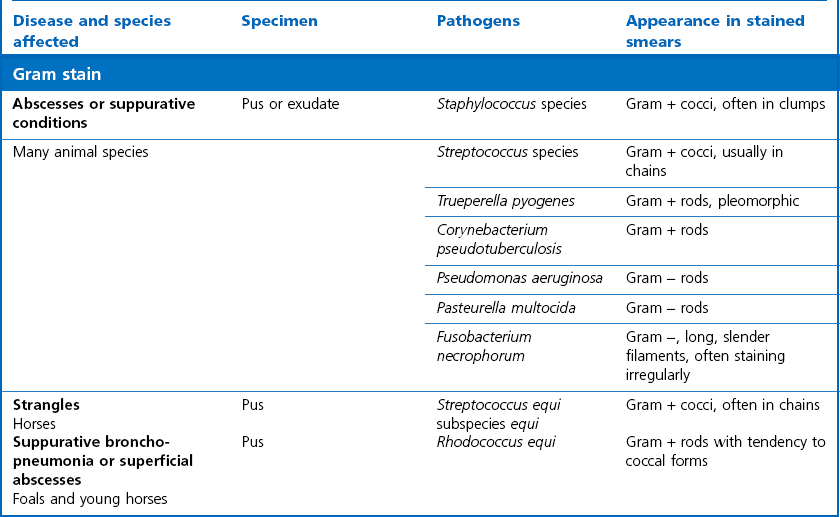
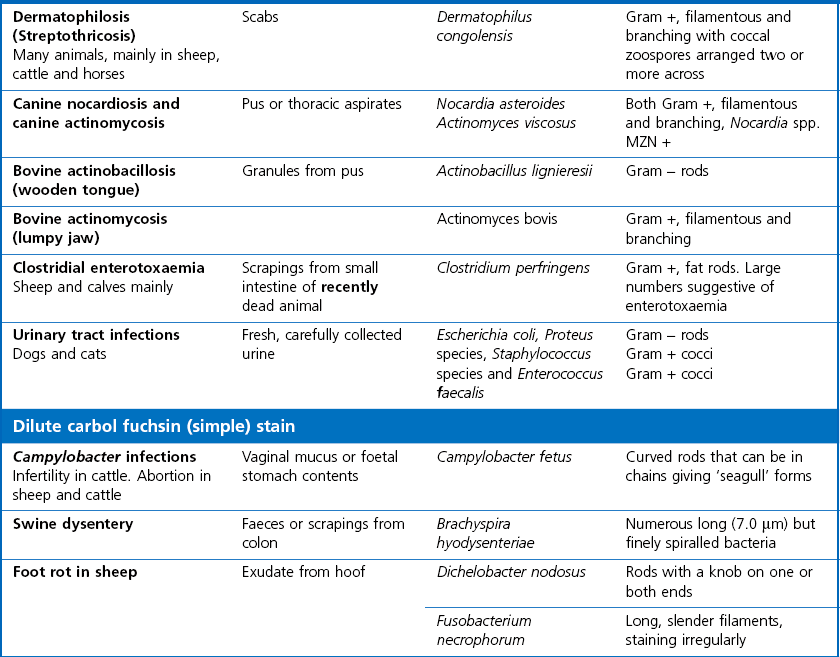
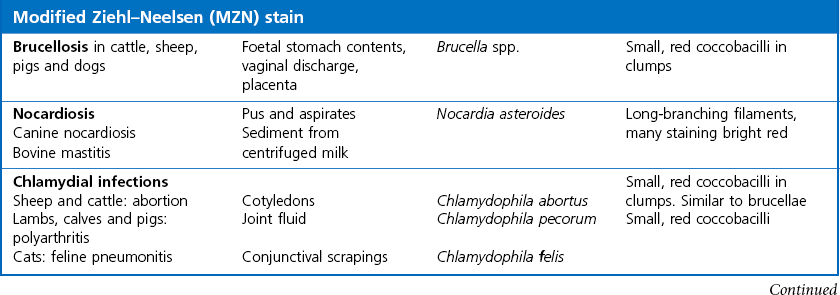
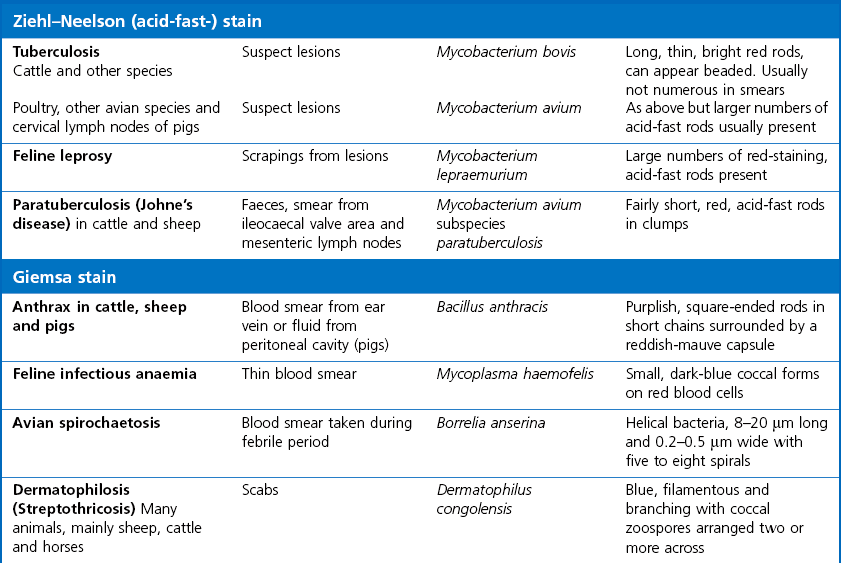
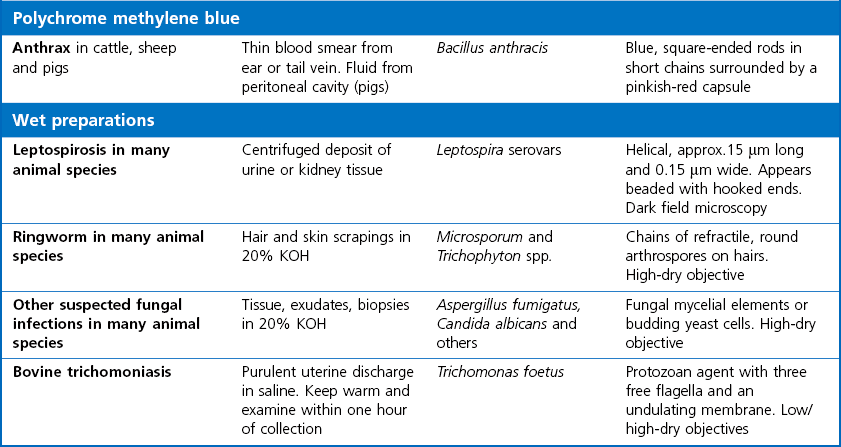
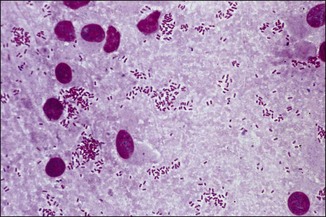
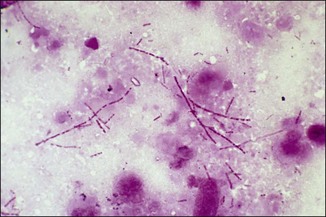
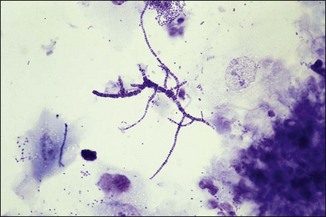
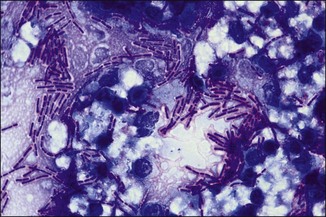
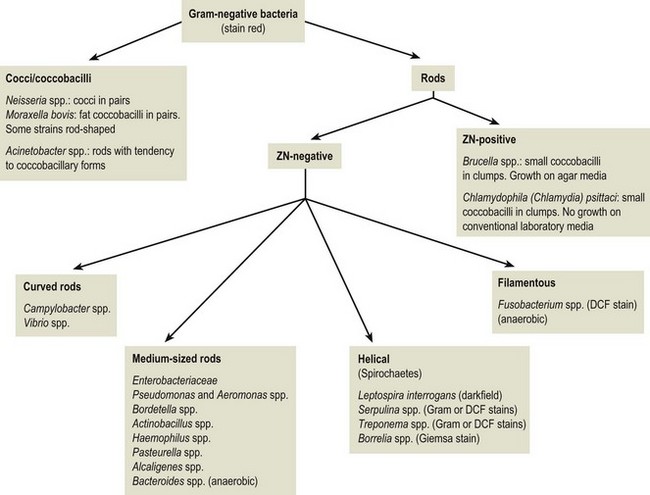
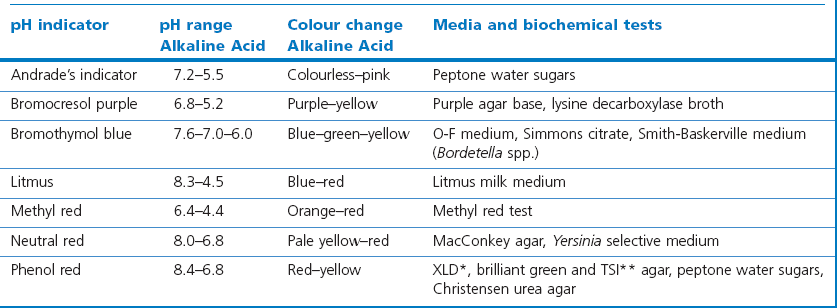
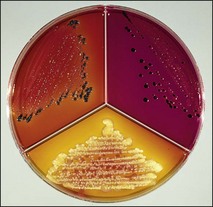
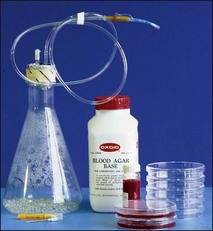
Chapter 2 A good-quality microscope with a built-in light source (bright-field microscopy) as well as low-power, high-dry and oil-immersion objectives is required. A darkfield condenser is a useful addition necessary for the visualization of unstained preparations such as those of spirochaetes. Microscopes for microbiology require a higher degree of resolution than those used for haematology or histopathology. Figure 2.1 indicates the size of bacteria relative to that of an erythrocyte and to viruses. Bacteria are measured in micrometres (µm) which are 10−6 m while viruses are measured in nanometres (nm) which are 10−9 m. Using an oil-immersion objective lens on a light microsope, a magnification of 1000 × can be achieved to visualize bacteria. On account of their small size viruses are visualized by using an electron microscope, which utilizes a beam of electrons to achieve magnifications of the order of 100,000 ×. Stained smears made from lesions can yield a considerable amount of information inexpensively and quickly. Table 2.1 summarizes the information that can be gained from the various diagnostic staining techniques. The fixed smears are placed on a staining rack over a sink. The staining solutions are flooded over the entire smear and left on the slide for the appropriate time. Between each staining reagent the smear is washed under a gently running tap, excess water tipped off and the next reagent added. Finally the stained smear is washed and air-dried. The preparation method of each of the staining solutions is given in Appendix 1. Gram’s iodine (mordant) 60 seconds Gram’s decolourizer 15 seconds Counter-stain (dilute carbol fuchsin or safronin) 60 seconds Gram-positive bacteria retain the crystal violet-iodine complex and stain purple-blue. Gram-negative bacteria are decolourized and are stained red by the counter-stain. Gram-stained smears are illustrated (Figs 2.2–2.6, inclusive). There can be slight differences in the composition of the reagents for the Gram stain. If using a commercial kit set for Gram staining always follow the manufacturer’s directions. Figure 2.2 Gram-stained porcine faecal smear showing Gram-positive (blue) and Gram-negative (red) bacteria. Note range of morphological forms. (×1000) Figure 2.3 Gram-stained smear of mastitic milk (bovine) showing Gram-positive streptococci in chains and inflammatory cells. (×1000) Figure 2.4 Gram-stained smear from an abscess with the Gram-positive, pleomorphic rods of Trueperella (Arcanobacterium) pyogenes predominating. (×1000) Figure 2.5 Gram-stained smear from the mucosa of the small intestine (lamb recently dead from enterotoxaemia): large Gram-positive rods of Clostridium perfringens. (×1000) The stain is used for some Gram-negative bacteria such as Campylobacter fetus, Brachyspira hyodysenteriae or Fusobacterium necrophorum (Fig. 2.7) where a greater depth of stain aids microscopic visualization. MZN-positive bacteria such as Nocarida asteroides (Fig. 2.8), Brucella spp. (Fig. 2.9) and Chlamydophila abortus stain a bright red with the background and other bacteria staining blue. Figure 2.8 MZN-stained smear of a thoracic aspirate from a dog with a pleural effusion: MZN-positive branching filaments of Nocardia asteroides. (×1000) Strong carbol fuchsin 10 minutes with heat Acid-alcohol decolourizer 15 minutes with several changes ZN-positive or acid-fast bacteria, such as the pathogenic Mycobacterium sp., stain bright red with the background and other bacteria counter-stained blue (Fig. 2.10). Heating the strong carbol fuchsin can be carried out in one of two ways: Figure 2.10 ZN-stained smear from a tuberculous lesion in a hen: red ZN-positive thin rods of Mycobacterium avium. (×1000) • Strong carbol fuchsin is flooded onto the fixed smear with the slide on the rack over a sink. A cotton wool swab, on a metal rod, is dipped in alcohol and set alight. This is used to gently heat the smear and carbol fuchsin from below. The stain is allowed to steam for the 10 minutes but not to boil. The sink should be rinsed with water before starting the heating process in case any inflammable reagents are present. • Heat the strong carbol fuchsin in a boiling tube to just below boiling point. Wear protective goggles when carrying out this procedure and direct the tube away from you. Add the hot stain to the smear on the staining rack over the sink. Keep topping-up the smear with hot stain for the full 10 minutes. Strong carbol fuchsin three minutes Acid-alcohol decolourizer three minutes exactly Several washes in distilled water Alkaline brilliant green three minutes The ZN-positive or acid-fast pathogenic Mycobacterium spp. are stained a bright red with the background and other microorganisms stained green. The dried smear is first fixed in absolute methyl alcohol for three minutes l part Giemsa stain + 9 parts buffer 60 minutes The Giemsa stain is used to stain spirochaetes such as Borrelia anserina; to demonstrate the capsule of Bacillus anthracis; to stain organisms such as Mycoplasma haemofelis; and it can demonstrate the morphology of Dermatophilus congolensis more clearly than the Gram method (Fig. 2.11). Polychrome methylene blue is methylene blue solution that has been allowed to oxidize by storing it exposed to the air (loosely plugged) for several months. A thin blood or exudate smear taken from a suspect case of anthrax is air-dried, flame-fixed and flooded with the stain for two to three minutes. The stained smear is washed and dried. The rods of B. anthracis stain blue and the capsular material a pale pink colour (Fig. 2.12). Any suspect anthrax material should be handled with care and the stained slides autoclaved after use. Viable spores may be present on the slide after staining. Some microorganisms can be demonstrated microscopically without the use of staining techniques. Wet preparations can be examined by phase contrast or darkfield microscopy and by the use of the high-dry objective of the light microscope, with the condenser slightly lowered. Fungal structures in tissues or skin scrapings can be placed in a few drops of 10–20% potassium hydroxide (KOH) on a microscope slide, under a cover slip, for two to four hours to allow clearing of the preparation to occur. The slide is then examined under the high-dry objective of the microscope. This is particularly useful to demonstrate the arthrospores of dermatophytes (Fig. 2.13). Methods for microscopic examination of specimens for fungal elements are given in more detail in the mycology section. Figure 2.13 KOH wet preparation of bovine hairs infected with Trichophyton verrucosum showing arthrospores. (×400) Figures 2.14 and 2.15 summarize the staining reactions and cellular morphology of some of the more commonly encountered Gram-positive and Gram-negative bacteria. Figure 2.14 Summary of the staining reactions and cellular morphology of Gram-positive bacteria. (MZN = modified Ziehl–Neelsen stain, ZN = Ziehl–Neelsen stain) Diagnostic bacteriological media can be divided into the following categories: • Chemically defined media: in these, the exact amounts of each ingredient are known. They are mainly used for experimental purposes but citrate broth is an example of a chemically defined medium that is used in diagnostic bacteriology. • Basic nutritive media: these are capable of sustaining growth of the less fastidious bacteria. Nutrient agar is an example. • Enrichment broths: a liquid medium that permits the growth and detection of a particular bacterium, which may have made up only a small proportion of the bacteria in the original inoculum. An example is selenite broth for the selection of salmonellae. • Selective media: these agar media have been made selective for the growth of a particular bacterium or group of bacteria and are used extensively in diagnostic bacteriology. They contain inhibitory substances that prevent the growth of unwanted bacterial species. Many selective media, such as brilliant green and MacConkey agars can also be described as indicator media. • Indicator media: these are particularly useful in diagnostic bacteriology. They are designed to give a presumptive identification of bacterial colonies due to the biochemical reactions in the media. Indicator media often contain fermentable sugars plus a pH indicator that gives a colour change in the media (Table 2.2). MacConkey agar contains the fermentable sugar lactose and neutral red as the pH indicator. Bacteria such as Escherichia coli that ferment lactose produce acidic metabolites that cause the colonies and surrounding medium to appear pink. Salmonellae that cannot ferment lactose will use the peptones in the medium with the production of alkaline metabolic products. Salmonella colonies and surrounding medium are pale straw in colour. Other indicator media may be designed to show hydrogen sulphide production (xylose-lysine-deoxycholate, XLD – agar) or aesculin hydrolysis (Edwards medium). Blood agar, although an enriched medium may also be considered as an indicator medium as it shows the type of haemolysis of a particular bacterium. Examples of media used in diagnostic bacteriology are given in Table 2.3 and illustrated (Figs 2.16 to 2.20, inclusive). They can be obtained commercially as dehydrated powders or can often be purchased as pre-poured plates. Table 2.3 Examples of media used in diagnostic bacteriology *= Xylose-lysine-deoxycholate agar ***= Eosin-methylene blue agar (colonies of E. coli have a metallic sheen) Figure 2.16 Indicator media: clockwise from top left, XLD, brilliant green, MacConkey and EMB agars. Figure 2.18 Brilliant green agar with Pseudomonas aeruginosa (left) Salmonella sp. (right) and Klebsiella sp. (bottom). Figure 2.19 MacConkey agar with Pseudomonas aeruginosa (left), Klebsiella sp. (right) and Salmonella sp. (bottom). Figure 2.20 Eosin methylene blue agar with Proteus sp. (left), Escherichia coli (right) and Salmonella sp. (bottom). • Clean glassware that has been rinsed free from detergents and other chemicals should be used. • The glassware need not be sterile unless sterilized medium is being decanted into it. • The appropriate amount of dehydrated medium is weighed out, placed in a flask and distilled water added to it. Glass-distilled water must be used, because this is free from chloride and heavy metal ions that can be inhibitory to bacteria. The medium is prepared in a flask with a capacity of about twice the final volume of the medium as this will allow for adequate mixing and the frothing of the medium during heating. Media not containing agar can usually be dissolved with gentle agitation, but dehydrated media containing agar is best dissolved by bringing to the boil with continuous stirring, using a glass rod or a hot plate that incorporates a magnetic stirrer system. Dehydrated media once dissolved are usually sterilized in an autoclave at 121°C for a holding time of 15 minutes. Some media, such as Edwards, contain ingredients that cannot tolerate this high temperature and they can be autoclaved at 115°C for a holding time of 20 minutes or according to the manufacturer’s instructions. Certain media such as brilliant green agar are inhibitory to many bacteria and these media are brought to the boil only and not autoclaved. Media containing agar should be cooled after autoclaving in a water bath at 50–54°C before the medium is poured into Petri dishes. Agar solidifies at about 42°C. The standard (90 mm) Petri dish should contain about 15 mL of agar medium, about one third full. Thus, one litre of medium should yield between 60–70 plates. Some additives to the medium, such as serum or red blood cells, will not tolerate high temperatures and are added as sterile solutions or suspensions once the medium has cooled to 50–54°C. After the poured plates are set, they are allowed to dry thoroughly at room temperature or for a few hours in the incubator at 37°C. For use, the surface of the agar must not contain obvious moisture. The plates are stored, agar side upwards, in a refrigerator at 4°C. Commercially available systems for the preparation and pouring of large numbers of plates are available. • Collection into a purchased human blood-donor kit. • Collection into a pre-sterilized apparatus consisting of a tube leading into a conical flask containing glass beads (3 mm) (Fig. 2.21). The flask is agitated continuously during collection and for at least five minutes after obtaining the blood. This defibrinated blood can be decanted into sterile bottles for storage in a refrigerator. The glass beads can be recovered from the fibrin clot and reused. A sterile anticoagulant solution, such as 0.2% sodium citrate, can be used either in the flask, in the place of the glass beads or blood can be collected in a sterile syringe and immediately added to the anticoagulant. The object of plate streaking is to obtain isolated bacterial colonies that are required for observing colonial morphology, antibiotic sensitivity testing and for biochemical identification. The quadrant streak method, using the whole plate, is usually employed for most diagnostic specimens (Fig. 2.22). Figure 2.22 Quadrant streaking method for obtaining isolated bacterial colonies on agar media. The loop should be flamed before and after streaking. The plate is first labelled, on the agar side, with the type of specimen, date of inoculation and reference number. A waterproof marker pen is used and the writing should be kept as near to the edge of the plate as possible so that after incubation the bacterial colonies are not obscured. Two inoculating loops are used so that one can be cooling while the other is in use. The loops should be flamed (Fig. 2.23) before starting and then after streaks 1, 2 and 3. The number of times the loops are flamed will depend on the estimated number of bacteria in the original inoculum. The loop must always be flamed after streak 4 before putting it down. The inoculating loop should be kept as near to parallel to the agar surface as possible to prevent the loop from digging into the agar (Fig. 2.24). Alternatively, disposable plastic loops can be used, a new loop being used after each streak. Streaks 1, 2 and 3 should be kept as close to the edge of the plate as is practical, thus leaving plenty of room for streak 4 where it is hoped to obtain isolated colonies (Fig. 2.25). This last area of the plate should be fully utilized, keeping the streak lines as close together as possible.
Bacterial pathogens
Microscopy, culture and identification
Microscopy
Stained Smears from Pathological Specimens
Staining the Smears: Staining Techniques
Gram stain
Dilute carbol fuchsin (DCF):
Modified Ziehl–Neelsen (MZN)
Ziehl-Neelsen (ZN) or acid-fast stain
Alternative method for the Ziehl–Neelsen stain
Giemsa stain
Polychrome methylene blue stain (M’Fadyean’s Reaction)
Wet preparations
Bacteriological media
Preparation of Culture Media
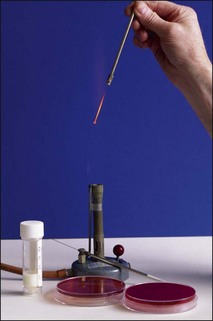
Collecting sterile blood
Inoculation of Culture Media
Streaking the agar plates
< div class='tao-gold-member'>
![]()
Stay updated, free articles. Join our Telegram channel

Full access? Get Clinical Tree


Bacterial pathogens: Microscopy, culture and identification

Only gold members can continue reading. Log In or Register to continue
