Arthroscopy

Chapter 21 Arthroscopy


Arthroscopic surgery is a relatively new discipline in veterinary surgery. The first report of arthroscopic surgery in the dog was in 1978 by Dr. G. B. Siemering who discussed arthroscopic anatomy in the canine stifle joint and established that the accurate diagnosis of canine cranial cruciate ligament (CCL) disease was possible arthroscopically. Arthroscopy advanced slowly from that initial report, and the first course in veterinary arthroscopy was not taught until 1996 at the American College of Veterinary Surgeons meeting. Instructors were Drs. Robert Taylor, Wayne Whitney, Andrew Sams, Tim McCarthy, and John Payne. Since that initial basic course in canine arthroscopy, there have been many articles discussing various uses of this exciting technology in small animal surgery. Arthroscopy is the most important and exciting advance in small animal orthopedics since the introduction of plate-and-screw fracture fixation. Arthroscopic procedures are now the state of the art for many common diseases in canine joints and have replaced open procedures in many cases.


Arthroscopy has gained wide acceptance due to a number of important factors. First and foremost is the rapid advance of all minimally invasive surgical procedures in human surgery. In humans and animals, minimally invasive procedures have gained acceptance because they are associated with less postoperative pain, less morbidity and fewer postoperative complications, a more rapid recovery, and, in humans, a more rapid return to work. Additionally, arthroscopic examination allows a more thorough examination of the joint being operated on and allows some treatments that previously were not possible. Arthroscopy has also allowed veterinary surgeons to identify new diseases (medial shoulder instability in dogs) and caused veterinarians to reevaluate other diseases about which they previously had an incomplete understanding (elbow dysplasia). Because arthroscopy is a new discipline, there is a lot to be learned, and veterinarians are still in the infancy of what this technology will allow them to achieve in the future.


Equipment for Small Animal Arthroscopy


Arthroscopy in the dog requires high-quality equipment that can be obtained from several manufacturers. It is ill advised to purchase outdated, used equipment because the technology has changed so much in recent years. The following discussion will give the budding arthroscopist advice on what equipment is needed to perform quality arthroscopic procedures. High-quality equipment is not a substitute for practice and attention to detail when learning arthroscopic skills, but poor quality equipment will frustrate and hamper progression of one’s skills.


Arthroscopes


The initial instrument that is considered is the arthroscope itself. Arthroscopes are surgical telescopes that allow visualization of the joint. These scopes are rigid tubes with lenses on the ends and fiberoptic bundles in the tube that allow transmission of the image and light. Arthroscopes are available in several diameters including 4.0, 2.7, 2.4, and 1.9 mm (Figure 21-1). The most commonly used endoscope in small animal orthopedics is the 2.7-mm arthroscope. The 2.4-mm scope is very similar, and the 1.9-mm scope is useful in smaller joints such as the carpus or tarsus. The 4.0-mm scope is too large for most dogs and is rarely used in companion animals. In addition to varying diameters, several lengths and viewing angles are available for arthroscopes. Most veterinary arthroscopists use a shorter scope (12 cm or less in length), although scopes are available up to 18 cm. Viewing angles of 0, 30, and 70 degrees have been used in the past, but the 30-degree arthroscope is almost exclusively used by veterinary arthroscopists. Even though arthroscopes have an eyepiece for direct viewing, all modern arthroscopy is performed with the use of a video arthroscope. The final feature of all arthroscopes is a post for attaching the light cable.
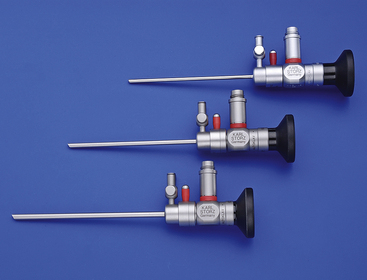


Because arthroscopes are rigid stainless steel tubes containing fiberoptics, a few words regarding care of the instrument are in order. Arthroscopes are fragile and do not tolerate bending or being dropped. An arthroscope should always be kept in its protective sheath or in its cannula. Arthroscopy should never be performed without a scope cannula. Visualization of the joint is made possible by carefully locating portals, not by forcing the scope into an inaccessible area. Using an arthroscope as a crowbar to force a view into the joint can break the scope, resulting in an unwarranted expense. Sterilization of the arthroscope is by ethylene oxide (ETO), by soaking in glutaraldehyde solution, or by plasma sterilization. Soaking in glutaraldehyde is messy and can be irritating to mucous membranes for most people. Certain scopes can be autoclaved, but this process will decrease the life of the scope.


Video Camera and Control Unit, Light Sources, and Monitor


All veterinary arthroscopy is performed with the use of a video camera. These cameras attach to the arthroscope by several mechanisms that vary by manufacturer. Video cameras may be single chip or three chip, and all give an excellent picture with good resolution. The three-chip camera is preferred by most arthroscopists because it allows higher quality pictures and video to be recorded. In addition, most camera heads have two to three buttons that can be programmed to perform a number of functions, including taking still pictures or video, controlling the light intensity, or turning on and off digital enhancement software. The camera head is sterilized by ETO, soaking in glutaraldehyde solution, or by plasma sterilization.


Light sources are an important part of the arthroscopy tower. Both halogen and xenon light sources have been used, but xenon is almost exclusively used in arthroscopy. The light cable is sterilized by ETO, by soaking in glutaraldehyde, or by plasma sterilization.


The monitor is the screen that is used to visualize the joint. Most modern monitors are high-definition flat screen monitors that give excellent picture quality. Monitor size varies considerably, but the rule of thumb is to purchase the largest monitor that fits your arthroscopy cart and your budget. A 21-inch or larger monitor is ideal because it allows the arthroscopy cart to be backed away from the surgical table as much as possible. The operating table area gets very crowded with all of the equipment necessary to perform the procedure, and the farther the arthroscopy cart is from the table, the more room is left for the surgeon and assistant to work.
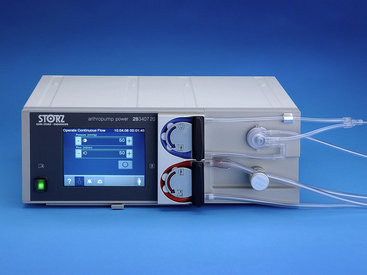


Fluid Management


During arthroscopic surgery, fluid continually flows through the joint to provide a clear field of view, free of blood and debris. For fluid to flow, an ingress and egress portal must be established in all joints. The route of ingress and egress varies from procedure to procedure and will be discussed later in this chapter. It is important to control both the flow and the pressure within the joint so that the joint is kept distended and fluid extravasation outside the joint is minimized. If the pressure within the joint is too low, the joint collapses and the surgeon is unable to see structures within the joint. If the pressure is too high, the fluid flows out of the joint into the subcutaneous area, leading to joint collapse and poor visualization. Fluid management is very important during the procedure, and there are three main ways that fluid flow and pressure are managed during surgery.


The simplest way to manage fluid within the joint is simply through gravity. The fluid irrigation bags are suspended from the operating room ceiling, and fluid is delivered imprecisely to the surgical site with the use of a standard intravenous infusion set. Pressure and flow are controlled by raising and lowering the bags. Many surgeons use this technique because it is inexpensive and effective; however, control of flow and pressure is limited, and optimal joint distension may not be achieved.


A variation of this technique is to use the inflatable fluid delivery devices designed to deliver fluid under pressure intravenously to trauma patients. The fluid bag is inserted into the inflatable device, and a hand pump is used to pressurize the system, delivering fluids at a varying pressure. These devices work well for arthroscopy, but one needs to be very careful not to overinflate the bag because too high a pressure leads to serious fluid extravasation and joint collapse.


The ideal way to deliver fluid to the joint is to use a mechanical arthroscopy pump (Figure 21-2). Several manufacturers market these pumps, and most use either an impeller or a roller pump to control fluid flow rate. A transducer built into the fluid line is used to precisely control pressure within the joint. The pumps work well, and fluid extravasation is minimized through optimal fluid management. For most arthroscopic procedures, a high flow setting is used with a modest pressure. Typically, pressures within the joint are set at 25 to 40 mm Hg. If bleeding from the joint capsule is a problem or the joint is not distending well, higher pressures can be used but rarely exceed 60 mm Hg. When choosing an arthroscopy pump to purchase, one should investigate the cost of the pump along with the cost of the tubing to determine whether the tubing can be used on more than one case or can be resterilized. Single-use tubing that cannot be reused may be prohibitively expensive.


Shavers


A power shaver is an important part of any arthroscopy setup (Figure 21-3). The power shaver is a motorized power tool that allows the rapid and precise removal of bone, cartilage, and soft tissue. The essential components of most power shaver units are the electronic control box, a handpiece and bit, and the foot pedal. The power shaver may be controlled with the use of a hand control or a foot control, but most surgeons prefer a foot control. The control box contains the electrical apparatus and controls for revolutions per minute of the handpiece. The handpiece is the motor and couples to interchangeable bits for different jobs, and the foot pedal is a variable speed controller that also allows the bit to rotate forward or backward or to oscillate. The speed of the handpiece is generally set to 1500 to 2500 rpm for most small animal procedures. Bits are cannulated so that debris that is cut is immediately removed from the joint by surgical suction that is coupled to the handpiece. Bits are a tube within a tube in which the inner tube rotates. The outer tube is a tissue guard that serves to protect the soft tissue. There is a defect on the side or end of the outer tube that exposes the blade or burr that does the cutting. Many types of bits are available, but the most useful for small animal arthroscopy are aggressive cutting blades that are 2.5 to 4.0 mm in diameter. Burr bits are also helpful and can be obtained in the same size range.


Hand Instruments


There are literally hundreds of arthroscopic hand instruments available, and many of them are very expensive. The veterinary surgeon should select wisely from this wide variety of hand instruments and only purchase those that will be used commonly. There are only a few hand instruments that are needed to perform arthroscopic surgery in dogs, and these will be described individually.


The first hand instrument necessary is a probe (Figure 21-4). This is a straight stainless steel rod with a 90-degree bend at the end so that it forms a small hook. This instrument is used to manipulate pieces of bone and cartilage, retract soft tissue, and check the integrity of articular tissues. A small probe is best, and perhaps the most useful is a temporomandibular joint (TMJ) probe designed for use in the TMJ of humans. It is a nice size probe and easily fits through a 2.9-mm cannula. Some probes have alternating color bands so that the surgeon can get an idea of dimension when exploring joints or measuring lesions.
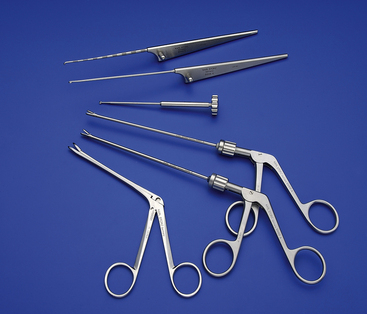


Perhaps the single most important hand instrument is a grasper. This is an alligator-style instrument that is used to grasp and remove cartilage and bone from the joint. A grasper needs to be small but sturdy so that pieces of the instrument do not break off within the joint as one works. The best graspers are 2.0 to 3.5 mm in diameter and have backward curving teeth to get a good grasp on tissues to be removed. Delicate graspers are discouraged because there is a risk of the top jaw breaking off within the joint. Alligator graspers should never be forced open within the joint because they are not very strong in this mode and are easily damaged. In some instances, a sturdy pair of mosquito hemostats can be used as arthroscopic graspers.


A small pair of arthroscopic rongeurs is also useful. They are similar to the graspers but have cupped jaws with sharp edges and are used for taking small bites of tissue in the joint. Rongeurs that are 2.5 to 3.0 mm in diameter are the ideal size. Arthroscopic rongeurs should also not be forced open as they are weak in this mode.


The next type of instrument needed is a set of several small curettes. Both open and closed curettes that are 2 to 3 mm in diameter are helpful. Curettes are used to trim and debride both bone and cartilage during procedures.


Arthroscopic scissors are required for some procedures, such as trimming meniscal tears in dogs. They come in a variety of sizes, but the most useful have relatively short blades and are 2.0 to 3.0 mm in diameter.


The last commonly used instrument is a small 2- to 3-mm osteotome. This instrument is used to elevate bone fragments and to split bone fragments that are too large to be removed through a portal. Any style of osteotome in this size range will work well for this purpose.


There are many other arthroscopic instruments that may be recommended for specific purposes, but those just mentioned will allow the veterinary arthroscopist to perform nearly any procedure. It is recommended that beginning arthroscopists obtain the aforementioned instruments initially and add to their collection as they get more experience.


Radiofrequency and Electrocautery


There are several manufacturers marketing radiofrequency units for use in a fluid environment during arthroscopic procedures. As in open surgical procedures, these devices are used to cauterize bleeding vessels or to ablate tissues in a cutting or cauterizing mode. Coagulation and cutting functions of these instruments operate by the generation of heat caused by the electrical resistance of the tissues. Additionally, these units can be used to coagulate collagen in tissues, which will cause them to shrink. These units are available as monopolar or bipolar devices and are useful during arthroscopic surgery. Arthroscopic radiofrequency units consist of a control box that houses the electronics and allows for control of the amount of power being generated. The second component is a handpiece that couples to the control box with the use of a cord. The final component is a tip that inserts into the joint and performs the work.


Patient Preparation


Preparation of the patient for an arthroscopic procedure is similar to preparation for an arthrotomy. The hair from the affected limb is clipped widely so that proper draping and manipulating of the limb are possible. During the procedure, the limb will be manipulated to allow access to different parts of the joint, and this may include extension and flexion of the joint or the application of a varus or a valgus stress to the joint. It is also common to place rotational stress on joints. It is also not unusual when learning arthroscopy to make a limited arthrotomy if one is unable to complete the procedure arthroscopically. It is a mistake to inadequately clip the limb because it will lead to compromise of the surgery in some cases. Some clients have the misconception that arthroscopy means less clipping of hair on the dog, and it must be explained to the client that this is not the case.


Once the limb is clipped, the patient is moved into the operating room and placed in the proper position on the operating table. This means dorsal recumbency for elbow, stifle, and tarsal arthroscopy and lateral recumbency for arthroscopy of the shoulder, hip, or carpus. Sandbags placed laterally to the dog for elbow arthroscopy are used as fulcrums to enable a valgus stress to be placed on the joint. Positioning aids are available or can be custom-made for shoulder or stifle arthroscopy, and these are placed into position before aseptic preparation of the limb. Once the dog is properly positioned, the surgical field is prepared aseptically with the use of standard procedure and either povidone-iodine or chlorhexidine solution.


Once the surgical team is scrubbed, gowned, and gloved, draping can take place. Drapes are placed on the patient with the use of the same landmarks that would be used if one was draping for an arthrotomy. Drapes are held in position with towel clamps, and a field drape covers the entire patient as well as the instrument table. The instruments are arranged on the table, and if the arthroscopic equipment has been soaked in glutaraldehyde solution, it is carefully rinsed in saline solution to prevent introduction of glutaraldehyde residue into the joint. Adherent drapes or stockinettes are not used for arthroscopic surgery.

Stay updated, free articles. Join our Telegram channel

Sep 10, 2016 | Posted by in SMALL ANIMAL | Comments Off on Arthroscopy

Full access? Get Clinical Tree

Get Clinical Tree app for offline access