General Considerations
 . Attributes of an Acceptable Approach to a Bone or Joint
 . Factors to Consider When Choosing an Approach
 . Aseptic Technique
 . Surgical Principles
 . Anatomy
Factors to Consider When Choosing an Approach
The Area to be Exposed
The problem of choosing the best approach is easily solved in some instances. For example, there is only one logical way to expose the midshaft of the femur (see Approach to the Shaft of the Femur, Plate 77), and therefore the decision is easily made. Other regions do not lend themselves to such clear-cut answers. In some instances, the choice is purely a matter of the surgeon’s personal preference. The hip joint perhaps illustrates this best, there being many choices for exposure of this general region. Ultimately, it rests with the surgeon to evaluate all approaches and to adapt those most suitable.
The exposure required for bone plating is generally more extensive than for bone-pinning techniques. In this instance, it may be useful or necessary to combine two or more of the approaches illustrated. This is discussed further in the section “The Type of Fracture or Luxation.”
Minimally Invasive Exposure of Bones and Joints
Perfect anatomic reduction of intra-articular fractures is possible with the aid of intra-operative fluoroscopic imaging, and therefore a complete open approach to the joint might not be required. This allows insertion of Kirschner wires and lag screws through small “stab incisions” to complete the fracture stabilization. Moreover, indirect reduction techniques can be applied to diaphyseal fractures to obtain overall alignment without the need for anatomic fracture reduction. For diaphyseal fracture stabilization, the technique of minimally invasive plate osteosynthesis can be applied. Small skin incisions are made in the proximal and distal metaphyseal regions of the bone, without exposing the fracture site directly. Afterward the two incisions are connected by a longitudinal epiperiosteal tunnel, so that the bone plate can be slid through the tunnel, across the fracture site (e.g., see Minimally Invasive Approach to the Shaft of the Humerus, Plate 36).
The Type of Fracture or Luxation
Multiple injuries require multiple approaches or perhaps a combination of methods. By scanning the approaches to various areas of a bone, one can easily note those that lend themselves to combining. An example might be a combination of one of the approaches to the hip or pelvis with the Approach to the Shaft of the Femur (Plate 77). The most likely alternative approaches are listed for each procedure.
Aseptic Technique
A detailed discussion of the methods of sterilization of packs, gowns, and other supplies is beyond the scope of this book. In general, autoclaving at 250° F and 15-lb pressure and with a contact time of 12 to 15 minutes is the most practical way of sterilizing instruments and cloth materials such as drapes and gowns. Sterilizer indicators1 that undergo a color change when exposed to proper sterilization conditions should be used in every pack. Total time in the autoclave is different from contact time; total time is that which is sufficient for steam penetration of the largest pack for the minimum contact time of 12 to 15 minutes. Sterilizer indicators are the only means of establishing the correct total time. Ethylene oxide is also a very useful sterilization method because it allows sterilization of items that would be damaged by heat and therefore allows the use of electric drills and other hardware store items in surgery.
The limb is clipped circumferentially from the inguinal or axillary area with a #40 blade and electric clippers to some distance distal to the proposed skin incision. For approaches to the hip or shoulder, the clipping extends proximally to the midline of the back. When the approach is below the elbow or stifle, the clipping usually starts just above the toes and extends proximally only to the elbow or stifle region. Adhesive tape is applied to the toes or foot to form a stirrup from which the leg can be suspended. The remaining unclipped area is covered with gauze or a latex or plastic glove and adhesive tape (Figure 1A and B).
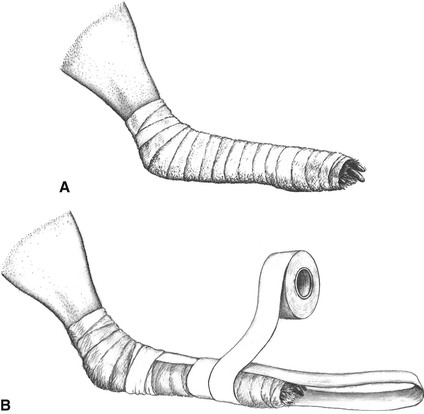
Figure 1 A, The unclipped portion of the lower limb is covered with roller gauze bandage or a latex or plastic glove from the toes proximally to the clipped area. B, Adhesive tape is used to make a stirrup and to cover the gauze or glove.
The patient is next placed on the surgery table with the clipped leg uppermost and the leg suspended by adhesive tape attached to the stirrup and to an infusion stand or a hook in the ceiling (Figure 2). Abduction of the limb to a 45- to 60-degree angle from midline is adequate to allow skin disinfection and draping.
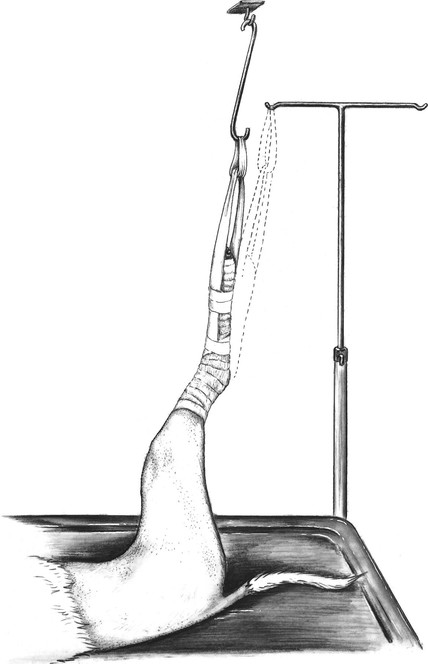
Figure 2 Suspension of the clipped limb preparatory to skin disinfection. An infusion stand or a hook in the ceiling is used. Adhesive tape can be run directly to the infusion stand from the tape stirrup or to an elongated S-shaped metal rod interposed between the ceiling and the foot.
Povidone-iodine2 (“organic iodine”) or chlorhexidine3 preparations have proved most efficacious for disinfection of the patient’s skin. Using sterile gauze sponges immersed in surgical scrub preparation diluted 50% with sterile saline solution or water, the patient’s skin is scrubbed, starting in the area of the incision and working outward to the limits of the clipped area. After 1 minute of scrubbing, the suds are wiped off with dry, sterile sponges. Again, the wiping starts in the area of the incision and proceeds toward the periphery of the clipped area. This cycle is repeated 5 times, and after the final rinse the whole area is sprayed or wiped with povidone-iodine or chlorhexidine solution, or 70% to 80% isopropyl alcohol, which is allowed to remain and dry on the skin. Povidone-iodine and chlorhexidine surgical scrubs are also highly effective for the scrubbing of the surgeon’s hands.
The patient is now ready for draping as soon as the surgeon or assistant is gowned and gloved. Four sterile towels are first placed around the leg at the inguinal or axillary region (Figure 3). The circulating assistant now grasps the leg on the unprepped area and cuts the suspending tape while holding the leg in position. The surgeon grasps the foot through a sterile towel that has been partially rolled (Figure 4A) and then wraps the towel around the unprepped area while holding the limb up and away from the table. The towel is folded over the toes and secured with towel clamps (Figure 4B). Now the rolled stockinette is placed over the foot (Figure 4C) and unrolled down the leg, taking care not to touch any unprepped areas in the process. When the stockinette meets the towels, the two are joined together and attached to the skin with towel forceps (Figure 5A). A method for the hip or shoulder region is shown in Figure 5B and C. (The cotton gauze stockinette is previously prepared and sterilized. Cut the stockinette twice as long as the leg, using a suitable diameter for the thigh or brachium. Pull half the stockinette inside the other half and tie or tape the cut ends together to make an elongated bag. Roll the uncut end toward the closed end as if rolling a stocking. Wrapping and sterilizing complete the preparation. Alternatively, a presterilized impervious stockinette4 can be used.)
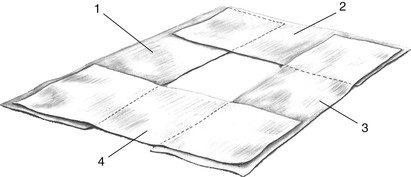
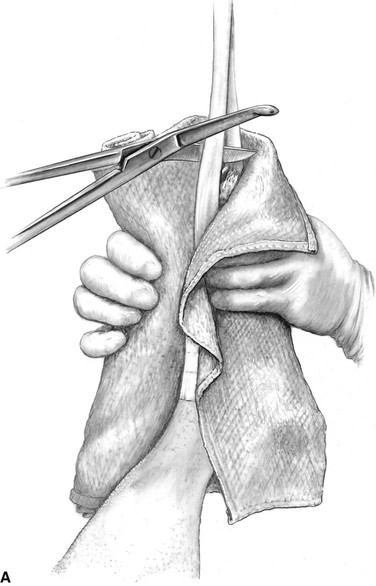
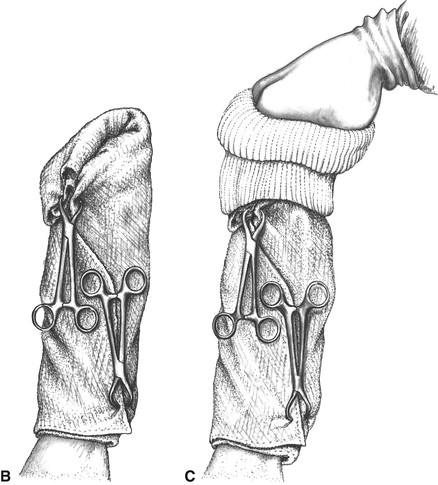
Figure 4 A, The surgeon grasps the suspended foot through a sterile towel that has been folded and rolled. The suspending tape is cut close to the foot by the technician. B, The towel is wrapped around the foot, taking care to cover all of the unprepped area. After the towel is folded over the toes, it is secured to the limb with towel clamps. C, The surgeon grasps the foot through a sterile, double-thickness, rolled stockinette.
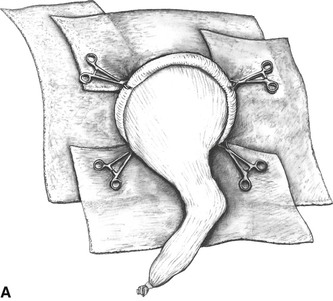
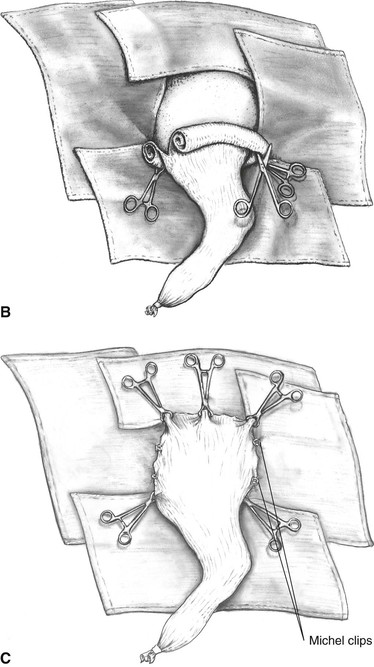
Figure 5 A, Four towels are attached to the stockinette and skin with towel forceps. B, When the stockinette must be rolled proximally to the midline over the hip or shoulder region, the distal towel forceps are attached to the medial half of the rolled stockinette, and the lateral half of the roll is cut close to the forceps. C, The lateral half of the rolled stockinette is rolled proximally and clipped to skin and towels proximal to the hip or shoulder. Michel skin clips can be used to supplement the towel forceps.
Stay updated, free articles. Join our Telegram channel

Full access? Get Clinical Tree


