Fig. 15.1
Equipment and material for aortic graft procurement
Heating apparatus to keep the saline solution warm.
Small fluid containers with saline solution to clean the microsurgical instruments during the surgery if necessary (Fig. 15.1c).
Cotton swabs (Fig. 15.1k), 5/8th inch (16 mm) orange needle, syringes (2 ml, 5 ml, 10 ml), heparinized saline solution (concentration 100 IU/ml), thiopental (Thiopental®, Spofa Czech Rep).
15.1.3.2 Surgical Instruments
15.1.3.3 Microsurgical Instruments
15.1.3.4 Procedure
1.
Place animal on a clean pad (Fig. 15.2a)
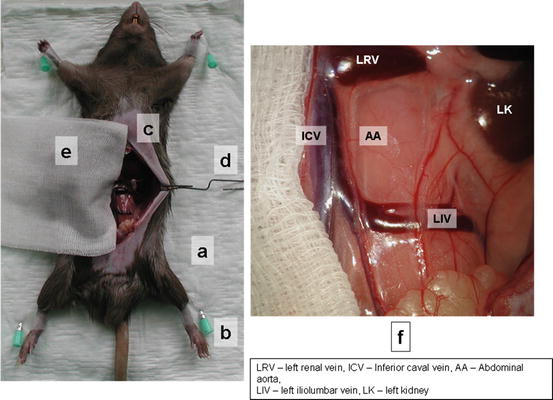
Fig. 15.2
Position of animal donor and focusing of microscope field
2.
Position with tape. Do not overstretch the legs or bind them in such a way as to restrict circulation (Fig. 15.2b).
3.
Check level of anesthesia again using the toe pinch method (verifying lack of withdrawal with a firm toe pinch).
4.
Make the midline laparotomy from urinary bladder to xyphoid using surgical scissors and forceps (Fig. 15.2c).
6.
Retract the small bowel on the animals’ right side (from the view of animal) and cover it with plastic foil and warm gauze (Fig. 15.2e).
8.
Dissect retroperitoneum and retroperitoneal fat and carefully identify inferior caval vein and abdominal aorta (Fig. 15.3a)
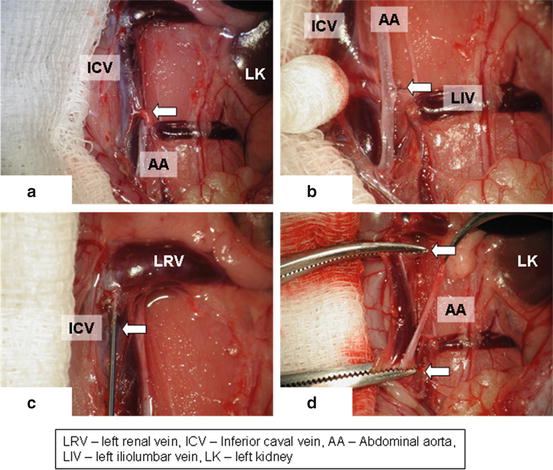
Fig. 15.3
Identifying of inferior caval vein (a), its separation from aorta (b), perfusion of caval vein with heparinized solution (c), clamps on aorta and inferior caval vein (d)
9.
Gently separate inferior caval vein from abdominal aorta using cotton swabs and microsurgical forceps (Fig. 15.3b). Be careful with the inferior caval vein manipulation with forceps as the vein wall is very fragile.
10.
Ligate the lumbar arteries using 8-0 silk suture (Fig. 15.3b, arrow) to obtain a long mobile aortic graft reaching from renal arteries to aortic bifurcation.
11.
In some anatomical variations, is it necessary to ligate iliolumbar vein crossing the aorta from ventral (Fig. 15.3a, arrow).
12.
Make a puncture of the inferior caval vein with 5/8th inch (16 mm) orange needle (Fig. 15.3c, arrow) and apply 2 ml of heparinized saline solution (concentration of 100 IU/ml)
13.
Use the same application method for applying of lethal doses of thiopental
14.
Apply small dissecting forceps on aorta and inferior caval vein both in the region of renal arteries and aortic bifurcation and dissect the aorta between both dissecting forceps (Fig. 15.3d, arrows)
15.
Flush ex situ the aortic lumen with heparinized saline solution (concentration of 100 IU/ml) using 5/8th inch (16 mm) orange needle and 2 ml syringe (Fig. 15.4a).
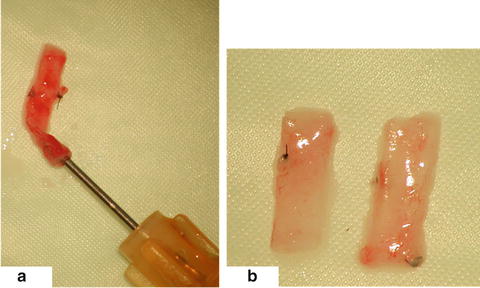
Fig. 15.4
Flushing of the graft in situ (a), cutting of the graft on two pieces (b)
16.
Cut the aorta into two pieces of an identical length for the use in two recipient rats (Fig. 15.4b)
17.
In according to study protocol, use the conservation solution for aortic pieces (saline solution, specific transplantation solution, cryoprotective solution etc.)
18.
Check the death sign of donor animal and handle with the body in accordance with the dead animal disposal act
15.1.3.5 Tips and Tricks
1.
Be very careful with the forceps manipulation of inferior caval vein as the vein wall is very fragile. Venous bleeding is hard to handle and is frequently lethal.
15.1.4 Abdominal Aortic Allograft Transplantation
15.1.4.1 Equipment + Material
Plastic foil to cover visceral organs during the surgery (Fig. 15.5a), gauze to cover the plastic foil (Fig. 15.5b), the gauze should be wetted at intervals with warm saline solution to avoid temperature decrease of animal body.
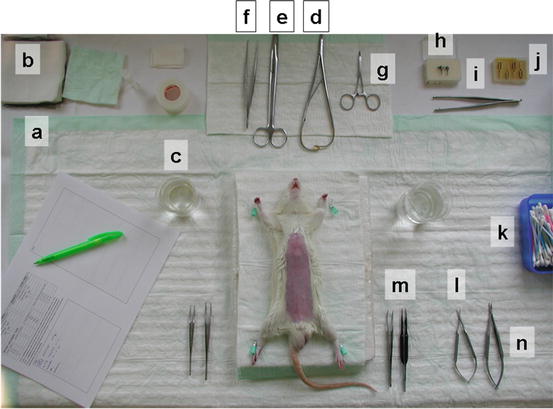
Fig. 15.5
Equipment for aortic graft transplantation
Heating apparatus to keep the saline solution warm.
Small fluid containers with saline solution to clean the microsurgical instruments during the surgery if necessary (Fig. 15.5c).
Cotton swabs (Fig. 15.5k), cutaway 5/8th inch (16 mm) orange needle, one, syringes (2 ml, 5 ml, 10 ml), saline solution.
15.1.4.2 Surgical Instruments
15.1.4.3 Microsurgical Instruments
One micro-scissors (curved) (Fig. 15.5l), two micro-forceps (one straight, one curved), (Fig. 15.5m, l) micro-needle holder (Fig. 15.5n), four vascular clamps (Fig. 15.5j), approximator vascular clamp (Fig. 15.5h), applying forceps for approximator vascular clamp (Fig. 15.5i), 10-0 monofilament sutures, 7-0 silk suture.
15.1.4.4 Procedure
1.
Place animal on a clean pad (Fig. 15.6a)
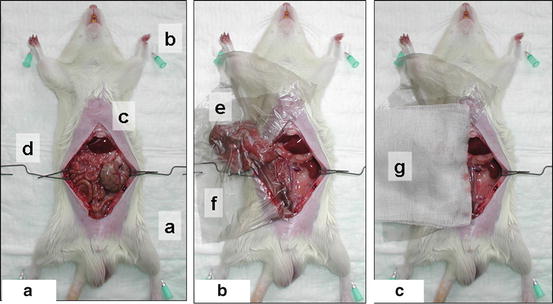
Fig. 15.6
Position of the recipient animal (a), operation field with plastic foil (b), midline laparotomy (c)
2.
Position with tape. Do not overstretch the legs or bind them in such a way as to restrict circulation (Fig. 15.6b).
3.
Check level of anesthesia again using the toe pinch method (verifying lack of withdrawal with a firm toe pinch).
4.
Make the midline laparotomy from urinary bladder to xyphoid using surgical scissors and forceps (Fig. 15.6c).
6.
7.
Install the operation microscope (Fig. 15.7a)
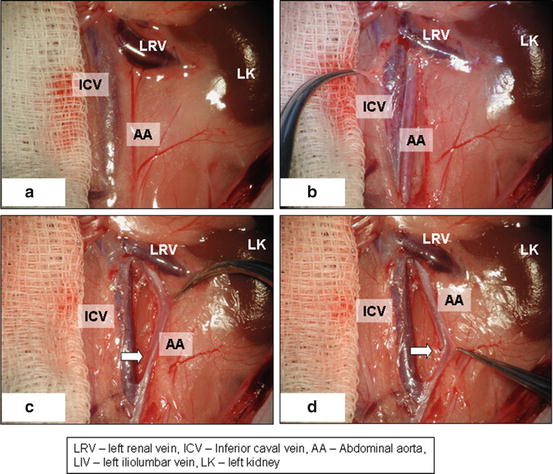
Fig. 15.7
Position of microscope field (a), identifying of inferior caval vein (b), separation of caval vein from aorta (c), ligation of lumbar arteries and mobilization of aorta (d)
8.
Dissect retroperitoneum and retroperitoneal fat and carefully identify inferior caval vein and abdominal aorta (Fig. 15.7b)
9.
Gently separate inferior caval vein from abdominal aorta using cotton swabs and microsurgical forceps (Fig. 15.7c). Be careful with inferior caval vein manipulation with forceps as the vein wall is very fragile.
10.
11.
Clamp the aorta with an approximator vascular clamp using the applying forceps (proximal clamp first) (Fig. 15.8a). No heparinization of recipient animal is necessary during the surgery.
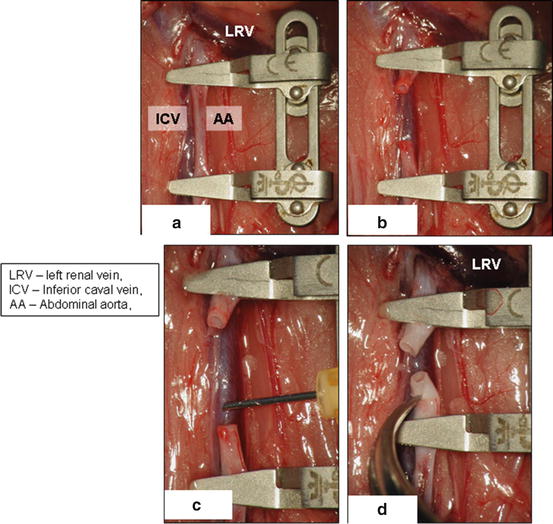
Fig. 15.8
Clamping (a) and cutting of the recipient’s aorta (b, d), flushing the coagula from aortic stumps (c)
12.
13.
Wash out blood coagula by flushing both aortic lumens with saline solution using the 2 ml syringe and a cutaway orange needle (Fig. 15.8c)
14.
Clean carefully the 1 mm broad margin of both aortic stumps from adventitial tissue using microsurgical forceps and scissors (Fig. 15.8d)
15.
16.
Rotate the pad with the animal 90° counterclockwise to get the animal head on your left side (Fig. 15.10a).
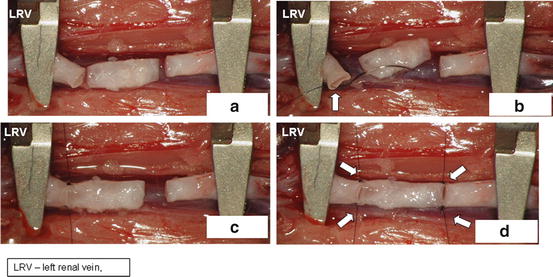
Fig. 15.10
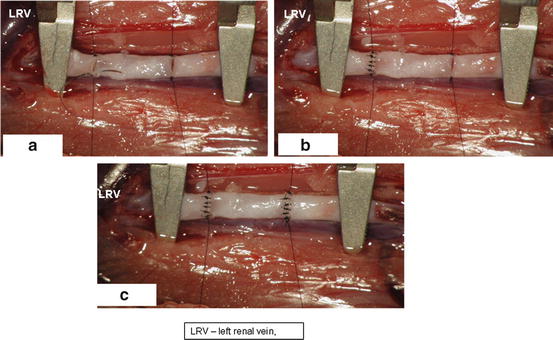
Rotation of recipient animal 90° clockwise (a), put aortic graft between clamped aortic stumps (b), connect aortic graft to recipient’s aortic stumps by separate sutures on both ends (c, d)
18.
Connect all four edges of aortic allograft to edges of both aortic stumps using a separate 10.0 suture and hang the microsurgical clamps on every one of the four sutures. The aortic allograft is now fixed in a suitable position for disrupted suture (Fig. 15.10d, arrows).
19.
Now use 10.0 monofilament separate stitches to make proximal and distal anterior anastomosis (Fig. 15.11)