Fig. 12.1
Overview anatomy of the rat abdominal cavity – biliary and duodenal portions of pancreas
The gastrosplenic portion (the left lobe = cauda; Fig. 12.2) is the largest one and continued along the dorsal wall of the stomach towards the splenic hilum and the transversal mesocolon. The tissue lies in the gastrosplenic ligament and is outlined with splenic and gastroepiploic blood vessels. It is drained by the anterior pancreatic duct which enters bile duct approx. 10 mm from the papila of Vater.
Fig. 12.2
The second overview of the abdominal cavity – gastrosplenic portion of pancreas
12.2 Preconditioning of the Animal Prior to Surgery of Pancreas
It is recommended to allow the animals to become familiar with the facility equipment and staff for at least 2 weeks after arrival from the supplier. This can provide the animals the necessary time to get accustomed to the environment and reduce stress. An added benefit is that the researcher can become familiar with individual animals, can identify those that are not in a perfect health condition and prevent them from inclusion into the experimental group. Ultimately, the animals used in chronic studies must be housed for at least 72 h prior to any procedures being performed.
Each animal must be clearly identifiable during the all phases of the study – they have to be explicitly marked before the first manipulation. Rats are unable to vomit, thus it is not absolutely required to let them fast before the surgery. But, in order to reduce the volume of intestinal content and therefore to make easier the surgical manipulations within abdominal cavity, overnight fasting is recommended. This fasting does not mean starvation. Thus, in order to prevent ketosis and hypoglycaemia, food pellets should be replaced by glucose solution and water freely accessible for the animal.
Both approaches for total anaesthesia induction and maintenance can be utilised according to the routine of the researcher. Ventilation anaesthesia used in our group is performed with a mixture (3–5 %) of isoflurane in the air throughout the duration of the surgery. Intramuscular anaesthesia can be based on ketamine (10 mg/kg)/xylazin (1.5 mg/kg) or ketamine (10 mg/kg)/medetomidin (0.25 mg/kg), both of which can be extended by the reinjection of 30 % of the initial dose . During the anaesthesia, temperature maintenance is crucial – the animal should be placed on safe heating pad, the room temperature should not be under 22 °C and the saline used for visceral moisturising must be warmed to 37 °C.
12.2.1 DO’s Just Before the Surgery
1.
Check the donor visually, weight it and calculate the dose of anaesthetic drugs
2.
Inject the anaesthesia and let the donor sleep in the dark
3.
Shave an area large enough to include a complete incision line and some surrounding skin allowing efficient disinfection.
4.
Treat the skin using detergent ⇒ alcohol ⇒ disinfectant.
5.
Cover recipient eyes with a proper unguent and put it onto the heating pad with the backside down
6.
Drape the animal using the sterile cloth to provide a sterile field around the incision
12.3 The Pancreas Organ Transplantation
12.3.1 The Pancreas Procurement
12.3.1.1 Equipment + Material
Microsurgical Instruments
Scissors, forceps, four vascular clamps, 9-0 nylon sutures, 7-0 and 4-0 silk suture, two micro-scissors (straight, curved), three micro-forceps (two straight, one curved), micro-needle holder, thermal cauterise unit, cotton swabs, gauze, saline solution, heparin solution, heating pad, needles, syringes (5 ml, 10 ml).
12.3.1.2 Procedure
1.
Open abdominal cavity with a midline incision
2.
Cauterise capillary bleeding from the incision edge
3.
Enlarge the incision to subcostal space for better pancreas exposure
4.
Retract the small bowel on the animal right side
7.
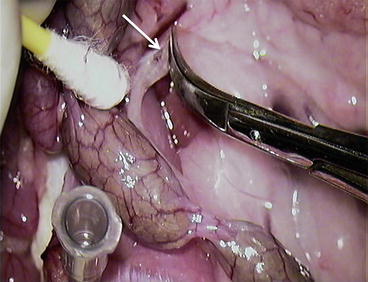
8.
Cut the “closer” layer of the mesocolon (Fig. 12.6)
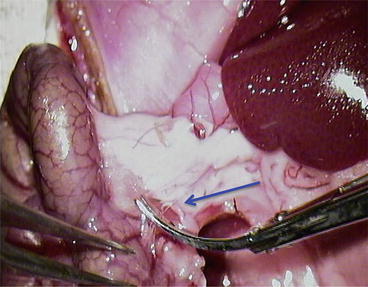
Fig. 12.6
Cut the “closer” layer of the mesocolon
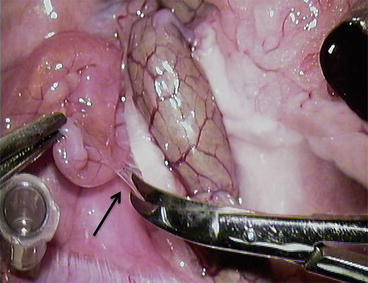
9.
Using cotton swab, gently divide pancreatic head from the mesocolon (Fig. 12.7)
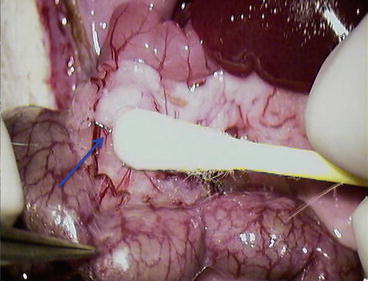
Fig. 12.7
Using cotton swab, gently divide pancreatic head from the mesocolon
10.
Expose superior mesenteric vessels (Fig. 12.8a): m.v. = mesenteric vessels; P = pancreas; blue arrow = cut the first branch of the m.v. (Fig. 12.8b)

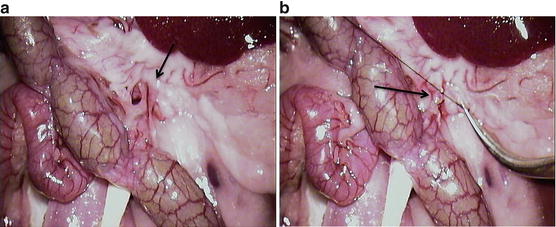
Fig. 12.8
Expose superior mesenteric vessels (a) m.v. = mesenteric vessels; P = pancreas; blue arrow = cut the first branch of the m.v. (b) Tied mesenteric vessel with 7-0 silk using artificial aperture in the mesentery at the duodenojejunal flexure and cut it (c) P = pancreas; blue arrow = the cutting of mesentery containing vessels
11.
Tied mesenteric vessel with 7-0 silk using artificial aperture in the mesentery at the doudenojejunal flexure and cut it (Fig. 12.8c). P = pancreas; blue arrow = the cutting of mesentery containing vessels
12.
Dissect the greater omentum from pancreas with cauteriser and open the omental bursa (Fig. 12.9a–c). P = pancreas; blue arrows = greater omentum
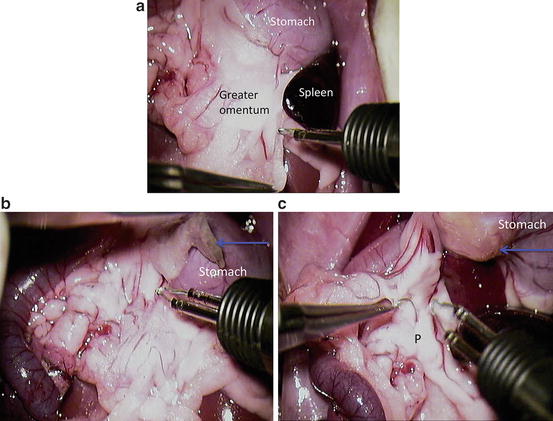
Fig. 12.9
Dissect the greater omentum from pancreas with cauteriser and open the omental bursa (a–c). P = pancreas; blue arrows = greater omentum
13.
Ligate the splenic vessels; do not cut it – the spleen can be used as a holder for manipulation with the pancreas (Fig. 12.10) P1 = pancreas gastrosplenic portion; P2 = pancreas duodenal portion; blue arrow = splenic vessels
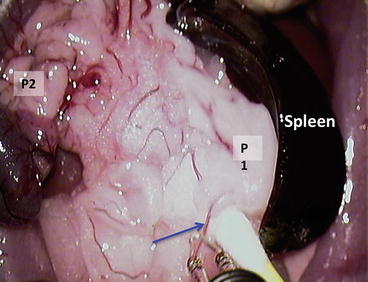
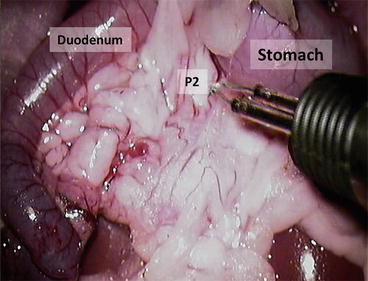
Fig. 12.10
Ligate the splenic vessels; do not cut it – the spleen can be used as a holder for manipulation with the pancreas. P1 = pancreas gastrosplenic portion; P2 = pancreas duodenal portion; blue arrow = splenic vessels
15.
Tie and divide the right gastroepiploic vessels at the pylorus (Fig. 12.12a); blue arrow = gastroepiploic vessels
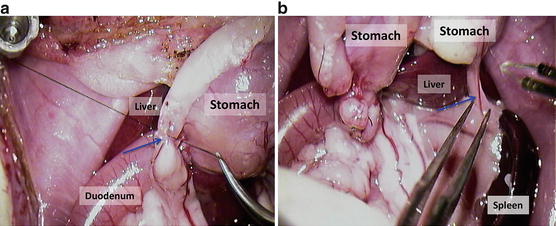
Fig. 12.12
(a) Tie and divide the right gastroepiploic vessels at the pylorus; blue arrow = gastroepiploic vessels. (b) Split up splenogastric ligament with vessels after the appropriate ligature; blue arrow = splenogastric ligament with vessels
16.
Split up splenogastric ligament with vessels after the appropriate ligature (Fig. 12.12b); blue arrow = splenogastric ligament with vessels
17.
Tie the pylorus and divide it (Fig. 12.13a); blue arrow = a suture over the pylorus; GO = greater omentum;
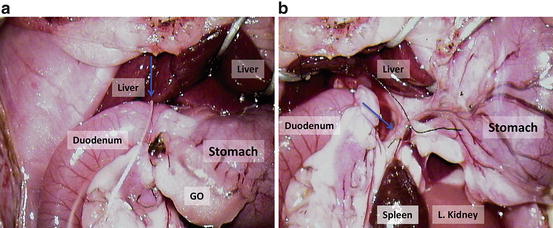
Fig. 12.13
(a) Tie the pylorus and divide it; blue arrow = a suture over the pylorus; GO greater omentum; (b) ligate the right gastric vessels and divide; blue arrow = the right gastric vessels between two sutures
18.
Ligate the right gastric vessels and divide (Fig. 12.13b); blue arrow = the right gastric vessels between two sutures
19.
Tie the common bile duct (Fig. 12.14a); blue arrow = common bile duct with the suture; S = stomach; Pancreas – duodenal portion;
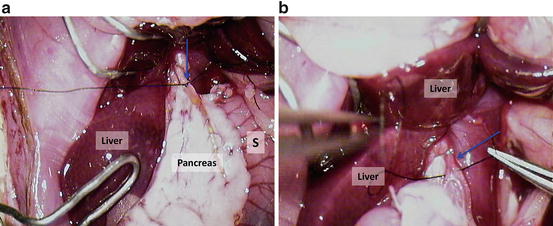
Fig. 12.14
(a) Tie the common bile duct; blue arrow = common bile duct with the suture; S = stomach; pancreas – duodenal portion; (b) put ligature on the proper hepatic artery; blue arrow = proper hepatic artery with the suture
20.
Put ligature on the proper hepatic artery (Fig. 12.14b); blue arrow = proper hepatic artery with the suture;
21.
Dissect the portal vein (Fig. 12.15a); D = duodenum; blue arrow = portal vein; green arrow = bile duct;
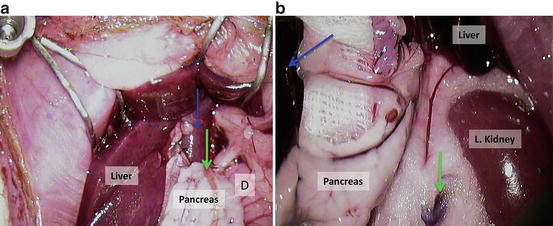
Fig. 12.15
(a) Dissect the portal vein; D = duodenum; blue arrow = portal vein; green arrow = bile duct; (b) retract the pancreas to the animals’ right side; blue arrow = spleen, green arrow = left renal vein
22.
Retract the pancreas to the animals’ right side (Fig. 12.15b); blue arrow = spleen, green arrow = left renal vein;
23.
Divide pancreas from the backside tissue (Fig. 12.16a); LAG = left adrenal gland; blue arrow = portal vein;
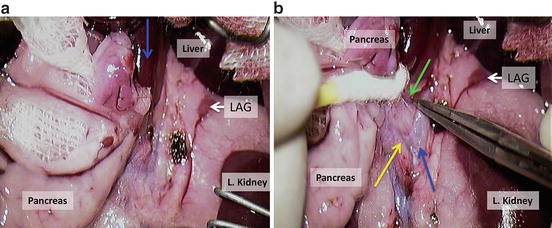
Fig. 12.16
(a) Divide pancreas from the backside tissue; LAG = left adrenal gland; blue arrow = portal vein; (b) expose aorta, coeliac trunk and superior mesenteric artery using cotton swabs or a cauteriser
24.
Expose aorta, coeliac trunk and superior mesenteric artery using cotton swabs or a cauteriser (Fig. 12.16b)
25.
Clamp the aorta above coeliac trunk (green arrow) and between mesenteric (yellow arrow) and left renal artery (Fig. 12.17a, b).
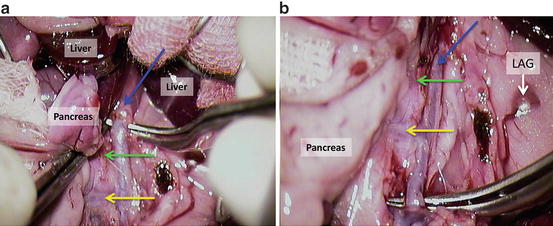
Fig. 12.17
(a, b) Clamp the aorta above coeliac trunk (green arrow) and between mesenteric (yellow arrow) and left renal artery
26.
Inject 3–5 ml heparin solution (10 i.u./ml of saline) into inferior caval vein (Fig. 12.18a);

Fig. 12.18
Inject 3–5 ml heparin solution (10 i.u./ml of saline) into inferior caval vein; blue arrow (a); put the clamp on the inferior caval vein; green arrow = left renal vein (b)
28.
Tie the aorta with 7-0 silk below mesenteric artery (Fig. 12.19a) and cross clamp the aorta above the celiac trunk (Fig. 12.19b); LAG = left adrenal gland; blue arrow = aorta; green arrow = coeliac trunk, yellow arrow = cranial mesenteric artery;
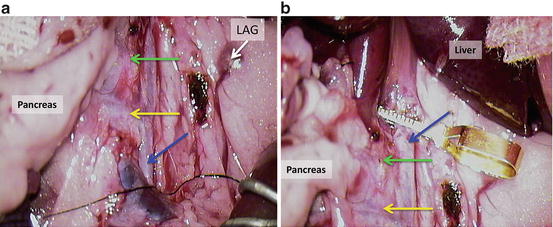
Fig. 12.19
Tie the aorta with 7-0 silk below mesenteric artery (a) and cross clamp the aorta above the celiac trunk (b); LAG = left adrenal gland; blue arrow = aorta; green arrow = coeliac trunk, yellow arrow = cranial mesenteric artery
29.
Cut the portal vein (Fig. 12.20a);
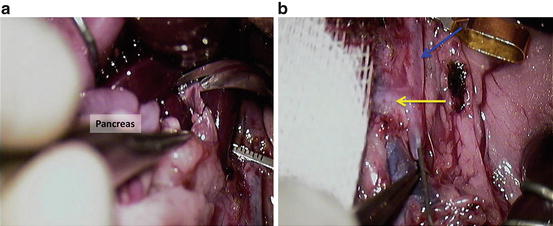
Fig. 12.20
Cut the portal vein (a); wash the pancreas through the aorta with 5 ml of ice cold heparin solution (10 i.u./ml of saline; (b) blue arrow = aorta; yellow arrow = cranial mesenteric artery
30.
Wash the pancreas through the aorta with 5 ml of ice cold heparin solution (10 i.u./ml of saline; Fig. 12.20b); blue arrow = aorta; yellow arrow = cranial mesenteric artery.
31.
Divide the aorta. Figure 12.21a = suture (yellow arrow) the aorta cranially to the puncture (blue arrow) after the needle; Fig. 12.21b = cut the aorta (blue arrow) between the sutures (green arrow), distally to cranial mesenteric artery (yellow arrow); Fig. 12.21c = cut the aorta (blue arrow) close to the vascular clamp; green arrow shows the free end of aorta with sutures; yellow arrow shows the cranial mesenteric artery;
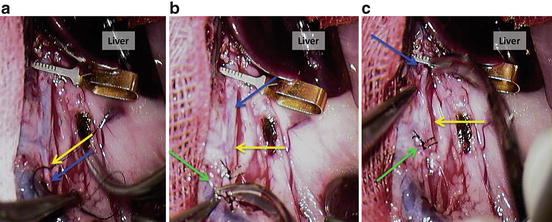
Fig. 12.21
Divide the aorta. (a) Suture (yellow arrow) the aorta cranially to the puncture (blue arrow) after the needle; (b) cut the aorta (blue arrow) between the sutures (green arrow), distally to cranial mesenteric artery (yellow arrow); (c) cut the aorta (blue arrow) close to the vascular clamp; green arrow shows the free end of aorta with sutures; yellow arrow shows the cranial mesenteric artery
32.
Get Clinical Tree app for offline access

Split up duodenum at the margin of tissue with an adequate perfusion Fig. 12.22a;
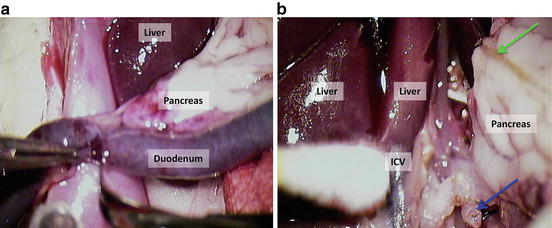
Fig. 12.22


Split up duodenum at the margin of tissue with an adequate perfusion (a); divide the aorta from background tissue, interrupt the lumbar vessels and right renal artery using a cotton swab or cauteriser (b); blue arrow shows the distal end of aortal segment of the graft; green arrow shows the bile duct
Stay updated, free articles. Join our Telegram channel
Full access? Get Clinical Tree